
On this page
Start here
Quick answer
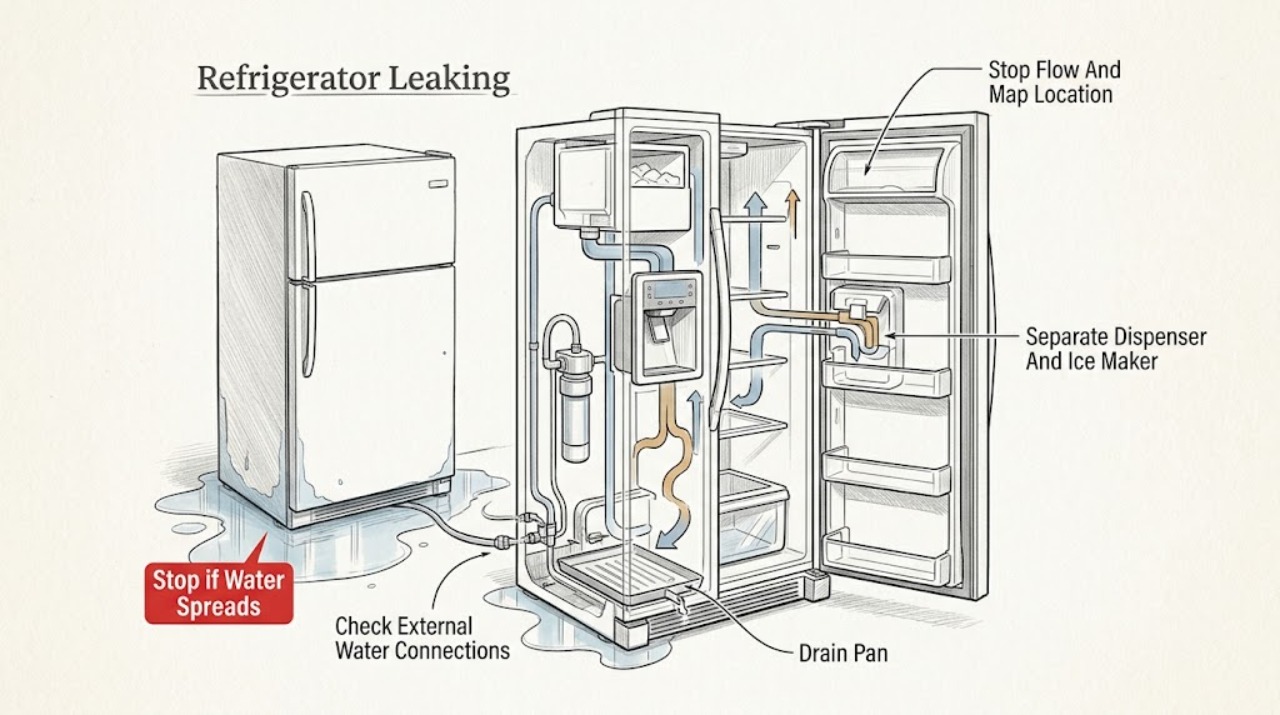
Stop the water first if a refrigerator with an ice maker or dispenser is leaking continuously: close the accessible refrigerator water shutoff valve, keep water away from electrical parts, and wipe up the floor. Then trace the highest wet point rather than the largest puddle. Water at the rear or beside the unit makes a supply line, filter housing, valve, or connection more likely; water inside the cabinet or below an ice maker points toward a filter fit, ice/defrost melt, or blocked drainage path; water at the dispenser may come from chute ice or residual line water. A leak that appears after a door was left open can follow frost and defrost melt, while a drip that starts after filter replacement raises filter seating or damage as a possibility. Frigidaire's refrigerator guidance also treats water-line installation, filter position/condition, and priming as model-dependent checks. Do only dry, visible inspections and model-documented filter handling. Do not remove panels, reach behind wet electrical parts, clear an internal drain with a tool, or service a valve, tubing, drain pan, or sealed system yourself. If the source is continuous, inaccessible, near wiring, or not resolved by a safe external check, leave the water supply closed and arrange qualified appliance service; a plumbing connection may need a plumber.
Before you begin
Safety first
- The user may close an accessible water shutoff, wipe the floor, map visible wet points, inspect dry accessible connections and a model-documented filter, and clean/dry an accessible gasket. Qualified service must handle internal valves, filter heads, tubing, ice-maker parts, drains, pans, wiring, and any panel or sealed-system work.
Work through in order
Diagnostic checks
Use only checks that match the exact appliance or system and its official guide.
-
Check 1
If water is actively running or spreading, close the accessible refrigerator water shutoff valve when the model is connected to household water, keep hands and feet dry, and move only loose items away from the puddle. Blot the floor and use a dry paper towel to trace the highest fresh wet point at the front, side, rear, dispenser, cabinet, or ice-maker area. Do not reach behind a wet refrigerator or touch wet electrical components.
Expected result: The leak stops when the water supply is closed, continues with the supply closed, is clearly at a visible external connection, is inside the cabinet or dispenser area, or cannot be localized safely.
Next step: Keep the supply closed for a continuous water leak and continue only with the safe location/timing observations. If the wet point is behind panels, near wiring, or unreachable without moving a plumbed unit, stop and arrange service or plumbing help.
Stop if: Do not operate a refrigerator with water reaching the plug, controls, lights, or wiring; do not pull a wet or built-in unit forcefully; and do not reopen the water valve repeatedly to reproduce a leak.
Why this matters
Why: Stopping with the supply closed makes a pressurized water path more likely; continuing may indicate stored water, meltwater, condensation, or a drain/pan problem. A high wet point is more useful than the floor puddle for choosing the next branch. An inaccessible or electrical-area leak is already a service boundary.
-
Check 2
Only for a model with a connected ice maker or dispenser, inspect the accessible supply line, shutoff connection, filter area, and rear connection from a dry position. Dab each visible joint with a dry paper towel rather than loosening it. Note whether a connection is wet, a line is kinked or visibly split, the filter was recently changed, or no water connection exists. Do not use a wrench on a wet, cracked, or inaccessible connection.
Expected result: A visible supply joint or line is wet, a filter housing or filter is wet, the line is damaged, the filter is frozen/cracked/loose, or all visible connections are dry.
Next step: Leave the water valve closed for a wet or damaged connection and arrange a plumber or qualified appliance technician. For a model-documented user-replaceable filter, reseat or replace it only as the exact manual permits and only with the supply isolated; if the housing or leak remains wet, stop and call service.
Stop if: Do not tighten cracked plastic, cut or splice tubing, remove an internal filter head, or work behind a wet appliance. Do not assume a filter fits because it resembles another Frigidaire filter.
Why this matters
Why: A wet joint or damaged line makes an external supply leak more likely. A recent filter change or a cracked, frozen, or incompletely seated filter makes a filter-path leak possible. Dry accessible connections shift attention to internal water routing, dispenser/chute melt, or defrost drainage rather than proving the supply is sound.
-
Check 3
If the refrigerator has a dispenser or ice maker, record whether water appears only after dispensing, around the dispenser chute, below the ice maker, or continuously without anyone using water. From outside the chute, look for visible ice or frost; after a recent filter or installation, note whether the water path was primed according to the model instructions. Do not dismantle the chute or ice maker.
Expected result: The drip follows dispensing, ice/frost is visible at the chute, the leak starts after filter installation, water collects below the ice maker, or the leak is unrelated to dispensing and ice production.
Next step: Clear only loose, visible chute frost if the exact model permits and keep the area dry; follow the model's documented prime/purge procedure only when there is no active leak. If water continues, appears below the ice maker, or requires internal access, keep the supply closed and arrange service.
Stop if: Do not run repeated dispense or ice cycles to provoke a leak, insert tools into the chute, remove an ice maker, or access a fill valve or tubing.
Why this matters
Why: A post-dispense drip or chute frost pattern makes residual line water or melting chute ice more likely than a floor-level drain leak. A filter or newly installed water path can have air or a seating problem. Water below an ice maker may be meltwater or an internal fill/harvest issue; unrelated continuous flow needs the supply closed and service.
-
Check 4
Inspect whether the leak follows an extended door opening, a door that fails to close, a visibly dirty or folded gasket, or frost at an accessible cabinet or ice-maker area. Clean and dry the accessible gasket with a soft cloth as Frigidaire describes; remove only a loose package blocking the door. Do not remove covers, chip frost, use a heater, or attempt to clear an internal drain.
Expected result: The door was left open, the gasket is dirty or does not seal, frost is visible, water appears after cooling/defrost activity, or the door and accessible gasket look normal.
Next step: Close the door, clean and dry the gasket, and remove only visible loading obstructions. Observe whether the leak stops without opening panels. If meltwater recurs, frost is inaccessible, or water reaches electrical areas, call qualified service.
Stop if: Do not bend the gasket, adjust hinges, chip ice, pour cleaner or hot water into a drain, or remove an evaporator, drain, fan, or rear cover.
Why this matters
Why: A door-seal or extended-open condition can allow extra moisture and frost that later melts; this timing differs from a supply line that leaks continuously. A normal visible gasket does not rule out an internal drain or pan fault, and frost behind a cover is not a user repair.
-
Check 5
After the water supply is isolated where applicable, record the exact model, whether the refrigerator has an ice maker/dispenser, leak location and highest wet point, timing, recent filter or installation work, door/frost observations, and whether the leak stops. If no safe external observation identifies and resolves the source, leave the unit protected from water and schedule service.
Expected result: The leak stops after a documented filter/gasket correction, returns with the water supply open, continues with the supply closed, recurs after defrost or door opening, reaches electrical parts, or remains unexplained.
Next step: Keep the water shutoff closed for connected models and contact Frigidaire or qualified appliance service. Use a plumber for a household shutoff or supply-line connection; use appliance service for internal filter heads, valves, tubing, ice maker, drain, pan, or electrical areas.
Stop if: Do not order a valve, filter head, drain pump, pan, or tubing from the symptom alone; do not remove panels, perform live electrical work, or keep the unit operating through a continuous leak.
Why this matters
Why: A repeatable change after a safe documented correction can identify the relevant branch without identifying a replacement part. A supply-dependent leak suggests plumbing or water-valve work; a supply-independent or recurring melt pattern suggests drain, pan, frost, tubing, or control diagnosis. Water near electrical parts or an unexplained leak is not safe for further testing.
Use your observations
Decision map
Find the observation that best matches what you see, then follow the next safe action.
-
PATH 01Safety boundary
What you see
A connected refrigerator leaks continuously or the flow stops when its accessible water shutoff is closed, with a wet rear/side connection, supply line, filter area, or valve region.
Do this next
Keep the water supply closed, dry the area from a safe position, and arrange plumbing help for a household line/connection or qualified appliance service for the refrigerator-side filter head, valve, or tubing.
Why this path and its safety boundary
Why it matters: A pressurized water-supply path is more likely than normal defrost moisture; the precise joint or internal component cannot be identified from a floor puddle.
Safety stop: Do not reopen the valve to test, tighten cracked plastic, splice tubing, pull a wet built-in unit, or reach behind wet electrical parts.
-
PATH 02Safety boundary
What you see
Water begins after a filter change or installation, the filter is visibly cracked/frozen/loose, the housing is wet, or dispensing flow changed after the work.
Do this next
With the supply isolated, use only the exact model's documented filter installation and prime/purge steps. If the filter cannot seat securely, is damaged, or water returns, leave the supply closed and call service.
Why this path and its safety boundary
Why it matters: Filter seating, filter condition, or air in a newly connected water path is more likely than a defrost-only leak, but the housing or valve may still need service.
Safety stop: Do not force a filter, substitute an unverified type, dismantle the filter head, or repeatedly dispense to find the leak.
-
PATH 03Safety boundary
What you see
The leak is at the dispenser or below the ice maker, follows dispensing/ice activity, and visible chute frost or ice is present; the connected water line is not continuously wet.
Do this next
Keep the area dry, remove only loose visible chute ice if the model permits, and use the exact model's documented water-path procedure. Persistent water below the ice maker or any internal access requirement needs appliance service with the supply closed.
Why this path and its safety boundary
Why it matters: Residual dispenser water, melting chute ice, or an ice-maker water-path issue is more likely than a cabinet drain leak.
Safety stop: Do not insert tools into the chute, remove the ice maker, or run repeated dispense/harvest cycles.
-
PATH 04Safety boundary
What you see
Water appears inside or at the bottom after a long door opening, poor visible door closure, or accessible frost; no pressurized water connection is wet and the leak is not continuous.
Do this next
Close the door, wipe and dry the accessible gasket, remove only a loose obstruction, and monitor without removing covers. Recurring meltwater, inaccessible frost, or a wet electrical area requires service.
Why this path and its safety boundary
Why it matters: Moisture entering during an open-door or gasket condition and later melting is more likely than a supply-line leak, although a drain or pan fault remains possible if it recurs.
Safety stop: Do not chip frost, use heat, pour liquid into the drain, bend the gasket, or remove evaporator/drain covers.
-
PATH 05Safety boundary
What you see
The leak continues with the water supply closed, returns after a safe external correction, is behind a panel/under the cabinet, or reaches the plug, controls, lights, or wiring.
Do this next
Keep the water supply closed where applicable, isolate power only from a safe dry location if water threatens electrical parts, and arrange qualified appliance service. Use a plumber if the household water connection itself is the source.
Why this path and its safety boundary
Why it matters: Stored water, condensate/defrost drainage, an internal pan/tube/valve issue, or a secondary electrical hazard is possible; user inspection cannot safely distinguish them.
Safety stop: Do not operate through the leak, pull panels, probe a drain, reach into wet wiring, or perform electrical or sealed-system work.
Helpful context
Understand the symptom
Start with the leak's location, not the puddle size
A puddle can travel under the cabinet, so wipe the floor dry and look for the highest fresh wet point. A rear or side wet point suggests a supply connection only on a model connected to household water. A cabinet or ice-maker wet point has a different path from a dispenser drip. A bottom-front puddle can be meltwater, a drain-pan issue, or water that migrated from behind the unit. If no water line is connected, skip water-supply and filter branches.
Timing separates filter and dispenser leaks from meltwater
Ask when the water appears: immediately and continuously, after dispensing, after an ice harvest, after a filter change, after a long door opening, or only during a defrost period. Frigidaire's support identifies secure filter installation, filter cracks, water-line priming, and ice or frost around the chute as distinct water-path observations. Extended door opening can also create frost that later melts. Treat timing as a clue, not proof of a failed part.
Protect the floor and keep internal work professional
Close the refrigerator's water shutoff when a connected unit continues to leak, and keep water away from the plug, controls, lights, and wiring. Only clean accessible gaskets or inspect a model-documented filter from a dry, safe position. Internal tubing, inlet valves, drain passages, drain pans, ice-maker mechanisms, and electrical or sealed-system work require qualified service.
Safety boundary
Stop conditions
- Close the accessible refrigerator water shutoff and stop using a connected refrigerator for an active or continuous leak, water near the plug, controls, lights, or wiring, or a damaged hose or filter housing.
- Do not reopen the water supply repeatedly, pull a wet or built-in refrigerator forcefully, or reach behind the unit when the floor or electrical area is wet.
- Do not chip frost, use heat, pour liquid into an internal drain, remove rear/evaporator/drain/ice-maker covers, or dismantle a filter head, valve, pan, or tubing.
- Do not clean around controls or electrical parts with excess water, and do not perform live electrical, refrigerant, or sealed-system work.
- If a safe, model-documented filter or gasket correction does not stop the leak, leave the water supply closed where applicable and arrange qualified appliance service or plumbing help.
Only after diagnosis
Potential parts
- water filter or filter-head assembly
Consider a filter only when the exact model has that user-serviceable feature and the leak follows filter installation or a visibly cracked/incorrectly seated filter. Consider the filter head only after qualified diagnosis finds the housing itself leaking.
Confirm the exact model and the manufacturer's fit information; Frigidaire filter types and housings vary, and a similar-looking filter is not proof of compatibility. - water inlet valve, tubing, or drain-pan assembly
These parts are possibilities only after the leak location, supply-shutoff result, filter/dispenser timing, and door/defrost observations lead a qualified technician to an internal water or drainage path.
Do not order from a puddle symptom alone. Verify the exact model, configuration, and manufacturer's fit information before any professional replacement.
When checks do not resolve it
Need a professional?
Safety scope: The user may close an accessible water shutoff, wipe the floor, map visible wet points, inspect dry accessible connections and a model-documented filter, and clean/dry an accessible gasket. Qualified service must handle internal valves, filter heads, tubing, ice-maker parts, drains, pans, wiring, and any panel or sealed-system work.
Common questions
FAQ
What should I do first if my Frigidaire refrigerator is leaking?
If it has an ice maker or dispenser and the leak is active, close the accessible refrigerator water shutoff valve, keep water away from electrical parts, and wipe the floor. Then trace the highest wet point and note whether the leak is at the rear/side, filter, dispenser, ice maker, cabinet, or bottom. Do not pull a wet or built-in refrigerator forcefully.
Why is water leaking after I changed the refrigerator filter?
A filter that is not seated securely, or one that is cracked or frozen, can make a water-path leak possible on models with a filter. Close the water supply, inspect only as the exact model manual permits, and reseat or replace the filter only if it is an approved user step. If the housing remains wet or the leak returns, call service rather than forcing the filter.
Why does water appear at the bottom after the door was left open?
An extended open door can admit moisture and contribute to frost that later melts, so that timing differs from a water line that leaks continuously. Close the door, wipe and dry the accessible gasket, and remove only a loose obstruction. If the leak recurs or frost is behind a cover, arrange service; do not chip ice or clear an internal drain.
Can I keep using the water dispenser while the refrigerator is leaking?
No if water is active, spreading, or near electrical parts. Keep the refrigerator water shutoff closed until the source is identified. A small post-dispense drip or chute frost pattern still needs a model-appropriate check, and persistent or internal leaks require service.
Do all Frigidaire refrigerators have a water filter or supply line?
No. Water-line, filter, ice-maker, and dispenser checks apply only to models equipped and connected for those features. If your refrigerator has no household water connection, skip those branches and investigate the visible cabinet, door/frost, condensation, and drainage pattern without removing panels.
Read the exact guide
Official sources
- Refrigerator Clean and Care GuideFrigidaire · Official Frigidaire Owner Center article labeled Applies to: Refrigerators; its cleaning guidance is limited to accessible surfaces.
- Refrigerators - What does it mean to ‘Prime the Water Supply System’ and why is it important for my refrigerator?Frigidaire · Official Frigidaire Owner Center article labeled Applies to: Refrigerators, French Door Refrigerators, Side by Side Refrigerators, and Top Freezer Refrigerators; only water-connected models use this path.
- Refrigerators - Why does my refrigerator run most of the time? Is this normal?Frigidaire · Official Frigidaire Owner Center article labeled Applies to: Refrigerators, French Door Refrigerators, Side by Side Refrigerators, and Top Freezer Refrigerators.
- Refrigerators - No WaterFrigidaire · Official Frigidaire Owner Center article labeled Applies to: Refrigerators; water-line and filter details apply only to models with those features.
Community feedback
Share a repair observation
Share a plain-text repair observation. Accepted observations are published automatically; this page may take a moment to update.