
On this page
Start here
Quick answer
First specify what is missing: water, cubed ice, crushed ice, or both water and ice. GE refrigerator configurations differ—some have an external dispenser, some have an internal water dispenser, some have no built-in filter, and some use a chilled reservoir that can freeze. For no water, check that the supply valve is open, the door is fully closed, the control lock is not active, and the filter is correctly installed; after a new installation or filter, air may need to be purged. If a filter bypass test is supported by the model, improved flow with the bypass plug points to a clogged filter, not a valve diagnosis. For no ice, confirm the icemaker and water supply are on, distinguish an empty ice bin from a jammed chute or clumped ice, and check whether the auger runs. A leak-detected message or a reservoir that is frozen or cracked requires service. Do not force a door switch, reach into a moving auger, disconnect tubing, or work on the inlet valve or wiring. Stop for water near electrical parts, damaged power hardware or a leak that reaches the controls, and arrange qualified service when the architecture-specific external checks do not restore dispensing.
Before you begin
Safety first
- The owner may identify the configuration, use normal controls, check a safe external supply, follow model-approved filter/purge steps, and observe a cool removable bin or visible chute. Qualified personnel must handle the reservoir, water valve, auger motor, icemaker, dispenser controls, wiring, panels and leak/electrical hazards.
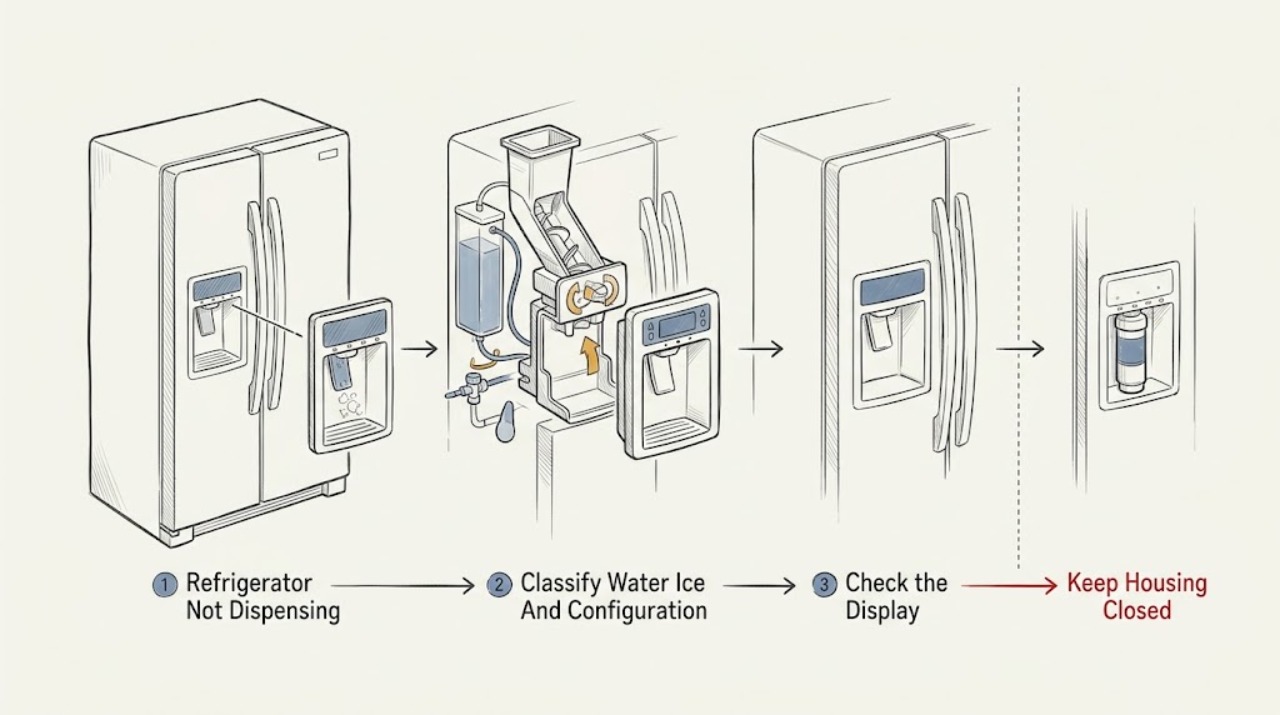
Work through in order
Diagnostic checks
Use only checks that match the exact appliance or system and its official guide.
-
Check 1
Identify whether the failure is water, cubed ice, crushed ice, or both, and whether the dispenser is in the door or inside the refrigerator. Record the full model and whether it has a water filter, bypass plug, ice bucket and visible control lock/leak message.
Expected result: Only water fails; only ice fails; cubed and crushed differ; both fail; or the dispenser/model configuration is unknown.
Next step: Follow only the matching water or ice branch and the exact model manual. Stop if identifying the configuration requires moving an installed refrigerator or removing a panel.
Stop if: Do not apply a top-freezer, side-by-side or bottom-freezer procedure to a different design, and do not bypass a dispenser or door switch.
Why this matters
Why: Water and ice share some supply and control components but have distinct reservoirs, chutes, augers and icemaker paths. A model without the assumed filter or reservoir needs a different branch.
-
Check 2
Confirm the refrigerator has power, the selected water/ice control is active, the doors are fully closed, and no Control Lock, Leak Detected, Replace Water Filter or similar model message is present. Press the paddle/cradle normally without forcing it.
Expected result: The door is ajar; a lock or leak message is displayed; the control responds but no water/ice exits; or the controls and doors appear normal.
Next step: Close the door and use the exact manual to clear a control lock or address the model's filter/leak message. If a leak is indicated, stop dispensing and arrange service.
Stop if: Do not tape or defeat door/cradle switches, pry the door, or continue using a dispenser after water reaches controls.
Why this matters
Why: GE says closed doors are required for ice dispensing, and a filter/leak condition can disable a dispenser on supported models. A responsive control with no output moves attention to water flow, ice path or service rather than button technique.
-
Check 3
For a water failure, verify the external shut-off valve is open and the line is not visibly kinked. If the refrigerator was newly installed or the filter was just changed, follow the model's fill/purge instructions. If the model supports a bypass plug, compare flow with the filter and bypass installed as directed.
Expected result: Water begins after filling/purging air; flow improves with the bypass plug; flow stays poor with the bypass; the model has no filter/bypass; or the line/reservoir leaks.
Next step: Use only the exact model's purge and filter procedure. Replace a filter only when the model and bypass comparison support it; arrange plumbing or appliance service for poor bypass flow, a frozen/cracked reservoir or a leak.
Stop if: Do not disconnect tubing, remove a frozen reservoir, run a bypass not approved for the model, or handle water near energized parts.
Why this matters
Why: GE links new-installation air to no water, a clogged filter to no or slow flow, and persistent poor flow with the bypass to supply tubing, valve or household pressure. A reservoir that is frozen or cracked requires service.
-
Check 4
For an ice failure, confirm the ice maker/water supply is on and observe whether the bin contains loose ice. With the appliance in its normal safe state, look for clumps or a visible chute blockage; do not reach into the auger or force a cube through the mechanism.
Expected result: The bin is empty; cubes are frozen into clumps; the chute is visibly jammed; only crushed ice dispenses; the auger makes an abnormal sound; or no ice path issue is visible.
Next step: Use the exact model instructions to remove or rinse a cool removable bucket and clear only an accessible loose chute obstruction. If clumping returns, the auger is abnormal, the bucket will not seat, or no visible cause exists, arrange service.
Stop if: Do not put hands or tools into a moving auger, force the ice bucket, melt ice near electronics, or disassemble the dispenser.
Why this matters
Why: GE says frozen bucket ice can stop dispensing, clumps can cause crushed-only output, and ice can jam the chute. Moisture/frost behind the freezer wall can affect the auger motor, which is a service condition if it does not recover through the documented external procedure.
-
Check 5
If water is slow rather than absent and the model permits GE's general flow check, dispense into a measuring cup for 20 seconds and compare the result with the model guidance. Note whether the icemaker is receiving water while the dispenser does not, or whether both water and ice are dry.
Expected result: The model-specific flow check passes; flow is below the documented general reference; the icemaker works but the dispenser does not; or both dispenser and icemaker lack water.
Next step: Treat the result as a direction, not a component diagnosis. Use the exact model's filter, supply and reservoir instructions; arrange service for persistent low/no flow or a suspected reservoir, valve, control or leak fault.
Stop if: Do not measure household pressure by opening fittings, disconnect tubing, or infer a valve failure from one flow test.
Why this matters
Why: GE describes the 20-second test as general and says results can vary; on supported filtered models, improvement with a bypass points toward the filter. Icemaker working while water does not can shift attention to a reservoir/dispenser path, while both failing points toward shared supply/filter/valve conditions.
-
Check 6
Record model/serial number, output that fails, dispenser location, control messages, door/lock state, filter and bypass state, supply/air/purge history, flow result, ice-bin/chute/auger observations, leaks and any electrical or temperature symptom.
Expected result: A model-approved external correction restores output; water/ice remains absent or slow; the problem returns; or a leak, electrical hazard or internal access is involved.
Next step: Arrange qualified refrigerator service and provide the complete record. Stop using or safely isolate power for water near electricity, damaged power hardware, smoke, burning odor or a leak reaching controls.
Stop if: Do not order a valve, auger motor or control from the symptom alone, and do not open panels or perform live tests.
Why this matters
Why: A correction supports a setting, air, filter, bin or visible-clump explanation. Recurrence or an unexplained split between dispenser and icemaker needs model-specific diagnosis of the valve, reservoir, auger, control or wiring.
Use your observations
Decision map
Find the observation that best matches what you see, then follow the next safe action.
-
PATH 01Safety boundary
What you see
Only water fails after installation/filter work, the supply valve or line is suspect, flow improves with an approved bypass, or air remains in the system.
Do this next
Follow the exact model's fill/purge and filter/bypass procedure. Arrange plumbing or appliance service for poor bypass flow, a frozen/cracked reservoir, persistent no flow or a leak.
Why this path and its safety boundary
Why it matters: GE links these patterns to an unfilled reservoir/tubing, clogged filter, shut-off supply or kinked/poor-flow line rather than an ice auger fault.
Safety stop: Do not disconnect tubing or use a bypass plug that the model does not support.
-
PATH 02Safety boundary
What you see
Only ice fails, the bin is empty/clumped, the chute is visibly jammed, crushed/cubed behavior changes, or the auger is noisy/nonresponsive.
Do this next
Use only the model-approved cool bucket/chute procedure and verify the bucket seats. Arrange service for a returning clump, suspected leak, auger fault or inaccessible blockage.
Why this path and its safety boundary
Why it matters: The problem is more likely in ice supply, clumping, chute clearance or auger engagement than in the water dispenser path. Recurring clumps can indicate a leak/overfill condition.
Safety stop: Do not reach into or force a moving auger, use heat near the dispenser electronics or disassemble the bucket/door.
-
PATH 03Safety boundary
What you see
Both water and ice fail, a lock/leak/filter message disables output, or the model's supply and filter checks do not restore either path.
Do this next
Address only the model-documented message or filter installation. Arrange service for a leak lockout, persistent no output, internal valve/control issue or water near electricity.
Why this path and its safety boundary
Why it matters: A shared supply, filter, valve, control or power condition becomes more likely than two unrelated output obstructions. The exact model decides whether a filter/bypass and reservoir exist.
Safety stop: Do not bypass leak detection, door controls or internal water/electrical components.
-
PATH 04Safety boundary
What you see
The refrigerator lacks the assumed reservoir/filter, the dispenser is internal rather than in-door, the external checks pass, or the remaining fault requires removing a reservoir, icemaker, auger, valve or panel.
Do this next
Use the exact model manual and arrange qualified service for internal access or an unexplained dispenser/valve/auger/control fault.
Why this path and its safety boundary
Why it matters: The general procedure no longer establishes a safe diagnosis. GE's pages explicitly condition several checks on refrigerator design and model support.
Safety stop: Do not force a model mismatch, remove panels, disconnect harnesses/tubing or perform live tests.
-
PATH 05Safety boundary
What you see
Water reaches controls or electrical parts, a filter message indicates Leak Detected, a reservoir is cracked, or the cord/plug/outlet is hot, damaged, smoking or repeatedly trips.
Do this next
Stop dispensing and isolate power only from a safe, dry, accessible point. Arrange qualified appliance or electrical service and do not restore power to reproduce the leak or fault.
Why this path and its safety boundary
Why it matters: This is an immediate stop-use and service branch, not a flow-adjustment problem.
Safety stop: Do not touch wet electrical parts, move the refrigerator, bypass leak detection or open the dispenser/valve area.
Helpful context
Understand the symptom
Start with the dispenser output, not the refrigerator label
Pressing the water paddle and pressing the ice cradle use overlapping but different paths. Water may stop because of supply, filter, trapped air, a frozen reservoir, a leak lockout or a dispenser control. Ice may fail because the bin is empty, cubes are clumped, the chute is jammed, the door is open, or the auger/icemaker path needs service. Say which output fails before interpreting a check.
Model architecture controls the safe procedure
GE notes that some refrigerators have a chilled tank or coil, while top-freezer models with a water dispenser may not have a reservoir. Filter presence, bypass-plug behavior, internal versus door dispensers, and ice-bucket layout vary. Use the full model number and its manual before removing a filter, checking a tank, or interpreting a filter indicator.
Water and moving ice parts need a stop boundary
Only visible, model-approved checks belong to the owner: supply status, controls, filter seating, safe flow observation and loose clump/chute observation. Do not reach into the auger, bridge a door or dispenser switch, disconnect a water line, or remove an icemaker or valve to test it. A leak, water near electrical parts or a frozen/cracked reservoir ends troubleshooting.
Safety boundary
Stop conditions
- Stop using the dispenser for water near controls or electrical parts, a cracked/frozen reservoir that leaks, Leak Detected with ongoing water, smoke, burning/electrical odor, hot or damaged cord/plug/outlet, exposed wiring or repeated breaker trips.
- Do not reach into a moving auger or icemaker, force the ice bucket, defeat a door/dispenser switch, bypass leak detection, disconnect water tubing, remove valves/reservoirs/panels or perform live tests.
- Use only the exact refrigerator model's filter, bypass-plug, reservoir, door and dispenser procedure. A top-freezer water path may not have the same tank or filter architecture as another GE refrigerator.
- Treat a flow measurement as directional, not proof of a failed component. Persistent no/slow output after safe external checks requires qualified diagnosis.
Only after diagnosis
Potential parts
- refrigerator water filter
Consider only when the exact model has a filter and an approved bypass comparison or filter condition indicates restricted flow; a filter reminder alone is not proof of a dispenser failure.
Filter type, RFID/indicator behavior and bypass requirements vary by GE refrigerator model. Confirm the full model and manufacturer's fit information before ordering. - ice dispenser auger or motor assembly
Consider only after qualified diagnosis confirms an auger/chute engagement or motor fault after bin seating, clump and visible chute checks.
Auger assemblies and door layouts are model-specific; do not order or access an auger from a no-ice symptom alone. - water inlet valve or reservoir assembly
Consider only after qualified diagnosis separates shared supply/filter issues from a valve or frozen/cracked reservoir fault.
Valve connectors, reservoir form and filter architecture vary by model. Confirm fitment and leak safety before any replacement; internal water/electrical work is professional service.
When checks do not resolve it
Need a professional?
Arrange qualified GE refrigerator service when water or ice remains absent after the model-specific supply, filter, lock, door, bin and chute checks; when a reservoir, valve, auger or control requires internal access; when clumping returns; or when the dispenser and icemaker symptoms do not agree. Stop immediately for leaks near electricity, Leak Detected with ongoing water, smoke, electrical odor, hot/damaged power hardware or repeated breaker trips.
Safety scope: The owner may identify the configuration, use normal controls, check a safe external supply, follow model-approved filter/purge steps, and observe a cool removable bin or visible chute. Qualified personnel must handle the reservoir, water valve, auger motor, icemaker, dispenser controls, wiring, panels and leak/electrical hazards.
Common questions
FAQ
Why does my GE refrigerator dispense neither water nor ice?
Start with shared conditions: power, closed doors, control lock or leak message, external water supply and filter/bypass state. If both remain unavailable after the exact model checks, a shared supply, valve or control condition is more likely and needs service.
Why does my GE refrigerator make ice but not dispense water?
That split points toward the water dispenser's filter, air, reservoir, tubing or dispenser-control path rather than the ice auger. GE notes that a frozen or cracked chilled reservoir requires service; use only the model's fill, purge and filter procedure.
Why does my GE refrigerator not dispense ice?
Check closed doors, an empty or clumped bucket, a visible chute jam and correct bucket seating. GE also notes that frost around the auger motor may need service. Do not reach into the auger or force ice through the chute.
Can a GE refrigerator water filter stop the dispenser?
A clogged or partially clogged filter can cause no or slow water on supported models. GE's bypass comparison is only a directional model-dependent check; if flow improves with the approved bypass, replace the exact filter. A leak message or a dispenser that stays off needs service.
Why is my GE ice dispenser giving crushed ice instead of cubes?
Frozen or clumped ice in the bucket can block dispensing or leave crushed-only output. Follow the exact model's cool bucket procedure and check the chute. If clumping returns, the icemaker may be leaking or overfilling and should be serviced.
When should I stop using a GE refrigerator dispenser?
Stop for water near electrical controls, a cracked or leaking reservoir, Leak Detected with ongoing water, smoke, electrical odor, a hot/damaged cord or outlet, exposed wiring or repeated breaker trips. Do not bypass leak detection or restore power to reproduce the problem.
Read the exact guide
Official sources
- Refrigerator - Steps to Fill Water Dispenser TankGE Appliances · Use only for refrigerator designs with chilled water tank or coil; some models, including some top-freezer designs, differ.
- Refrigerator - Not Dispensing IceGE Appliances · Use for GE refrigerators with an ice dispenser; bucket and chute layout varies by model.
- Refrigerator - Dispenser Water Flow TestGE Appliances · General directional flow test; GE says results can vary and filter/bypass features depend on model.
- Refrigerator - Water Filter Indicator Light Will Not Shut OffGE Appliances · Use only on models with the corresponding filter/indicator architecture, including supported RPWFE configurations.
- Refrigerator and Freezer Troubleshooting and SupportGE Appliances · Brand support hub for model-specific refrigerator water, ice and service pathways.
- Refrigerator - Not Getting Water from the DispenserGE Appliances · Use for refrigerator water dispensers; conditions differ by model and internal versus external dispenser.
Community feedback
Share a repair observation
Share a plain-text repair observation. Accepted observations are published automatically; this page may take a moment to update.