
On this page
Start here
Quick answer
Keep water away from the plug, outlet, controls, and compressor area. If water is near an electrical connection, the cord is damaged, the cabinet was flooded, or cooling has stopped, disconnect power only from a safe dry location and arrange service. Once safe, locate where the water first appears and whether it follows defrosting, a door opening, a blocked drain, or a rear collection pan. Haier explains that defrost water normally travels to a collection container, but high humidity, frequent door opening, frost, or a drainage problem can overwhelm that path. Do not chip ice with a sharp tool, puncture an interior wall, move the appliance while wet, or open refrigeration or electrical panels.
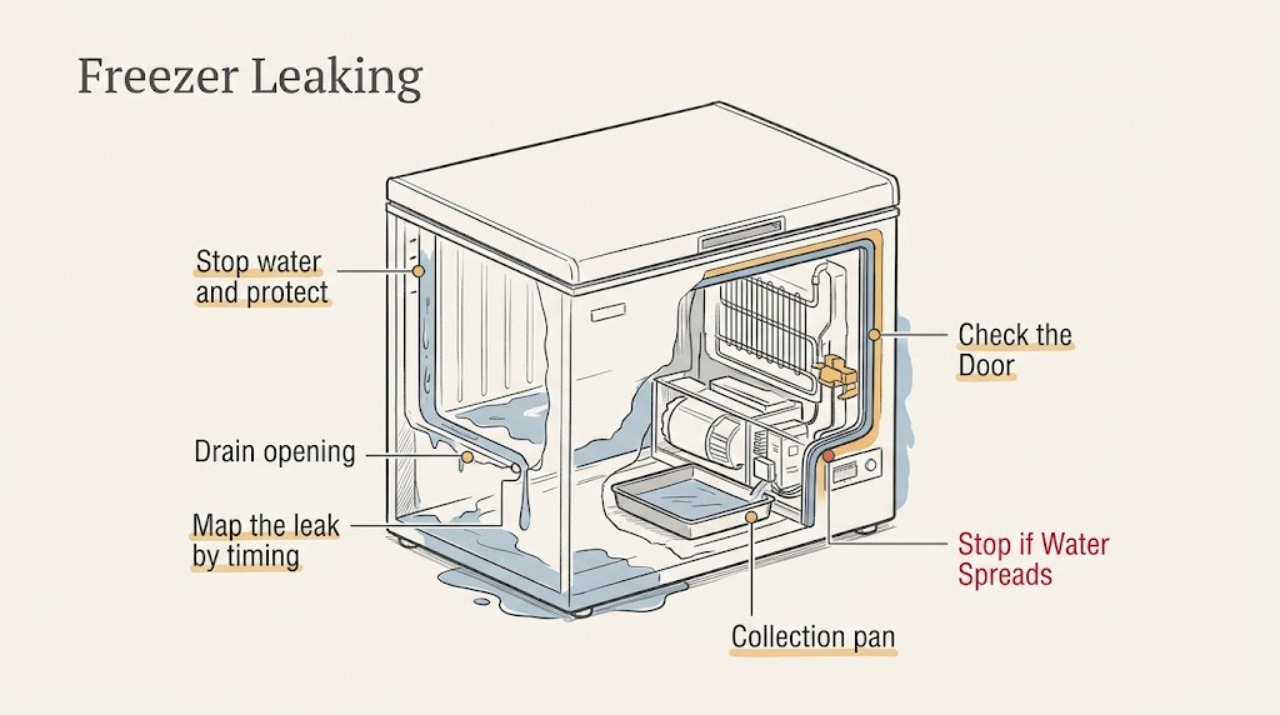
Work through in order
Diagnostic checks
Use only checks that match the exact appliance or system and its official guide.
-
Stop water and protect the electrical area
Keep people away from the wet area. Do not touch the plug, outlet, power cord, controls, or compressor-area electrical parts if they are wet. If it is safe to do so from a dry location, disconnect the freezer's power; otherwise leave it isolated and obtain qualified help. Keep the door closed as much as possible to protect frozen food.
Expected result: Water is near an outlet or cord, the cabinet was flooded or tipped, the cord is damaged, the compressor area is wet, or the leak is limited to a dry removable surface.
Next step: For any wet electrical connection, flooding, damaged cord, or loss of cooling, keep power off and arrange service. Do not move or tilt the freezer to find the source.
Why this matters
Why: Water and electricity together are a stop condition. A small, isolated meltwater spot can be investigated only after the appliance and surrounding floor are safe and dry.
-
Map the leak by timing and location
With the freezer safe and not being energized, identify the first wet point: inside a drawer or on a shelf, around the door seal, under the cabinet, at the rear container, or at a floor drain. Note whether it appeared after defrosting, a long door opening, a power interruption, or a cleaning event. Do not remove fixed covers or interior panels.
Expected result: Water begins at frost or a drawer, runs from the door edge, pools under the cabinet, spills from a rear container, or has no visible source.
Next step: Follow the matching branch. Photograph only dry, accessible evidence if useful; keep the freezer isolated when the source is hidden or any electrical area is wet.
Why this matters
Why: The location separates frost/condensation and door-seal clues from a defrost drain or rear-container issue. An unseen source or water from inside the cabinet needs service rather than more dismantling.
-
Check the door and moisture pattern
After the freezer is safe and dry, inspect the door gasket and frame from the outside for a visible gap, debris, or a door that is not fully closed. Note whether the door has been opened frequently or left open in a warm, humid room, and whether high-moisture food was placed inside without covering. Do not pull the seal out or force the door alignment.
Expected result: The seal does not contact evenly, the door was left open, frost is concentrated around the opening, or the gasket and door appear normal.
Next step: Remove only plainly visible debris and close the door normally. If the gasket is damaged, frost returns rapidly, or water continues with a good seal, keep the freezer out of service as needed and arrange assessment.
Why this matters
Why: Warm humid air can add frost and meltwater around cold drawers and surfaces. A torn, loose, or persistently ineffective seal is a hardware issue, not a reason to lower the temperature indefinitely.
-
Inspect the accessible defrost-water route
Use the exact Haier manual to identify whether your model has a user-accessible defrost drain or rear collection container. With power isolated and the area dry, look for a plainly visible blockage or a container that is overflowing. Wipe or collect accessible water without allowing it to reach electrical parts; do not remove a fixed container, loosen refrigeration tubing, or open an electrical cover.
Expected result: The rear container is full, the drain opening is visibly blocked by ice or debris, the model has no user-accessible route, or the route appears clear.
Next step: Empty or clean only a removable user-accessible part as the exact manual permits and keep water away from electrical parts. If the container is fixed, the blockage is deep, or leakage returns, arrange service.
Why this matters
Why: A collection container can overflow when defrost water increases, while a blocked drain can redirect meltwater into the cabinet or onto the floor. A clear or inaccessible path makes a hidden drain, defrost, or refrigeration fault more likely.
-
Handle frost without puncturing the cooling system
If the exact manual calls for user defrosting, unplug the freezer from a safe dry location, protect the floor, and let ice melt using the documented method. Use only the supplied or appropriate plastic scraper where the manual allows it. Never chip, drill, pry, or heat ice against the liner, evaporator area, or tubing, and never restart the freezer while water remains near electrical parts.
Expected result: Frost clears and the water follows the documented drain route, or the ice is thick, returns quickly, the liner is damaged, or water appears from behind a fixed panel.
Next step: Dry the interior and surrounding floor fully before any permitted restart. If the liner or cooling surface was damaged, or frost and leaking recur, keep the freezer off and arrange service.
Why this matters
Why: A one-time frost melt can explain a small amount of water. Thick recurrent ice, a damaged liner, or hidden water path can indicate a seal, airflow, defrost, drain, or refrigeration problem.
-
Record cooling and leak evidence for service
Record the model, freezer type, leak location, timing, defrost state, frost pattern, door-seal condition, rear-container status, whether cooling and the compressor sound remain normal, and whether power was isolated. Do not test for refrigerant leaks, open the sealed system, or restore power repeatedly to reproduce the leak.
Expected result: Cooling is reduced, the compressor does not run normally, water comes from inside the cabinet, the leak returns after a safe drain/defrost check, or the source cannot be identified.
Next step: Keep the freezer isolated when a stop condition occurred and contact Haier support or a qualified refrigeration appliance technician with the recorded evidence.
Why this matters
Why: Reduced cooling or a hidden recurring leak can involve the defrost system, drain, sealed refrigeration circuit, wiring, or control. These faults cannot be identified safely from a visual water check alone.
Use your observations
Decision map
Find the observation that best matches what you see, then follow the next safe action.
-
PATH 01Next step
What you see
Water is near the cord, outlet, controls, compressor electrical parts, or the cabinet has been flooded or tipped.
Do this next
Arrange qualified service and follow the exact model guidance.
Why this path and its safety boundary
Why it matters: The freezer remains out of service until the electrical and water-damage condition is assessed.
-
PATH 02Next step
What you see
Water is concentrated around a drawer or door after humidity, frequent opening, or a visible frost buildup, with normal cooling and no electrical warning.
Do this next
Arrange qualified service and follow the exact model guidance.
Why this path and its safety boundary
Why it matters: A condensation or frost-melt event may stop; rapid recurrence or a damaged seal requires service.
-
PATH 03Next step
What you see
Water is at the rear collection area or a documented drain opening is blocked or overflowing.
Do this next
Arrange qualified service and follow the exact model guidance.
Why this path and its safety boundary
Why it matters: A full container or accessible drain restriction may be addressed; a fixed container, deep blockage, or recurring leak requires service.
-
PATH 04Next step
What you see
The source is hidden, cooling is reduced, the liner or cooling surface is damaged, or the leak returns after a safe external check.
Do this next
Arrange qualified service and follow the exact model guidance.
Why this path and its safety boundary
Why it matters: A hidden defrost, drain, refrigeration, or electrical fault is assessed without causing further damage or exposure.
Helpful context
Understand the symptom
Find the first wet point before assuming the freezer is leaking internally
Water on the floor can come from a rear defrost-water container, a blocked drain, frost melting around a drawer or door, a damaged seal, or water entering from the surrounding room. Clean water that appears after defrosting or frequent door opening is a different clue from a leak that begins under the cabinet or is accompanied by loss of cooling. Dry the safe surrounding area and protect food, but do not move a wet freezer or keep energizing it while water approaches electrical parts.
Model and defrost design control the safe next step
Some Haier freezers defrost automatically and some require manual defrosting. A chest freezer may have a user-facing drain, while another model routes defrost water to a rear container. Use the exact owner manual for the model, and do not infer a drain location, defrost method, or component from a different Haier product.
When checks do not resolve it
Need a professional?
Contact Haier support or a qualified refrigeration appliance technician for an unexplained, recurring, internal, or electrically unsafe leak, reduced cooling, damaged liner, or inaccessible drain or collection area.
Common questions
FAQ
Why is my Haier freezer leaking from the back?
Haier explains that defrost water may flow to a rear container and normally evaporate, but humidity, frequent door opening, or humid food can increase the amount. Keep water away from compressor electrical parts and use the exact manual before handling a container; recurring or unexplained leakage needs service.
Can frost inside a Haier freezer turn into a water leak?
Yes. Haier says moisture and frequent or prolonged door opening can create frost, and frost around drawers can melt into droplets as surfaces warm. Check the seal and follow the exact model's safe defrost method, but never chip ice with a sharp tool.
Should I use a knife to clear ice from the freezer?
No. Haier warns that sharp tools can damage the cooling surface and cause a refrigerant leak. Use only the supplied or appropriate plastic scraper where the exact manual allows it, or arrange service for thick, inaccessible, or recurring ice.
When is a Haier freezer leak an emergency stop?
Stop using it if water reaches the plug, outlet, controls, or compressor electrical area, if the cord or cabinet is damaged, if the freezer was flooded or tipped, if cooling is reduced, or if the source is inside a fixed panel. Isolate power only from a safe dry location and request qualified help.
Read the exact guide
Official sources
- Water leakage from the back of the freezerHaier India · Haier freezer troubleshooting page; rear-container and defrost-water guidance is model- and design-dependent, and electrical parts must remain dry.
- Icing in the freezer compartmentHaier Philippines · Haier freezer icing guidance; apply the defrost, humidity, door-opening, and tool-safety instructions only to comparable models.
- Haier Refrigerators and Freezers Common Questions and TroubleshootingHaier · Haier's official refrigerator/freezer troubleshooting hub; use its safety and drain guidance as general direction and defer to the exact model manual.
Community feedback
Share a repair observation
Share a plain-text repair observation. Accepted observations are published automatically; this page may take a moment to update.