
On this page
Start here
Quick answer
Start with the symptom: a completely dark blender points to the power switch, plug, outlet, fuse, or breaker, while an illuminated control that will not run points first to model-specific jar, collar, lid, or control conditions. Hamilton Beach's consumer Use & Care guidance says the jar must be securely seated and the lid secured before blending; some models also stop after overheating and document unplugging for about 15 minutes before retrying. Unplug before removing a jar, blade, or obstruction, keep hands away from sharp blades, and never bypass a safety feature. If the cord or base is damaged, the blade is locked, there is a burning smell, smoke, liquid in the base, a repeated breaker trip, or the blender still will not start after the model-approved checks, stop and arrange qualified service.
Before you begin
Safety first
- The owner may inspect a dry plug/outlet from outside, follow model-documented jar/lid seating, and allow a documented thermal cool-down. Qualified personnel must access the base, motor, switch, controls, interlocks, wiring, and any damaged or wet electrical component.
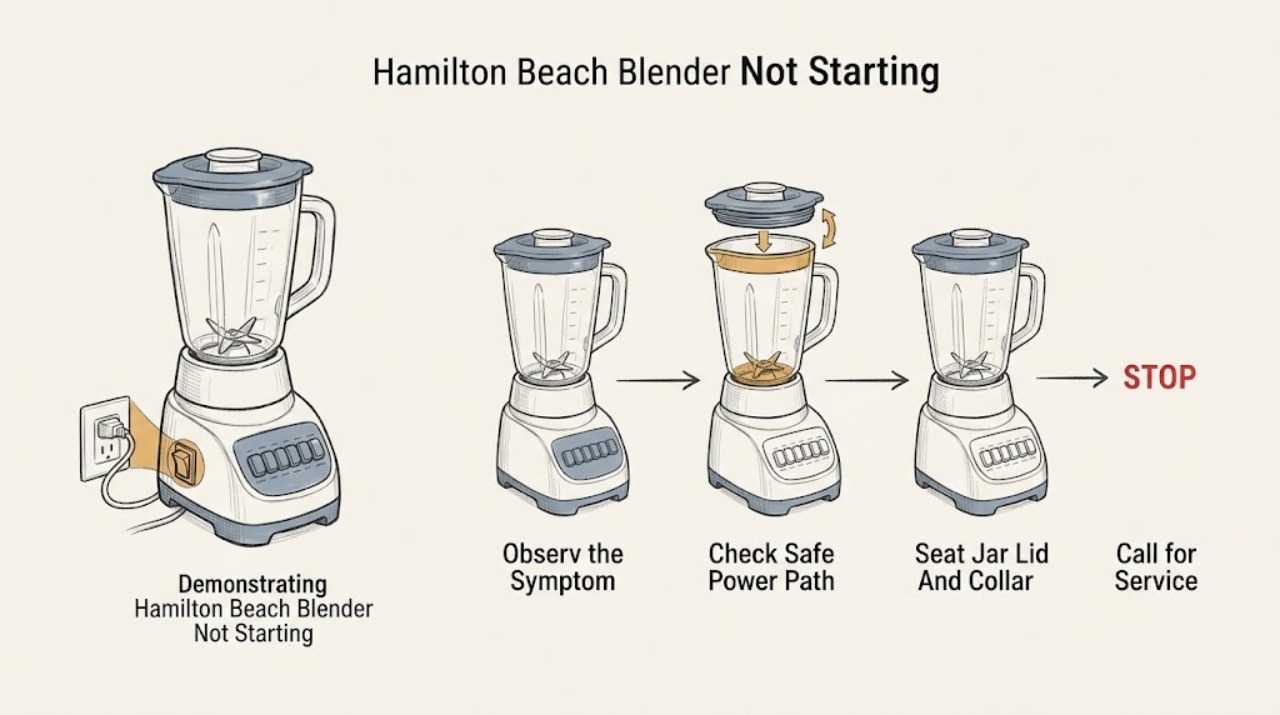
Work through in order
Diagnostic checks
Use only checks that match the exact appliance or system and its official guide.
-
Check 1
Read the complete model/type/series information from the blender and locate the exact Hamilton Beach Use & Care guide. With the jar and blades untouched, note whether the power indicator or controls are dark, illuminated but unresponsive, or whether the blender stopped during a previous blend.
Expected result: The controls are dark; lights are on but the motor is silent; the unit stopped while blending; or the model uses a personal jar, collar, lid, or another model-specific start arrangement.
Next step: Follow the matching branch and the exact manual. Do not assume that a control layout or interlock from another Hamilton Beach model applies.
Stop if: Stop for smoke, burning odor, sparks, abnormal heat, a damaged cord or plug, liquid in the base, a locked blade, or a repeated breaker trip.
Why this matters
Why: A dark unit prioritizes supply and power-switch checks. An illuminated but silent unit prioritizes documented jar/lid/control conditions. A stop during blending raises thermal overload or a jam, but the model determines the exact recovery sequence.
-
Check 2
Make sure the control is OFF before checking that the plug is fully inserted into the correct outlet and that the model's power switch is in its ON/RESET position. From a dry position, check whether another appliance works at the outlet and whether a fuse has blown or a breaker has tripped; do not open the base or make live electrical measurements.
Expected result: The power switch is OFF; the plug is loose; the outlet is dead; a fuse is blown or breaker is tripped; or the outlet and supply appear normal but the blender remains dark.
Next step: Correct only a safe switch or plug position, or have an electrician address a household outlet problem. If the outlet is normal and the blender remains dark, unplug it and arrange service.
Stop if: Do not use a damaged cord or plug, defeat a polarized plug, use a wet outlet, repeatedly reset a tripped breaker, or open the base.
Why this matters
Why: Hamilton Beach lists the switch, secure plug, outlet fuse, and breaker as start-failure checks. A normal outlet with a dark blender makes an internal switch, cord, control, or motor fault more likely, not a reason to bypass protection.
-
Check 3
With the blender unplugged and the blades fully stopped, remove and re-seat the jar, collar/blade assembly, and lid exactly as the model guide shows. Confirm the jar is fully seated on the base and the lid or personal-jar assembly is in its normal operating position; never press a control while a safety part is removed or try to defeat an interlock.
Expected result: The jar rocks, is not fully seated, the collar is loose, the lid is not secured, a personal jar is mounted in the wrong orientation, or all parts appear correctly seated.
Next step: Correct only the documented seating problem, then make one normal start attempt. If the jar or lid cannot seat because a tab, collar, or base is damaged, stop and arrange model-specific service or parts assessment.
Stop if: Do not run without the lid, bypass an interlock, place a blade assembly on the base without its jar, or put hands near the blades.
Why this matters
Why: Hamilton Beach guides require secure jar placement and a secured lid or collar before operation, but different models use different mechanical arrangements. Correct seating can restore a no-start condition; correct seating with no response points beyond a user-level interlock check.
-
Check 4
With power disconnected, inspect the jar, collar, and blade assembly from the outside and only as far as the model manual permits. Look for a crack, chip, loose cutter, or an obvious frozen piece preventing movement; do not force the blade, insert a hand or metal tool, or remove a permanently attached blade assembly.
Expected result: The jar or blade is cracked or loose; the blade is locked; a plainly visible frozen piece is present; or no damage or obstruction is visible.
Next step: Do not use a damaged or locked assembly; arrange qualified service or a model-confirmed replacement. If the components are intact, continue to the thermal-protection branch only when the symptom followed heavy use.
Stop if: Do not force locked blades, use a knife or screwdriver in the jar, operate with a cracked jar, or test the motor with the jar removed unless the exact manual explicitly documents a safe procedure.
Why this matters
Why: Hamilton Beach says damaged jars or blades must not be used and warns that locked blades can damage the motor. A visible obstruction does not make it safe to reach into the blade area, and an apparently clear jar does not rule out an internal motor or control fault.
-
Check 5
If the blender stopped during a heavy or extended blend and there is no smoke, liquid in the base, damaged part, or locked blade, follow the exact model's thermal-overload instruction. For models whose guide documents it, leave the unplugged blender undisturbed for approximately 15 minutes before one restart attempt; do not repeatedly reset it.
Expected result: The blender was hot or stopped after heavy use; the guide documents thermal overload; it restarts after the cool-down; or it remains unresponsive after cooling.
Next step: If it does not restart once after the documented cool-down, unplug it and arrange service. Reduce load and use only the recipe and fill limits in the exact guide on future attempts.
Stop if: Do not cool the unit with water, operate it while hot, ignore a burning smell, or repeatedly cycle power after an overload.
Why this matters
Why: Hamilton Beach documents resettable thermal protection on several consumer models. A successful restart supports temporary overload; a persistent no-start, repeated stop, or burning smell indicates a service condition rather than proof that the motor needs a user replacement.
-
Check 6
After the safe power, seating, blade, and applicable cool-down checks, make at most one normal start attempt using the exact model controls. Record whether the panel lights, whether the motor hums or is silent, the model, any odor or sound, the outlet result, and whether the problem began after a jam, spill, or overheating event.
Expected result: The blender starts normally; it remains dark; it lights but stays silent; it hums without turning; or it stops again with odor, heat, or a breaker event.
Next step: Unplug and arrange qualified Hamilton Beach service with the model and observations. Do not order a motor, switch, control board, or interlock solely from the symptom.
Stop if: Stop and leave the blender unplugged for smoke, burning odor, sparks, abnormal heat, liquid in the base, a damaged cord, or a repeated breaker trip.
Why this matters
Why: A successful start after a clear seating or cool-down issue points to that condition. Persistent darkness, silent controls, humming, repeat stopping, or electrical symptoms cannot identify a safe internal part from outside.
Use your observations
Decision map
Find the observation that best matches what you see, then follow the next safe action.
-
PATH 01Next step
What you see
The controls or indicator are completely dark when the blender is plugged in.
Do this next
Check the switch and outlet from a dry, safe position, then unplug and arrange service if the blender remains dark. Do not open the base or repeatedly reset the breaker.
Why this path and its safety boundary
Why it matters: Hamilton Beach's start troubleshooting points first to the power switch, secure plug, outlet fuse, or tripped breaker. If those are normal, an internal power, switch, cord, or control problem is possible.
-
PATH 02Next step
What you see
The power indicator or control panel is lit, but pressing the model's start/speed control produces no motor response.
Do this next
Unplug, re-seat only the documented parts, and make one normal attempt. If it still will not start, stop and arrange service; do not bypass an interlock.
Why this path and its safety boundary
Why it matters: This makes an incorrectly seated jar, lid, collar, personal jar, or other model-specific start condition more relevant than a dead outlet. Proper seating with no response points to an internal control or interlock fault.
-
PATH 03Next step
What you see
The blender stopped during a heavy or extended blend, then will not start, without smoke, liquid in the base, or visible damage.
Do this next
Follow the exact model guide once; if it does not restart after the documented cool-down, leave it unplugged and arrange service.
Why this path and its safety boundary
Why it matters: Several Hamilton Beach consumer guides document thermal-overload protection and an approximately 15-minute unplugged cool-down. That is model-dependent and does not explain a repeated stop or odor.
-
PATH 04Next step
What you see
The blade does not move, a jar/cutter is cracked or loose, or the jar contains an obvious frozen obstruction that cannot be removed without approaching the blades.
Do this next
Keep the blender unplugged and obtain qualified service or a model-confirmed replacement assessment. Do not attempt a powered test.
Why this path and its safety boundary
Why it matters: Hamilton Beach warns not to use damaged jars/blades and says locked blades can damage the motor. The symptom does not justify forcing the assembly or reaching into the jar.
-
PATH 05Next step
What you see
The blender remains unresponsive after safe checks, or there is a burning smell, smoke, liquid in the base, abnormal heat, a damaged cord/plug, sparks, or a repeated breaker trip.
Do this next
Stop use, unplug if the connection is dry and safe to reach, keep the blender away from water, and arrange qualified Hamilton Beach service or electrical assistance as appropriate.
Why this path and its safety boundary
Why it matters: An internal motor, control, cord, switch, or electrical fault is possible, but outside symptoms cannot distinguish the part safely. Continued attempts can worsen an electrical or motor hazard.
Helpful context
Understand the symptom
Not all Hamilton Beach blenders start the same way
A full-size blender may have a side power switch and speed buttons, while a personal blender may start only after its jar and blade collar are mounted on the base. Hamilton Beach publishes model-specific Use & Care guides, so record the model before treating a button, knob, lid, or jar position as universal. The safe common point is that the jar must be properly attached and the blades must be stopped before parts are removed.
Use lights and motor response to choose the branch
If the control panel is dark, start with the model's power switch, plug, outlet, fuse, and breaker checks. If controls illuminate but the motor is silent, check only the documented jar/lid/collar seating and any model-specific shield or control reset. If the blender stopped after heavy use, thermal protection is more plausible; if there is a burning smell or a locked blade, stop rather than repeatedly pressing Start.
A jam is not an invitation to reach into the jar
Hamilton Beach warns that blades are sharp and says a locked cutting assembly can damage the motor. Turn the control off, unplug, and wait for every blade to stop before removing the jar or inspecting it. Do not use a hand, utensil, or tool near moving or locked blades, and do not run a damaged jar or blade assembly.
Keep liquid and electricity separated
Hamilton Beach's safety instructions say not to put the cord, plug, base, or motor in water or another liquid and to disconnect power before cleaning. Wipe only an accessible exterior base with power disconnected; do not immerse it, open it, or test internal wiring. Stop for a damaged cord or plug, liquid in the base, smoke, burning odor, abnormal heat, sparks, or a breaker that trips again.
Safety boundary
Stop conditions
- Stop immediately for smoke, sparks, persistent burning odor, abnormal heat, liquid in the base, a damaged cord or plug, or a repeated breaker trip.
- Unplug before removing the jar, lid, collar, blade assembly, or any obstruction; wait until blades have completely stopped.
- Do not bypass a jar/lid/collar safety condition, operate without the required lid, or place a removable blade assembly on the base without its jar.
- Do not use a cracked or chipped jar, broken/loose blades, or a blade assembly that is locked; do not reach into the jar with a hand or tool.
- Arrange qualified service for persistent no-start after model-specific checks, internal controls/motor/wiring, or any appliance that has been wet or electrically damaged.
Only after diagnosis
Potential parts
- blender jar, lid, collar, or blade assembly
Consider only when the complete model confirms a cracked/damaged jar, damaged blade, failed gasket, or broken seating component and qualified diagnosis identifies the replaceable assembly.
Jar shape, blade/collar design, gasket, and safety geometry vary by Hamilton Beach model; confirm the complete model before ordering.
When checks do not resolve it
Need a professional?
Arrange qualified Hamilton Beach service when the blender stays dark after a safe outlet check, the controls light but it will not run after model-specific jar/lid seating, it fails to recover after the documented cool-down, the blade is locked or damaged, or there is burning odor, smoke, liquid in the base, a damaged cord, abnormal heat, or a repeated breaker trip.
Safety scope: The owner may inspect a dry plug/outlet from outside, follow model-documented jar/lid seating, and allow a documented thermal cool-down. Qualified personnel must access the base, motor, switch, controls, interlocks, wiring, and any damaged or wet electrical component.
Common questions
FAQ
Why is my Hamilton Beach blender completely dark?
Check the model's power switch, secure plug, outlet, fuse, and breaker from a dry, safe position. Hamilton Beach lists those as no-start checks; if the outlet is normal and the blender remains dark, unplug it and arrange service rather than opening the base.
Why do the lights work but my Hamilton Beach blender will not start?
With power disconnected, re-seat the jar and the model's lid, collar, or personal-jar assembly exactly as its guide shows. Hamilton Beach requires secure seating, but a correctly seated assembly that remains silent can indicate an internal control or interlock fault.
How long should I let a Hamilton Beach blender cool before trying again?
Several Hamilton Beach consumer guides document unplugging and allowing approximately 15 minutes after an overheating stop. Use that only when the exact model documents thermal protection and there is no smoke, liquid, damaged part, or locked blade; a repeated failure needs service.
Can I bypass the lid or jar safety switch on a Hamilton Beach blender?
No. Secure the jar and lid/collar only as the exact manual shows; do not press a control with a safety part removed or defeat an interlock. If correct seating does not restore operation, arrange service.
What if the Hamilton Beach blender blade is stuck?
Turn it off, unplug it, wait for the blade to stop, and do not reach in or force it with a tool. Hamilton Beach warns that locked blades can damage the motor and that damaged blades or jars must not be used; obtain a qualified or model-confirmed parts assessment.
When should I stop troubleshooting and call for service?
Stop for a damaged cord or plug, liquid in the base, smoke, burning odor, abnormal heat, sparks, a repeated breaker trip, a locked blade, or a no-start condition that remains after the exact model's power, seating, and applicable cool-down checks.
Read the exact guide
Official sources
- Hamilton Beach Personal Blender - Use & Care Guide 840236002Hamilton Beach · Specific Hamilton Beach personal-blender guide family; do not transfer its personal-jar orientation or fill guidance to a full-size model.
- Blenders - Use & Care Guide 840165603Hamilton Beach · Hamilton Beach household blender guide family represented by this manual; exact model controls the applicable jar and control arrangement.
- Hamilton Beach Power Elite Multi-Function Blender 58148GHamilton Beach · Specific Hamilton Beach 58148G product page; its button layout and jar are not universal to all Hamilton Beach blenders.
- Hamilton Beach Wave Action Quiet Blender (53530) - Use & CareHamilton Beach · Specific Hamilton Beach 53530 Wave Action model; power-switch layout and exact fill/control behavior must not be transferred to other models without confirmation.
Community feedback
Share a repair observation
Share a plain-text repair observation. Accepted observations are published automatically; this page may take a moment to update.