
On this page
Start here
Quick answer
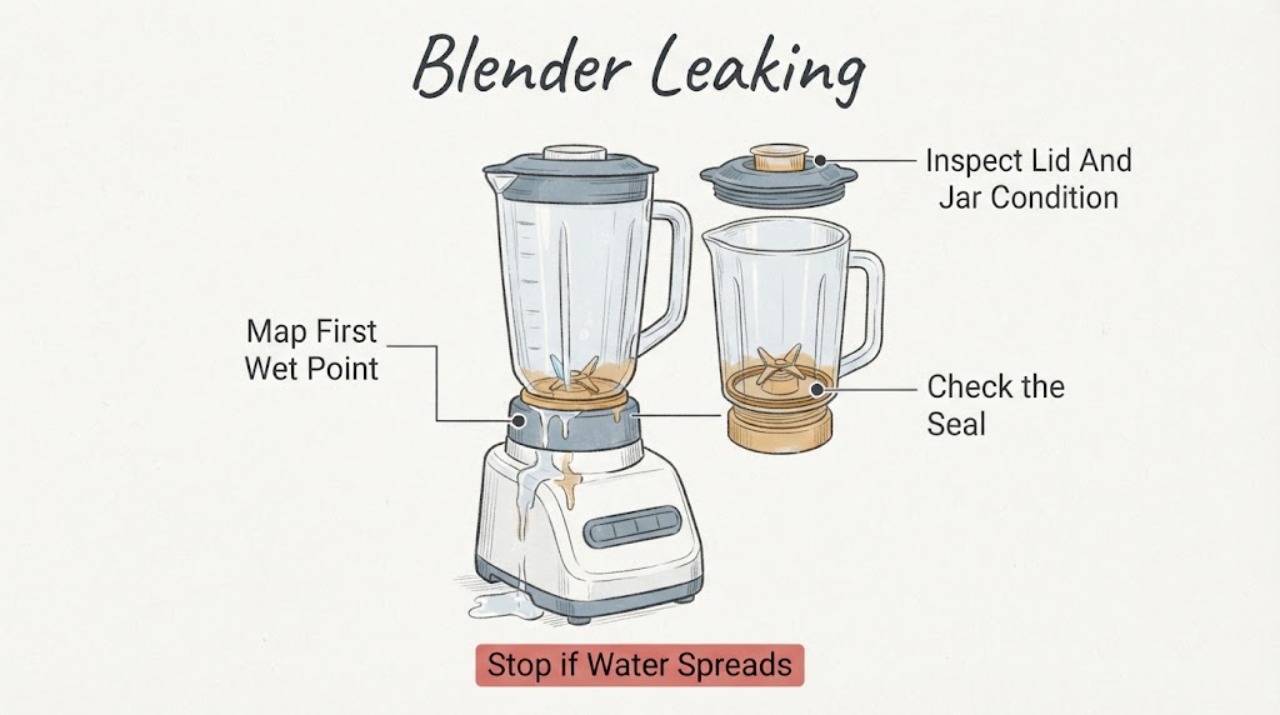
If a Hamilton Beach blender is leaking, unplug it and identify the first wet point before running it again: the lid or filler cap, the jar seam or collar, the bottom around the cutting assembly, a personal jar, or the motor base. Hamilton Beach's use-and-care troubleshooting lists a loose cutting assembly, a lid or filler cap that is not seated, and a gasket that is damaged, twisted, or missing as leak causes. On models with a removable gasket or cutting assembly, inspect and reseat only the parts and direction shown in that model's manual; some models use a permanent gasket that must not be removed. Check the jar for a crack, chip, or warped sealing surface and keep any liquid away from the base, cord, plug, and controls. Do not plug in a blender with liquid in or under the base, do not reach toward sharp blades, and do not keep testing a leak by blending. Replace a damaged jar, gasket, lid, or cutting assembly only after model-specific fit is confirmed; a leak from the base, electrical area, or an inaccessible shaft seal requires stop-use and qualified service.
Before you begin
Safety first
- Do not run a leaking blender to reproduce the symptom, open the motor housing, perform live electrical tests, immerse or rinse the base, touch sharp blades unnecessarily, bypass a seal or interlock, or use a cracked jar, damaged blade, wet cord, or wet plug.
Work through in order
Diagnostic checks
Use only checks that match the exact appliance or system and its official guide.
-
Check 1
Unplug the blender and separate the jar from the base. Dry the jar, lid, collar, and base, then inspect without touching the blade edges where liquid first reappears: lid/filler cap, jar seam, collar, bottom of cutting assembly, personal jar, or motor base.
Expected result: Liquid starts at the lid; at the jar-to-collar or cutting-assembly seam; from a personal jar; or inside/under the motor base.
Next step: Keep the blender unplugged and follow the matching branch. If liquid reached the base, do not reconnect it for a test.
Stop if: Stop for a wet plug, cord, control panel, smoke, burning odor, sparks, cracked jar, broken blade, or any liquid inside the base.
Why this matters
Why: The first wet point distinguishes a lid or gasket fit from a bottom assembly seal or an electrical-base ingress problem. Liquid already in the base is not an ordinary jar-seal adjustment.
-
Check 2
With the jar off the base, inspect the lid, filler cap, pour spout, jar rim, and sealing surface for food debris, a lid that is not fully seated, cracks, chips, warping, or a split. Do not use a cracked or chipped jar and do not force a lid onto a damaged rim.
Expected result: The lid or filler cap is loose or obstructed; the jar or rim is cracked, chipped, or distorted; or all visible lid and jar surfaces appear intact.
Next step: Clean and reseat only the visible lid parts as the exact manual permits. Replace a damaged jar or lid only after confirming the model and part fit; do not blend to prove the leak is gone.
Stop if: Do not use a cracked, chipped, leaking, or unstable jar, and do not put fingers near the blade assembly.
Why this matters
Why: A lid that is not pushed down tightly or a damaged jar/rim can leak from the top or side. An intact top shifts attention toward the cutting assembly, gasket, personal-jar interface, or base.
-
Check 3
If the leak began at the jar bottom, inspect the cutting assembly and gasket only after the blender is unplugged and the blades are fully still. If the model has a removable assembly, check for a loose retaining ring and a gasket that is missing, twisted, flattened, torn, or out of its groove. If the model's gasket is marked permanent or the manual says not to remove it, leave it in place.
Expected result: The cutting assembly is loose; the gasket is displaced or visibly damaged; the gasket is a model-specific permanent type; or no accessible defect is visible.
Next step: Hand-tighten or reseat only in the direction and manner specified by the exact manual, without touching blade edges. Replace a damaged gasket/cutting assembly only after model fit is confirmed; call service if the seam still leaks.
Stop if: Do not hand-spin blades, pry a permanent gasket out, use tools to over-tighten, bypass a seal, or reconnect power while the assembly or base is wet.
Why this matters
Why: Hamilton Beach's leak guidance ties a loose cutting assembly and a damaged, twisted, or missing gasket to leaks. A permanent gasket or an intact, correctly seated assembly means the leak may require a model-specific replacement or internal service rather than more tightening.
-
Check 4
If the leak occurs with a personal, travel, or grinding jar, inspect the jar threads, collar, blade assembly, and its gasket or seal ring for cross-threading, debris, or damage. Confirm that the jar is the accessory intended for the blender model and that the assembly is seated as shown in the manual; do not interchange collars or force threads.
Expected result: The personal jar or collar is cross-threaded, loose, cracked, or using a damaged seal; or the accessory fits and appears correctly assembled.
Next step: Stop using a damaged or incompatible accessory and confirm model-specific replacement fit. If the correct, undamaged accessory still leaks, keep the blender unplugged and arrange service.
Stop if: Do not blend with a cracked cup, missing seal, cross-threaded collar, exposed blade, or liquid on the base.
Why this matters
Why: A personal-jar seal or collar can leak even when the full-size jar does not. Correct fit and assembly can rule out an obvious accessory issue but cannot prove that an internal shaft seal or base is sound.
-
Check 5
Inspect the jar pad, drive opening, underside of the jar, controls, cord, plug, and counter for liquid or dried residue. Wipe only the exterior of the base with a damp cloth if the model guide allows it, then dry thoroughly; never immerse, hose, or pour cleaner into the base.
Expected result: Liquid or residue is in the drive opening or motor base; the cord or plug is wet or damaged; or the base is dry and the leak is confined to the jar assembly.
Next step: Leave a contaminated or wet base unplugged and arrange qualified service; do not open it to dry or test. For a dry base, continue only with the model-approved jar correction and a non-powered inspection.
Stop if: Do not plug in a wet base, touch a wet plug, immerse the base, use a spray bottle, or perform electrical tests.
Why this matters
Why: Liquid at the base can damage electrical and motor parts and makes a powered test unsafe. A dry base with a jar-only leak keeps the focus on the lid, jar, gasket, collar, or cutting assembly.
-
Check 6
After any permitted external correction, do not blend to reproduce a leak. Document the model, accessory used, liquid location, whether the jar was hot or cold, and whether liquid reached the base. Arrange service when the leak returns, originates below the cutting assembly, or cannot be explained by an accessible seal or lid fit.
Expected result: The visible sealing issue is corrected and the base stayed dry; the leak returns; liquid comes from the shaft/base area; or an electrical, smoke, odor, blade, or jar hazard is present.
Next step: Keep the blender unplugged for a recurrent, bottom, or internal leak and contact Hamilton Beach support or a qualified small-appliance technician. Do not order parts from the symptom alone.
Stop if: Do not restore power after liquid enters the base, smoke, burning odor, sparks, shock, a damaged cord, or a cracked jar/blade is observed.
Why this matters
Why: A recurrence or bottom/base leak makes a worn seal, damaged assembly, shaft, motor housing, or another internal fault more likely. A dry base after an external correction is encouraging but does not establish long-term safety without a model-appropriate check.
Use your observations
Decision map
Find the observation that best matches what you see, then follow the next safe action.
-
PATH 01Safety boundary
What you see
Liquid first appears around the lid, filler cap, or pour opening and the jar rim is intact.
Do this next
Unplugged, clean and reseat only the visible lid parts as the exact manual allows. Replace a damaged lid or jar only after model fit is confirmed, and do not blend to retest a continuing leak.
Why this path and its safety boundary
Why it matters: A lid that is not pushed down tightly, a displaced cap, or debris at the rim is more likely than a bottom blade seal.
Safety stop: Do not use a cracked or warped jar, force the cap, or operate with liquid on the base.
-
PATH 02Safety boundary
What you see
Liquid appears at the jar bottom or collar, while the motor base is dry and the jar is not cracked.
Do this next
With power disconnected and blades still, follow the exact model guide for external tightening or gasket seating. Replace only a confirmed model-compatible seal/assembly; service a leak that persists.
Why this path and its safety boundary
Why it matters: A loose cutting assembly or damaged, twisted, missing, or model-specific gasket is more likely.
Safety stop: Do not pry out a permanent gasket, touch blades, over-tighten, or run the blender while wet.
-
PATH 03Safety boundary
What you see
The full-size jar is dry, but a personal/travel/grinding jar leaks at its collar, threads, or seal.
Do this next
Stop using the accessory, verify the exact model and manual, and replace only a confirmed compatible seal/collar/jar. Arrange service if the correct accessory still leaks.
Why this path and its safety boundary
Why it matters: The accessory's seal, collar, thread engagement, or model compatibility is more likely than a full-size jar fault.
Safety stop: Do not force threads, mix collars between models, or blend with a missing seal or exposed blade.
-
PATH 04Safety boundary
What you see
Liquid or dried residue is under the jar, in the drive opening, on the controls, or inside/under the motor base.
Do this next
Leave the blender unplugged and arrange qualified small-appliance service. Keep the base dry from further cleaning liquid and do not open or test it.
Why this path and its safety boundary
Why it matters: An electrical and motor contamination hazard is present; the source may be an internal shaft seal or an overflow that cannot be safely diagnosed from outside.
Safety stop: Do not reconnect power, immerse or rinse the base, probe the drive opening, or use a wet cord or plug.
-
PATH 05Safety boundary
What you see
The jar, lid, gasket, collar, and accessible cutting assembly appear correctly fitted, but the leak returns, comes from below the assembly, or is accompanied by smoke, odor, sparks, shock, heat, a damaged cord, or a cracked jar/blade.
Do this next
Stop using the blender and arrange qualified service or model-specific support. Provide the model, accessory, leak location, and hazard observations; do not select a part from the symptom alone.
Why this path and its safety boundary
Why it matters: An internal seal, shaft, motor, electrical, or damaged food-contact component may be involved, and continued operation is unsafe.
Safety stop: Do not blend again, open the motor housing, perform live tests, bypass safety features, or use a damaged jar or blade.
Helpful context
Understand the symptom
Find where the liquid starts
Record the exact Hamilton Beach model and whether the leak appears while blending, while pouring, immediately after filling, or only after washing. Dry the outside of the jar and base, place the unplugged jar over a sink or dry towel, and look for the first wet seam without touching the blades. A lid leak, a jar-to-collar leak, a bottom blade-assembly leak, and liquid inside the base are different decisions. Use the model's Use & Care guide because removable parts and gasket designs vary.
Check sealing parts before suspecting the motor
Most externally observable blender leaks can be narrowed to a lid or filler-cap fit, a cutting assembly that is not tight, a gasket that is missing or damaged, a jar crack, or a personal-jar connection. A clean, correctly assembled jar that still leaks from the bottom or sends liquid into the base may have a worn shaft seal or another internal defect. Do not choose a motor, clutch, blade, jar, or gasket from the symptom alone; model fit and the exact manual matter.
Keep liquid out of the electrical base
Stop using the blender for liquid under the base, wet controls, a wet cord or plug, smoke, a burning smell, sparks, a cracked jar, a broken blade, or a motor that has smoked. Unplug from a dry, accessible point and allow the appliance to remain out of service; do not immerse or rinse the base, do not probe it, and do not run the blender to see whether the leak returns. Blades are sharp, and hot contents can create pressure or a burn hazard, so let hot mixtures cool and handle the jar only as the model guide permits.
Only after diagnosis
Potential parts
- blender gasket or seal
Consider only when the exact model's manual shows a replaceable gasket and inspection finds it missing, twisted, cracked, torn, flattened, or leaking while the jar and base are otherwise sound.
Confirm the exact model, jar type, and whether the gasket is removable or permanent before ordering; do not infer fit from the brand alone. - cutting assembly or jar collar
Consider only when the exact model's guide identifies a compatible assembly and the leak remains at a damaged or worn cutting-assembly/collar interface after safe external checks.
Confirm model and jar compatibility with Hamilton Beach documentation; do not substitute a visually similar assembly or attempt an internal motor repair. - blending jar or lid
Consider only when inspection finds a crack, chip, warped rim, damaged lid, or filler-cap fit problem that is the first leak point.
Confirm the exact model, capacity, material, and accessory interface before ordering; do not use a damaged food-contact part.
When checks do not resolve it
Need a professional?
Call qualified small-appliance service for liquid in or under the motor base, a recurring leak, a leak from the shaft or inaccessible bottom, or any suspected internal electrical or motor fault. Stop immediately for smoke, burning odor, sparks, shock, overheating, a damaged cord or plug, a cracked jar, or a broken blade. Confirm model fit before replacing any jar, lid, gasket, collar, or cutting assembly.
Safety scope: Do not run a leaking blender to reproduce the symptom, open the motor housing, perform live electrical tests, immerse or rinse the base, touch sharp blades unnecessarily, bypass a seal or interlock, or use a cracked jar, damaged blade, wet cord, or wet plug.
Have this ready
- Provide the exact model and serial/type information, jar or accessory used, first wet point, whether the leak occurred while blending or standing, lid/gasket/cutting-assembly observations, whether the base or plug became wet, and any smoke, odor, heat, spark, shock, or blade/jar damage.
Common questions
FAQ
Why is my Hamilton Beach blender leaking from the bottom?
Hamilton Beach's troubleshooting guidance points first to a cutting assembly that is not tight and a gasket that is damaged, twisted, or missing. Unplug the blender, keep clear of the sharp blades, and inspect only the external assembly described in the exact model guide. A leak that persists or reaches the motor base needs service.
Can a Hamilton Beach blender lid cause a leak?
Yes. Hamilton Beach lists a lid with filler cap that is not pushed down tightly as a leak cause. Check the lid, filler cap, rim, and jar for debris or damage while unplugged; do not blend with a cracked or warped jar or with liquid on the base.
Can I remove the gasket from my Hamilton Beach blender?
Only if the exact model's Use & Care guide identifies it as removable. Hamilton Beach documentation differs by model, and some cutting assemblies use a permanent gasket. Do not pry out a permanent gasket; replace a damaged seal only after confirming the exact model and fit.
What if liquid got into the Hamilton Beach blender base?
Stop using the blender and unplug it from a dry, safe point. Do not immerse, rinse, open, or test the base. Hamilton Beach instructs owners not to immerse the cord, plug, base, or motor; a wet or contaminated base requires qualified service.
Should I replace the gasket or cutting assembly when my blender leaks?
Not from the symptom alone. Consider a replacement only when inspection identifies the damaged part, the exact model's guide shows that part is replaceable, and compatibility is confirmed. A recurring or internal leak should be assessed by service.
When should I stop using a leaking blender?
Stop immediately for liquid in the base, a wet cord or plug, smoke, burning odor, sparks, shock, overheating, a cracked jar, or a broken blade. Do not run the blender to reproduce a leak or perform live electrical tests.
Read the exact guide
Official sources
- Hamilton Beach FAQsHamilton Beach · Hamilton Beach general FAQ; apply only the parts and procedures that match the exact blender model.
- Wave~Action® Quiet Blender, WhiteHamilton Beach · Exact Hamilton Beach 53532J product page used to establish model-specific product/parts variation; do not generalize its components to every blender.
- 840250900 ENv01.inddHamilton Beach · Hamilton Beach use-and-care PDF for a specific blender family; cleaning and permanent-gasket details must be checked against the exact model.
- Print SpecsHamilton Beach · Hamilton Beach use-and-care PDF for a specific blender family; use only the leak checks that match the exact model's parts and assembly.
Community feedback
Share a repair observation
Share a plain-text repair observation. Accepted observations are published automatically; this page may take a moment to update.