
On this page
Start here
Quick answer
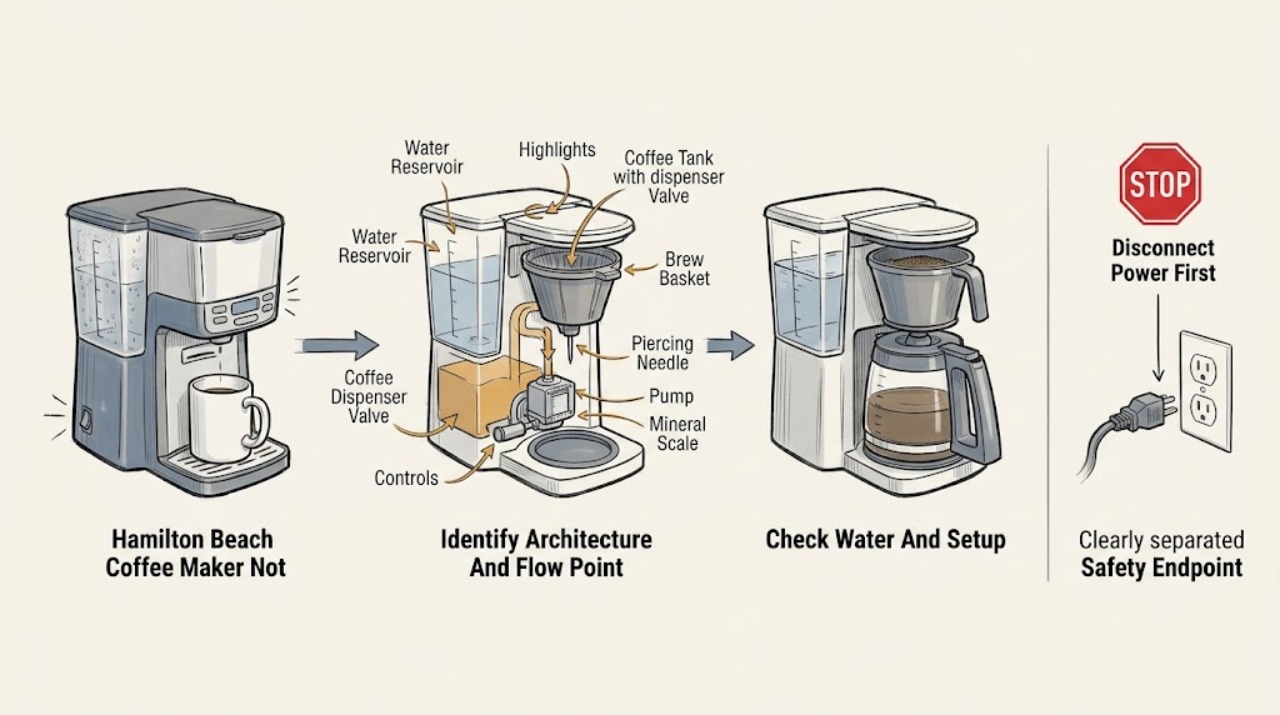
First identify the Hamilton Beach architecture and where flow stops. A BrewStation brews into an internal coffee tank and dispenses when the bar or valve is pressed; slow or absent output can come from a clogged tank screen, residue in the dispensing mechanism, or mineral buildup. A FlexBrew or other single-serve machine can heat but dispense nothing when the reservoir is too low, the lid or needle holder is not locked, the piercing needle is clogged, or mineral deposits restrict the pump. A traditional carafe drip machine can appear not to dispense if the water reservoir is empty, the brew basket is not seated, the carafe or lid is misplaced, or scale blocks the internal water path. Unplug and let hot parts cool before cleaning removable parts, never lift a brewing lid or handle hot water, and never open the bottom cover. If descaling and the model-specific external checks do not restore flow, or the unit leaks, overheats, smokes, repeatedly trips power, or needs pump, valve, heater, wiring, or control access, stop using it and arrange qualified service.
Before you begin
Safety first
- The user may identify the architecture, unplug and cool the unit, check water and visible setup, clean removable screens, needles, baskets, tanks, and carafes as the exact manual permits, and run its documented descaling cycle. Qualified personnel must handle the bottom cover, pump, heater, valve, control, wiring, thermal protection, internal tubing, and live testing.
Work through in order
Diagnostic checks
Use only checks that match the exact appliance or system and its official guide.
-
Check 1
Unplug the coffee maker if a hot or stopped cycle is present and identify the architecture from the model label and visible path: BrewStation internal coffee tank and dispensing bar, single-serve pod or grounds holder with a piercing needle, or carafe drip basket and warming plate. Note whether no water moves, brewing occurs but coffee will not pour, or coffee drips slowly.
Expected result: A BrewStation tank brews but dispenses slowly or not at all; a single-serve cup receives no liquid; a carafe remains empty while the basket is wet; or no heating or brewing occurs.
Next step: Continue with the architecture-specific check. If the machine does not heat or respond at all, use the exact model's power and control checks; if it produces a strong electrical odor or heat, stop and arrange service.
Stop if: Stop for smoke, sparks, a hot or damaged cord or plug, leaking hot liquid, melted plastic, or any need to open the housing.
Why this matters
Why: The stopping point separates the BrewStation valve or tank screen, single-serve needle or pump path, carafe basket or carafe-position path, and a general power or heating fault.
-
Check 2
With the unit cool, check the reservoir level, reservoir seating, brew basket or pod holder, lid closure, carafe or mug position, and the model's MIN/MAX markings. Use cold water only where the manual specifies it; do not exceed the model's fill line or open a lid during brewing.
Expected result: The reservoir is empty or below the required level, the reservoir or basket is mis-seated, the lid is not locked, a carafe or mug is absent or misplaced, or setup is correct.
Next step: Correct only the visible setup condition and retry one model-documented brew cycle after the machine is cool. If water is present and output remains absent, continue with the relevant architecture path.
Stop if: Stop for a cracked reservoir, carafe, lid, basket, or holder; a leak; hot liquid; liquid on the base; or any need to defeat an interlock.
Why this matters
Why: A missing water supply or safety-position sensor can prevent pumping or direct flow into the wrong path without a failed component. Correct setup makes mineral restriction or an internal pump or valve fault more likely if no liquid moves.
-
Check 3
For a BrewStation, after the coffee tank and liquid have cooled, remove and hand-wash the tank and filter basket as the exact manual permits. Check the visible tank screen and dispensing valve or mechanism for coffee grounds or residue; do not pry seals, remove the bottom cover, or run the dispenser with parts missing.
Expected result: The screen is visibly clogged, grounds are trapped at the dispensing mechanism or seal, coffee brews but the bar remains slow, or the visible path is clean and flow is still absent.
Next step: Clean the visible screen and tank path with the manual's method, rinse thoroughly, and retest after cooling. If dispensing remains absent or a seal or valve is damaged, arrange qualified repair.
Stop if: Stop for hot coffee, a damaged seal or valve, a cracked tank, liquid inside the base, or any need to open the bottom cover or access the pump.
Why this matters
Why: Hamilton Beach links slow BrewStation dispensing to a clogged tank screen and links dispensing issues to residue in the tank mechanism. A clean accessible path with no dispensing leaves the pump, valve, seal, or internal control for service diagnosis.
-
Check 4
For a single-serve or FlexBrew path, unplug and let the unit cool completely. Remove the model's removable needle holder or pod holder only as shown in the manual, inspect the piercing needle and holder for grounds, confirm the lid locks, and use the exact descaling procedure if CLEAN, NEEDLE, or mineral buildup is indicated. Do not touch the sharp needle or insert tools while parts are installed.
Expected result: The needle or holder is clogged, the lid does not lock, the reservoir is too low, CLEAN or NEEDLE appears, scale is present, or the needle and setup are clear but no coffee dispenses.
Next step: Clean the needle and removable holder exactly as the manual directs, complete and rinse the model-specific descaling cycle, and retry once. Escalate a damaged needle, returning code, leak, or no flow after these checks.
Stop if: Stop for a sharp or bent needle, hot water, a damaged lid or seal, a leak, smoke, or any need to open the housing or access internal tubing.
Why this matters
Why: Hamilton Beach identifies a clogged needle, mineral deposits, too little water, and an unclosed lid as single-serve no-dispense conditions. A clear needle, adequate water, locked lid, and completed descaling shift concern toward the pump, heater, valve, or control.
-
Check 5
For a traditional drip or carafe side, let the coffee maker cool, verify the brew basket is fully seated, the filter is not collapsed or overfilled, the carafe and lid are correctly positioned under the outlet, and the water reservoir has water. After the model-specific cleaning or descaling cycle, observe whether water enters the basket and coffee reaches the carafe; do not remove a hot basket or lift the lid during brewing.
Expected result: Water enters the basket but the carafe stays empty, the carafe was missing or misplaced, the basket overflowed or was clogged, water never enters the basket, or flow returns after cleaning.
Next step: Correct the visible carafe or basket condition and discard any overfilled or overheated brew safely. If no flow returns after the exact manual's cleaning and setup checks, unplug the unit and arrange service.
Stop if: Stop for overflowing hot coffee or water, a cracked carafe, a damaged basket, a hot plate with spilled liquid, smoke, odor, or any need to remove the bottom cover.
Why this matters
Why: A carafe, lid, basket, filter, or grounds condition can interrupt or redirect a drip stream. Water that never enters the basket after correct setup and descaling makes an internal pump, heater, valve, or control fault more likely.
Use your observations
Decision map
Find the observation that best matches what you see, then follow the next safe action.
-
PATH 01Safety boundary
What you see
A BrewStation completes or attempts brewing, but its internal coffee tank dispenses slowly or not at all.
Do this next
Unplug and cool the unit, clean the screen, tank, and visible dispensing path as the exact manual allows, then retest. Persistent no flow or a damaged seal or valve needs qualified service.
Why this path and its safety boundary
Why it matters: A clogged tank screen, residue in the dispensing mechanism, seal buildup, or mineral restriction is more likely than a carafe or single-serve needle issue.
Safety stop: Do not open the bottom cover, access the pump, or handle hot coffee or liquid.
-
PATH 02Safety boundary
What you see
A single-serve cup receives no coffee, the lid or needle indicator appears, the needle is clogged, or water is below the model's required level.
Do this next
Cool and unplug the unit, clean the removable needle holder and needle as directed, fill the reservoir within the model's limits, and complete the documented descaling cycle if indicated. Service a damaged holder, seal, or recurring code.
Why this path and its safety boundary
Why it matters: A needle, lid-lock, reservoir, or mineral restriction is more likely than a failed internal pump.
Safety stop: Do not touch the sharp needle while energized, open the lid during brewing, or use a tool that can damage the needle or seal.
-
PATH 03Safety boundary
What you see
A traditional drip or carafe side heats and wets the basket, but coffee does not reach the carafe, or the flow stops when the carafe is removed.
Do this next
Cool the machine, place the correct carafe and lid level under the outlet, reseat the basket, and correct filter or grounds loading. If the outlet remains blocked after permitted cleaning, arrange service.
Why this path and its safety boundary
Why it matters: Carafe placement, lid alignment, pause-and-serve behavior, a seated basket, filter or grounds overflow, or a clogged drip outlet is more likely than a no-power failure.
Safety stop: Do not remove a hot basket, place a hot carafe on a wet or cold surface, or continue through an overflow.
-
PATH 04Safety boundary
What you see
Flow is slow or intermittent, the model displays CLEAN, mineral buildup is visible, or the unit has not been cleaned on its documented schedule.
Do this next
Run only the exact model's descaling or cleaning cycle and the required clear-water rinses. If flow remains absent, do not dismantle the unit; arrange qualified service.
Why this path and its safety boundary
Why it matters: Scale or residue restricting the pump, valve, needle, or water path is more likely than a sudden component failure.
Safety stop: Stop for leaks, hot liquid, a damaged reservoir, smoke, odor, or any need to inject cleaner into an unapproved opening.
-
PATH 05Safety boundary
What you see
Water and setup are correct, the architecture-specific screen, needle, basket, carafe, and documented cleaning checks are complete, but no liquid moves; the unit overheats, leaks internally, shows a recurring fault, or trips power.
Do this next
Unplug and leave the coffee maker out of service. Arrange qualified Hamilton Beach evaluation and provide the model, architecture, output point, water and scale observations, codes, heat, leak, and power history.
Why this path and its safety boundary
Why it matters: An internal pump, valve, heater, control, wiring, or thermal-protection fault is possible and cannot be identified safely from the no-dispense symptom.
Safety stop: Do not open the bottom cover, perform live measurements, bypass thermal or lid protection, or repeatedly replug the machine.
Helpful context
Understand the symptom
“Not dispensing” depends on the coffee-maker architecture
A BrewStation has an internal coffee tank and a dispensing bar or valve, so it may brew but pour slowly. A single-serve FlexBrew sends water through a needle into a pod or small basket. A carafe drip model sends brewed coffee through a basket and carafe lid. Identify the output path before cleaning or ordering a part; a BrewStation screen and a single-serve piercing needle are not interchangeable diagnoses.
Scale is a flow problem, not proof of a failed pump
Hamilton Beach directs owners to descale BrewStation and other coffee makers when mineral deposits slow pumping or brewing. Use only the cleaning cycle and solution specified by the exact model, then rinse as directed. If flow remains absent after a complete cleaning, the pump, valve, heater, control, or internal tubing needs service diagnosis.
Hot water and needles make this a burn and cut hazard
A machine can retain hot water after a stopped cycle. Hamilton Beach instructs owners to unplug and allow the coffee maker to cool before cleaning, warns that single-serve needles are sharp, and warns not to open a lid during brewing or immerse the appliance. Clean only the accessible removable path described by the manual.
A carafe or brew basket can stop a drip stream
Traditional drip and carafe modes rely on the basket being fully seated, the lid being closed, and the correct carafe being level under the outlet. A missing or misplaced carafe can trigger pause-and-serve behavior or cause overflow rather than a normal stream. Do not remove a hot basket or carafe until the manual's cooling guidance is satisfied.
Safety boundary
Stop conditions
- Stop immediately and unplug for smoke, sparks, flame, burning odor, abnormal heat, a hot or damaged cord or plug, liquid in the base, overflowing hot water or coffee, a leak, or a tripped breaker.
- Allow the coffee maker and coffee tank, carafe, basket, water, and needle area to cool before removing parts or cleaning. Do not lift a brewing lid or handle hot liquid.
- Do not immerse the cord, plug, base, pump, or coffee maker; do not open the bottom cover, perform live measurements, or bypass a lid, basket, pod, or thermal interlock.
- Do not touch a single-serve piercing needle with bare fingers, force a clogged valve, or use sharp tools in an internal water path.
- If the exact architecture's external setup and documented cleaning or descaling do not restore dispensing, leave the unit unplugged and arrange qualified service.
Only after diagnosis
Potential parts
- model-matched BrewStation dispensing valve, tank screen, or tank seal
Consider only when a BrewStation's visible screen, tank, and dispensing mechanism inspection confirms a damaged or persistently blocked part after the documented cleaning.
Confirm the complete Hamilton Beach BrewStation model and tank design; do not infer fit from reservoir capacity or appearance. - model-matched single-serve needle holder, seal, brew basket, or carafe
Consider only when inspection confirms a cracked holder, bent or damaged needle, missing seal, damaged basket, or incompatible carafe after the unit is unplugged and cool.
Verify the exact Hamilton Beach model, side, holder, needle, basket, and carafe design; do not order from a generic capacity or visual match. - model-matched pump, valve, heater, control, or thermal component
These internal parts are relevant only after qualified diagnosis of no flow following correct water, architecture-specific setup, needle or screen, basket or carafe, and descaling checks.
Internal electrical and water-path parts require exact model identification and qualified service; do not open the base or select a part from a no-dispense symptom alone.
When checks do not resolve it
Need a professional?
Arrange qualified Hamilton Beach service when a BrewStation still will not dispense after its tank screen, dispensing path, and descaling checks; when a FlexBrew or single-serve needle, lid, reservoir, and cleaning checks do not restore flow; when a carafe drip path remains dry after correct basket, carafe, reservoir, and cleaning checks; or when an internal pump, valve, heater, control, wiring, or thermal fault is suspected. Stop immediately for smoke, sparks, burning odor, a hot or damaged cord or plug, overflowing hot liquid, a leak into the base, abnormal heat, a damaged carafe, or repeated breaker trips. Give the technician the exact model/type/series, architecture, water level, output point, filter or pod setup, cleaning or descaling performed, fault indicators, and whether the machine heats, pumps, leaks, or stops.
Safety scope: The user may identify the architecture, unplug and cool the unit, check water and visible setup, clean removable screens, needles, baskets, tanks, and carafes as the exact manual permits, and run its documented descaling cycle. Qualified personnel must handle the bottom cover, pump, heater, valve, control, wiring, thermal protection, internal tubing, and live testing.
Common questions
FAQ
Why does my Hamilton Beach BrewStation brew but not dispense coffee?
The internal coffee tank screen or dispensing mechanism may be clogged with grounds or residue, or mineral deposits may be restricting flow. Unplug and cool the unit, clean only the accessible tank path as the exact guide directs, and arrange service if dispensing remains slow or absent.
Why does my Hamilton Beach FlexBrew make no coffee?
Check that the reservoir has enough water, the lid and needle holder lock, the piercing needle is clear, and mineral buildup is not present. Clean and descale only with the model's instructions; a damaged needle, leak, or continuing no-flow condition needs service.
Why is water going into the brew basket but not the carafe?
On a carafe drip or carafe side, verify that the basket is seated, the filter is not overflowing, and the correct carafe and lid are level under the outlet. Pause-and-serve behavior can stop flow when the carafe is removed. Let hot parts cool before correcting setup.
Can mineral buildup stop a Hamilton Beach coffee maker from dispensing?
Yes. Hamilton Beach links slow BrewStation pumping and slow or absent single-serve brewing to deposits or clogs. Run the exact model's cleaning or descaling cycle and clear-water rinse; if flow does not return, the internal water path requires service.
Is it safe to open the coffee maker to repair the pump?
No. Unplug before cleaning, allow hot water to cool, keep the appliance out of liquid, and do not remove the bottom cover or perform live testing. A pump, valve, heater, control, wiring, or internal tubing fault should be handled by qualified service.
Read the exact guide
Official sources
- Read before use.Hamilton Beach · Applies to the group of traditional coffeemaker designs covered by this guide; exact carafe, basket, reservoir, and controls vary by model.
- Hamilton Beach FAQsHamilton Beach · Applies to the Hamilton Beach FAQ guidance; BrewStation, FlexBrew, single-serve, and drip models have different flow paths and procedures.
- Hamilton Beach 2-Way FlexBrew Coffee Maker (49940) - Use & CareHamilton Beach · Applies directly to the 49940 2-Way FlexBrew guide and conditionally to similar FlexBrew designs; capacities and controls vary by model.
- Hamilton Beach FlexBrew Advanced 5 in 1 Coffee Maker (49965F) - Use & CareHamilton Beach · Applies directly to model 49965F and conditionally to similar combined FlexBrew designs; exact buttons, capacities, and holders vary by model.
- Hamilton Beach Brewstation [48463] - Use & CareHamilton Beach · Applies directly to BrewStation model 48463 and conditionally to similar BrewStation designs; verify the exact model guide before applying a procedure.
Community feedback
Share a repair observation
Share a plain-text repair observation. Accepted observations are published automatically; this page may take a moment to update.