
On this page
Start here
Quick answer
Treat a Hisense dehumidifier leak as a water-and-electricity hazard first. From a dry position, switch it off and unplug it before removing the bucket or changing a hose; do not operate it in standing water or with water at the outlet, cord, or controls. Identify where the first moisture appears: bucket rim or compartment, hose connector, drain end, or the cabinet/base. For bucket use, empty the bucket and reinstall it fully and level; Hisense says the bucket and water-level float must be aligned for the unit to operate. For gravity draining, use the exact model manual, secure the hose to the connector, keep its outlet lower than the connection, and avoid kinks or pinching. A pump drain applies only to pump-function models and requires the correct connector before the Pump control is used; a flashing pump light or a returning leak needs service. If water is coming from inside the cabinet or base, the source is not safely visible, the cord or outlet is wet/damaged, the unit was splashed, or the leak persists after these external checks, leave it unplugged and arrange qualified appliance service rather than opening the cabinet or handling sealed refrigeration or electrical parts.
Before you begin
Safety first
- Keep the dehumidifier unplugged when water is near the appliance or electrical area. Do not operate it in standing water, remove covers, probe live wiring, bypass the float or pump controls, or work on sealed refrigeration components. Disconnect power only from a dry, safe, accessible location.
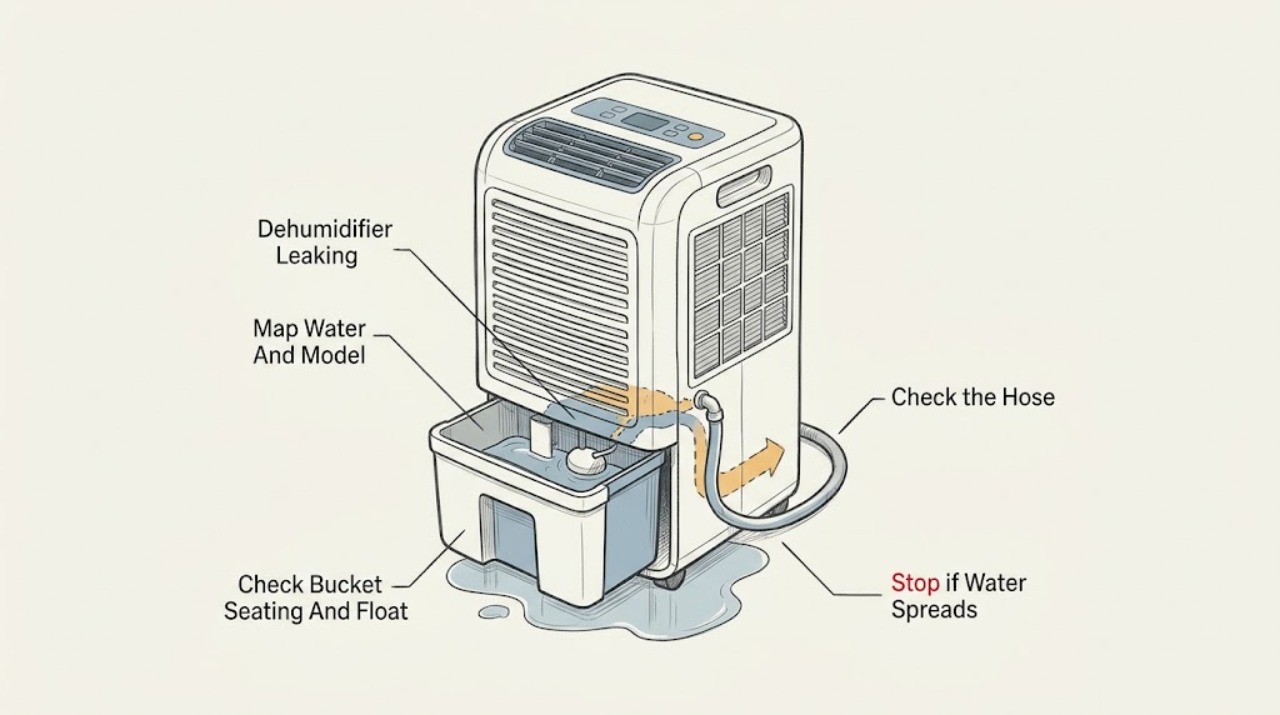
Work through in order
Diagnostic checks
Use only checks that match the exact appliance or system and its official guide.
-
Check 1
From a dry, stable position, switch the dehumidifier off and unplug it. Without moving a wet unit or touching water near power, record the complete model number and identify the first visible moisture: bucket rim or compartment, hose connector, hose outlet, or cabinet/base.
Expected result: The water is only around the bucket, starts at a drain connection or hose end, appears under the cabinet, or cannot be traced safely; also note whether the flow is a one-time spill, a slow drip, or an active stream.
Next step: Follow the matching branch below. Keep the unit unplugged if the source is internal, the flow is worsening, or any electrical part is wet.
Stop if: Do not step into standing water, pull the appliance through water, or touch a wet plug, outlet, cord, or control.
Why this matters
Why: A bucket or hose observation supports an external drainage check. Water emerging from the cabinet/base or an untraceable source can involve an internal drain, pump, coil, or enclosure path and is not identified by a puddle location alone. The model determines whether gravity or pump instructions apply.
-
Check 2
Only with the unit unplugged and the area dry, grasp the bucket by its intended sides or handle, empty it, and inspect the accessible seating area for a displaced bucket. Reinstall it fully on a level surface; check only that the accessible water-level float is present and in its intended position. Do not force the bucket or dismantle the float.
Expected result: The bucket was overfilled, tilted, cracked, not fully seated, or the float was visibly out of position; or the bucket and float appear correctly installed but water returns outside the intended container.
Next step: Clean up only accessible spilled water with a dry or soft cloth, keep the unit level, and use the bucket path if the model manual does not confirm a hose feature. Escalate a cracked bucket, cabinet leak, or recurring spill to service.
Stop if: Do not run with the bucket removed, bypass the float/interlock, wash the powered unit, or continue if water has reached electrical parts.
Why this matters
Why: A full, mis-seated, or misaligned bucket can spill or prevent the level interlock from working. If the bucket is sound and correctly seated yet water reappears elsewhere, the leak is more likely in the drain route or an internal water path.
-
Check 3
If the exact model manual supports gravity draining, keep the unit unplugged and inspect the visible hose and connector. Verify the hose is securely attached to the correct connector, lies flat to the drain, ends below the connection at the unit, and is not kinked or pinched. Do not loosen a hot, pressurized, or inaccessible fitting.
Expected result: The hose is loose, detached, routed uphill, kinked/pinched, or not actually inside the floor drain; or the route and connector look correct but water still forms at the connector or cabinet.
Next step: With power still disconnected, correct only the visible hose placement allowed by the exact manual, protect the floor from residual water, and arrange service if the connector, port, or cabinet remains wet.
Stop if: Do not drill a drain port, substitute a connector from another model, open the cabinet, or reconnect power while the outlet or appliance is wet.
Why this matters
Why: Hisense identifies an unsecured connection, an outlet that is not lower than the unit connection, and a kink or pinch as conditions that can cause drainage failure or leakage. A correct visible route with continued water at the cabinet points beyond a simple hose correction.
-
Check 4
Only if the exact model's manual identifies a Pump function, inspect the supplied pump-hose connector from a dry position while unplugged. Confirm the hose is connected to the correct unit connector before any Pump control is used, and look for a bent hose or a flashing pump indicator. Do not attempt to test a pump by opening the cabinet or applying external power.
Expected result: The model has no Pump control; the connector is not fully engaged; the hose is bent; the pump indicator flashes; or the hose and indicator appear normal but the unit still leaks.
Next step: For a non-pump model, return to its bucket or gravity instructions. For an applicable model, correct only a clearly visible connector or hose placement described by its manual; a flashing indicator or recurring leak requires qualified service.
Stop if: Do not add a hose to a model that does not document the feature, bypass the pump indicator, disassemble the pump, or run a wet appliance.
Why this matters
Why: Hisense says the pump option is model-dependent, requires the hose connection before pressing Pump, and uses a flashing pump light to indicate improper pump operation. A pump symptom does not prove the motor or control is replaceable by the owner.
-
Check 5
If the only moisture appeared inside the bucket storage area immediately after shutting the unit off and removing the bucket, wipe the accessible water with a soft cloth while power remains disconnected. Do not touch the float or insert tools into the air inlet/outlet; note whether the moisture returns without moving the unit.
Expected result: A small amount of water was present only immediately after bucket removal and does not return, or water continues to collect after the compartment is dry.
Next step: If it was a one-time residual drip, keep the bucket installed correctly and monitor the floor while remaining alert to safety. If moisture returns, stays at the base, or has an unexplained source, leave the unit unplugged and arrange appliance service.
Stop if: Do not use water to clean the unit, remove panels, probe a drain opening, or restore power while the cabinet or electrical area is wet.
Why this matters
Why: Hisense notes that water remaining in the heat exchanger may drip into the bucket storage area when the bucket is removed immediately after shutdown. Continued collection, water from the base, or moisture away from that compartment is not explained by that note alone.
-
Check 6
After the safe external checks, classify the remaining condition without restarting the unit: water from the cabinet/base, a connector that cannot be made dry and secure, a continuing stream, a damaged bucket, or water near the plug, outlet, cord, controls, or internal wiring.
Expected result: The leak persists, is internal or rapidly worsening, or any electrical or physical hazard is present; alternatively, no leak returns and all moisture was limited to a corrected external spill or hose route.
Next step: Keep the unit unplugged and arrange qualified appliance service for the persistent condition. Use a qualified electrician for a wet/damaged outlet or cord, and provide the model, first wet point, drainage mode, and isolation history.
Stop if: Do not disassemble, live-test, handle sealed refrigerant components, bypass a float or pump control, or repeatedly power-cycle a leaking appliance.
Why this matters
Why: A resolved external spill or route issue may be documented for monitoring. Persistent or internal water can involve a drain pan, pump, float mechanism, cabinet seam, or another model-specific part; water and electricity together increase shock and damage risk.
Use your observations
Decision map
Find the observation that best matches what you see, then follow the next safe action.
-
PATH 01Safety boundary
What you see
Water is concentrated at the bucket rim or inside the bucket compartment, and the bucket was full, tilted, cracked, or not fully seated.
Do this next
With power disconnected and the area dry, empty and fully reseat an undamaged bucket on a level surface. Arrange service for a returning spill, cracked bucket, or water that migrates from the cabinet.
Why this path and its safety boundary
Why it matters: Bucket capacity, seating, level, or an accessible float alignment is more likely than a confirmed cabinet failure.
Safety stop: Do not run without the bucket or defeat the float/interlock.
-
PATH 02Safety boundary
What you see
Water begins at a documented gravity-drain connector or hose end, and the hose is loose, kinked/pinched, uphill, or outside the drain.
Do this next
Using the exact model manual while unplugged, secure the hose, keep the outlet lower than the unit connection, remove kinks, and place the end in the intended drain. Escalate if water remains at the port.
Why this path and its safety boundary
Why it matters: The visible gravity-drain connection or route is more likely than an internal leak.
Safety stop: Do not substitute undocumented fittings or reconnect power while the appliance or outlet is wet.
-
PATH 03Safety boundary
What you see
The exact model has a Pump function and its hose is bent or not connected as specified, or the pump light flashes.
Do this next
Correct only the visible hose/connector condition in the model manual. If the light continues to flash or the leak returns, keep the unit off and call qualified service.
Why this path and its safety boundary
Why it matters: Hisense's documented pump connection or pump-function fault path is more likely; a non-pump model should not be placed on this branch.
Safety stop: Do not bypass the pump control, open the cabinet, or test the pump live.
-
PATH 04Safety boundary
What you see
A small amount of water appeared only in the bucket storage area immediately after shutdown and bucket removal, then stopped once the area was wiped dry.
Do this next
Keep the bucket correctly installed and watch for recurrence from a safe, dry position. Escalate if water returns, spreads to the base, or appears near power.
Why this path and its safety boundary
Why it matters: Residual water from the heat exchanger after immediate bucket removal is a documented possibility and is less suggestive of a continuous cabinet leak.
Safety stop: Do not wash the appliance, touch the float, or operate it while the electrical area is wet.
-
PATH 05Safety boundary
What you see
Water emerges from the cabinet/base or an inaccessible area, the leak is active or recurring after external checks, or water reaches the outlet, plug, cord, or controls.
Do this next
Leave the unit unplugged, keep people away from wet electrical areas, and arrange qualified appliance service or electrical help as appropriate. Share the model and exact first wet point.
Why this path and its safety boundary
Why it matters: An internal drain, pump, float, cabinet, electrical, or installation problem remains possible; the condition is outside safe owner troubleshooting.
Safety stop: Do not restart to reproduce the leak, remove panels, probe live parts, or handle sealed-system components.
Helpful context
Understand the symptom
Find the first wet point, not the largest puddle
Water can travel across a floor, so begin from a dry position and identify the highest visible wet point. Record the complete model number and whether the unit is using its bucket, a gravity hose, or a pump feature. Hisense's manual describes these as different drainage options and warns that the control panel and connector arrangement may differ by model.
Bucket leaks and hose leaks are different paths
If moisture is in the bucket compartment or around the bucket rim, check emptying, seating, level, and the accessible float. If it begins at a hose connector or appears where the drain terminates, inspect the hose route and connector instead. A hose-connected unit still requires the bucket to be installed and aligned, so removing or mis-seating the bucket can create a no-run condition without proving that the cabinet is leaking.
Do not assume a pump is fitted
The Hisense manual separates gravity draining from pump draining and marks the pump option for pump-function models only. On an applicable model, a bent or incorrectly connected pump hose can prevent pumping and may make the pump light flash. On a model without that feature, do not add a pump procedure or press controls that are not shown in its manual.
Water near power ends the owner check
Do not operate the unit in standing water or allow direct splashing. Stop if water reaches the outlet, plug, cord, controls, or internal cabinet; if there is smoke, a strange smell, a damaged cord, or a loose/damaged outlet, keep clear and arrange qualified electrical or appliance help. Hisense says not to disassemble, repair, or modify the product, so internal drains, pumps, wiring, controls, and sealed refrigeration parts are service work.
Only after diagnosis
Potential parts
Only if the exact model's manual or technician confirms a cracked, warped, or otherwise damaged bucket.
Only for a documented gravity- or pump-drain model after the exact connector and hose path are confirmed.
When checks do not resolve it
Need a professional?
Call qualified appliance service for a leak from the cabinet/base, an inaccessible or persistent source, a damaged bucket or connector, a flashing pump indicator, or any leak that returns after safe external drainage checks. Call an electrician for a wet or damaged outlet, cord, or plug. Stop immediately for standing water, smoke, strange odor, damaged wiring, or water near energized parts.
Safety scope: Keep the dehumidifier unplugged when water is near the appliance or electrical area. Do not operate it in standing water, remove covers, probe live wiring, bypass the float or pump controls, or work on sealed refrigeration components. Disconnect power only from a dry, safe, accessible location.
Have this ready
- Provide the complete model and serial information, first wet point, bucket/gravity/pump configuration, whether the unit was level, hose route and connector observations, whether water appeared after immediate bucket removal, and any wet outlet, damaged cord, odor, smoke, or standing-water history.
Common questions
FAQ
Why is my Hisense dehumidifier leaking from the bucket area?
Turn it off and unplug it before removing the bucket. Empty and fully reseat an undamaged bucket on a level surface, and check only the accessible water-level float. Hisense notes that a small amount of water can drip into the bucket storage area if the bucket is removed immediately after shutdown; a recurring leak, cracked bucket, or water from the cabinet needs service.
How should a Hisense dehumidifier gravity-drain hose be routed?
For a model whose manual documents gravity draining, secure the hose to the correct connector, place the outlet lower than the connection at the unit, keep the hose flat and inside the drain, and avoid kinks or pinching. The bucket still has to be installed and aligned. If the connector remains wet or the cabinet leaks, stop and arrange service.
Does every Hisense dehumidifier have a pump drain?
No. Hisense labels pump drainage for pump-function models only. On an applicable model the hose must be connected before using Pump, and a flashing pump light indicates a pump problem. Match the exact model manual before using a pump procedure or ordering a hose.
Can I use a Hisense dehumidifier after water reaches the floor?
Only an isolated, cleaned-up external spill with no water near the appliance's electrical parts can be considered for an external check. Do not operate the unit in standing water or after water reaches the outlet, plug, cord, controls, or cabinet interior. Keep it unplugged and arrange qualified service or electrical help for those conditions.
What if the hose and bucket look correct but the Hisense unit still leaks?
Leave the unit unplugged and do not reopen or live-test it. Water from the cabinet/base or a recurring leak can involve an internal drain, pump, float, cabinet path, or another model-specific component; provide the model and first wet point to qualified appliance service.
Read the exact guide
Official sources
- DH-50K1SFRE00-0 50 Pint Capacity 2 Speed Dehumidifier SupportHisense Canada · Applies specifically to the DH-50K1SFRE00-0 support record; used to reinforce model-specific documentation and not as proof of feature availability on another model.
- User-Care-Guide.pdfHisense USA · Official Hisense USA user-care guide; connector types, controls, and pump availability vary by model and must be checked against the exact manual.
- 50-Pint Capacity, 4500 Sq. Ft. Coverage, 3-Speed Dehumidifier DH5026K1W SupportHisense USA · Applies specifically to the DH5026K1W support record; used here to establish that model-specific documentation must be matched, not to assert that every Hisense model has the same hardware.
Community feedback
Share a repair observation
Share a plain-text repair observation. Accepted observations are published automatically; this page may take a moment to update.