
On this page
Start here
Quick answer
For a leaking Whirlpool dehumidifier, unplug it when water is near electrics, wait before removing a full bucket, and check that the bucket is seated, the drain plug is installed for bucket mode, and any continuous-drain adapter and hose are tight, low, unkinked, and below the outlet. Whirlpool's official manual says an uneven surface or improper hose setup can fill the bucket and cause spillover. Do not operate with a damaged cord or open electrical panels. Persistent leaking needs service.
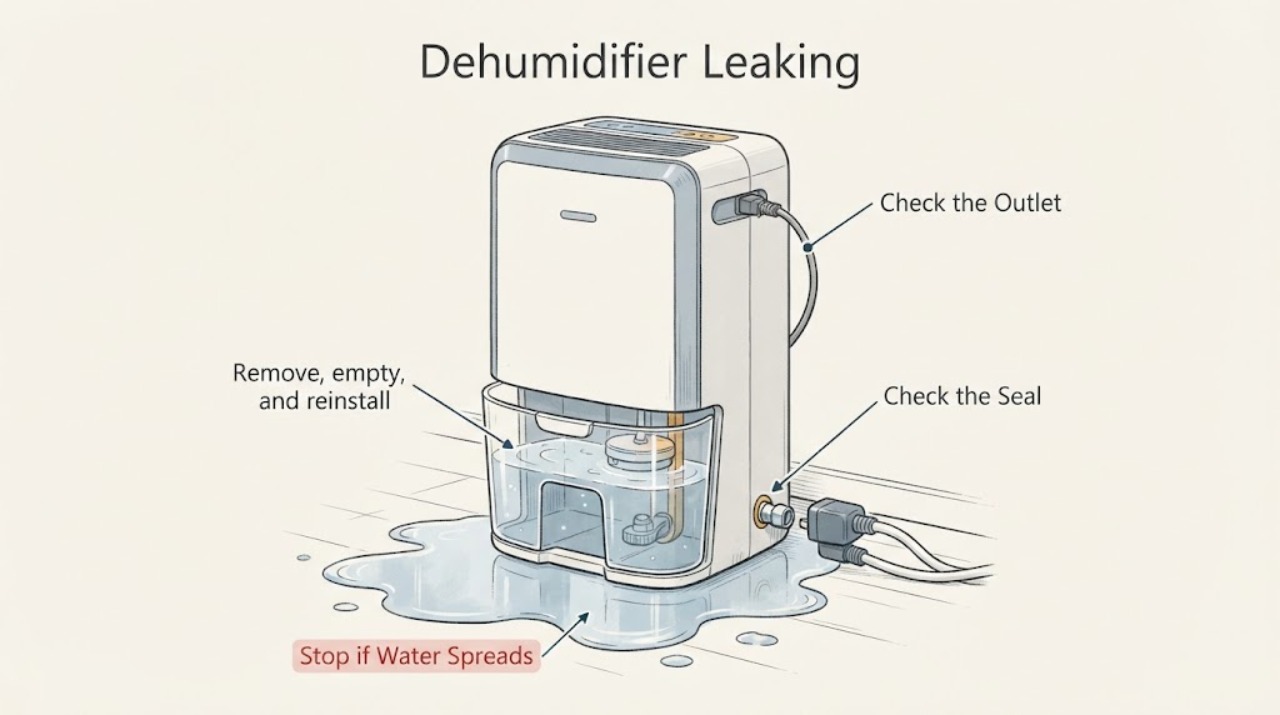
Work through in order
Diagnostic checks
Use only checks that match the exact appliance or system and its official guide.
-
Check 1
Turn the dehumidifier off and unplug it when water reaches the cord, outlet, or control area; wait three minutes before pulling the bucket.
Expected result: Water stops, continues from the bucket, or is near electrics.
Next step: Clean the area and do not restart until the source is identified.
Why this matters
Why: A full bucket can spill during removal and water near electrics is a safety boundary.
-
Check 2
Remove, empty, and reinstall the bucket only after the wait period, checking that it is fully seated and the float is not damaged.
Expected result: The bucket is full, misaligned, cracked, or correctly seated.
Next step: Correct only seating or emptying described by the manual and observe the next collection cycle.
Why this matters
Why: A full or poorly positioned bucket can cause the unit to stop or spill rather than drain normally.
-
Check 3
For bucket mode, verify the continuous-drain plug is installed and sealed; for hose mode, verify the plug is removed only as the manual directs.
Expected result: The wrong plug state or a damaged seal is present, or the configuration matches the mode.
Next step: Restore the exact manual-described configuration before restarting.
Why this matters
Why: A missing plug in bucket mode can let water leak, while a retained plug can block continuous drainage.
-
Check 4
Inspect the adapter and hose for tight connection, kinks, blockage, damage, upward routing, or an outlet above the drain port.
Expected result: The hose is restricted or high, or the route is low and clear.
Next step: Route the hose downward to a suitable drain and replace a damaged hose through model-specific parts support.
Why this matters
Why: Whirlpool says the hose should not exceed outlet height, must be below the appliance, and must not be bent; poor setup can spill water.
-
Check 5
Place the dehumidifier on a level, stable surface and check that the drain outlet is not blocked.
Expected result: The unit rocks or the outlet is blocked, or the surface and outlet are clear.
Next step: Correct the accessible placement or obstruction and monitor one cycle.
Why this matters
Why: An uneven unit or blocked outlet can make condensate fill the bucket and leak.
-
Check 6
Apply the stop boundary after one test: check for a cracked bucket, recurring leak, pump failure, abnormal noise, or water from the cabinet.
Expected result: The leak stops or returns.
Next step: Keep the unit unplugged and arrange qualified Whirlpool service.
Why this matters
Why: A recurring or internal leak needs float, pump, pan, seal, or control diagnosis.
Use your observations
Decision map
Find the observation that best matches what you see, then follow the next safe action.
-
PATH 01Next step
What you see
Water spills when a full bucket is removed or the bucket is not seated.
Do this next
Wait after shutdown, empty, inspect, and reseat the bucket; service a cracked or recurring leak.
Why this path and its safety boundary
Why it matters: Bucket handling or alignment is the leading cause.
-
PATH 02Next step
What you see
Water leaks from the rear drain adapter or hose in continuous-drain mode.
Do this next
Unplug, restore the manual-described adapter and low, clear hose route, then monitor one cycle.
Why this path and its safety boundary
Why it matters: Plug, seal, connection, routing, or blockage is likely.
-
PATH 03Next step
What you see
The unit is level and both bucket and hose configuration are correct, but the base still leaks.
Do this next
Keep it unplugged and obtain service.
Why this path and its safety boundary
Why it matters: An internal pan, float, pump, or seal fault is more likely.
-
PATH 04Next step
What you see
Water reaches the cord, outlet, or control panel.
Do this next
Disconnect power if safe and do not resume operation until qualified service inspects it.
Why this path and its safety boundary
Why it matters: The leak creates an electrical hazard.
Helpful context
Understand the symptom
Switch the unit off, protect the floor, and wait three minutes before removing a bucket after operation. Identify whether water is from the bucket edge, rear drain connection, hose, or the cabinet base.
Drain configuration is model-specific. Use Whirlpool's manual lookup and the exact manual before removing a plug, installing a hose, or servicing the float.
Only after diagnosis
Potential parts
- drain adapter, plug, or hose
Only if inspection confirms the model-specific seal, adapter, plug, or hose is damaged.
Match exact model and drain configuration.
When checks do not resolve it
Need a professional?
A technician may inspect the bucket, float, drain pan, adapter, hose, pump if fitted, seals, and controls. Provide model, mode, wet point, hose route, and timing.
Common questions
FAQ
Why does my Whirlpool dehumidifier leak when I remove the bucket?
Whirlpool says water can drip onto the base if the bucket is removed during operation or immediately after shutdown; wait three minutes, then remove it carefully.
Can a missing drain plug cause a Whirlpool dehumidifier leak?
Yes in bucket mode. The manual warns that losing the plug can let water leak; use the exact configuration for bucket or continuous-drain mode.
How should the continuous drain hose be routed?
Keep it tight, unblocked, below the drain outlet height, without bends, and with its end below the appliance as the manual shows.
Should I keep running a dehumidifier that leaks from its base?
No. Unplug it when the source is internal or water reaches electrics, and arrange service after documenting the wet point.
Read the exact guide
Official sources
- Use & Care GuideWhirlpool · General Whirlpool dehumidifier guidance; exact drain hardware varies by model.
- Whirlpool Manuals & LiteratureWhirlpool · Use to identify exact dehumidifier instructions and compatible service information.
Community feedback
Share a repair observation
Share a plain-text repair observation. Accepted observations are published automatically; this page may take a moment to update.