
On this page
Start here
Quick answer
First stop the water source and protect the electrical supply: stop using the refrigerator if water reaches the plug, outlet, wiring, or a damaged cord, and do not touch a wet connection. Record where the first water appears. Hisense's upright-refrigerator manual says droplets on the rear wall can be normal during automatic defrost, while dripping or leaking from the refrigerator can result from a blocked water-discharge opening or water passing the gutter; it permits a gentle clean with a plastic straw on applicable models. Check that the door closes and the gasket is clean and intact, and keep food from touching the rear wall. If the refrigerator has an ice maker or dispenser, close its water shutoff before inspecting a visible line or fitting; Hisense water-line manuals require power disconnection and a closed shutoff before connection work. Water from under or behind the cabinet, a damaged line, persistent leakage, or water near electrical parts is a service condition—do not move the refrigerator, open panels, puncture tubing, or use knives or heat to remove ice.
Before you begin
Safety first
- The owner may close an accessible water valve, observe from outside, inspect an accessible door seal, keep food clear of the rear wall, and clear an accessible defrost opening only when the exact manual permits and power is safely disconnected. Water lines, drain pans, valves, pumps, electrical parts, compressor, refrigerant tubing, and hidden leaks require qualified service.
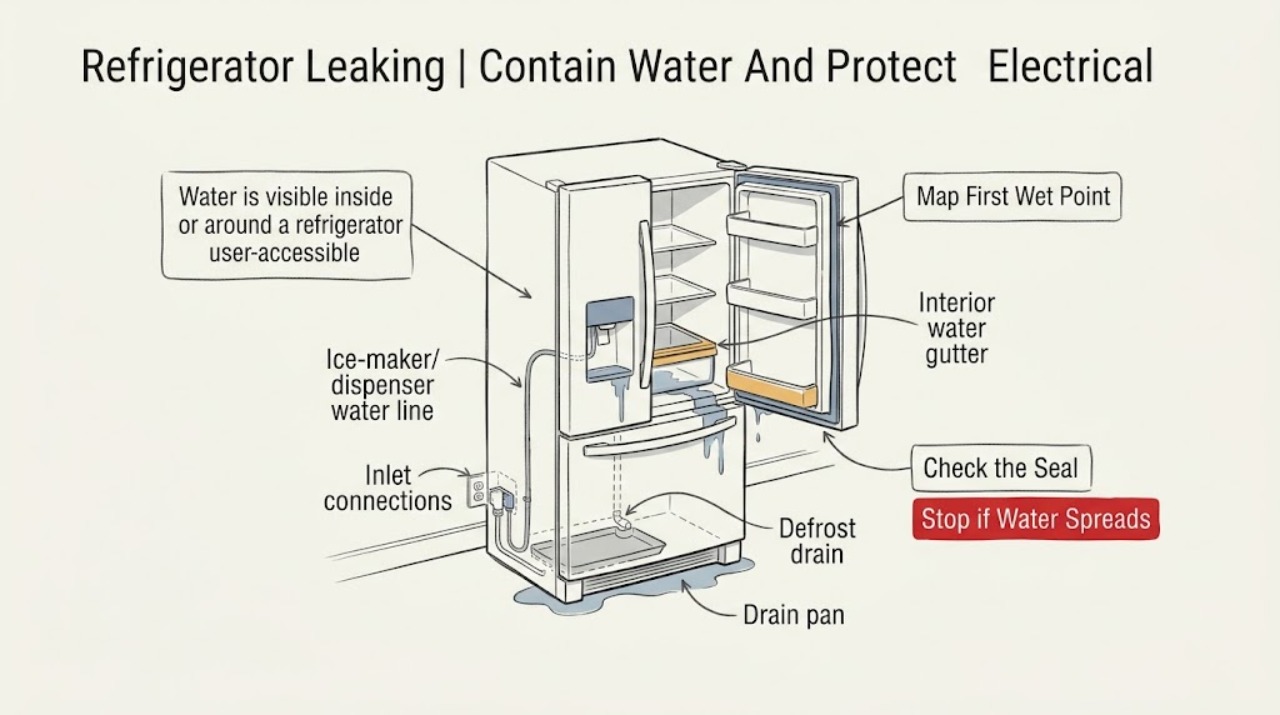
Work through in order
Diagnostic checks
Use only checks that match the exact appliance or system and its official guide.
-
Check 1
Stop dispensing ice or water and close the refrigerator's accessible water shutoff if the model has an ice maker or dispenser. Keep the floor dry and do not touch the plug, outlet, cord, or rear connections if they are wet. If there is smoke, burning odor, sparking, a hot cord, or repeated breaker tripping, isolate power only from a dry, safe point and stop using the appliance.
Expected result: Water stops when the supply valve is closed; water is only residual condensation; water continues; or water has reached electrical parts or a hazard is present.
Next step: For electrical or fire signs, keep the refrigerator isolated and arrange qualified service. Otherwise leave the water valve closed and use towels or a tray only outside the cabinet while recording the first wet point.
Stop if: Do not reach behind a wet refrigerator, repeatedly restore water to test it, or disconnect a wet plug or outlet.
Why this matters
Why: A continuing supply leak needs water isolation before any power disconnection or inspection. Water near electrics changes this from a routine drain check to an electrical and appliance safety issue. Residual condensation without a flow can proceed to location classification.
-
Check 2
With the appliance off and any water supply closed, record when water first appears: after door opening or defrost, while dispensing ice or water, during compressor operation, after a temperature change, or while the appliance is idle. Look from outside only for the first wet point: rear wall/gutter, interior floor, door edge, under-sink or rear water line, drain pan area, or beneath the cabinet.
Expected result: Water is on the rear wall or interior floor; it escapes at the door; it follows dispenser/ice-maker use; it is at a visible water-line connection; or it appears under/behind the cabinet or while idle.
Next step: Continue only with the matching accessible branch. If the first wet point cannot be seen without moving the refrigerator or removing a cover, keep the water closed and arrange service.
Stop if: Do not move the refrigerator sideways, remove a rear panel, or run another cycle solely to reproduce the leak.
Why this matters
Why: Rear-wall droplets can fit normal defrost, while interior-floor water suggests a blocked discharge opening or gutter. Door-edge water suggests seal or door alignment. A use-linked water-line leak is separate from defrost drainage. An underside, rear, or idle leak is more likely concealed plumbing, drain-pan, valve, or internal damage.
-
Check 3
Inspect the accessible door gasket for dirt, a tear, a fold, or a visible gap, and confirm no food container holds the door open. Inside the refrigerator, keep food away from the rear wall and note whether droplets are limited to the rear wall or collect on shelves and the bottom. Clean only accessible surfaces with the exact model's approved method; do not pull out or reshape the gasket.
Expected result: The door does not close squarely; the gasket is dirty or damaged; food touches the rear wall; droplets are limited to the rear wall; or water collects on the floor despite a normal door seal.
Next step: Remove only an accessible door obstruction, clean an intact seal, and keep packages clear of the rear wall. Arrange service for a damaged or persistent gap, recurring floor water, or a door that will not align.
Stop if: Do not glue, heat, stretch, or replace a gasket without exact model fitment, and do not scrape ice with a knife or use a heat gun.
Why this matters
Why: Door gaps and warm humid air can increase condensation and interfere with drainage patterns. Rear-wall droplets alone can be normal defrost. Floor water despite a sound door makes a blocked gutter, drain, ice buildup, or concealed leak more likely.
-
Check 4
If the exact Hisense manual identifies the interior water gutter or discharge opening as accessible, unplug the appliance from a dry, safe connection and gently clear only the opening with a non-sharp plastic straw or the tool specified by that manual. If thick ice is present, use the model's complete defrost procedure instead of scraping or heating it. Do not open the rear drain pan or compressor area.
Expected result: The opening was visibly blocked and water drains normally afterward; thick ice returns; the opening is not visible; or water still collects or leaks after the permitted check.
Next step: Refit any exact-manual parts, restore power only when dry, and monitor without restoring a water line unless applicable. Arrange service for a hidden or returning blockage, drain-pan leak, or continued water on the floor.
Stop if: Do not use knives, picks, metal wire, boiling water, heat guns, compressed air, or chemicals in the drain, and do not touch the compressor or refrigerant tubing.
Why this matters
Why: A blocked discharge opening can explain interior-bottom water on applicable Hisense models. A hidden opening, recurring ice, or continued leakage is not safely resolved by enlarging the hole or accessing the sealed area.
-
Check 5
For a refrigerator with an ice maker or dispenser, inspect only visible water-line fittings and tubing after the shutoff valve is closed and power is safely isolated. Look for a kink, split, displaced fitting, or water track; do not loosen a compression connection or pull the refrigerator out. If there is no water connection, skip this branch.
Expected result: A visible line or fitting is wet or damaged; the line appears normal; the leak comes from under or behind the cabinet; or the water returns after the valve is reopened.
Next step: Keep the water supply closed and arrange qualified appliance/plumbing service for any damaged or hidden water-line leak. Provide the exact model and leak timing; do not restore the supply for another test without professional direction.
Stop if: Do not disconnect pressurized tubing, move the refrigerator, open panels, puncture refrigerant tubing, or work near wet electrical parts.
Why this matters
Why: A visible water-line defect is a plumbing repair condition. A normal visible line with an underside, rear, or returning leak points toward a concealed valve, reservoir, drain pan, tubing, or internal connection. Water that returns when supplied confirms the need to keep the valve closed.
Use your observations
Decision map
Find the observation that best matches what you see, then follow the next safe action.
-
PATH 01Safety boundary
What you see
Small droplets are limited to the refrigerator compartment's rear wall and do not collect on the floor, shelves, or outside the cabinet.
Do this next
Keep food from touching the rear wall, close the door promptly, and monitor. Escalate if the droplets become a puddle, the drain overflows, or water reaches the floor.
Why this path and its safety boundary
Why it matters: Hisense's opened upright manual describes rear-wall droplets as a normal result of automatic defrost, with water routed to a tray above the compressor for evaporation.
Safety stop: Do not scrape the rear wall, insert a sharp tool into the drain, or open the rear cabinet.
-
PATH 02Safety boundary
What you see
Water collects at the interior bottom or flows onto a shelf, while the door closes and the exact manual identifies an accessible water-discharge opening or gutter.
Do this next
With power disconnected safely, perform only the exact manual's gentle, non-sharp opening check; arrange service if the opening is hidden, ice returns, or water continues.
Why this path and its safety boundary
Why it matters: A blocked discharge opening or water passing the gutter is more likely than a supply-line leak.
Safety stop: Do not use knives, metal picks, heat, or chemicals to enlarge or thaw the drain.
-
PATH 03Safety boundary
What you see
Water or condensation follows a door that does not close fully, a dirty/damaged gasket, frequent opening, or food contacting the rear wall.
Do this next
Remove an accessible obstruction, clean an intact gasket as directed, and keep the rear wall clear. Arrange service for a torn gasket, persistent gap, or continuing floor leak.
Why this path and its safety boundary
Why it matters: Warm humid air entering through the door or restricted interior space is more likely than a hidden supply leak.
Safety stop: Do not heat, glue, stretch, or remove the gasket.
-
PATH 04Safety boundary
What you see
Water appears after dispensing or ice-maker operation, or a visible water-line fitting or tube is wet, kinked, split, or displaced.
Do this next
Keep the water shutoff closed and arrange qualified appliance/plumbing service. Do not loosen the fitting or pull out the refrigerator to reach a rear connection.
Why this path and its safety boundary
Why it matters: The water-supply path is more likely than automatic-defrost drainage. Hisense's water-line manual requires a closed shutoff and qualified plumbing connection work.
Safety stop: Do not restore pressure to a damaged line or work near wet electrical connections.
-
PATH 05Safety boundary
What you see
Water appears beneath or behind the refrigerator, while idle, from a hidden drain pan or tube, or continues after the accessible door and drain checks.
Do this next
Keep the water line closed if present, isolate power safely if needed, protect the floor, and arrange qualified Hisense appliance service.
Why this path and its safety boundary
Why it matters: A concealed drain, pan, valve, reservoir, tubing, or internal fault remains possible; external observation cannot identify the component safely.
Safety stop: Do not move the refrigerator, remove the rear cover, touch the compressor or refrigerant tubing, or keep operating it over standing water.
Helpful context
Understand the symptom
Not every water drop is a leak
Hisense's opened upright manual says rear-wall droplets can be part of automatic defrost: water flows through the rear opening to a tray above the compressor and evaporates. A puddle at the interior bottom, water over a shelf, or water on the floor is a different observation. Treat the first wet point and timing as more useful than the amount of water alone.
Keep door, drain, and water-line branches separate
A door that does not seal can admit warm, humid air and contribute to condensation; a blocked interior discharge opening can overflow into the cabinet; and a dispenser or ice-maker line can leak independently of defrost water. A full-size model without a water connection cannot have a supply-line leak, while a model with a rear line must be treated as a pressurized plumbing appliance. Use the exact manual for the layout.
External checks stop at the cabinet boundary
You may observe the door seal, accessible gutter or drain opening, floor, and visible water-line connections after safely closing the water supply. Do not move a heavy refrigerator, remove a rear cover, touch the compressor or refrigerant tubing, or work around wet electrical parts. A leak that cannot be localized without those steps needs qualified service.
Safety boundary
Stop conditions
- Close the water shutoff and stop immediately for water near electrical parts, smoke, burning odor, sparking, a hot or damaged plug or cord, or repeated breaker trips.
- Do not touch wet electrical connections, move a heavy refrigerator, remove rear or base panels, disconnect pressurized tubing, or run another cycle to reproduce a leak.
- Do not use knives, picks, metal wire, boiling water, heat guns, or chemicals to clear ice or a defrost drain; do not puncture refrigerant tubing.
- If water is hidden, persistent, returns when the supply is opened, or continues after the exact manual's accessible check, keep the appliance isolated and arrange qualified appliance/plumbing service.
Only after diagnosis
Potential parts
- door gasket or drain-gutter component
Consider only when the exact model and qualified diagnosis confirm a damaged gasket or blocked/damaged accessible gutter after external checks.
Gaskets, gutters, drain openings, and clips are model-specific. Do not glue, stretch, puncture, or replace one from a puddle alone. - water inlet tube, fitting, valve, drain pan, or internal tubing
Consider only when the refrigerator has the relevant water feature and qualified diagnosis identifies a leaking or damaged component at the observed stage.
Water-path and concealed components require exact model fitment, water shutoff, and safe service access. Do not disconnect a pressurized line or open the cabinet as a first check.
When checks do not resolve it
Need a professional?
Arrange qualified Hisense appliance or plumbing service for water beneath or behind the refrigerator, a damaged or leaking ice-maker/dispenser line, a torn or persistently leaking door seal, a hidden drain-pan or tubing leak, recurring interior-floor water, or a blocked/iced drain that is not accessible in the exact manual. Use a qualified electrician as well for a wet, hot, damaged, sparking, or repeatedly tripping electrical supply. Provide the exact model, first wet point, timing, water-line status, door/gasket condition, drain observations, and photos taken without moving the appliance.
Safety scope: The owner may close an accessible water valve, observe from outside, inspect an accessible door seal, keep food clear of the rear wall, and clear an accessible defrost opening only when the exact manual permits and power is safely disconnected. Water lines, drain pans, valves, pumps, electrical parts, compressor, refrigerant tubing, and hidden leaks require qualified service.
Common questions
FAQ
Why is water dripping from the back wall of my Hisense refrigerator?
Small droplets limited to the rear wall can be normal automatic-defrost water. Hisense's opened upright manual says water dripping or leaking from the refrigerator, especially with interior-floor collection, can instead indicate a blocked discharge opening or water passing the gutter. Escalate if it becomes a puddle or reaches the floor.
Can I unclog a Hisense refrigerator defrost drain myself?
Only if the exact model manual identifies the opening as accessible. An opened Hisense upright manual suggests a gentle clean with a plastic straw and says to use its defrost procedure for thick ice. Keep power safely disconnected and never use a knife, metal pick, heat gun, or boiling water; a hidden or returning blockage needs service.
What if my Hisense refrigerator leaks from the ice-maker or dispenser line?
Close the water shutoff and do not pull the refrigerator out or loosen a pressurized fitting. Hisense's water-line manual requires a closed shutoff and power disconnection for connection work; a wet, split, or returning line leak should go to qualified appliance or plumbing service.
Can a bad Hisense refrigerator door gasket cause water inside?
A dirty, damaged, or poorly closing gasket can admit warm humid air and increase condensation. Inspect its visible contact and remove door obstructions, but do not heat, glue, stretch, or replace it without exact model fitment. Persistent water on the floor or beneath the cabinet needs service.
Read the exact guide
Official sources
- Hisense SupportHisense · Supports retrieving the exact refrigerator manual before applying a drain, door, water-line, or defrost procedure.
- Hisense HQD20 Refrigerator User ManualHisense-USA · Applies to the HQD20 model family and supports water-line safety and connection reasoning only for refrigerators equipped with a water line.
- Hisense Detailed Instructions for Use of Upright RefrigeratorHisense · Directly supports the named upright-refrigerator manual; its drain opening, gutter, and defrost details are kept conditional because no model was assigned.
Community feedback
Share a repair observation
Share a plain-text repair observation. Accepted observations are published automatically; this page may take a moment to update.