
On this page
Start here
Quick answer
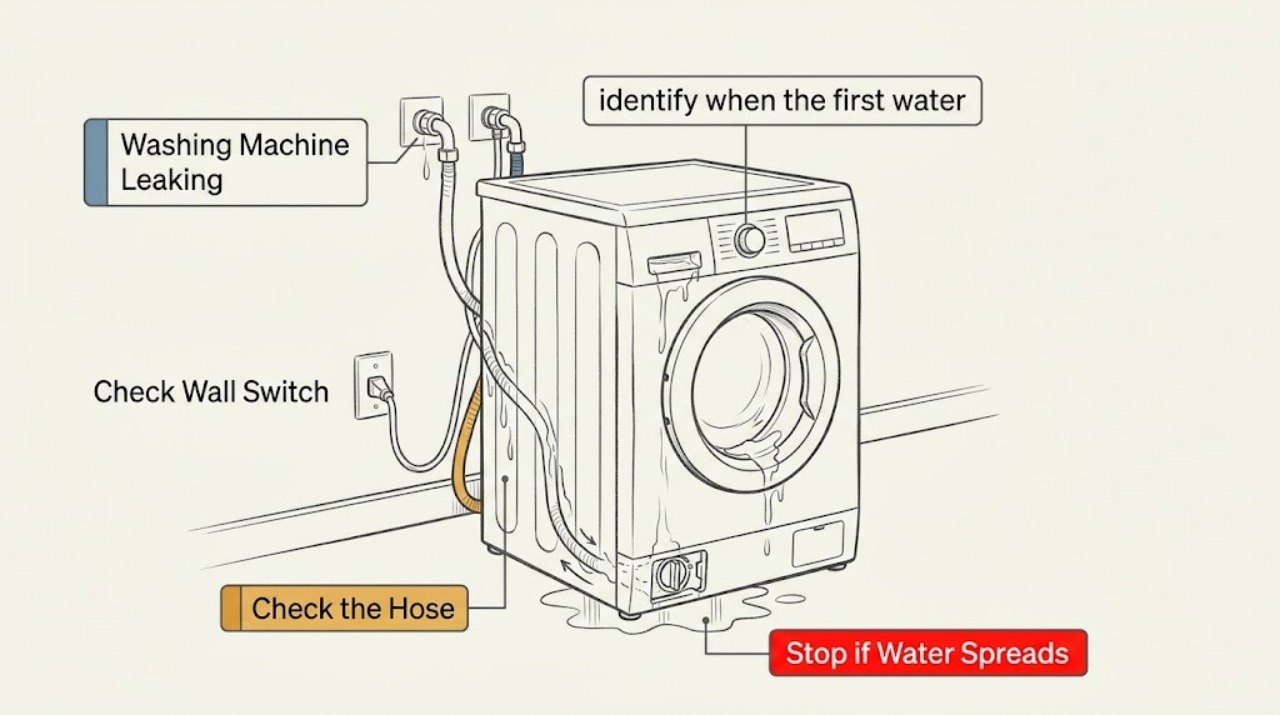
Stop a leaking Hisense washing machine immediately. From a dry position, stop the cycle or switch the appliance off, then close the household water tap; do not unplug while standing in water or touch a wet outlet, cord or control. Note whether the first leak appears during filling, washing, rinsing or draining and whether it comes from the rear hose connections, door, dispenser, filter area, underside or household drain. Hisense guidance points to hose connections, the filter, door gasket, trapped clothing, overloading, excess detergent and a blocked household drain as useful checks. A damaged cord, water near electrical parts, flooding, smoke, burning smell or a leak that persists after safe external checks requires the appliance to remain off and qualified service.
Work through in order
Diagnostic checks
Use only checks that match the exact appliance or system and its official guide.
-
Check 1
Stop the cycle or switch the Hisense washing machine off from a dry position, close the household water tap, and keep away from water near an outlet, cord or control; do not unplug while standing in water.
Expected result: The flow stops, slows, or continues after the appliance is off and the tap is closed.
Next step: If water is near electrical parts, there is flooding, smoke, burning smell or a damaged cord, leave the appliance off and arrange qualified help. Otherwise record the cycle phase and first wet location.
Why this matters
Why: Stopping incoming water limits flooding. Continued water can be retained in the drum or indicate a plumbing problem, but water near electrical parts changes the task to a safety stop.
-
Check 2
With the machine off and the floor safe, identify when the first water appears: filling, washing or rinsing, draining, or after the cycle, and inspect only visible front, rear and side areas without moving the appliance.
Expected result: The leak is tied to filling, tumbling or rinsing, pump-out, or an unknown time and location.
Next step: Follow the matching phase check below. If the source cannot be seen safely or appears underneath the cabinet, stop and call service.
Why this matters
Why: Timing narrows the path to inlet and dispenser, door and wash sealing, drain and filter, or an internal fault.
-
Check 3
For a leak during filling, visually inspect the water inlet hose, connection washers, household tap and rear of the appliance for a kink, crack, wet thread or loose connection; do not loosen a pressurized connection.
Expected result: Wetness begins at a hose end, along the hose, at the household tap, or away from the inlet path.
Next step: Keep the tap closed and follow the exact Hisense manual for a safe hose or washer replacement. Use a plumber for a leaking household tap; arrange appliance service for a leak at the machine body.
Why this matters
Why: A damaged hose or connection can leak as water pressure arrives. A dry inlet path shifts attention to the dispenser, door or internal water circuit.
-
Check 4
For a front leak during washing or rinsing, inspect the door glass and accessible rubber gasket with the machine off for trapped clothing, lint, residue, ice or a tear; check that the door closes normally without force.
Expected result: A garment or residue crosses the seal, the gasket is damaged, the door is overloaded or misaligned, or the seal appears intact.
Next step: Remove only loose, accessible material and reduce the load according to the manual. Do not force or use the appliance with a torn gasket; arrange service.
Why this matters
Why: Hisense identifies the door rubber, trapped clothing, overloading and excess detergent as possible front-leak causes. A torn gasket or damaged door is not a user adjustment.
-
Check 5
Inspect the detergent drawer and its surrounding area for residue, overflow marks, an open drawer or excessive foam; use only the detergent type and amount specified by the model manual.
Expected result: The drawer is blocked or open, residue is present, heavy suds are escaping, or the dispenser area is dry and clear.
Next step: Clean only as the manual permits and stop if foam or water continues to escape. Do not mix cleaning chemicals or keep testing an overflowing drawer.
Why this matters
Why: Buildup or too much detergent can divert water or create foam that escapes from the front. A clear drawer with a repeat leak points to another path.
-
Check 6
For a leak during draining, inspect the visible drain hose and its household standpipe or drain connection for a split, kink, loose end or backup; do not push the hose farther into the drain than the installation instructions allow.
Expected result: The hose is displaced or damaged, the household drain backs up, or the outlet accepts water without overflow.
Next step: Keep the washer off. Arrange a plumber for a household blockage or leaking plumbing; arrange appliance service for a damaged hose or leak at the machine.
Why this matters
Why: A loose or damaged hose can discharge onto the floor, while a blocked household drain can send water back toward the washer.
-
Check 7
If the leak is at the lower filter or pump area, use the exact Hisense manual to decide whether the accessible filter can be checked with power off, water contained and the floor dry; do not open it with a full drum or standing water.
Expected result: The filter is visibly loose or obstructed, or the area is inaccessible, pressurized, wet or leaking from inside the cabinet.
Next step: Stop and arrange service when the manual does not clearly authorize the check, when water cannot be contained, or when the leak continues after a correct accessible reseating.
Why this matters
Why: Hisense leak guidance includes a filter that is not seated correctly as a possible bottom-leak cause, but opening a wet or full pump area can release water and expose electrical parts.
-
Check 8
After a visible low-risk issue is corrected, the appliance is dry and no hazard remains, run a short supervised rinse or empty test; do not run a test when the source is internal, flooding, electrical or associated with a damaged cord.
Expected result: No water appears, the same location leaks again, or a new location becomes wet.
Next step: Stop immediately for any returning leak and record the phase, location, model and symptoms for Hisense service. Do not tip the machine, remove panels or repeat cycles indefinitely.
Why this matters
Why: A controlled washer-side test can verify a hose, seal, dispenser, drain or filter correction. A repeat or new leak means the underlying fault is unresolved.
Use your observations
Decision map
Find the observation that best matches what you see, then follow the next safe action.
-
PATH 01Safety boundary
What you see
Water is actively flowing, flooding the floor or near electrical parts.
Do this next
Stop the cycle or power from a dry position, close the household water tap, keep clear and arrange qualified help; do not unplug while standing in water.
Why this path and its safety boundary
Safety stop: Record the phase and first wet location.
-
PATH 02Safety boundary
What you see
The leak begins while the drum fills.
Do this next
Inspect visible inlet hoses, washers, tap connections and the dispenser area; stop for a cracked hose or machine-body leak.
Why this path and its safety boundary
Safety stop: Follow the wash, drain or unknown-source branch.
-
PATH 03Safety boundary
What you see
The leak begins at the front during washing or rinsing.
Do this next
Check the door glass, gasket, trapped clothing, load size, drawer and suds without forcing the door.
Why this path and its safety boundary
Safety stop: Continue to the drain and underside checks.
-
PATH 04Safety boundary
What you see
The leak begins when the pump-out or drain phase starts.
Do this next
Inspect the visible drain hose and household drain for displacement, damage or backup; use a plumber for household plumbing.
Why this path and its safety boundary
Safety stop: Continue to the filter or internal-source branch.
-
PATH 05Safety boundary
What you see
The inlet or drain hose is visibly split, kinked or loose.
Do this next
Keep the water tap closed and follow the model manual or qualified service path; do not use the machine until secure.
Why this path and its safety boundary
Safety stop: Continue to door, dispenser, filter and load checks.
-
PATH 06Safety boundary
What you see
The door gasket or dispenser has visible residue, trapped clothing, damage or heavy foam.
Do this next
Remove only accessible material, clean as documented and correct the load or detergent; service any tear or persistent overflow.
Why this path and its safety boundary
Safety stop: Continue to drain, filter and underside checks.
-
PATH 07Safety boundary
What you see
The lower filter or pump area is wet, loose, full of water or not clearly user-accessible.
Do this next
Do not open or dismantle it; leave the appliance off and arrange service.
Why this path and its safety boundary
Safety stop: Follow the exact manual for one safe accessible filter check.
-
PATH 08Safety boundary
What you see
A short supervised test leaks again or the source is underneath or internal.
Do this next
Stop all testing, record the phase and location, and arrange qualified Hisense service.
Why this path and its safety boundary
Safety stop: Resume use only when the appliance remains dry and no warning or damage is present.
Helpful context
Understand the symptom
Make the area safe before diagnosis
Do not keep running the cycle to watch the leak. Stop the machine from a dry position and close the household water tap. If water is near an outlet, cord or control, keep away rather than reaching for the plug; use qualified help. Hisense warns against operating a damaged appliance, using wet hands around the plug, spraying the appliance with water, or attempting panel removal.
Use timing and location as evidence
A leak that begins as the drum fills usually points to an inlet connection, detergent drawer or water path. A front leak during tumbling or rinsing points toward the door gasket, trapped clothing, overloading or suds. A leak that begins during pump-out points toward the drain hose, filter area or household drain. Water from underneath or from an unknown internal location should not be diagnosed by tipping the machine.
Retest only after a low-risk correction
After a visible hose, gasket, drawer or load issue is corrected, the floor is dry and there is no electrical or flooding risk, a short supervised rinse test can confirm whether the washer remains dry. Stop as soon as water returns. Do not use chemicals in the drain, remove covers, or continue testing a machine with a damaged cord or internal leak.
Only after diagnosis
Potential parts
- water inlet hose or connection washer
Only consider this class when water is visibly escaping from a damaged hose or connection after the household tap is closed safely.
Confirm the complete Hisense model and the manual's connection requirements before ordering or fitting a replacement. - door gasket
Only consider this class when a torn, distorted or persistently leaking door gasket is identified after accessible debris and load issues are ruled out.
Confirm model-specific fitment and use qualified service if the door or seal requires more than a simple documented maintenance step. - drain hose or pump-filter component
Only consider this class when a qualified diagnosis confirms a damaged drain path or filter component after safe external checks.
Confirm the model and safe service procedure; do not open a wet pump area or use a damaged hose.
When checks do not resolve it
Need a professional?
Arrange qualified Hisense service when the leak continues after the documented external checks, comes from underneath or inside the cabinet, involves a damaged gasket, hose, pump or filter area that cannot be safely resolved, or requires moving, tipping, opening panels or working near electrical parts. Call a plumber for a leaking household tap or blocked drain. Stop immediately for flooding, water near an outlet, cord or control, smoke, burning smell, abnormal heat, a repeated protective-device trip or any damaged appliance. Do not run another cycle to locate a dangerous leak.
Common questions
FAQ
What should I do first if my Hisense washing machine is leaking?
Stop the cycle from a dry position and close the household water tap. Do not unplug while standing in water or touch a wet outlet, cord or control.
How do I locate the source of a Hisense washer leak?
Note whether it begins during filling, washing, rinsing or draining, then inspect visible front, rear and side areas without moving the appliance.
Why is water leaking from the front door?
Check the accessible gasket and glass for trapped clothing, residue, damage or a door that cannot close normally. Also check load size and excess foam.
Can too much detergent make a Hisense washer leak?
Yes. Hisense identifies excessive detergent and over-foaming as possible contributors. Follow the exact manual and stop if foam or water continues to escape.
What if water leaks from the back?
Check the visible inlet and drain hose connections, washers, kinks, cracks and household drain backup after the tap is closed. Use a plumber for a leaking household connection.
Can I clean the Hisense pump filter when the washer is leaking?
Only if the exact manual clearly permits the accessible check with power off, water contained and the floor dry. Do not open a full or wet pump area; arrange service instead.
When should I stop using the Hisense washer and call service?
Stop for flooding, water near electrical parts, smoke, burning smell, a damaged cord or appliance, a repeat leak, or any need to tip the machine, remove panels or work on internal parts.
Read the exact guide
Official sources
- (2465422)X08064122-A-使用说明书-WFQE7514-NVW001-000-澳洲-英语Hisense · Hisense washing-machine water, electrical, damage and repair safety instructions plus model-specific maintenance
- De wasmachine lekt water, wat moet ik doen?Hisense · Hisense washing-machine leak location, water shutoff, door, hose, filter, detergent and household-drain checks
- Support LaundryHisense UK · Hisense laundry model identification, manuals, maintenance and support
Community feedback
Share a repair observation
Share a plain-text repair observation. Accepted observations are published automatically; this page may take a moment to update.