
On this page
Start here
Quick answer
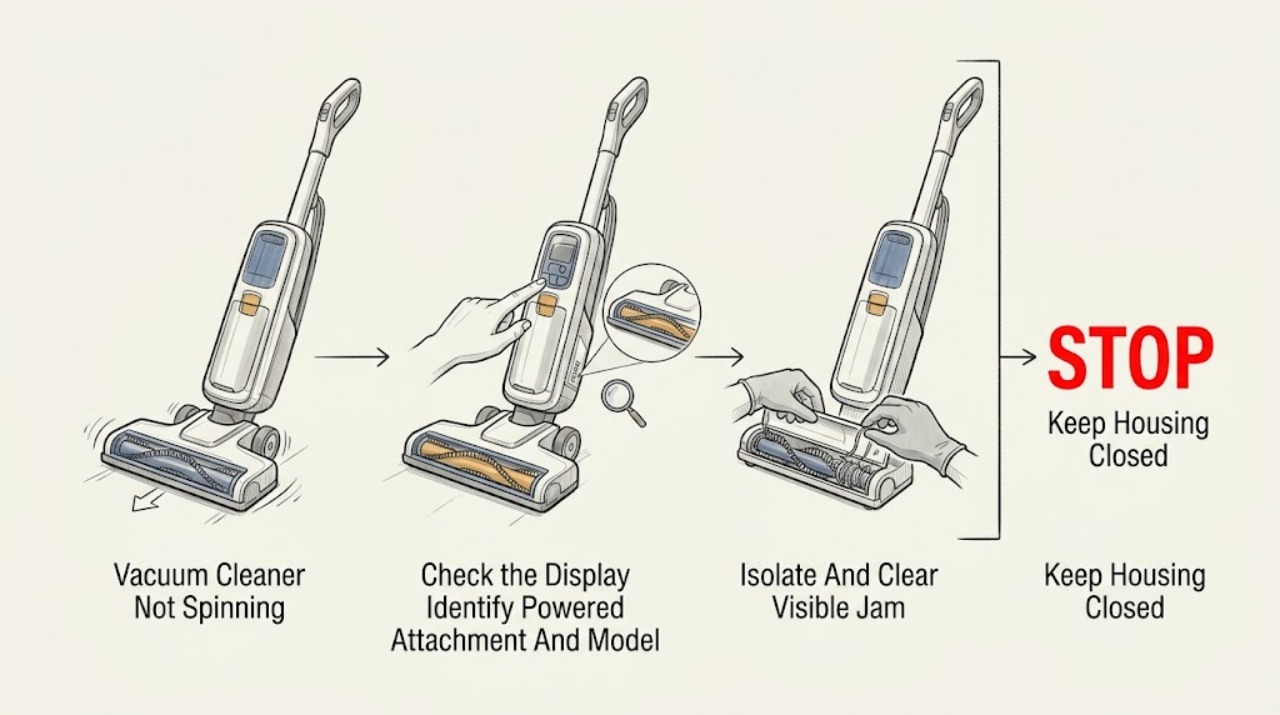
First confirm that the Hoover model and attachment actually contain a powered brush roll or rotating tool: a plain crevice, dusting, upholstery, or suction-only nozzle will not spin. Record the model/product code because Hoover's brush switch, floor selector, belt, brush release, and powered-head contacts vary by model. If the vacuum has power but suction works and the brush is still, check the model's brush-on control or carpet setting; some Hoover controls deliberately leave the brushes off in a floor setting. Switch off and disconnect mains power, or follow the exact cordless manual's power-isolation procedure, before looking at the brush. Remove only visible hair, thread, and debris from an accessible removable roll or powered head, and refit its lock, cover, tube, bin, filter, and contacts exactly as the manual shows. A Hoover safety cutout may stop a jammed or overheated brush, but do not bypass it or repeatedly run a blocked cleaner. A broken belt, failed head drive, worn brush, connector, motor, control, or internal fault is model-specific: do not assume every Hoover uses a belt or open the housing. Stop for burning smell, smoke, sparks, hot or damaged cord/plug, a swollen or hot battery, exposed wiring, or a brush that remains locked, and arrange qualified Hoover service.
Before you begin
Safety first
- The owner may identify the model and attachment, select a documented brush mode, isolate power, remove visible debris from a model-documented accessible roll, check visible seating and air paths, and follow a documented cooldown. Qualified personnel must handle housing removal, belts unless the exact manual explicitly and safely authorizes the procedure, motors, controls, electrical testing, wiring, battery packs, and damaged power connections.
Work through in order
Diagnostic checks
Use only checks that match the exact appliance or system and its official guide.
-
Check 1
Read the Hoover model or product code from the information plate and identify the attachment that is expected to rotate: an upright foot brush roll, a powered cordless floor head, a mini turbo, or another model-documented rotating tool. Separate it from a plain crevice, dusting, upholstery, or suction-only nozzle.
Expected result: A powered brush or rotating tool is clearly shown in the model manual; only a suction-only nozzle is fitted; the attachment is model-dependent; or the model/product code cannot be read.
Next step: Use the exact Hoover manual or support page for the recorded product code. If the fitted tool is suction-only, use it as designed; if a powered head is confirmed, continue with the matching branch.
Stop if: Do not plug in an unknown attachment, substitute a different head, or open the cleaner to discover whether a hidden brush motor exists.
Why this matters
Why: A missing powered component means there is no spinning fault to repair. If the model and attachment are uncertain, the expected controls and drive cannot be inferred safely from the Hoover name alone.
-
Check 2
With the cleaner assembled normally, determine whether the whole vacuum has power and suction. From outside the machine, check the exact model's brush-bar button, slider, carpet/floor selector, or documented head mode. Do not keep the brush near loose fabric, hair, fingers, or pets while observing.
Expected result: The cleaner is completely dead; suction works but the brush is off; the model's brush control is off or in a floor/suction-only setting; or the correct control is selected but the brush remains still.
Next step: For a dead unit, follow the model's power/charging guidance. For suction with a disabled brush, select the documented brush or carpet mode. For a correct mode with no rotation, switch off and isolate power before inspecting the head.
Stop if: Do not bypass a brush switch, defeat an attachment interlock, operate an exposed rotating part, or perform live electrical tests.
Why this matters
Why: A dead cleaner points first to supply, charging, battery, or whole-unit control. Suction with a disabled brush can be normal for some Hoover settings. A correctly selected brush mode shifts the investigation to the brush, head, or drive.
-
Check 3
Switch off and disconnect mains power before examining a corded cleaner. For a cordless model, follow its exact manual to stop the machine and isolate the removable head or battery/charger safely. Use only the documented release to remove an accessible brush roll or open a mini turbo, then remove visible hair, thread, fringe, and debris from the roll, ends, housing, and visible airway.
Expected result: The roll is wrapped with debris; the roll is free after cleaning; the roll is cracked, bristles are worn, an end is seized; or safe access is not provided by the manual.
Next step: Refit an intact roll exactly as the manual shows, keeping locks and covers fully secured. If it remains damaged, seized, or inaccessible, keep the cleaner off and arrange model-specific service.
Stop if: Do not cut toward the bristles or wiring, pull on hidden cables, reach into an unisolated head, force a seized roll, or use a sharp tool to pry the housing.
Why this matters
Why: A visible wrap or obstruction is a plausible reversible cause and may have activated a brush safety stop. A damaged or seized roll, or a head that cannot be safely opened as documented, is a component/service issue rather than a generic cleaning task.
-
Check 4
With power isolated, check only the model-documented attachment points: brush cover or lock, tube/nozzle seating, visible electrical contacts on a cordless powered head, dust bin, filter, and accessible hose or nozzle blockage. Reassemble each part fully and dry, clean filters only as the exact manual permits, and do not remove panels.
Expected result: The head or cover is not latched; contacts or mating surfaces are visibly dirty; the bin/filter or visible airway is blocked; all parts are correctly seated; or checking would require opening the housing.
Next step: Correct only the visible, manual-documented condition, then keep the cleaner disconnected until all washable parts are completely dry. If the head still does not spin or access requires disassembly, move to the service branch.
Stop if: Do not bridge contacts, scrape terminals aggressively, run with a missing filter or open cover, spray liquid into the head, or test continuity or voltage.
Why this matters
Why: An unseated head, cover, dirty contact, or blocked air path can prevent a powered tool from operating or can cause a protective stop on some designs. A correctly seated, clear assembly makes a hidden drive or control fault more likely.
-
Check 5
If the vacuum stopped during use, record whether a red indicator, sudden cutout, hot body, blocked filter/airway, or jam was present. Leave the isolated machine to cool only for the period and under the conditions stated in the exact manual; do not repeatedly restart it to test the protection.
Expected result: A jam or obstruction preceded the stop; a manual documents a thermal cutout and cooldown; the cleaner restarts after maintenance; or it cuts out again, becomes hot, smells abnormal, or never recovers.
Next step: After a fully cleared and correctly reassembled head, follow the exact manual once. If the symptom returns or any hazard sign appears, stop using the cleaner and arrange qualified service.
Stop if: Do not bypass or short a thermal protector, charge a hot or swollen battery, restore power after smoke/arcing, or use a timer as a substitute for diagnosis.
Why this matters
Why: Some Hoover manuals describe thermal protection and a model-specific cooldown, while Freedom guidance ties a red light and stop to a jammed brush. Repeated cutout or abnormal heat is not a normal reset condition and may indicate a continuing obstruction, airflow, battery, motor, or control fault.
-
Check 6
After the model, powered attachment, control setting, visible brush condition, seating, filter/airway, and documented cooldown have been checked, classify the remaining symptom as suction-only with a stationary brush, intermittent rotation, a locked or damaged brush, or a completely dead cleaner. Keep the cleaner isolated while arranging service.
Expected result: The brush works after clearing or correcting a setting; it remains stationary with suction; it stops intermittently; the roll or head is damaged/seized; or the cleaner has smoke, odor, sparks, hot power hardware, or battery damage.
Next step: Use the cleaner only when the brush operates normally and there is no hazard. Otherwise provide the technician the model/product code, attachment, symptom timing, indicator state, and safe observations; arrange Hoover-qualified appliance or electrical service as appropriate.
Stop if: Stop immediately for smoke, sparks, burning/electrical odor, a hot or damaged plug/cord, exposed wiring, a swollen or hot battery, melted plastic, or any need to open the housing or perform live testing.
Why this matters
Why: A resolved visible condition supports a setting, obstruction, seating, or model-documented protection explanation. Persistence points to a model-specific belt, brush assembly, head contact, motor, control, battery, or wiring fault; hazardous signs make continued use unsafe.
Use your observations
Decision map
Find the observation that best matches what you see, then follow the next safe action.
-
PATH 01Safety boundary
What you see
The fitted tool is a crevice, dusting, upholstery, or other suction-only accessory, or the exact model documentation does not identify a powered brush in that tool.
Do this next
Use the tool for suction as intended, or identify and fit only the exact model's documented powered head. Do not infer compatibility from a similar-looking Hoover accessory.
Why this path and its safety boundary
Why it matters: There is no supported expectation that this attachment should rotate. The not-spinning symptom belongs to a different powered head or brush-bearing configuration.
Safety stop: Do not modify an accessory or install an unverified head to create a rotating function.
-
PATH 02Safety boundary
What you see
The cleaner has suction, the roll is physically present, and the model's brush button, slider, or carpet/floor selector is off or in the documented suction-only/floor setting.
Do this next
Select the exact model's documented brush or carpet mode and observe only from a safe distance. If the control is correct and the brush remains still, isolate power and inspect the accessible head.
Why this path and its safety boundary
Why it matters: A control state is more likely than a failed brush drive. Hoover documents that some products run suction without brushes and that a carpet setting can enable the roll.
Safety stop: Do not force a switch, defeat an interlock, or hold a brush-on control while the head is open.
-
PATH 03Safety boundary
What you see
Hair, thread, fringe, or debris is wrapped around the brush; the roll is locked; or a covered cordless model stopped with a red jam indicator.
Do this next
Disconnect power, clean the model-documented removable brush/head, refit all locks, and follow the exact manual's single recovery/cooldown instruction. Escalate a seized or damaged roll.
Why this path and its safety boundary
Why it matters: A brush obstruction is more likely, and Hoover documents automatic stopping for a jam on covered Freedom models. The indicator behavior is not universal across all Hoover products.
Safety stop: Do not run the head while blocked, bypass the cutout, force the roll, or cut into hidden wiring.
-
PATH 04Safety boundary
What you see
The powered head, brush cover, tube, bin, filter, or visible airway is not seated or is blocked, and no electrical hazard is present.
Do this next
With power isolated, correct only the model-documented visible condition; then retest only when every part is dry and secured. Persistent failure needs model-specific diagnosis.
Why this path and its safety boundary
Why it matters: A visible assembly or airflow condition can prevent the brush system from starting or can provoke protection on some designs. Correct seating and a clear, dry filter make that explanation less likely.
Safety stop: Do not bridge contacts, run without a filter or cover, spray the head, or remove panels.
-
PATH 05Safety boundary
What you see
The brush remains stationary after the correct control, clean accessible roll, secure head, clear visible airway, and documented cooldown, or the cleaner shows smoke, sparks, burning odor, hot power hardware, exposed wiring, or battery damage.
Do this next
Stop using the cleaner and arrange qualified Hoover appliance service; use qualified electrical service for the cord, plug, outlet, arcing, or wiring. Provide the exact model/product code and symptom record.
Why this path and its safety boundary
Why it matters: A drive belt where fitted, brush assembly, head contact, motor, control, battery, or wiring fault is possible; hazard signs make continued operation unsafe. Hoover's own pages do not support one universal belt or motor procedure.
Safety stop: Do not open the housing, replace a belt or motor by generic instructions, take live measurements, charge a hot/swollen battery, or restore power to reproduce the fault.
Helpful context
Understand the symptom
Not every Hoover attachment is supposed to spin
Start with the physical architecture, not the symptom label. Hoover manuals identify ordinary tools such as a crevice or upholstery tool separately from a mini turbo nozzle, and note that some attachments are available only on certain models. The brush beneath an upright foot, a powered floor head on a cordless cleaner, or a mini turbo with its own rotating brush is the relevant component. If the vacuum is using a plain suction-only nozzle, no repair is needed because there is no powered brush to rotate.
Use the model number before choosing a control or part
Hoover's advice pages are tied to model families and product codes. Some uprights select suction and brush operation with a slider or carpet setting; other models have a separate brush-bar button; cordless heads can use a removable roll and electrical contacts. One Hoover upright manual documents a belt, while another official brush page explicitly says that its product has no belt. Treat the product label and matching manual as the boundary for every control, release, belt, head, and replacement part.
A brush jam can explain both no rotation and a sudden stop
Hair, thread, carpet fringe, and other debris can wrap around the roll or its ends. Hoover says a jam can prevent the brush from turning and, on covered Freedom models, can operate an automatic stop. The safe response is to stop the cleaner, disconnect it, use only the model-documented brush release, and remove visible debris without damaging bristles. Do not run a blocked head to see whether the protection trips again.
Separate a brush-control setting from a mechanical drive fault
If suction is present but the brush is still, first compare the observed setting with the model's manual. Hoover documents a control that can run the cleaner for suction while leaving brushes off, and a carpet setting that enables the roll on a covered unplugged cleaner. If the correct setting is selected and the roll is clean, seated, and still does not move, the likely causes become model-specific: a worn or broken belt on some uprights, a head contact or connector issue on some cordless designs, or a brush-drive, motor, or control fault. The symptom alone cannot identify which part failed.
Thermal protection is a stop signal, not a reset procedure
Hoover manuals describe a thermal cutout that can turn a cleaner off when it is full, blocked, or has dirty filters; one model states that its cutout may take about 45 minutes to reset. That timing is not universal across Hoover products. Let a disconnected cleaner cool only as the exact manual says, correct visible maintenance issues, and stop if it repeatedly cuts out. Never bypass a thermal protector, probe the drive circuit, or continue operation while heat, odor, smoke, or damaged wiring is present.
When the brush remains stopped, service is safer than a generic belt repair
A persistent stopped brush after the correct control, clean roll, secure cover, and model-specific attachment checks is not enough to select a replacement. Hoover's published procedures differ between products and may involve a belt, brush assembly, contact, motor, or control. Keep the appliance out of service when the brush is damaged or locked, when a cord or battery is abnormal, or when access would require opening the housing. Give the technician the full model/product code and the exact symptom: whole cleaner off, suction with brush off, intermittent brush, or a safety cutout.
Safety boundary
Stop conditions
- Stop using the vacuum for smoke, sparks, burning or electrical odor, melted plastic, a hot or damaged cord/plug/outlet, exposed wiring, a swollen or hot battery, water in electrical areas, or a brush/head that is cracked or seized.
- Disconnect a corded cleaner from mains before examining a brush, cover, belt area, nozzle, or blockage. For cordless models, follow the exact manual's safe power-isolation procedure before separating a powered head.
- Do not bypass a brush switch, attachment interlock, thermal cutout, battery protection, or filter; do not perform live electrical tests or operate with an open brush housing.
- Do not assume all Hoover vacuum cleaners have the same belt, brush release, floor selector, safety indicator, contact layout, or cooldown time. Match the exact model/product code before selecting a procedure or part.
- Do not force a seized brush, chip debris with sharp tools, pull hidden wiring, spray liquid into a head, charge a hot/swollen battery, or open the housing to diagnose a motor, control, belt, or wiring fault.
Only after diagnosis
Potential parts
- Hoover powered brush roll or brush-bar assembly
Consider only when the exact model has a documented removable powered roll and inspection confirms worn, cracked, seized, or damaged bristles/roll after visible debris is removed. A stationary brush alone does not identify this part.
Brush construction, release, belt use, head contacts, and fit vary by Hoover model and region. Confirm the full model/product code before ordering. - Hoover powered floor head or rotating tool
Consider only after qualified diagnosis confirms a failed powered-head assembly or connector on a model that actually uses one; do not substitute a similar-looking suction-only nozzle.
Head geometry, contacts, brush motor, and interlocks are model-specific. Verify exact compatibility and use qualified installation for electrical or enclosed drive faults. - Hoover drive belt
Consider only for an exact Hoover model whose manual and diagnosis confirm a belt drive and a worn or broken belt. Hoover also documents products with no belt, so this cannot be inferred from the symptom.
Belt routing, guards, screws, and brush assemblies differ by model; confirm the manual and part fit before any service.
When checks do not resolve it
Need a professional?
Arrange qualified Hoover appliance service when a powered brush remains stationary after the exact control, visible debris, head seating, filter/airway, and model-documented cooldown checks; when the roll is damaged or seized; or when the model's belt, motor, control, contacts, battery, or wiring would need diagnosis. Stop immediately and disconnect only from a safe, dry point for smoke, sparks, burning odor, hot/damaged power hardware, exposed wiring, or battery damage. A plain suction-only attachment does not need brush service.
Safety scope: The owner may identify the model and attachment, select a documented brush mode, isolate power, remove visible debris from a model-documented accessible roll, check visible seating and air paths, and follow a documented cooldown. Qualified personnel must handle housing removal, belts unless the exact manual explicitly and safely authorizes the procedure, motors, controls, electrical testing, wiring, battery packs, and damaged power connections.
Common questions
FAQ
Why is my Hoover vacuum suction working but the brush is not spinning?
First confirm that the fitted head has a powered brush. Then check the exact Hoover model's brush button or carpet setting, isolate power, and remove visible hair or thread from an accessible roll. If the correct mode and a clear, seated head still do not spin the brush, the belt, head contact, motor, or control is model-specific and needs diagnosis.
Can a Hoover vacuum run without the brush spinning?
It can be normal when the attachment is suction-only or when a model's floor/suction setting intentionally disables brushes. Hoover documents controls that run suction without the brush and separate powered or rotating tools. It is not normal for a confirmed powered brush in its documented brush mode to remain stopped after a clean, seated head.
How do I clear a Hoover brush that stopped turning?
Switch off and disconnect the cleaner, then use only the exact manual's brush release. Remove visible hair, thread, and debris from the roll and its ends, refit the roll and lock, and follow any model-documented cooldown. Do not work on an energized head, force a seized roll, or bypass a safety stop.
Does every Hoover vacuum cleaner use a belt when the brush will not spin?
No. Hoover's official guidance differs by product: some upright models document a belt and brush assembly, while another official brush page says its product has no belt. Use the full model/product code and matching manual; do not open the housing or order a generic belt from the symptom alone.
When should I stop using a Hoover vacuum with a stopped brush?
Stop for smoke, sparks, burning or electrical odor, melted plastic, a hot or damaged cord or plug, exposed wiring, a swollen or hot battery, or a cracked/seized head. Disconnect only from a safe, dry point and arrange qualified service. Also stop when the brush repeatedly triggers a cutout or remains stopped after the exact external checks.
Read the exact guide
Official sources
- Keep the brush roll cleanHoover Service · Official Hoover care guidance showing several model-dependent brush-release designs; use the exact model's release method.
- Check the brush bar switchHoover Service · Official model-family guidance for listed Hoover models; the separate brush button must not be generalized to every Hoover cleaner.
- The brush may have jammedHoover Service · Official Hoover Freedom advice for the listed covered models; the red-light behavior is not a universal Hoover code.
- Check the brushes are spinning round (1)Hoover Service · Official Hoover advice for the model family displayed on the page; controls and belt construction are not universal across Hoover cleaners.
- Hoover Reactiv Bagless Upright Vacuum Cleaner RV71RV01 Instruction ManualHoover Service · Manual for the specific RV71RV01 family; it is evidence of one upright architecture, not a universal Hoover procedure.
- Brushes are not turningHoover Advice Centre · Official advice containing separate model-family sections; it demonstrates why belt and control claims must be conditional.
- Search and download of instruction manualsHoover Home · Official Hoover manual portal; the user must select the product line, model, and product code for the exact appliance.
- Hoover HU300RHM Instruction ManualHoover Service · Manual for a specific Hoover upright family; the listed 45-minute protection behavior must not be generalized to every model.
- Vacuum Cleaner Troubleshooting — Freedom Stick RangeHoover Service · Official Freedom Stick support hub; exact brush, battery, and contact behavior depends on the model listed in the manual.
Community feedback
Share a repair observation
Share a plain-text repair observation. Accepted observations are published automatically; this page may take a moment to update.