
On this page
Start here
Quick answer
First decide whether the Hoover vacuum is completely without power or has a light/charging indication but the motor does not respond. For a corded model, check the plug, the household outlet and the labeled breaker from a dry, safe position; for a cordless model, use only the supplied charger, keep the cleaner switched off while charging, and confirm the model's battery indicator changes. Hoover's Vortex Evo TH31 manual lists the electricity supply first and says a full bin, blocked hose/base, blocked filters or overheating can also shut the cleaner down; its thermal-cut-out warning says to switch off, unplug, correct the blockage or dirty-filter condition, and allow the cut-out to reset. A cordless Hoover manual likewise says not to open the battery pack and to use an authorised service engineer for unsafe repairs. If the cord, charger or battery is damaged, a breaker trips, there is burning smell/smoke/heat, or the cleaner remains dead after model-specific external checks, stop and arrange qualified Hoover service. This page is about no power or no motor response, not a vacuum that powers on but has weak suction or a brush that alone will not start.
Before you begin
Safety first
- This article covers model identification, dry external power/charger checks, model-approved battery seating, accessible bin/filter/blockage checks with power disconnected, and observation of indicators. It does not authorize opening the battery, motor, switch, charger or control housing, live testing, safety bypasses or improvised cooling/charging.
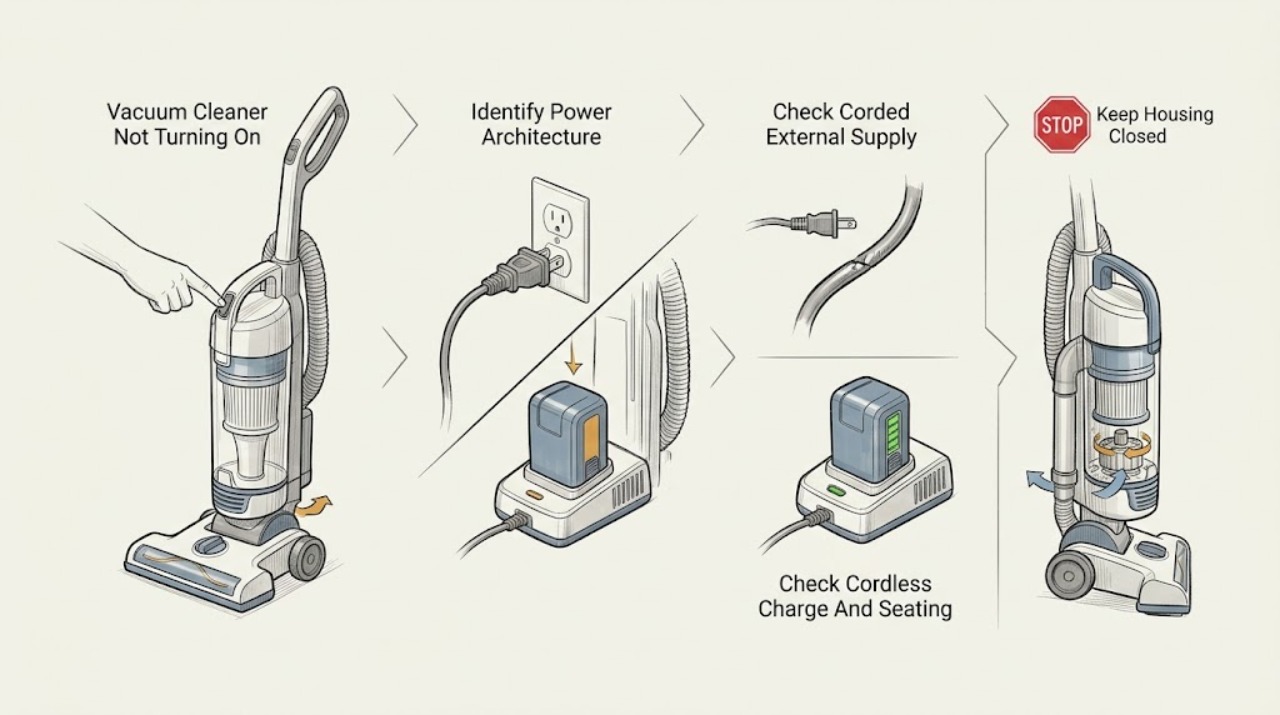
Work through in order
Diagnostic checks
Use only checks that match the exact appliance or system and its official guide.
-
Check 1
Read the complete Hoover model/product code without opening the cleaner. Record whether it is corded, has a removable battery, or has a battery in the handle; note whether any LED, display, charger light or motor sound appears when the ON/OFF control is used, and whether it stopped after extended use or a blockage.
Expected result: There is no response at all, a charger/battery LED responds, the corded switch responds but the motor is silent, or the cleaner stopped hot after a long run.
Next step: Use the corded, cordless or thermal branch below and the manual for the recorded model. Do not apply a battery procedure to a mains-only model or a reset time from one Hoover model to another.
Stop if: Stop for smoke, burning odor, sparks, a hot/damaged cord or charger, battery swelling/leakage, water exposure or a repeated breaker trip.
Why this matters
Why: No indicator on a corded machine points first to supply, cord or switch; a cordless LED changes the first check to charging/seating. A hot shutdown makes a model-specific thermal cut-out plausible. A powered machine with only weak suction or a brush issue is not the complete no-power symptom.
-
Check 2
For a corded Hoover only, keep the switch off and inspect the plug and visible cord for cuts, crushed insulation or heat damage. From a dry position, confirm the plug is seated and check the labeled household breaker or fuse; Hoover's TH31 manual suggests checking the outlet with another electrical product. Do not open the plug, switch or motor housing.
Expected result: The outlet is dead, the breaker/fuse is off, the cord or plug is damaged, the outlet works but the vacuum is still silent, or the supply appears normal.
Next step: Restore only an obviously interrupted household supply once. If the cord is damaged, the breaker trips again, or the cleaner remains dead at a working outlet, unplug it and arrange qualified service.
Stop if: Do not reset a repeatedly tripping breaker, use an extension lead or adapter, tape a damaged cord, or perform live-voltage tests.
Why this matters
Why: A dead outlet or damaged cord can explain total no response. A normal outlet with a dead vacuum moves suspicion to the ON/OFF switch, thermal protection, motor or internal wiring, which is not an external DIY repair.
-
Check 3
For a cordless Hoover only, switch the cleaner off, connect the original model-supplied charger to the specified port or battery, and inspect the model's charging indicator. If the battery is removable and the model manual permits it, reseat it until the documented latch/click engages; do not remove a battery with the charger connected.
Expected result: The charging LED or display changes, the battery remains at empty, no charging indication appears, the battery does not latch, or the charger/cable becomes unusually hot or damaged.
Next step: Use only the exact model's charging duration and indicator meaning. If the battery will not charge, cannot seat, is swollen/leaking, or the charger is damaged, stop and arrange service or the model-approved battery/charger support path.
Stop if: Do not open or repair the battery pack, substitute a generic charger, short the contacts, charge when hot or wet, or continue with swelling, leakage or a damaged cable.
Why this matters
Why: A charging indication or loose battery points to a charge/seating issue; no indication at a known-good compatible charger can involve the charger, port, battery or internal control. Hoover documents different LED and battery arrangements by model.
-
Check 4
If the cleaner stopped after running hot, switch it off and unplug it or remove the charger. Once cool, check only the user-accessible bin, hose, base opening and filter condition described by the exact manual; empty the bin and clean or dry a removable filter only as that manual directs. Do not run the cleaner with a missing filter.
Expected result: The bin is full, fine dust or a visible blockage is present, the filter is blocked or damp, the body is still hot, or the accessible airflow path is clear.
Next step: Correct the accessible blockage or filter condition, allow the exact model's documented reset interval, and check whether the cleaner's normal indicator returns. If it remains dead or repeatedly cuts out, arrange service.
Stop if: Do not force a brush or motor, run with a wet filter, use improvised heat to cool or dry the cleaner, open the motor, or bypass thermal protection.
Why this matters
Why: Hoover's TH31 manual links a full bin, blockages and dirty filters to thermal cut-out operation. A clear accessible path after cooling makes an internal thermal, switch, motor or control fault more likely; it does not justify bypassing the cut-out.
-
Check 5
With power disconnected, confirm the external ON/OFF control moves normally and that the handle, dust container and any battery pack or charging connection are fitted as the exact model's manual shows. Do not repeatedly press a loose or intermittent switch to force a start.
Expected result: A component is visibly out of position, the battery does not click into place, the switch is loose/stuck, or all external assembly and controls appear normal.
Next step: Correct only an obvious user-assembly issue according to the model manual. If the switch, interlock, motor or wiring still gives no response, leave the cleaner unplugged/off and contact qualified Hoover service.
Stop if: Do not bridge an interlock, remove switch covers, pull internal wires, or test continuity or voltage while connected.
Why this matters
Why: Hoover's cordless documentation uses a seated battery and a main ON/OFF control; a model may also use assembly interlocks. A damaged switch or persistent no motor response after correct assembly points to internal control or motor service.
-
Check 6
After the safe external supply, charger/battery, assembly and accessible thermal checks, document the model, whether any light or charger response exists, the last use conditions, and any cord, charger, battery or heat symptom. Do not deliberately reproduce a suspected electrical or thermal fault.
Expected result: The vacuum powers on, remains completely dead, starts only intermittently, cuts out again, or has a hazard or repeated breaker trip.
Next step: Use the exact model/product code to arrange Hoover or qualified appliance service. If the vacuum powers on but only suction, hose, brush or accessory performance is abnormal, use the separate symptom path rather than treating it as no power.
Stop if: Keep the appliance out of use for electrical, heat, liquid or battery hazards and do not reconnect it to ‘see if it works’.
Why this matters
Why: Persistent no response can involve the switch, thermal device, battery-management circuit, charger/port, motor or internal wiring. The external symptom cannot select a safe part or authorise opening the cleaner.
Use your observations
Decision map
Find the observation that best matches what you see, then follow the next safe action.
-
PATH 01Safety boundary
What you see
A corded Hoover has no motor or indicator response, the outlet works with another product, and the cord and plug look sound.
Do this next
Leave the vacuum unplugged and arrange qualified service with the model/product code and the external supply result.
Why this path and its safety boundary
Why it matters: The failure is downstream of the household supply, such as the ON/OFF switch, thermal protection, motor or internal wiring; this is a no-power path, not a suction or brush diagnosis.
Safety stop: Do not open the switch or motor housing, probe live wiring or keep cycling the power.
-
PATH 02Safety boundary
What you see
A cordless Hoover remains dead and its model-approved charger produces no expected charging indication, or the battery will not seat.
Do this next
Stop using a damaged or hot charger/battery and use the exact model support route for service or an approved replacement. Do not open the pack or substitute a charger.
Why this path and its safety boundary
Why it matters: The compatible charger, charging port, battery or battery-management path is more likely than a blocked hose; the LED meaning and removable-battery procedure are model-specific.
Safety stop: Treat swelling, leakage, heat, smell or a damaged cable as an immediate stop-use condition.
-
PATH 03Safety boundary
What you see
The vacuum stopped after a long run and felt hot, with a full bin, blocked filter, hose or base, or another restricted airflow observation.
Do this next
Switch off, unplug, correct only the accessible bin/filter/blockage condition permitted by the exact manual, and allow its documented reset interval. Escalate if it stays dead or cuts out again.
Why this path and its safety boundary
Why it matters: Hoover documents a thermal cut-out for a full or blocked cleaner or dirty filters. This is different from a machine that has never had any power response.
Safety stop: Do not bypass the cut-out, run with a wet/missing filter, or use heat to force a reset.
-
PATH 04Safety boundary
What you see
The cordless battery LEDs or corded supply are present, but pressing the external ON/OFF control produces no motor response.
Do this next
Verify only the documented external assembly and switch position once. If the response remains absent, arrange service; do not diagnose by opening the housing.
Why this path and its safety boundary
Why it matters: A switch, assembly interlock, battery-management, motor or internal control issue is more likely than ‘not turning on’ caused by the household outlet; the exact model determines the safe check.
Safety stop: Do not bridge an interlock, repeatedly actuate an intermittent switch, or perform live electrical tests.
-
PATH 05Safety boundary
What you see
The motor runs or the machine clearly powers on, but suction is weak, a brush alone does not rotate, or one accessory does not work.
Do this next
Use the exact model's suction, brush or accessory troubleshooting path; do not replace the power switch or battery from this symptom alone.
Why this path and its safety boundary
Why it matters: This is not complete no-power/no-motor failure. Hoover manuals treat bin, hose, base, filters, nozzle height and brush behavior as separate performance checks.
Safety stop: Stop if the running cleaner smells hot, sparks, has a damaged cord, or repeatedly cuts out.
Helpful context
Understand the symptom
Define ‘not turning on’ before cleaning anything
Hoover's official vacuum support is model-specific and asks for the product code or model number. Record whether the cleaner is corded, a removable-battery cordless model, or a battery-in-handle model; whether any motor sound, LED, display or charger indication appears; and whether the failure began after a long run, a blockage, a fall, a spill or a power event. If the machine powers on but has weak suction, a non-spinning brush, or only one accessory fails, that is a different symptom path from complete no-start/no-response.
Cords and batteries are different power paths
A corded Hoover needs a sound plug, supply cord and household outlet. A cordless Hoover needs a compatible, seated battery and a charger/charging port that matches the model. The VE18LIG manual shows a battery pack that clicks into the cleaner, a charging-status LED and a supplied charger; the official battery-charge guide applies only to the model list printed on that support page. Do not use a generic charger or borrow a battery merely because the connector fits.
A thermal cut-out can mimic a dead cleaner
Hoover's TH31 manual says a thermal cut-out can switch the cleaner off when it is full, blocked or has dirty filters. Its checklist and warning use model-specific reset wording, including an approximate checklist wait and a separate warning that the cut-out may take longer to reset. Treat any wait time as the exact-model manual's instruction, not a universal Hoover value. Clear only user-accessible bin, hose or filter restrictions with the cleaner switched off and unplugged; persistent no response is a service symptom.
Stop for electrical, heat or battery hazards
Stop using the vacuum for smoke, a burning odor, sparks, a hot or damaged cord, a damaged charger, swelling or leaking from a battery, water exposure, or a breaker that trips again. Unplug a corded cleaner and remove the charger from the socket before cleaning or maintenance. Do not open a battery pack, probe the motor or switch, bypass a thermal cut-out, use a non-original charger, or continue running a machine that appears faulty.
Safety boundary
Stop conditions
- Stop immediately for smoke, burning odor, sparks, a hot or damaged cord, a damaged charger, battery swelling/leakage, water exposure or a repeated breaker trip.
- Switch off and unplug a corded vacuum or remove the charger from the socket before cleaning, filter work or inspection; keep hands away from rotating brushes.
- Use only the charger and battery arrangement approved for the exact Hoover model; do not open or self-repair a battery pack.
- Do not bypass a thermal cut-out, interlock or switch, perform live electrical tests, open the motor housing, or continue restarting a cleaner that appears faulty.
Only after diagnosis
Potential parts
- model-specific charger or battery pack
Consider only for a cordless model after the exact model's charging procedure, compatible outlet and seating have been checked and service confirms the charger or battery is defective.
Hoover cordless battery chemistry, connector, charger and LED behavior vary by model; never substitute a charger by plug shape alone. - model-specific power cord, ON/OFF switch or interlock
Consider only for a corded or assembled model that has a verified external supply but no response and a qualified diagnosis of cord, switch or interlock failure.
Do not open or live-test the cleaner; confirm the complete Hoover model/product code before any service part is selected. - model-specific thermal protector or motor/control assembly
Consider only after recurring thermal shutdown or persistent no motor response is confirmed by qualified service after accessible airflow checks.
A thermal cut-out, motor and control layout differs across Hoover generations; overheating or no-start symptoms do not identify one part.
When checks do not resolve it
Need a professional?
Arrange qualified Hoover or appliance service when a corded vacuum remains dead at a working outlet, a cordless vacuum will not charge or seat its approved battery, a switch/interlock appears damaged, a thermal shutdown returns after accessible bin/filter/blockage checks, or any internal electrical or motor diagnosis is needed. Stop use immediately for smoke, burning odor, sparks, hot/damaged cords or chargers, battery swelling/leakage, water exposure or repeated breaker trips.
Safety scope: This article covers model identification, dry external power/charger checks, model-approved battery seating, accessible bin/filter/blockage checks with power disconnected, and observation of indicators. It does not authorize opening the battery, motor, switch, charger or control housing, live testing, safety bypasses or improvised cooling/charging.
Common questions
FAQ
What should I check first when a corded Hoover vacuum has no response?
Record the exact model, inspect the plug and visible cord, confirm the outlet and check the labeled breaker or fuse from a dry position. Hoover's TH31 manual puts a working electricity supply first. If the outlet works but the cleaner remains dead, unplug it and arrange service rather than opening the switch or motor.
Why did my Hoover vacuum stop and then refuse to turn on after running hot?
Hoover documents a thermal cut-out that can switch off a full cleaner, a blocked hose/base or dirty filters. Switch off and unplug it, correct only the accessible condition allowed by the exact manual, and wait for that model's reset instruction. A repeat shutdown or permanent no response needs service.
How do I know whether my cordless Hoover is charging?
Use only the exact model's supplied charger, keep the cleaner switched off, and compare the LED or display with that model's manual. Hoover's VE18LIG manual describes a battery pack that can charge in or out of the cleaner and a model-specific multi-LED status; the official charge guide applies only to its listed models.
Can I open a Hoover cordless battery or replace the motor to fix no power?
No. Hoover says not to open or self-repair the battery pack, and its cordless safety guidance calls for authorised service for hazardous repairs. A battery, charger, switch, motor or control part should be selected only after the exact model and qualified diagnosis are confirmed.
Is weak suction the same as a Hoover vacuum that will not turn on?
No. If the motor or indicators operate, the cleaner has power and the symptom is more likely bin, hose, filter, nozzle or brush performance. Hoover's TH31 checklist treats those as separate checks; this page is for no motor/no power response.
Read the exact guide
Official sources
- How do I charge the battery - Hoover Advice CentreHoover Service / Candy Hoover Group · Official support article limited to the vacuum models listed on the page; not universal to every Hoover cordless design.
- Product Manuals – HooverHoover · Official Hoover US catalogue; listed model families demonstrate architectural variation, while instructions remain model-specific.
- Can I replace the battery? - Hoover Advice CentreHoover Service / Candy Hoover Group · Official support article limited to the FD22 and other models listed on the page; do not generalize its replaceable-battery design.
- Hoover Vacuum Cleaner Hurricane All Surface HU4208 Instruction Manual - Product Code 39100211Hoover Service / Candy Hoover Group · Exact HU4208/Product Code 39100211 manual; used as corroborating model-specific evidence for external checks and thermal protection.
- Hoover Unplugged Cordless Rechargeable Vacuum Cleaner UNP252A Instruction Manual - Product Code 39400245Hoover Service / Candy Hoover Group · Exact UNP252A/Product Code 39400245 manual; safety boundary is applicable to this cordless model and used conditionally for other battery designs.
- Hoover Vacuum Cleaner Vortex Evo TH31 VO01 Instruction Manual - Product Code 39100486Hoover Service / Candy Hoover Group · Exact TH31 VO01/Product Code 39100486 manual; checklist and reset wording are conditional evidence, not universal Hoover timing.
- Hoover Velocity Evo Cordless Bagless Upright Vacuum Cleaner VE18LIG Instruction Manual - Product Code 39100491Hoover Service / Candy Hoover Group · Exact VE18LIG/Product Code 39100491 manual; battery and LED behavior is conditional to this model family.
- Vacuum Appliance Advice CentreHoover Service / Candy Hoover Group · Official Hoover support hub; exact checks and controls must be selected by model/product code.
Community feedback
Share a repair observation
Share a plain-text repair observation. Accepted observations are published automatically; this page may take a moment to update.