
On this page
Start here
Quick answer
First decide what not working means: no light or motor, a motor that starts and stops, a running cleaner with poor pickup, a brushbar that does not turn, or a cleaner that has just cut out. Record the exact Hoover model and whether it is corded, cordless, upright, stick, or handheld. With the cleaner switched off and disconnected from mains power, check the outlet or charger, battery seating and charge where applicable, dust bin, filter, hose, nozzle, and brushbar for visible blockage. Hoover manuals make these model-specific checks, and Hoover's advice centre says to disconnect the appliance before examining it. If it has overheated, use only the exact manual's reset interval after clearing the cause; do not open a battery pack, defeat an interlock, or open the motor/electrical housing. Stop for smoke, burning odor, a hot or damaged cord/plug, sparks, liquid intrusion, or repeated trips, and use Hoover support or a qualified repair service.
Before you begin
Safety first
- This article covers model identification, safe external power/charge checks, documented bin/filter/air-path/brushbar maintenance, and a model-specific thermal wait only. Do not open the battery, charger, motor, control, or mains wiring; do not bypass protection.
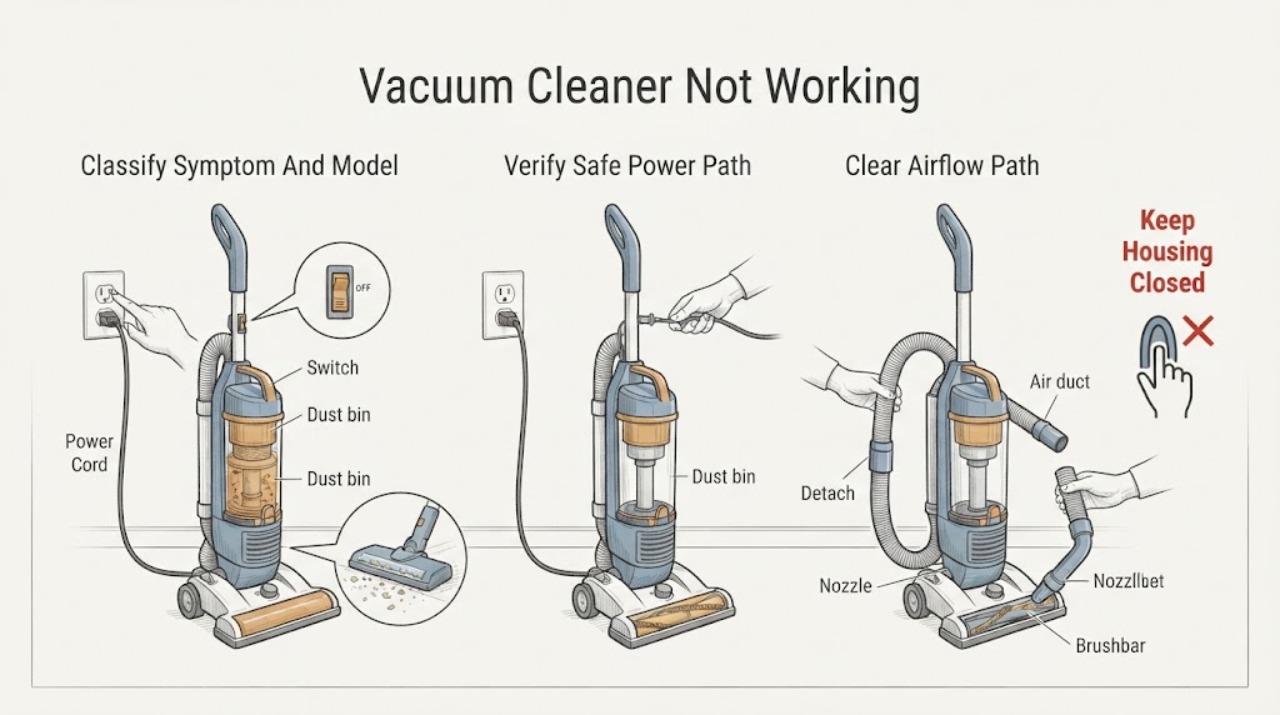
Work through in order
Diagnostic checks
Use only checks that match the exact appliance or system and its official guide.
-
Check 1
Read the model or product code from the cleaner without opening its housing. Record whether it is corded or cordless, whether any light/display responds, whether the motor starts at all, whether suction is weak, whether the brushbar is stationary, and whether it stopped after becoming hot.
Expected result: The unit is completely dead, has a charge/power indication but no motor, starts and stops, runs with poor pickup, has a non-turning brushbar, or has recently cut out from heat.
Next step: Use the matching branch below and the exact Hoover manual. Do not reconnect repeatedly just to collect a pattern.
Stop if: Stop for smoke, burning odor, sparks, liquid intrusion, a hot or damaged cord/plug, a damaged battery, or repeated electrical trips.
Why this matters
Why: These are different failure modes: power/charge/control, airflow or brush loading, or thermal protection. Hoover support is model-specific, so the product code determines which controls and reset behavior apply.
-
Check 2
With the cleaner off, check the corded model's plug and outlet externally, or the cordless model's charger connection and battery seating as described by its manual. For a corded cleaner, a separate known-working appliance may be used to check the outlet only if it is safe and dry; do not open the plug, charger, battery, or cleaner housing.
Expected result: The outlet has no power, the cord/plug is damaged, the charger has no normal indication, the battery is not seated or charged, or the external power path appears normal but the cleaner remains dead.
Next step: Correct only a loose external connection or use the exact model's charging instructions. If the supply is safe but the cleaner still will not work, stop and contact Hoover support or service.
Stop if: Do not use a damaged cord/plug or charger, bypass a battery or safety switch, use an unapproved charger, or make internal electrical measurements.
Why this matters
Why: A supply or charging problem can mimic a failed cleaner. Hoover's manuals distinguish charge/battery seating on cordless models and electricity-supply checks on uprights; normal external power does not identify an internal fault.
-
Check 3
After disconnecting power, empty the dust bin or container and inspect the accessible nozzle, hose, tube, inlet, and air duct for lint or debris. Refit the dust bin and hose only as the exact manual shows; do not push tools deep into a powered or obstructed assembly.
Expected result: The bin is full, the bin or hose is not seated, or a visible obstruction is present; alternatively the accessible air path is clear and correctly assembled.
Next step: Remove only loose, accessible debris with the unit disconnected, refit the parts, and test once according to the manual. If the cleaner still stops or remains ineffective, use service rather than opening the motor.
Stop if: Stop if the obstruction is deep, wet, sharp, melted, or entangled in a motorized assembly; do not bypass guards or run the cleaner with parts missing.
Why this matters
Why: Hoover manuals link stopping, poor pickup, or motor problems to blocked air inlets/tubes, dust-bin fit, nozzle, hose, or duct restrictions. A clear accessible path makes a hidden blockage, motor, control, or another model-specific fault more likely, not ruled out.
-
Check 4
With power disconnected, inspect the filters, brushbar, belt area if the exact manual exposes it, and nozzle for compacted dust, hair, or debris. Clean or wash a filter only as the manual permits, and let a washed filter dry completely before refitting; never run the cleaner with a wet or missing filter.
Expected result: Filters are visibly loaded or wet, the brushbar is wrapped or jammed, the nozzle is blocked, or these parts are clean and free to move by the manual's permitted check.
Next step: Complete only the documented cleaning and refit steps, then perform one normal test. Replace a damaged filter, belt, or brushbar only with the exact approved part or ask Hoover service to identify it.
Stop if: Do not touch a brushbar while powered, use a sharp tool near wiring, operate with wet filters, or open a sealed motor or control compartment.
Why this matters
Why: Hoover's official advice connects dirty filters with reduced suction and overheating, while upright manuals identify brushbar and nozzle blockage as separate causes. A clean air path with a stationary brushbar can indicate a model-specific drive, switch, or motor fault.
-
Check 5
If the cleaner stopped after becoming hot or after a blockage, switch it off, disconnect it, clear only the accessible cause, and consult the exact manual for its thermal-cutout wait period. Do not repeatedly press the power control while it is hot or use an undocumented forced reset.
Expected result: The unit was hot and later recovers after the model's documented interval, or it remains dead, becomes hot again quickly, or cuts out repeatedly.
Next step: Allow the exact documented recovery period, then test once after maintenance. If it will not recover or cuts out again, leave it disconnected and arrange Hoover service.
Stop if: Do not defeat thermal protection, run with blocked or wet filters, place the cleaner near heat to force a reset, or open the motor/electronics.
Why this matters
Why: Some Hoover models use thermal protection: the HU300RHM manual states that a cutout can prevent restart for 45 minutes and says to perform maintenance before resuming. This timing is model-specific; persistent or rapid recurrence suggests an unresolved blockage, filter, motor, or control issue.
-
Check 6
After the external checks, record whether the cleaner is dead, runs without pickup, stops under load, shows a model-specific error, or repeatedly overheats. Provide the model/product code and the completed observations to Hoover support; do not reproduce a fault that involves heat, odor, sparks, or damaged power parts.
Expected result: The issue remains after safe cleaning and the exact reset/assembly steps, or the cleaner shows an electrical, battery, motor, control, or repeated thermal symptom.
Next step: Use Hoover's model-specific support, warranty, parts, or service route; ask a qualified repairer to diagnose internal electrical or motor faults. Keep the unit disconnected until assessed when a safety symptom is present.
Stop if: Do not open the battery pack, repair mains wiring, bypass interlocks or thermal protection, or substitute an unapproved part.
Why this matters
Why: A remaining fault may involve the motor, battery pack, charger, switch, PCB, brush drive, wiring, or thermal protection. These parts and error behaviors vary by model and cannot be selected safely from the broad phrase not working.
Use your observations
Decision map
Find the observation that best matches what you see, then follow the next safe action.
-
PATH 01Safety boundary
What you see
There is no motor response or normal indication: a corded cleaner has a suspect outlet/cord, or a cordless cleaner is uncharged, has a loose battery, or has no normal charger response.
Do this next
Check only the safe external supply, charger connection, charge state, and battery seating covered by the exact manual. Contact Hoover service if the external path is sound or damaged.
Why this path and its safety boundary
Why it matters: The power or charge path is more likely than a suction blockage, but the exact charger, battery, switch, and control arrangement is model-specific.
Safety stop: Do not open the charger, battery, plug, or cleaner housing, and do not use an unapproved charger or damaged cord.
-
PATH 02Safety boundary
What you see
The motor runs, but suction or debris pickup is poor and there is no immediate electrical hazard.
Do this next
Disconnect power, empty the bin, clean or dry filters as instructed, and inspect accessible air paths and brushbar. Escalate if the exact manual's maintenance does not restore pickup.
Why this path and its safety boundary
Why it matters: A full bin, dirty filter, blocked hose/nozzle/duct, or brushbar obstruction is more likely than a no-power fault.
Safety stop: Do not run without a filter, with a wet filter, or with a blocked motorized nozzle.
-
PATH 03Safety boundary
What you see
The cleaner starts but stops after seconds or minutes, especially after the hose/nozzle is loaded or the body becomes hot.
Do this next
Disconnect, clear accessible blockage, inspect filters and brushbar, and observe the exact manual's thermal-reset interval. Arrange service for recurrence.
Why this path and its safety boundary
Why it matters: Airflow restriction, brushbar load, dirty filters, or thermal protection is more likely; a repeat stop after maintenance can indicate a motor or control fault.
Safety stop: Do not keep restarting a hot cleaner, defeat a thermal cutout, or open the motor.
-
PATH 04Safety boundary
What you see
The vacuum motor runs and has suction, but the brushbar or motorized nozzle does not turn or the cleaner performs poorly only on the floor head.
Do this next
Disconnect power and inspect the accessible brushbar/nozzle exactly as the manual directs; use service for a drive, belt, motor, wiring, or control diagnosis.
Why this path and its safety boundary
Why it matters: A hair/debris jam, nozzle blockage, belt/brush drive, nozzle motor, or model-specific control issue is more likely than a whole-cleaner power failure.
Safety stop: Do not touch or force a powered brushbar, open a sealed nozzle motor, or bypass a nozzle interlock.
-
PATH 05Safety boundary
What you see
Smoke, burning odor, sparks, liquid intrusion, a hot or damaged cord/plug or battery, repeated trips, or a fault that returns immediately after safe maintenance is observed.
Do this next
Stop using the cleaner, disconnect it only if this can be done without touching a hazard, move away from smoke or suspected battery damage, and contact Hoover support or qualified service.
Why this path and its safety boundary
Why it matters: Fire, shock, battery, or internal electrical risk takes priority over further troubleshooting.
Safety stop: Do not reconnect, charge, open, puncture, cool with water, or attempt an internal repair.
Helpful context
Understand the symptom
Not working is a symptom family, not one fault
A Hoover can be completely dead, run but fail to pick up, stop after a few seconds, refuse to turn the brushbar, or shut down after becoming hot. Those patterns lead to different checks. A no-start page is about the power path, charge, battery seating, and controls; this broader page also covers air-path blockage, filters, brushbar load, and thermal protection when the motor runs or has cut out.
Start with the exact model and architecture
Hoover's UK advice centre is organized by product code, type, and range, while Hoover's US manuals list separate corded uprights and cordless vacuums. Read the manual for the exact model before interpreting a battery light, brushbar control, filter location, or thermal-reset behavior. A cordless stick's battery and air-duct checks cannot be assumed to describe a corded upright.
Disconnect before cleaning or inspecting
Turn the cleaner off and disconnect it from mains power before examining the nozzle, hose, filters, dust bin, or brushbar. On a cordless model, follow the exact manual for removing the battery when that is required. Hoover's advice pages and manuals warn that replacement parts must be approved and that a battery pack must not be opened or repaired by the owner.
Safety boundary
Stop conditions
- Stop using the vacuum for smoke, burning odor, sparks, liquid intrusion, a hot or damaged cord/plug, repeated trips, or suspected battery damage.
- Disconnect mains power before examining the hose, nozzle, filters, dust bin, or brushbar; follow the exact cordless manual for battery removal.
- Do not open or repair a battery pack, bypass interlocks or thermal protection, make internal electrical measurements, or open the motor/control housing.
- Do not run with a wet or missing filter, blocked motorized nozzle, damaged cord, unapproved charger, or unapproved replacement part.
Only after diagnosis
Potential parts
- exact-model filter or dust-bin seal
Consider only when the exact manual or Hoover parts lookup identifies a damaged or missing filter/seal after the cleaner is disconnected.
Filter shape, rating, and seal are model-specific; do not run without the required filter or substitute by appearance. - exact-model brushbar, belt, or nozzle assembly
Consider only when the exact manual and service diagnosis confirm a brush/nozzle fault rather than a blockage or control issue.
Brush drives, belts, interlocks, and nozzle motors vary by model; use Hoover-approved parts. - exact-model battery or charger
Consider only when Hoover or a qualified technician confirms a battery/charging fault and identifies the exact model part.
Do not open, rebuild, or cross-fit battery packs or chargers by connector appearance.
When checks do not resolve it
Need a professional?
Contact Hoover support or an authorized/qualified repair service when the cleaner remains inoperative after the exact manual's safe power, charge, assembly, blockage, filter, brushbar, and thermal-reset checks; when a battery, charger, motor, switch, control, wiring, or internal nozzle fault is suspected; or whenever a safety symptom occurs.
Safety scope: This article covers model identification, safe external power/charge checks, documented bin/filter/air-path/brushbar maintenance, and a model-specific thermal wait only. Do not open the battery, charger, motor, control, or mains wiring; do not bypass protection.
Common questions
FAQ
Is Hoover vacuum cleaner not working the same as not starting?
No. Not starting usually describes no motor response, while not working can also mean poor pickup, a brushbar that does not turn, starts and stops, or thermal shutdown. Classify the symptom before selecting the model-specific check.
What should I check first if my Hoover vacuum is completely dead?
Identify the model, then check only the safe external outlet or charger, charge state, and battery seating covered by the exact manual. Do not open the battery, charger, plug, or cleaner housing.
Why does my Hoover vacuum start and then stop?
A blocked air path, full bin, dirty filter, brushbar load, or thermal cutout may be involved. Disconnect power, perform the exact manual's accessible maintenance, and use its model-specific wait period; repeated cutout needs service.
Can I wash a Hoover vacuum filter?
Only if the exact manual permits washing. Hoover's official advice says washed filters must be thoroughly dry before refitting; never run the cleaner with a wet or missing filter.
When should I stop troubleshooting and call Hoover?
Stop for smoke, burning odor, sparks, liquid intrusion, a hot or damaged cord/plug, suspected battery damage, repeated trips, or a fault that returns after safe model-specific maintenance. Internal battery, motor, control, wiring, and charger work belongs to qualified service.
Read the exact guide
Official sources
- No suction and not picking upHoover Advice Centre · Official Hoover UK advice page with solutions tied to listed models; use the exact manual for other models.
- Hoover H-Free 800 HF822OF 001 Instruction ManualHoover · Exact HF822OF 001/H-Free 800 manual; use only for comparable cordless architecture and defer to the exact model manual.
- Vacuum Cleaner Troubleshooting Advice CentreHoover · Official Hoover UK advice-centre index; exact controls, parts, and instructions vary by model and market.
- Product ManualsHoover · Official Hoover US manual index; listed models and instructions are model-specific.
- Hoover H-Free 500 HF522BH 001 Instruction ManualHoover · Exact HF522BH 001/H-Free 500 manual; battery, control, and reset details must not be generalized to other Hoover models.
- HU300RHM Troubleshooting ManualHoover · Exact HU300RHM upright manual; its 45-minute thermal-reset interval is not universal to Hoover vacuums.
- HF9 Vacuum Cleaner Help and AdviceHoover Advice Centre · Official Hoover UK HF9 advice page; error codes and nozzle architecture apply only to HF9 range.
- Customer SupportHoover · Official Hoover US customer-support page; regional contacts and product availability may differ outside the US.
Community feedback
Share a repair observation
Share a plain-text repair observation. Accepted observations are published automatically; this page may take a moment to update.