
On this page
Start here
Quick answer
If your Hoover washing machine will not fill, first stop it if water is leaking, the floor or controls are wet, you smell burning, see sparks, or a breaker trips; close the water tap only if it is safely reachable and keep away from wet electrical areas. With no hazard, check that the door is closed, the selected programme has actually started, the delay or pause state is clear, and the cold-water tap is open. Inspect the inlet hose for a crush or kink and, with the tap closed and the machine disconnected from mains power, clean only the accessible inlet mesh filter if your exact Hoover manual permits it. An E2 or equivalent fill fault points toward supply, pressure, hose, drain routing, or the inlet path, but the code meaning is model-specific. If water enters when the machine is idle, stop using it and arrange service because the inlet valve may not be closing.
Before you begin
Safety first
- Do not use the Hoover washer with a leak near electrical parts, burning smell, smoke, sparks, overheating, repeated protective trips, an unsafe hose or tap, an idle-fill symptom, or a failed door interlock until qualified service has assessed it.
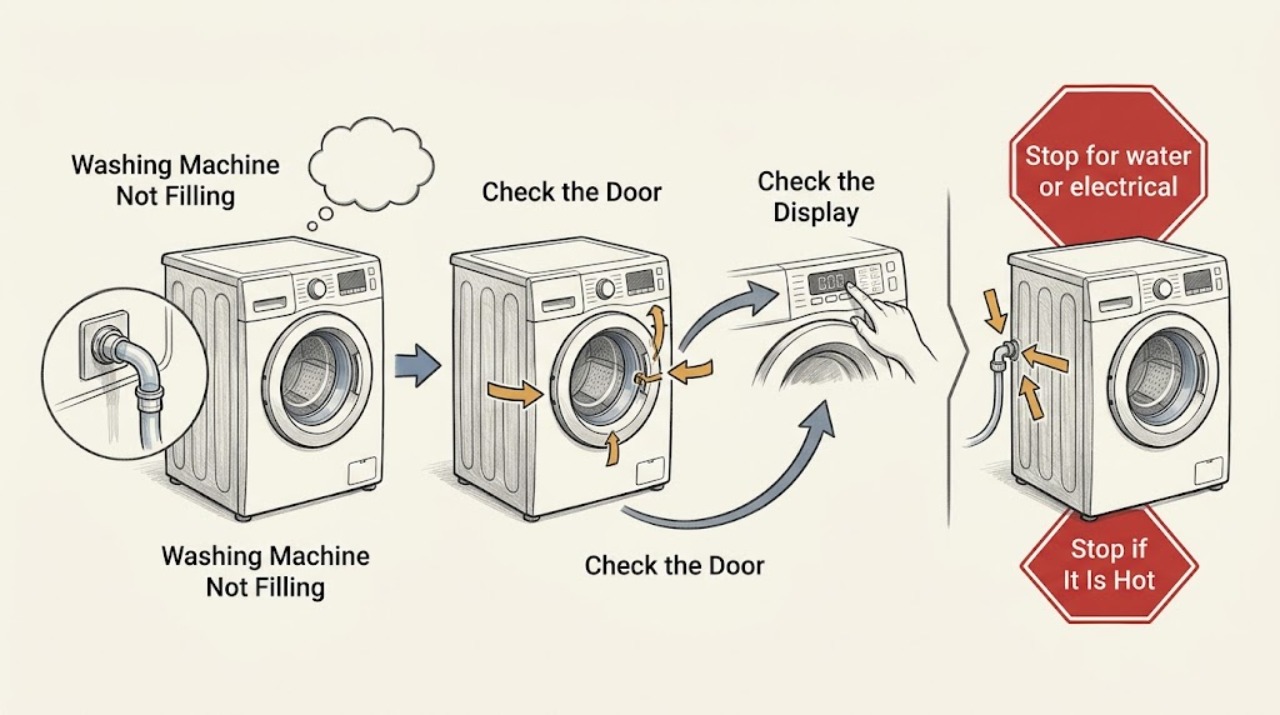
Work through in order
Diagnostic checks
Use only checks that match the exact appliance or system and its official guide.
-
Stop for water or electrical danger first
Stop the cycle immediately if water is running onto the floor, approaching the plug or controls, the door seal or hose has burst, you smell burning, see smoke or sparks, or the breaker or residual-current device trips again. From a dry, safe position close the water tap if it is already reachable without stepping into water, then keep away and arrange qualified help; do not touch wet electrical parts or keep resetting the protection.
Expected result: There is no leak, wet electrical area, burning smell, smoke, spark, or repeated trip, and the washer is stable, or one of those warning signs is present.
Next step: Continue only in the dry, safe state. For any warning sign, leave the washer unused and use a plumber, qualified appliance technician, or emergency electrical route as appropriate.
Why this matters
Why: A no-fill symptom is secondary when water can reach electricity or when an electrical fault is active. Continued testing can increase flood, shock, or fire risk.
-
Confirm the door and programme are actually asking for water
With no hazard, close the door fully without forcing it, select a normal programme shown in the Hoover manual, press Start or Pause as the model requires, and note whether a door-lock indicator or delay symbol remains. Do not bypass the interlock or hold the door open while the machine is trying to start.
Expected result: The door does not latch, a delay or pause remains active, the machine immediately reports a door or programme fault, or the programme starts but no water arrives.
Next step: Clear only the documented delay or pause and close the door as the manual shows. If the door will not latch or the cycle still refuses to start, keep the machine off and arrange service rather than bypassing the lock.
Why this matters
Why: A washer may not open its water valve until the door and programme conditions are satisfied. Hoover manuals list a door problem, an unselected or delayed programme, and an unpressed start control as reasons a cycle does not begin.
-
Read the display or light pattern exactly
Record the complete code, letter, number, and any repeating light pattern before switching anything off. Compare it with the exact Hoover manual or the official Advice Centre page for your product code; do not infer a code from a single flash or substitute another model's meaning.
Expected result: The display shows E2 or an equivalent water-fill indication, another code appears, or no code is shown.
Next step: For a fill code, follow the supply, hose, drain-routing, and inlet-filter checks below. For another code or a recurring code after the model-specific reset, stop and provide the exact display to Hoover or qualified service.
Why this matters
Why: Hoover's E2 guidance describes a water-supply problem that can include low pressure, no flow, or a twisted or kinked hose. Other codes can describe a door, drainage, overfill, or unrelated fault, so the code must stay tied to the model.
-
Check the cold-water tap and household pressure
From a dry, accessible position, confirm the cold-water tap serving the washer is open and not visibly damaged. If supply is uncertain, turn the tap off, disconnect the fill hose only after the washer is disconnected from mains power, place its end in a suitable bucket, and briefly open the tap only if this plumbing check is safe and familiar; do not force a seized valve or continue if water sprays or leaks.
Expected result: No water flows from the tap, flow is weak or intermittent, the tap is seized or broken, or a normal flow is available.
Next step: For no or weak flow, close the tap and call a plumber. If flow is normal, close the tap again and continue with the hose and filter checks; never leave a disconnected hose pressurized.
Why this matters
Why: No or weak flow points to the household tap, plumbing, or pressure rather than the washer's inlet valve. Hoover says a broken or seized blue tap may not open the internal valve even when the handle turns.
-
Inspect the fill hose for a crush or kink
With the tap closed and mains power disconnected, look along the cold-water fill hose behind the washer for a sharp bend, flattened section, trapped section, or damaged coupling. Move the washer only if it can be moved safely without straining the hose or drain; route the hose as the Hoover installation information shows and do not use a visibly damaged hose.
Expected result: The hose was crushed or kinked behind the cabinet, a connection or hose is damaged, or the hose is open, intact, and correctly routed.
Next step: Correct a simple routing problem only with the appliance isolated and the tap closed, then inspect for drips when supply is restored. Replace a damaged hose through model-appropriate service and stop if the machine still will not fill.
Why this matters
Why: Hoover says a hose trapped when the appliance is pushed into place can flatten and prevent water flow. A damaged connection can also leak as soon as supply is restored.
-
Check the accessible inlet mesh filter cautiously
Only if the exact Hoover manual or Advice Centre procedure applies, keep the tap closed and mains power disconnected before examining the hose connection at the rear. Inspect the small inlet or anti-sand mesh filter for debris; clean only the accessible filter as directed, do not push debris into the valve, remove sealed components, or use force on a corroded connection. Reconnect the hose carefully and check for leaks before a cycle.
Expected result: The mesh is visibly blocked, the connection leaks or will not release safely, or the filter is clean and the hose connection is dry and secure.
Next step: If the connection cannot be safely examined or leaks after reconnection, close the tap and arrange plumbing or appliance service. If it is dry and the fill fault remains, do not open the washer; continue to the service boundary.
Why this matters
Why: Hoover identifies debris at the inlet filter as a cause of slow or absent filling. A clean filter shifts attention to pressure, routing, the door or programme condition, the inlet valve, wiring, or control system.
-
Rule out drain-hose siphoning or incorrect routing
Compare the drain hose route and height with the exact Hoover installation instructions, especially if the washer briefly takes water and then appears empty or reports a fill fault. Look for a drain hose pushed too far into a standpipe, a missing air gap, or a route that is too low; do not pull apart a sealed drain connection or reach into dirty standing water.
Expected result: Water disappears as it enters, the drain hose is too low or inserted too far, the home drain is blocked, or the drain route matches the manual.
Next step: Correct only an obvious, manual-supported routing issue while the washer is isolated. If water still leaves immediately, the drain is blocked, or the route is uncertain, arrange a plumber or qualified technician.
Why this matters
Why: Hoover's fill-fault troubleshooting includes checking drain-pipe height, and an incorrectly routed hose can siphon incoming water so the machine never reaches the expected level. A correct route shifts the diagnosis back to the fill path or sensing system.
-
Use one model-supported reset, then escalate
After the tap, hose, connections, floor, and controls are dry and intact, perform only the reset described by the exact Hoover manual. Some Hoover manuals describe switching off and disconnecting the washer briefly before restarting a programme; do not repeatedly reset it, keep testing a leaking unit, or clear a code by guessing.
Expected result: The programme fills normally after the documented reset, the fault returns, the washer hums without taking water, or clean water enters while the washer is idle.
Next step: Stop using the washer for a recurring or idle-fill symptom and arrange Hoover or qualified appliance service. Provide the model, exact code, water-flow result, hose and filter observations, drain route, and whether the door locked.
Why this matters
Why: A one-time recovery can clear a transient control state, but recurrence suggests an inlet valve, pressure or level-sensing, door-interlock, wiring, or control fault. Water entering while idle is consistent with an inlet valve that is not closing and is not a normal no-fill correction.
Use your observations
Decision map
Find the observation that best matches what you see, then follow the next safe action.
-
PATH 01Safety boundary
What you see
Water is leaking, reaches electrical parts, or a burning smell, smoke, spark, or repeated breaker trip occurs
Do this next
From a dry position close the water tap if safely reachable, keep away from wet electrical areas, and arrange qualified plumbing or appliance/electrical help.
Why this path and its safety boundary
Safety stop: Do not touch wet plugs or controls, keep resetting protection, or restart the washer to test it.
-
PATH 02Safety boundary
What you see
The door does not latch, a delay or pause is active, or the programme does not start
Do this next
Use the exact manual to close the door and clear one documented delay or pause state.
Why this path and its safety boundary
Safety stop: Do not bypass the door interlock or force the door; arrange service if the cycle will not begin.
-
PATH 03Safety boundary
What you see
E2 or a two-flash water-fill indication is shown
Do this next
Check the water tap, safe flow, fill-hose routing, drain-hose height, and model-supported inlet filter procedure.
Why this path and its safety boundary
Safety stop: If the code returns after those checks, stop and arrange Hoover or qualified service; do not guess at another code's meaning.
-
PATH 04Safety boundary
What you see
No water comes from the household tap or pressure is weak
Do this next
Close the tap and call a plumber to address the supply, pressure, or seized valve.
Why this path and its safety boundary
Safety stop: Do not force a stiff tap or leave a disconnected hose pressurized.
-
PATH 05Safety boundary
What you see
The fill hose is crushed, kinked, damaged, or leaking
Do this next
Keep the tap closed, correct only safe routing, and arrange a model-appropriate hose replacement or plumbing service for damage.
Why this path and its safety boundary
Safety stop: Do not run a cycle with a damaged hose or pull the washer in a way that strains the connections.
-
PATH 06Safety boundary
What you see
The inlet mesh filter is blocked and the connection can be safely accessed
Do this next
With mains power disconnected and the tap closed, clean only as the exact Hoover procedure permits, reconnect, and inspect for leaks.
Why this path and its safety boundary
Safety stop: Do not remove sealed parts, force corroded fittings, or continue if the connection leaks.
-
PATH 07Safety boundary
What you see
Water enters but immediately disappears or the drain route is too low
Do this next
Compare and correct the drain hose route and height against the exact Hoover installation instructions, or call a plumber if the drain is blocked or uncertain.
Why this path and its safety boundary
Safety stop: Do not reach into dirty standing water or dismantle a sealed drain connection.
-
PATH 08Safety boundary
What you see
The washer fills while switched off, or it still will not fill after safe supply checks and one documented reset
Do this next
Close the water tap when the washer is not supervised and arrange Hoover or qualified appliance service for the inlet valve, sensing, interlock, or control path.
Why this path and its safety boundary
Safety stop: Do not keep the water supply open to an unattended washer or open the cabinet to test the valve.
Helpful context
Understand the symptom
Start by separating no water from no cycle
A washer can appear not to fill when it has not accepted the programme, the door is not locked, a delay is active, or the machine is paused. If the programme starts and you hear a valve attempt but no water arrives, focus on supply, hose, pressure, filter, and drain routing. If clean water slowly appears while the machine is switched off, that is a different symptom: Hoover says contamination at the inlet valve can prevent it closing and the machine should be checked by an engineer if the problem persists.
Keep model-specific instructions model-specific
Hoover publishes manuals by model or product code. Use the label on the machine and the Hoover manual search to confirm the door-lock behavior, error-code meanings, delay controls, and whether an inlet filter may be accessed by the owner. Do not treat an E2 description or a filter procedure from a different series as a universal repair instruction.
Keep water and electricity separated
Before looking behind the washer, close the water tap and disconnect the appliance from mains power as Hoover directs. Do not reach into standing water, handle a plug or socket with wet hands, or continue testing after a leak reaches the controls, a burning smell appears, sparks are visible, or a protective device trips again. A seized tap, persistent leak, or uncertain plumbing connection belongs with a plumber or qualified appliance technician.
Only after diagnosis
Potential parts
- inlet hose or inlet mesh filter
Only relevant when the exact model procedure or a technician confirms a damaged hose or obstructed, serviceable inlet filter after the tap and pressure are normal.
Confirm the complete Hoover model or product code and connection type before ordering; isolate water and mains power before any approved inspection. - water inlet valve
Only relevant when the supply, hose, filter, door, programme, and drain routing are correct and a qualified diagnosis finds that the valve does not open or does not close.
Fitment and electrical testing are model-specific professional work; do not open the cabinet or test the valve live. - door interlock or water-level sensing component
Only relevant when the door does not report locked or the machine still fails to fill after the safe external checks and a technician confirms an interlock or sensing fault.
Confirm the exact model and use qualified installation; never bypass the interlock or substitute a part from another series.
When checks do not resolve it
Need a professional?
Provide the Hoover model or product code, exact display code or light pattern, whether the door locked, whether the programme and delay state were clear, tap flow and pressure observations, hose and inlet-filter condition, drain-hose route, and whether water enters while idle.
Safety scope: Do not use the Hoover washer with a leak near electrical parts, burning smell, smoke, sparks, overheating, repeated protective trips, an unsafe hose or tap, an idle-fill symptom, or a failed door interlock until qualified service has assessed it.
Common questions
FAQ
Why is my Hoover washing machine not taking in water?
Confirm the door and programme have started, then check the cold-water tap, household flow, fill-hose routing, and the model-specific inlet filter procedure with mains power disconnected. An E2 or equivalent indication supports a supply or fill-path diagnosis, but a recurring fault needs qualified service.
What does E2 mean on a Hoover washing machine?
Hoover's E2 guidance describes a failure to fill and points to water pressure, the supply tap, or a twisted or kinked hose. Hoover manuals can add drain-hose height and inlet-filter checks, so confirm the exact model's instructions and do not assume every code is identical across the range.
Can a blocked filter stop a Hoover washer filling?
Yes, Hoover identifies debris at the accessible rear inlet or anti-sand filter as a possible cause of slow or absent filling. Close the water tap and disconnect mains power before any model-supported inspection; stop if a connection is corroded, leaks, or cannot be handled safely.
Why does my Hoover washing machine fill and then empty?
Check the drain-hose route and height against the exact Hoover installation instructions. A hose routed too low or pushed too far into a drain can siphon incoming water. If water disappears immediately, the drain is blocked, or the route is uncertain, call a plumber or qualified technician.
What if clean water enters my Hoover washer while it is off?
Close the water tap when the washer is not supervised and arrange service. Hoover describes contamination at the inlet valve as one possible cause and recommends checking for leaks and having an engineer inspect the appliance if the symptom persists. Do not leave an idle-filling washer connected to an open supply.
When should I stop troubleshooting a Hoover washer that will not fill?
Stop for leaks near electrical parts, wet controls, burning smell, smoke, sparks, overheating, repeated protective trips, a damaged hose or tap, an interlock problem, or a recurring fill fault after the model-specific external checks and one documented reset. Use qualified plumbing, electrical, or appliance service as the symptom requires.
Read the exact guide
Official sources
- Error message E02 - Hoover Advice CentreHoover Advice Centre · Hoover washing-machine E2 or E02 fill faults, water pressure, supply tap, and kinked hose guidance
- Is it filling up when not in use?Hoover Advice Centre · Hoover washing-machine clean water entering while idle, inlet-valve filter, leak check, and service guidance
- Check the water fill pipe is not trapped or twistedHoover Advice Centre · Hoover washing-machine fill-hose routing, crushing, kinking, and safe installation guidance
- Check that the water supply is turned onHoover Advice Centre · Hoover washing-machine cold-water tap, seized or broken tap, safe hose-flow check, and mains isolation guidance
- Search and download of instruction manuals – Hoover UKHoover Home · Hoover model and product-code manual lookup for model-specific operating and troubleshooting instructions
- Check the filter on the back of the applianceHoover Advice Centre · Hoover washing-machine rear inlet filter, slow or absent filling, debris, and mains isolation guidance
- Is the water turned on?Hoover Advice Centre · Hoover washing-machine cycle-start dependency on water supply, tap state, and fill-hose routing
- Hoover Washing machine DXOA 412AHFN Instruction ManualHoover · Hoover washing-machine E2 fill indication, drain-pipe height, door, delay, reset, water-supply, and service guidance in an owner manual
Community feedback
Share a repair observation
Share a plain-text repair observation. Accepted observations are published automatically; this page may take a moment to update.