
On this page
Start here
Quick answer
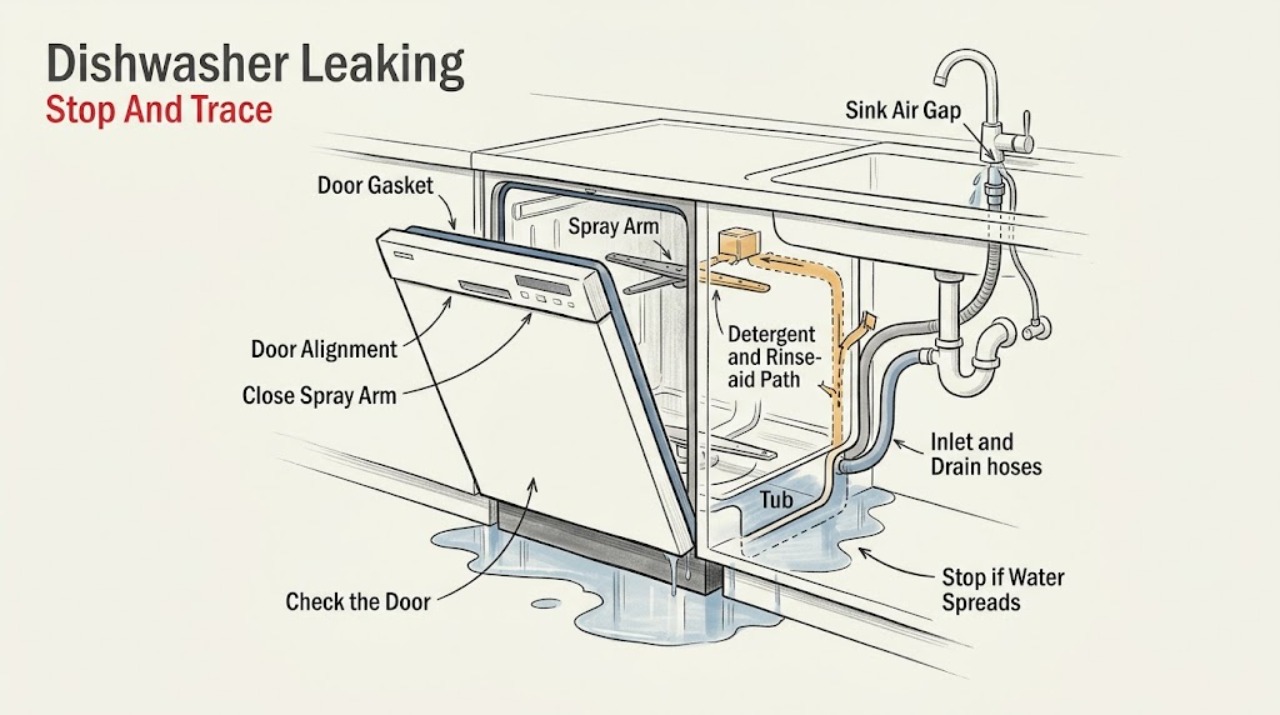
If a Hotpoint dishwasher is leaking or flooding, stop the cycle and keep people away from the water. If water is near the plug, wiring, outlet, or other electrical equipment, disconnect power only from a safe, dry, accessible point; do not touch a wet connection or pull a built-in dishwasher out. Dry and trace where water first appears: under the door, under the cabinet, at the sink air gap, or only inside the tub. Hotpoint dishwashers are sold in multiple model families through the official GE-hosted Hotpoint site, so use the full model number before applying a procedure. For a door leak, check only an obvious obstruction, new-installation alignment, visible gasket damage, and—on models that have one—the internal vent cap. Wrong detergent, too much detergent, rinse-aid spills, dish-soap residue, or a sponge can create suds that push water out. A blocked or damaged spray arm can misdirect water toward the door. For an air-gap leak, follow the model and plumbing arrangement to inspect the external cap only with the dishwasher unlatched. Do not remove panels, reach under a wet appliance, loosen hidden hoses, test a pump or valve, or run repeated cycles to reproduce a flood. Recurring water, an under-cabinet or internal leak, a damaged gasket, a flood-protection event, or any electrical/water hazard needs qualified Hotpoint/GE appliance service; an external drain-system or air-gap problem may need a plumber.
Before you begin
Safety first
- The owner may stop the cycle, isolate power from a safe dry point, trace visible water, remove an obvious loading obstruction, correct a clearly identified detergent source, inspect accessible spray-arm holes, and follow the exact external air-gap cap procedure. Qualified personnel must handle built-in removal, hidden hoses, base/pump/valve/sump/tub access, electrical testing, door assemblies, flood sensors, and recurring leaks.
Work through in order
Diagnostic checks
Use only checks that match the exact appliance or system and its official guide.
-
Check 1
Stop the dishwasher and, from a dry safe position, note where water first appears: under or around the door, under the front/base, at the sink air gap, or in the cabinet beside the appliance. Record whether it occurs while filling, washing, draining, or after the cycle ends. Photograph the puddle and model label without moving the machine.
Expected result: Water is near electrical parts; it is spreading rapidly; it appears at the door during washing; it appears under the base; it exits the air gap during draining; or it is beside the cabinet at a visible valve or hose.
Next step: Use the matching branch below. If power isolation cannot be done safely, leave the area alone and call qualified help. Do not run another cycle solely to identify timing.
Stop if: Stop for water at an outlet, plug, cord, wiring, smoke, sparks, burning odor, a hot connection, or rapidly spreading water. Do not pull or tip a built-in dishwasher.
Why this matters
Why: Water near electricity is an immediate stop condition. Timing and location separate door/suds/spray issues from drain, air-gap, inlet, or internal leaks.
-
Check 2
With the cycle stopped and the dishwasher safe to approach, inspect the visible door edge, gasket, lower corners, racks, and nearby dishes for an obvious obstruction. On a new installation, check from outside whether the door or control panel contacts the adjacent cabinet. Look for a torn, cut, worn, displaced gasket or a model-documented vent cap that is visibly loose.
Expected result: A dish or rack blocks closure; the panel touches cabinetry; the gasket is damaged or displaced; a vent cap is visibly loose on a model that has one; or the door and seal appear even and unobstructed.
Next step: Remove only an obvious loading obstruction and close the door normally. Follow the exact model manual for a visible vent cap or installation alignment. Arrange service for a damaged gasket, baffle, door, or recurring leak.
Stop if: Do not remove inner-door parts, gaskets, baffles, hinges, or panels; do not force alignment or operate with a damaged seal or water near electrical parts.
Why this matters
Why: An incomplete seal or misdirected door geometry can let wash water escape even when the latch catches. A sound visible seal makes detergent, spray direction, plumbing, or internal causes more likely.
-
Check 3
Inspect the tub and door for obvious foam or detergent residue after the machine is safe and stopped. Record whether the load was pre-washed with dish soap, rinse aid spilled on the door, a sponge or dish cloth was washed, or the wrong/excess detergent was used. Inspect only accessible spray-arm holes for food, detergent, mineral deposits, splits, or a visibly blocked arm, following the model manual.
Expected result: Persistent foam or soap residue is present; detergent type or amount was wrong; rinse aid spilled; a sponge was washed; a spray arm is blocked or damaged; or there are no suds and the accessible arm looks intact.
Next step: Stop the leak, remove only the clearly identified source of excess soap or obstruction, and follow the exact model cleaning guidance. Do not mix cleaners or run repeated cycles to flush foam. Escalate a damaged arm or continuing leak.
Stop if: Do not add household dish soap, bleach, drain cleaner, or another chemical; do not reach into a moving arm or operate with panels removed.
Why this matters
Why: These are distinct ways to create suds or deflect water out of the door. If none is present, a door seal, drain/inlet, installation, or internal fault is more likely.
-
Check 4
If water came from the sink air gap or cabinet side, keep the dishwasher latch off/unlatched and inspect only the external air-gap cap, sink drain opening, shut-off valve, and visible hose/clamp connections. Do not loosen a connection or reach behind the appliance. If the air-gap design matches the official guidance, clean only the accessible cap and material as directed, then replace the cap.
Expected result: The air gap overflows during drain; the cap has visible accumulation; the sink drain is backed up; a visible valve or hose/clamp is wet; or water comes from behind or beneath the dishwasher.
Next step: For a matching accessible air gap, restore its cap after cleaning and arrange plumbing help if it continues. For a visible external connection problem, stop water safely and call a plumber or qualified installer. Escalate hidden/base water to appliance service.
Stop if: Do not touch wet electrical connections, pull the dishwasher, loosen hidden hoses, remove the base, or continue operation with water under the appliance.
Why this matters
Why: Backflow or an external plumbing/installation connection is more likely than a door seal. A hidden or base leak cannot be localized safely from outside.
-
Check 5
Review the full Hotpoint model number and installation timing. Without moving the dishwasher, compare visible door clearance, drain routing, inlet routing, and any flood-protection or vent feature with the exact installation and use-and-care instructions. Note whether the leak began after installation, a hose change, arm cleaning, detergent change, or a first cycle.
Expected result: The leak began after installation; the door or control panel contacts cabinetry; a visible connection was changed; the model has a documented flood-protection feature; or no installation/model event explains the water.
Next step: Correct only an obvious external installation obstruction described by the exact manual and keep the appliance dry. Do not reset or defeat flood protection to continue washing. Arrange qualified service for a base leak, recurring flood response, or uncertain installation.
Stop if: Do not pull out a built-in dishwasher, alter drain loops, disconnect water lines, bypass a flood sensor, or operate with a wet base or electrical hazard.
Why this matters
Why: Hotpoint models and installations differ. A new-installation door contact or incorrectly connected visible hose can leak without an internal component failure, while a documented flood sensor does not identify the cause in another model.
-
Check 6
After documenting the leak location and completing only safe visible door, suds, spray-arm, air-gap, external-connection, and exact-model installation checks, decide whether water returns or remains unexplained. Keep the dishwasher out of service and preserve the model number and photos for the technician.
Expected result: The leak stopped after an obvious correction; water returns; water comes from the base or hidden hose; the tub does not drain; or the leak is accompanied by electrical symptoms.
Next step: Use the dishwasher only when it is dry, correctly closed, and operating without recurrence. Otherwise isolate water/power only when safe and arrange qualified Hotpoint/GE appliance service; use a plumber for an external drain or air-gap problem.
Stop if: Do not remove panels, test live wiring, reach under the machine, run repeated cycles, bypass flood protection, or keep operating with water near electricity, smoke, sparks, or burning odor.
Why this matters
Why: A stopped leak after a clear visible correction supports that branch but does not prove internal components are sound. Recurrence or hidden water may involve a pump, valve, hose, seal, sensor, control, drain system, or installation fault.
Use your observations
Decision map
Find the observation that best matches what you see, then follow the next safe action.
-
PATH 01Safety boundary
What you see
Water appears under or around the door and a load obstruction, cabinet contact, damaged gasket/baffle, loose applicable vent cap, or new-installation alignment issue is visible.
Do this next
Remove the obvious loading obstruction and follow the exact model's visible installation or vent-cap guidance. Arrange service for damaged seals, baffles, doors, or recurrence.
Why this path and its safety boundary
Why it matters: A seal or water-direction problem is more likely than a hidden pump fault; the exact gasket, baffle, vent, and alignment arrangement is model-dependent.
Safety stop: Do not remove inner-door parts, reshape the gasket, force hinges, or continue with water near electrical parts.
-
PATH 02Safety boundary
What you see
Foam or soap residue is present, wrong/excess detergent or rinse aid was used, a dish had soap residue, a sponge was washed, or the accessible spray arm is blocked or damaged.
Do this next
Stop the cycle, remove the visible cause using model care instructions, and do not mix cleaners or run repeated cycles to recreate the leak. Escalate continuing foam or a damaged spray arm.
Why this path and its safety boundary
Why it matters: Suds can push water through the door, and a blocked or split spray arm can direct water toward the door.
Safety stop: Do not use household dish soap or drain chemicals, reach into a moving arm, or operate an open machine.
-
PATH 03Safety boundary
What you see
Water exits the sink air gap during draining, the sink drain backs up, or the cabinet-side visible valve, drain hose, or clamp is wet.
Do this next
Inspect or clean only the accessible air-gap cap with the latch off as officially described. Call a plumber for recurring backflow or an external drain; call appliance service for hidden/base water.
Why this path and its safety boundary
Why it matters: Backflow or an external plumbing/installation connection is more likely than a door seal. The air gap is part of the home's drain system, not a universal dishwasher component.
Safety stop: Do not pull the dishwasher, loosen hidden hoses, handle wet electrical connections, or continue draining water onto the floor.
-
PATH 04Safety boundary
What you see
Water comes from under the dishwasher or a hidden hose, returns after visible checks, or appears without a clear door, suds, spray, air-gap, or external-connection cause.
Do this next
Keep the dishwasher out of service and arrange qualified Hotpoint/GE appliance diagnosis with the model, leak timing, and photos. Do not move the built-in unit unless instructed by a professional.
Why this path and its safety boundary
Why it matters: An inlet valve, drain/fill hose, sump, pump, seal, tub, sensor, or installation fault is possible. The puddle alone cannot select a component or justify disassembly.
Safety stop: Do not remove panels, reach underneath, test the pump or valve live, or operate with a wet base or electrical hazard.
-
PATH 05Safety boundary
What you see
Water reaches an outlet, cord, plug, junction, or exposed wiring, or smoke, sparking, burning odor, a hot connection, rapid flooding, or damage is present.
Do this next
Keep clear. Isolate power or water only from a safe, dry, accessible point; if that cannot be done safely, leave it for emergency or qualified service.
Why this path and its safety boundary
Why it matters: This is an immediate water/electrical safety event, not a detergent, gasket, or reset problem.
Safety stop: Do not touch wet electrical parts, pull the machine, restore power for testing, or run another cycle.
Helpful context
Understand the symptom
Safety comes before finding the first drip
A dishwasher combines water with a mains electrical connection under or beside cabinetry. Stop the cycle and keep clear of standing water. If water has reached an outlet, plug, cord, junction, or exposed wiring, do not touch the connection; isolate power only from a safe, dry location or have qualified help do it. Do not pull or tip a built-in dishwasher across wet flooring. The first inspection should locate the leak from outside, not expose the base, pump, valve, or wiring.
The location changes the diagnosis
Official support organizes dishwasher leaks by location: around the door, below the unit, at an air gap, or in the cabinet beside the appliance. Water that appears during washing at the door points toward suds, spray direction, closure, or gasket alignment. Water beside the cabinet can be an inlet or drain connection, while water that returns from the tub or base after visible checks needs service. Dry the area and record the cycle stage without repeatedly running a leaking machine.
Door leaks can be a seal or water-direction problem
On a new installation, the control panel or door can contact the adjacent cabinet and still latch without making a tight seal. A visible gasket tear, cut, wear, or missing/damaged corner baffle can also allow water out, although the arrangement varies by model. Support additionally notes that a loose internal vent cap can leak on models with that vent. Inspect only the visible door area and use the exact model procedure; do not remove the inner door, gasket, baffle, or hinge as a generic fix.
Suds and a blocked spray arm can push water out
Only automatic-dishwasher detergent belongs in the dispenser. Hotpoint/GE support says excess or wrong detergent, dish soap left on pre-washed dishes, rinse-aid spilled on the door, and washing a sponge or dish cloth can create foam that pushes water out. Food, detergent, or mineral deposits in a spray arm can also deflect water toward the front door. Correct only the visible condition described in the manual; do not add another cleaner to counteract the first one.
Air gaps and cabinet hoses are plumbing branches
Some installations use a sink air gap to prevent drain backflow. Official guidance says the latch should be off or unlatched before removing the external air-gap cover, and accumulated material can be removed before replacing the cap. A leak beside the cabinet can instead come from a shut-off valve or hose clamp. These checks concern visible external plumbing only. A hose disappearing behind the dishwasher, a wet base, or a leak that returns after an external check should be left for a plumber or appliance technician.
Do not choose a pump or gasket from the puddle alone
Hotpoint models differ in tub, spray, flood-sensor, hose, door-seal, and control arrangements. The official Hotpoint model page shows Active Flood Protect on a listed HDF330PGRBB dishwasher, but that feature and its response should not be generalized to every Hotpoint model. If water returns after visible door, detergent, spray-arm, air-gap, and external-connection checks, the source may be an internal pump, valve, sump, hose, seal, sensor, or installation issue. Keep the dishwasher out of service and provide the model, leak location, timing, and safe observations to qualified service.
Safety boundary
Stop conditions
- Stop immediately for water at an outlet, plug, cord, junction, or exposed wiring; smoke, sparks, burning odor, a hot connection, rapid flooding, or a damaged cabinet or appliance.
- Disconnect power only from a safe, dry, accessible point. Do not touch a wet plug or outlet, pull a built-in dishwasher, tip it, or reach under a wet appliance.
- Do not remove panels, inner-door parts, pumps, valves, hoses, or base covers; do not perform live electrical tests or bypass flood protection, door latches, or controls.
- Do not add household dish soap, bleach, drain cleaner, or another chemical to counteract suds. Use only automatic-dishwasher detergent and exact model instructions.
- Do not select a replacement gasket, spray arm, hose, pump, valve, sensor, or flood component from leak location alone; confirm the full Hotpoint model and obtain qualified diagnosis.
Only after diagnosis
Potential parts
- Hotpoint dishwasher door gasket or model-specific door baffle
Consider only when the exact model and inspection confirm a torn, cut, worn, displaced, or missing seal/baffle after visible door-obstruction and alignment checks.
Hotpoint models use different gasket locations and may or may not use corner baffles. Confirm the full model before ordering or installing. - Hotpoint dishwasher spray arm
Consider only when the exact model's accessible spray arm is split, damaged, or remains defective after removing food, detergent, or mineral deposits as directed.
Arm shape, mounting, and wash-system layout vary by model. A door leak without spray-arm evidence does not justify this part. - Hotpoint dishwasher inlet/drain hose, pump, or valve
Consider only after qualified diagnosis identifies a leaking or failed water-path component; an under-unit puddle cannot distinguish an inlet hose, drain hose, pump, valve, sump, or tub seal.
Confirm exact model, voltage, hose routing, connection type, and service procedure. Do not select or replace hidden water-path parts from location alone.
When checks do not resolve it
Need a professional?
Arrange qualified Hotpoint/GE appliance service when the leak returns after safe visible door, detergent, spray-arm, air-gap, external-connection, and model-specific installation checks; when water comes from the base or a hidden hose; when a gasket, door, spray arm, pump, valve, sump, sensor, or flood system may be involved; or when the dishwasher will not drain normally. Use a plumber for an external sink air-gap, drain, shut-off valve, or cabinet-side plumbing leak. Stop immediately for water near electricity, smoke, sparks, burning odor, a hot connection, rapid flooding, or a damaged cord/appliance.
Safety scope: The owner may stop the cycle, isolate power from a safe dry point, trace visible water, remove an obvious loading obstruction, correct a clearly identified detergent source, inspect accessible spray-arm holes, and follow the exact external air-gap cap procedure. Qualified personnel must handle built-in removal, hidden hoses, base/pump/valve/sump/tub access, electrical testing, door assemblies, flood sensors, and recurring leaks.
Common questions
FAQ
Where should I look first if my Hotpoint dishwasher is leaking?
Stop the cycle and trace the first visible location: under the door, under the base, at the sink air gap, or beside the cabinet. Hotpoint/GE support uses those locations to separate door, suds/spray, drain, air-gap, inlet, and internal causes. Keep water away from electrical parts and do not pull a built-in dishwasher.
Can too much detergent make a Hotpoint dishwasher leak?
Yes. Official support says wrong or excessive detergent, dish-soap residue on dishes, rinse-aid spills, or washing a sponge or dish cloth can create suds that push water out. Stop the cycle, do not add another chemical, and use only automatic-dishwasher detergent in the model-specified amount.
Why is my Hotpoint dishwasher leaking from the door?
Check for a rack or dish blocking closure, cabinet contact after installation, visible gasket or baffle damage, a model-specific vent-cap issue, foam, or a spray arm that is blocked or damaged. If the visible seal and water direction are normal but leakage returns, arrange service rather than removing the inner door.
What should I do if water comes out of the sink air gap?
Keep the dishwasher unlatched and inspect only the accessible air-gap cap as official guidance describes. Remove visible accumulation and replace the cap if the installation matches that design. Recurring backflow may require a plumber; do not pull the dishwasher or touch wet electrical connections.
When should I stop using a leaking Hotpoint dishwasher?
Stop for water near an outlet, plug, cord, wiring, or other electrical part; smoke, sparks, burning odor, rapid flooding, a hot connection, a wet base, or a damaged appliance. Isolate power or water only from a safe, dry, accessible point and arrange qualified appliance, electrical, or plumbing service.
Read the exact guide
Official sources
- Hotpoint Dishwashers - Official Product SearchHotpoint / GE Appliances · Official Hotpoint catalog showing multiple dishwasher families; it is not a repair procedure for every model.
- Dishwasher - LeakingGE Appliances support for Hotpoint/GE dishwasher platform · Official manufacturer support overview hosted by GE Appliances; exact Hotpoint model procedures still control.
- Dishwasher - Water Leaks From the Air GapGE Appliances support for Hotpoint/GE dishwasher platform · Official guidance for built-in dishwasher installations that use an air gap; not every installation has one.
- Dishwasher - Leaks from Under CabinetGE Appliances support for Hotpoint/GE dishwasher platform · Official manufacturer guidance for visible cabinet-side connections; hidden and base leaks require qualified service.
- Dishwasher - Preventing LeakingGE Appliances support for Hotpoint/GE dishwasher platform · Official manufacturer guidance; detergent amounts, hardware, and access remain model-specific.
- Hotpoint HDF330PGRBB Hotpoint Two Button Dishwasher with Plastic InteriorHotpoint / GE Appliances · Official product page for HDF330PGRBB; features such as Active Flood Protect are not universal across every Hotpoint dishwasher.
- Dishwasher - Leaks From DoorGE Appliances support for Hotpoint/GE dishwasher platform · Official manufacturer support; gasket, baffle, vent, and alignment designs vary by model.
Community feedback
Share a repair observation
Share a plain-text repair observation. Accepted observations are published automatically; this page may take a moment to update.