
On this page
Start here
Quick answer
Stop the cycle and keep the appliance out of use until you know where the water is coming from. From a dry, stable position, close the washer dryer's water supply taps and disconnect power only if the plug and floor are dry and it is safe to do so; if water is near an outlet, cable, or electrical equipment, do not touch the plug or water and isolate power from a dry location or call a qualified professional. Mop up only water you can reach safely, then document whether the leak starts during filling, washing, dispensing, draining, or drying. Inspect the visible fill-hose connections, drain hose and waste connection, door seal, dispenser area, and floor level without removing cabinet panels. A loose or kinked hose, blocked waste path, excessive water pressure, dispenser buildup, damaged seal, or internal leak can look similar from the floor. If the source is inside the cabinet, the leak returns after external checks, the hose or seal is damaged, or there is flooding, electrical exposure, sewage, or structural damage, leave the appliance isolated and arrange qualified appliance or plumbing service.
Before you begin
Safety first
- This article covers safe observation and triage only. A qualified professional determines whether plumbing correction, hose or seal replacement, pump or valve repair, cabinet access, electrical testing, or other model-specific work is appropriate.
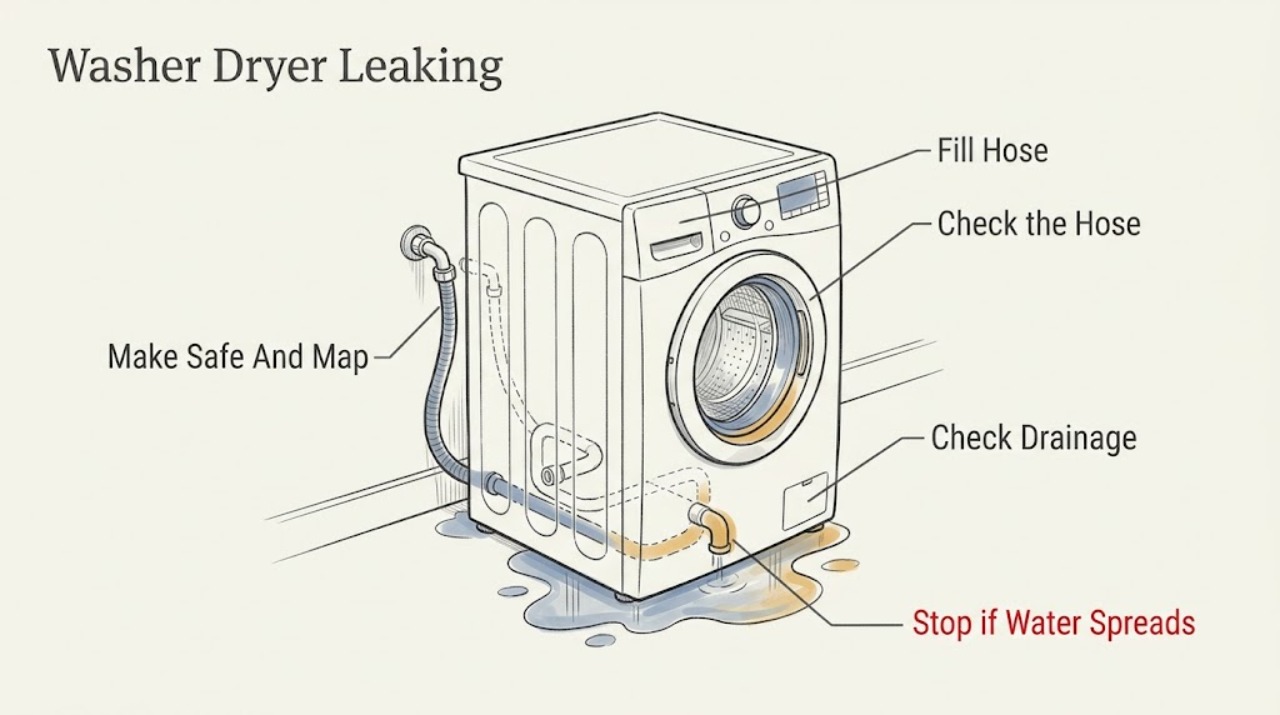
Work through in order
Diagnostic checks
Use only checks that match the exact appliance or system and its official guide.
-
Check 1
Stop the programme and move people and pets away from the wet area. From a dry, stable position, close the washer dryer's water-supply taps; disconnect the plug only when the plug, hands, floor, and route are dry and accessible, otherwise isolate the circuit from a dry location or call a qualified professional.
Expected result: Record whether water is still entering, whether the puddle is near the plug or cable, whether any breaker or residual-current device has operated, and whether the leak is a few drops, a spreading puddle, or active flooding.
Next step: Photograph the floor, hose route, controls, and any visible water trail without moving the appliance; keep the water supply closed and the appliance isolated until the source is identified.
Stop if: Do not touch a wet plug, socket, cable, standing water, or flooded floor; do not pull the appliance through water; do not restore power merely to repeat the leak.
Why this matters
Why: Water that continues with the appliance off can indicate a supply or plumbing leak. Water near electrical equipment, a tripped protective device, or active flooding is a safety condition rather than a troubleshooting invitation. A dry, isolated appliance permits only the visible checks below.
-
Check 2
With the water taps closed and the appliance isolated, inspect the visible fill-hose connection at the household tap and at the washer dryer, using a dry cloth only to identify fresh moisture; do not remove the hose while it is pressurized and do not reach behind a wet cabinet.
Expected result: The tap end, appliance end, hose body, or nearby plumbing is wet; the hose is kinked, cracked, bulging, or rubbing; or the connections remain dry.
Next step: Keep the tap closed and provide the location and photographs to a qualified appliance or plumbing professional; replace a hose only with the exact model-approved procedure and a new compatible hose.
Stop if: Do not overtighten, cut, patch, clamp, or reuse a visibly damaged or unknown hose; do not open an inlet safety device or perform a pressurized repair.
Why this matters
Why: Moisture at one connection or damage along the hose supports an external supply-side cause. A dry, intact hose does not rule out a leak that occurs only when the valve opens, but it makes the drain, dispenser, door, or internal path more important to compare.
-
Check 3
Follow the visible drain hose from the back of the washer dryer to the standpipe, sink trap, or waste connection without moving the appliance, and inspect the connection from a dry position; note the hose route without pushing it farther into the pipe.
Expected result: The drain hose is kinked, loose, submerged, pulled out, too far down the standpipe, or attached to a sink spigot that still has a blanking cap; the waste connection is blocked; or the route is dry and secure.
Next step: Keep the appliance out of service, clear only an accessible household waste obstruction from the plumbing side if no water or electrical hazard is present, and ask a professional to correct an appliance-side or uncertain connection.
Stop if: Do not pull the washer dryer forward across a wet floor, dismantle the pump or cabinet, insert tools into a hidden waste path, or run a cycle to pressure-test the connection.
Why this matters
Why: A loose or poorly routed drain hose can release water during pump-out. A blocked waste path can make water back up or escape at a joint. The exact installation rules are model-dependent, and a dry route shifts attention to the front or internal cabinet.
-
Check 4
From the front, inspect the door glass and visible seal, dispenser drawer area, lower filter cover if fitted, and the floor directly below them; use only ordinary access described by the exact user manual and do not remove panels or reach into the drum or pump.
Expected result: There is a trapped object, torn or displaced seal, detergent buildup or overflow trail, water at the filter cover, or no visible front source; record whether the leak begins during filling, washing, dispensing, or draining.
Next step: Remove only loose debris that the manual explicitly identifies as user-accessible and dry the area; if a seal, filter cover, dispenser path, or internal source is damaged or uncertain, leave the water off and arrange service.
Stop if: Do not force the door, unscrew a wet filter, open cabinet panels, probe a seal with sharp tools, or operate the appliance with a damaged door seal or leaking lower cover.
Why this matters
Why: A damaged door seal can leak during tumbling, while dispenser residue or excessive incoming flow can send water over the front. Moisture at a filter cover may indicate an improperly seated cap or a drainage issue. No visible front source leaves an internal leak unresolved.
-
Check 5
Use the saved display information, floor marks, and photographs to place the leak in the cycle timeline; compare whether it was present before filling, during dispensing or washing, during pump-out, after the cycle, or only during a drying programme, without starting another cycle.
Expected result: The leak is supply-side before the drum turns, front-side during filling or washing, rear or waste-side during draining, delayed after the cycle, or associated only with drying; the timing is unknown.
Next step: Give the timeline and exact phase to the service professional, along with whether the drum was full, empty, or unusually foamy; keep water and power isolated while the source remains unresolved.
Stop if: Do not run repeated rinse, spin, or dry programmes to reproduce a leak, and do not infer that a dry idle appliance is repaired.
Why this matters
Why: Timing narrows the handoff: fill timing favors the inlet or dispenser, wash timing favors the door or tub path, pump-out timing favors the drain route, and a drying-only symptom may require model-specific internal service. Unknown timing is not evidence that the appliance is safe to run.
-
Check 6
Review the leak location, timing, visible damage, water isolation, and electrical conditions, then choose the safest service route and prepare the appliance record; do not attempt an internal repair.
Expected result: Choose urgent help for active flooding, water near electrics, a tripped protective device, sewage-contaminated water, a burst or damaged hose, cabinet-base leakage, or a leak that returns. Choose prompt scheduled appliance or plumbing service only when the water is isolated and no hazardous condition is present.
Next step: Provide the model identification, dated photographs, leak phase, hose and waste arrangement, error or protective-device history, and every safe check already made to the qualified service provider.
Stop if: Do not bypass a protective device, make a live electrical check, dismantle the cabinet, replace an unverified part, or return the washer dryer to service while it leaks.
Why this matters
Why: The decision distinguishes a safe service handoff from continued use; it does not diagnose a pump, valve, tub, door seal, or control component. A part name should be confirmed against the exact model rather than guessed from a puddle.
Use your observations
Decision map
Find the observation that best matches what you see, then follow the next safe action.
-
PATH 01Safety boundary
What you see
Water is near the plug, socket, cable, control, or other electrical equipment; a protective device has tripped; or water is actively spreading.
Do this next
Keep clear, do not touch the water or plug, isolate power only from a dry safe location if possible, close the water supply if it can be reached without contact, and arrange urgent qualified help.
Why this path and its safety boundary
Safety stop: No wet-area electrical handling, plug removal, cabinet opening, or cycle reproduction.
-
PATH 02Safety boundary
What you see
Fresh water appears at the tap, fill-hose connection, hose body, or household plumbing before the machine begins its wash action.
Do this next
Keep the supply tap closed and request appliance or plumbing service; use only a model-approved new hose and procedure if a professional confirms the hose is the source.
Why this path and its safety boundary
Safety stop: Do not repair a pressurized connection, patch a hose, or run the appliance with the supply leak unresolved.
-
PATH 03Safety boundary
What you see
Water appears at the drain hose, standpipe, sink trap, waste connection, or floor behind the machine during or after pump-out.
Do this next
Keep the washer dryer isolated, document the route, and have the waste connection or appliance drain path corrected by the appropriate qualified professional.
Why this path and its safety boundary
Safety stop: Do not move the appliance through water, force the drain hose, open the pump, or pressure-test with another cycle.
-
PATH 04Safety boundary
What you see
Water appears at the dispenser, door seal, door glass, lower filter cover, or front floor during filling or washing.
Do this next
Leave water and power isolated, remove only safe loose debris allowed by the exact manual, and arrange service for a damaged seal, dispenser, filter cover, or internal path.
Why this path and its safety boundary
Safety stop: Do not force the door, scrape the seal, remove a wet filter, or operate with visible seal or cover damage.
-
PATH 05Safety boundary
What you see
The external hoses and visible front areas are dry, but water returns from beneath the cabinet, the source is hidden, or the leak occurs only during drying.
Do this next
Stop using the washer dryer and arrange model-specific qualified appliance service; provide the timing and photographs rather than opening the cabinet.
Why this path and its safety boundary
Safety stop: No cabinet removal, internal hose or pump work, live testing, or repeated programme runs.
Helpful context
Understand the symptom
First separate a supply leak from a cycle-related leak
A puddle at the rear can be a fill connection, a drain connection, or water that ran along the floor from somewhere else. Water at the front may come from the door seal or dispenser, while water that appears only during pump-out points toward the drain route. Do not start another full cycle just to make the leak appear. Record the phase shown on the display, whether the drum contained water, and whether the first use followed installation or relocation. Hotpoint notes that a newly installed appliance can still contain water left from factory testing, but continuing or recurring leakage still needs a safe source check.
Use the installation arrangement as evidence, not as a reason to open the cabinet
The visible hose route matters. Hotpoint's manual says the inlet hose should not be kinked, the drain hose should be secured and correctly positioned, and an under-sink connection must have its removable spigot restriction cleared. A hose pushed too far into a standpipe, an unsecured waste connection, or a kink can produce drainage trouble or water escaping at the connection. Model instructions vary, so compare the installation with the exact manual for the appliance rather than applying a generic height or fitting rule. Never cut a hose, open an electrical inlet device, or reach behind wet equipment.
A clean external check can still require professional repair
Visible checks can identify a loose connection, kink, dispenser overflow, damaged seal, or waste connection that needs attention. They cannot prove that an internal hose, pump, tub, valve, or cabinet seal is sound. If the source is hidden, if water returns after a permitted external correction, or if the washer dryer has tripped power, stopped with a fault, or leaked from the cabinet base, stop using it. Give the engineer the leak phase, photographs, model identification, and what was isolated; do not keep repeating cycles or remove panels to chase a drip.
Only after diagnosis
Potential parts
- washer-dryer inlet hose
Consider this only if the exact model manual and a qualified inspection identify a cracked, bulging, or leaking inlet hose; a puddle alone does not establish hose fit.
Match the exact Hotpoint model and connection arrangement, use a new approved hose, and close the water supply before any permitted replacement. - washer-dryer drain hose
Consider this only when the drain hose itself is damaged or its connection cannot be restored under the exact installation instructions.
Confirm the model, hose route, securing method, and waste connection; do not extend, cut, or force the hose as a trial. - washer-dryer door seal
Consider this only when inspection shows a tear, displacement, or persistent door-area leak and the exact model confirms the seal identity.
Seal replacement is a model-specific repair; do not use a generic seal, sharp tools, or the appliance with a damaged seal.
When checks do not resolve it
Need a professional?
Arrange qualified appliance or plumbing service when the leak returns, the source is inside the cabinet, a hose, door seal, dispenser, pump, or filter cover is damaged, the leak happens only during a cycle you cannot safely observe, or external checks do not identify a safe correction. Treat active flooding, water near electrical equipment, a tripped protective device, sewage-contaminated water, and structural or floor damage as urgent.
Safety scope: This article covers safe observation and triage only. A qualified professional determines whether plumbing correction, hose or seal replacement, pump or valve repair, cabinet access, electrical testing, or other model-specific work is appropriate.
Have this ready
- Exact model identification and installation location
- Dated photographs of the puddle, water trail, hose ends, drain route, dispenser, door seal, and lower front
- The programme phase when the leak begins and whether the drum is filling, washing, draining, or drying
- Whether water and power were isolated, whether a protective device operated, and whether the leak continued while idle
- Any recent installation, relocation, hose change, error display, overflow, foam, or household plumbing work
Common questions
FAQ
What should I do first if my Hotpoint washer dryer is leaking?
Stop the programme, keep people and pets away, close the water-supply taps, and isolate power only from a dry safe position. If water is near electrical equipment or is spreading, do not touch the plug or water; isolate power from a dry location or arrange urgent qualified help.
Why is my Hotpoint washer dryer leaking from the front?
A front leak can involve the door seal, dispenser area, lower filter cover, excessive incoming flow, or an internal path. Inspect only the visible areas with water and power isolated, note the cycle phase, and arrange service for damage or an unresolved source.
Can I run another cycle to find where the leak is?
Do not repeatedly run the appliance to reproduce a leak. Use the display, floor marks, photographs, and the last observed cycle phase to document timing; a professional can test the appliance safely after the water and electrical risks are controlled.
When does a washer-dryer leak need urgent service?
Seek urgent help for active flooding, water near a socket or cable, a tripped protective device, sewage-contaminated water, a burst hose, structural or floor damage, or a leak that continues while the appliance is idle.
Read the exact guide
Official sources
- Hotpoint Instructions for Use: RPD 10457 JHotpoint · Used for general installation principles only: inspect for kinks and secure connections, do not overgeneralize model-specific dimensions, and route electrical or internal work to a qualified person.
- Washing Machine Troubleshooting: Quick Fixes for Common ProblemsHotpoint · Provides corroborating guidance for checking door seals, hose connections, overloading, drain paths, and disconnecting power before repairs; model-specific instructions still control.
- Hotpoint Service Washer Dryer RepairHotpoint · Supports external hose, plumbing, dispenser, levelling, error and drain-path checks, and escalation when the leak persists.
- Washer Dryer Troubleshooting & Repair ServiceHotpoint · Supports the leak-source checks, first-use context, water-supply and drain-hose inspection, dispenser and levelling observations, and unplugging before spare-part work.
Community feedback
Share a repair observation
Share a plain-text repair observation. Accepted observations are published automatically; this page may take a moment to update.