
On this page
Start here
Quick answer
Stop the cycle, keep people away from wet electrical areas, close the dishwasher's water tap if it can be reached safely, and disconnect power only from a dry, safe position. Then locate when and where water first appears: front or door leaks point toward the door seal or loading/leveling; a rear leak points toward the inlet or drain hose and connections; leaking during filling makes the inlet path more likely; flooding or leaking at the end of a cycle makes the drain path, filter, or pump more likely. Indesit's official dishwasher guidance says the waste hose must be correctly installed and not kinked, the base filter should be clear, and integrated models require the rear water taps and pipes to be checked. Its official parts catalog links selected dishwasher front leaks with a door seal, rear leaks with a drain hose, filling leaks with an inlet valve, and end-of-cycle flooding with a drain pump, but each part is model-specific. Do not run another cycle to test a leak, pull an integrated machine out, open the base, or work near water and energized wiring; use qualified service for internal pumps, valves, seals, hoses, anti-flood devices, or any persistent leak.
Before you begin
Safety first
- The user may stop the cycle, close the water tap from a safe position, read the model plate, inspect visible loading and hose routing, and clean an accessible filter only when the manual permits it and the floor/electrical area is dry. Qualified service must handle internal seals, valves, pumps, sump, anti-flood parts, cabinet movement, pressurized connections, wiring, and live testing.
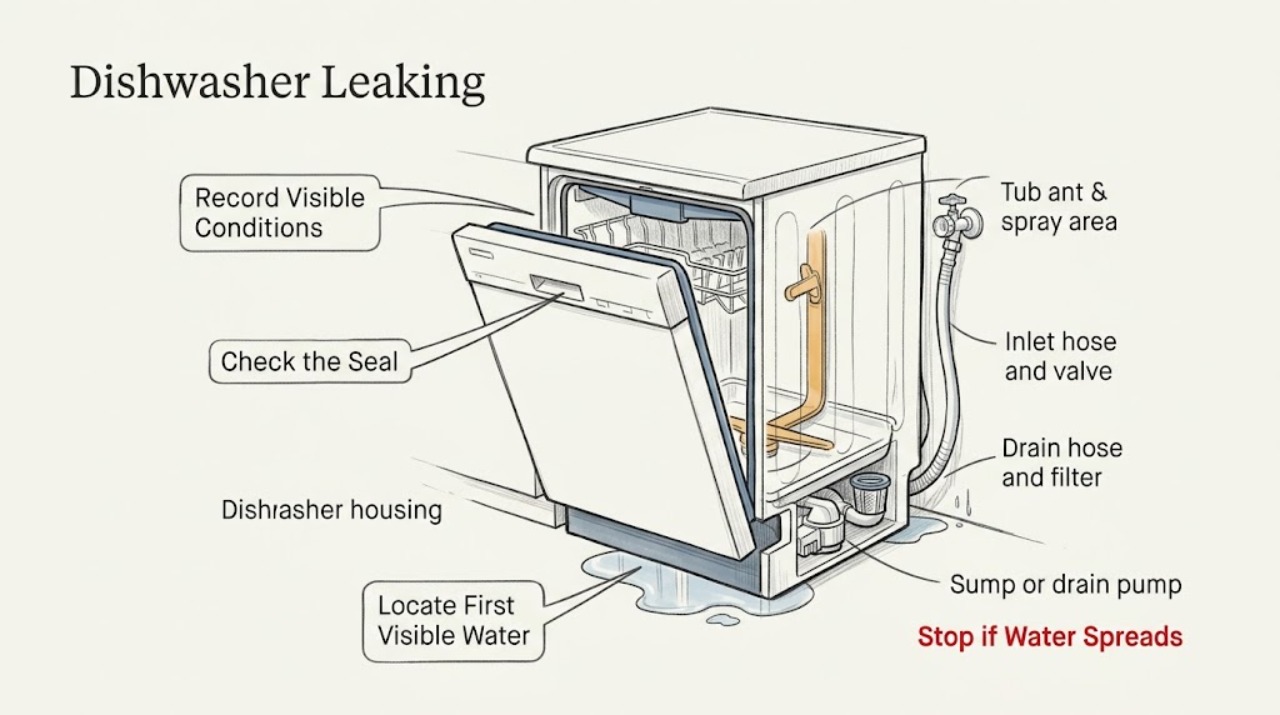
Work through in order
Diagnostic checks
Use only checks that match the exact appliance or system and its official guide.
-
Check 1
Stop the dishwasher, note the program phase and error lights, and read the model and serial information from the rating plate or door area without moving the appliance. If safe to reach, close the water tap and unplug from a dry position; otherwise keep clear.
Expected result: The leak is active, water is near the outlet or cord, the machine is integrated or difficult to access, or the area is dry enough for a safe shutoff and visual inspection.
Next step: Keep the appliance off until the source is located. If the floor or electrical area is wet, do not touch the plug or cabinet; arrange service. If dry and safe, continue with external, non-invasive checks.
Stop if: Do not step into water to unplug, pull out an integrated dishwasher, remove panels, or restart a leaking appliance.
Why this matters
Why: Immediate water and electrical safety takes priority. The model and installation type determine hose routing, filter access, door seal design, anti-flood protection, and whether a user check is allowed.
-
Check 2
With the machine off and safe to inspect, dry the accessible floor and look for the first wet edge at the door corners, beneath the front, along a side, at the rear hose area, or under the sink. Record whether the water is clean incoming water, cloudy wash water, or residual water after drain-out, without touching hot water.
Expected result: Water first appears at the door/front, at the rear or under-sink plumbing, or only after filling, washing, or draining.
Next step: Follow the matching door, inlet, drain, or base-filter branch. Do not run a deliberate test cycle if water is near electrical parts or the leak is substantial.
Stop if: Do not reach beneath the machine, touch a leaking hose while pressurized, or use a live cycle to watch for a leak.
Why this matters
Why: The first wet point and cycle phase narrow the path more reliably than the final puddle. Front timing suggests door/tub or spray-area issues; rear timing suggests inlet/drain connections; phase-specific timing distinguishes fill from drain faults.
-
Check 3
Inspect the accessible door perimeter, lower edge, gasket, racks, and spray arms for a folded or damaged seal, a dish or utensil preventing closure, a mis-seated rack, or a spray arm that cannot turn freely. Wipe visible detergent residue from the seal only when power is disconnected and the area is dry.
Expected result: The door does not close evenly, the gasket is torn, displaced, hardened, or dirty, an item obstructs closure, or the door and seal appear even and intact.
Next step: Remove only the visible loading obstruction and clean the accessible seal. If the gasket is damaged or the leak persists, arrange service or a model-verified seal; do not run another cycle to confirm it.
Stop if: Do not force the door, glue or stretch the gasket, remove inner-door panels, or order a seal based on appearance alone.
Why this matters
Why: A front leak or escaping steam is more consistent with the door-seal or loading path when the seal fails to contact evenly. An intact closure shifts suspicion toward internal tub, spray, inlet, or drain components.
-
Check 4
From outside the appliance, inspect the visible inlet hose, tap connection, cabinet connection, and floor around the rear or side for a kink, crack, loose-looking fitting, or water that appears before the spray phase. Do not loosen a pressurized connection or reach behind an integrated unit.
Expected result: Water appears as the dishwasher fills, the inlet hose or connection is visibly wet or damaged, or the visible inlet path is dry and the leak starts later.
Next step: Close the water tap and arrange service for a wet, cracked, or internal inlet path. If the inlet path is dry, continue with door and drain timing rather than replacing a valve.
Stop if: Do not cut a hose, remove a water-stop device, loosen a live water connection, or operate with an active supply leak.
Why this matters
Why: A filling leak makes the inlet hose, connection, or inlet valve path more likely. Indesit's official inlet-valve listing describes filling leaks as a possible valve fault, but its part is only for selected models and internal access is service work.
-
Check 5
Inspect the visible drain hose and under-sink connection for a kink, crushed section, loose clamp, or water trail. If the dishwasher's manual permits filter access and the floor is dry, disconnect power, remove only the accessible base filter, and clear visible food or glass while protecting hands.
Expected result: The drain hose is kinked or loose, the under-sink connection leaks during pump-out, the base filter is blocked, or the accessible drain path is clear.
Next step: Correct only a visible hose routing or under-sink connection issue permitted by the installation instructions and clean the accessible filter. Arrange service if water remains, the leak returns, or the internal drain path needs access.
Stop if: Do not remove the pump cover, put hands into standing water, use sharp tools in the sump, or pull out an integrated machine to reach a hose.
Why this matters
Why: Indesit says incorrect waste-hose installation, a blocked base filter, a trapped or kinked waste hose, or an unprepared under-sink spigot can prevent proper emptying and contribute to retained water or overflow. A clear external path does not rule out an internal pump or sump fault.
-
Check 6
Use the recorded history to classify the leak as only during filling, during wash spray, or at the end of a cycle when the machine drains. Note any standing water in the tub, anti-flood indication, pump noise change, or repeated failure to empty; do not restart a wet appliance to reproduce it.
Expected result: Water accumulates or spills at the end of a cycle, standing water remains after a clear filter and hose check, or the leak occurs before draining or with no retained water.
Next step: Keep the water supply closed and arrange qualified service for a recurring end-of-cycle leak, standing water, anti-flood condition, pump, sump, or internal hose fault.
Stop if: Do not run repeated cycles, override an anti-flood condition, drain by opening internal hoses, or perform live pump testing.
Why this matters
Why: End-of-cycle flooding or retained water makes a drain pump, sump, filter, or drain connection more likely; the official Indesit pump listing specifically associates a selected pump with flooding or leaking at the end of every cycle. Other timing points shift suspicion to inlet, tub, seal, or spray components.
-
Check 7
Stop owner troubleshooting when an accessible obstruction, gasket clean-up, visible hose routing, or permitted filter check does not restore a dry appliance, or when the suspected source is inside the base, door, tub, valve, pump, anti-flood assembly, or wiring.
Expected result: The leak persists, water is inside the base, a hose or seal is damaged, the anti-flood system activates, the machine is integrated, or water has reached electrical parts.
Next step: Keep the water tap closed and appliance disconnected when safe, protect the floor, and arrange qualified Indesit appliance service. Provide the model, installation type, first wet location, cycle phase, filter/hose observations, and any error indication.
Stop if: No cabinet removal, door disassembly, internal hose or pump work, live testing, or operation while water is near electrical parts.
Why this matters
Why: An internal seal, sump, pump, inlet valve, drain connection, anti-flood device, cabinet installation, or electrical component may be involved. The puddle does not identify a safe replacement part.
Use your observations
Decision map
Find the observation that best matches what you see, then follow the next safe action.
-
PATH 01Safety boundary
What you see
The first water appears at a door corner or front edge during washing, and the gasket is folded, damaged, dirty, or not contacting evenly.
Do this next
Clear visible loading interference and clean the accessible gasket. Arrange a model-verified seal or service if damage or leakage persists.
Why this path and its safety boundary
Why it matters: A door-seal, loading, door alignment, or spray-path issue is more likely than a rear hose fault; the official parts catalog associates selected front leaks or escaping steam with a door seal.
Safety stop: Do not force the door, glue the seal, or remove the inner door panel.
-
PATH 02Safety boundary
What you see
Water appears while the dishwasher fills, or the rear/side inlet connection or hose is wet, cracked, kinked, or loose-looking.
Do this next
Close the tap and arrange service for a supply leak or internal inlet-valve fault; do not loosen a pressurized connection.
Why this path and its safety boundary
Why it matters: The supply hose, connection, water-stop device, or inlet valve path is more likely. The official inlet-valve page uses filling leaks as a conditional indication, not a universal diagnosis.
Safety stop: Do not cut or bypass the inlet hose or continue operating with a supply leak.
-
PATH 03Safety boundary
What you see
Water first appears at the rear or under the sink during pump-out, and the waste hose is kinked, loose, trapped, or connected to an unprepared spigot.
Do this next
Close the water tap, correct only a clearly visible installation issue permitted by the manual, and arrange service if the hose, clamp, or plumbing continues to leak.
Why this path and its safety boundary
Why it matters: A drain-hose or plumbing connection is more likely than a door seal. Indesit directs users to waste-hose installation, under-sink plumbing, and kinks, while its parts catalog limits drain-hose fitment to selected models.
Safety stop: Do not pull out an integrated machine or disconnect a hose with standing water and power connected.
-
PATH 04Safety boundary
What you see
Water remains in the tub or spills at the end of a cycle after an accessible filter and visible drain-hose check, or an anti-flood indication appears.
Do this next
Keep the tap closed and arrange qualified service for pump, sump, anti-flood, or internal drain diagnosis.
Why this path and its safety boundary
Why it matters: A blocked internal drain path, sump, drain pump, or anti-flood condition is more likely than a simple external hose kink. Indesit's official pump listing associates selected pump faults with flooding or end-of-cycle leaks.
Safety stop: Do not repeatedly reset or run the dishwasher, override anti-flood protection, or open the base.
-
PATH 05Safety boundary
What you see
The source cannot be seen externally, water is inside the base or near electrical parts, the appliance is integrated, or the leak persists after safe owner checks.
Do this next
Close the water tap and disconnect only from a safe dry position; arrange qualified appliance or electrical service and protect the floor.
Why this path and its safety boundary
Why it matters: An internal tub, seal, valve, pump, hose, anti-flood, cabinet, or wiring fault may remain. The appliance should not be operated to gather more evidence.
Safety stop: No live testing, cabinet movement, internal disassembly, or operation with water near the outlet, cord, or wiring.
Helpful context
Understand the symptom
Locate the first wet point, not just the largest puddle
Water can travel under a dishwasher before it reaches the floor, so the puddle location is only a clue. Note whether the first visible water appears at the door edge, beneath the front kickplate, at the rear hose connections, or after draining. A clean paper towel placed on a dry floor can show the first edge that becomes wet, but do not run a cycle to reproduce a leak on a wet or electrically unsafe floor.
The cycle phase narrows the water path
A leak that begins as the machine fills is different from water appearing during spray or only when the pump-out starts. The official Indesit parts pages use that distinction: an inlet valve is a conditional possibility for a filling leak, a drain hose for a rear leak, and a drain pump for flooding or leaking at the end of every cycle. Those are diagnostic categories, not permission to replace a part without the exact model.
Filter and plumbing checks are the owner boundary
Indesit directs users to the waste hose, under-sink connection, and dishwasher base filter for drainage-related symptoms. Clear only visible debris from an accessible filter with power disconnected and no standing water around the electrical connection. Do not dismantle the sump, pump, anti-flood assembly, inlet valve, or a built-in cabinet to reach a hidden leak.
Protect against water and electrical hazards
A dishwasher combines mains electricity, hot water, and a wet floor. Close the water tap and disconnect the plug only if both can be reached without stepping into water or touching damaged equipment. If water is near the outlet, cord, junction box, or cabinet wiring, leave the appliance alone and arrange qualified appliance or electrical service. Do not keep restarting a machine with an active leak.
Safety boundary
Stop conditions
- Stop the cycle and close the water tap when safe; disconnect power only from a dry, safe position. Never step into water to unplug the machine.
- Do not run repeated cycles to locate a leak, pull out an integrated dishwasher, open the base, or work on pumps, valves, anti-flood devices, internal hoses, or wiring.
- Arrange urgent qualified appliance or electrical service for water near an outlet, cord, junction box, or wiring, as well as smoke, scorching, a hot or damaged cord, or repeated protective-device trips.
- Use the exact model manual and official fitment check for seals, hoses, valves, and pumps; protect the floor and keep the appliance off when an internal or persistent leak remains.
Only after diagnosis
Potential parts
- dishwasher door seal or gasket
Consider this category only when a front leak follows the door edge and the exact model's seal is visibly torn, displaced, hardened, or not contacting after loading and cleaning checks.
Indesit seal shapes and fitment vary by model. Confirm the complete model and official fit information; do not use a universal seal by appearance. - dishwasher inlet hose or inlet valve service
Consider this category only when water appears during filling or a qualified inspection finds a wet, cracked, loose, or internally failed inlet path.
Water-stop hoses, valves, connectors, and electrical controls are model-specific. Close the water tap and leave internal replacement to qualified service. - dishwasher drain hose or under-sink connection
Consider this category only when the first wet point is at the rear or under-sink connection during drain-out and visible routing or plumbing correction does not cure it.
Drain hose length, clamps, routing, and model fit vary. Do not pull out an integrated dishwasher or disconnect a wet hose with power connected. - dishwasher drain pump or sump service
Consider this service category only when water remains or flooding occurs at the end of a cycle after the accessible filter and drain-hose path are clear.
Pump, sump seals, anti-flood parts, and wiring require model-specific diagnosis. Do not open the base or perform live tests.
When checks do not resolve it
Need a professional?
Arrange qualified Indesit dishwasher service when a front, rear, filling, washing, or end-of-cycle leak persists after safe visible checks, when the filter and drain hose are clear but water remains, or when a seal, inlet valve, drain pump, sump, anti-flood device, integrated installation, or internal wiring needs access. Close the water tap and disconnect only from a safe dry position. Stop immediately for water near electrical parts, smoke, scorching, a hot or damaged cord, or repeated protective-device trips.
Safety scope: The user may stop the cycle, close the water tap from a safe position, read the model plate, inspect visible loading and hose routing, and clean an accessible filter only when the manual permits it and the floor/electrical area is dry. Qualified service must handle internal seals, valves, pumps, sump, anti-flood parts, cabinet movement, pressurized connections, wiring, and live testing.
Common questions
FAQ
Why is my Indesit dishwasher leaking from the front door?
Check for a dish or rack holding the door open and inspect the accessible gasket for dirt, folds, displacement, or damage. Indesit's official parts catalog associates a front leak or escaping steam with a selected-model door seal, but a spray-area, tub, or alignment fault can look similar. Do not force the door or replace a seal without the exact model check.
What does a leak from the back of an Indesit dishwasher mean?
Inspect the visible inlet and drain hose routing and under-sink connection from a dry, safe position. A leak during filling points toward the inlet path; a leak during pump-out points toward the drain hose or plumbing. Indesit's official drain-hose listing links a rear leak with that category but limits fitment to selected models.
Why does my Indesit dishwasher flood or leak at the end of a cycle?
First keep the water tap closed and, if safe, inspect the accessible base filter, drain hose, and under-sink connection for blockage or kinks. If water remains or the leak returns after those checks, a drain pump, sump, anti-flood device, or internal drain path may be involved. Indesit's official pump listing associates a selected pump with flooding or end-of-cycle leaks; arrange service rather than opening the base.
Should I run my Indesit dishwasher again to find the leak?
No, not if water is near the floor, outlet, cord, or cabinet, or if the leak is substantial. Record whether the first water appeared during filling, washing, or draining from the previous safe observation, close the water tap, and disconnect only from a dry safe position. Qualified service should reproduce an internal leak safely.
Can I replace an Indesit dishwasher hose or pump myself?
Do not choose or replace one from the symptom alone. Indesit's official parts pages identify hoses, valves, seals, and pumps only for selected models and require a model fit check. Visible routing or an accessible filter may be checked as the manual allows, but internal pump, valve, anti-flood, pressurized-water, and electrical work belongs to qualified service.
Read the exact guide
Official sources
- Dishwasher Inlet Valve J00114345 - Indesit Spare PartsIndesit Spare Parts · Official Indesit-hosted parts page. It is conditional evidence for a leak during filling and does not authorize homeowner valve replacement or establish universal fit.
- Dishwasher Drain Hose J00053248 - Indesit Spare PartsIndesit Spare Parts · Official Indesit-hosted parts page. Use the rear-leak association only conditionally and verify the exact model; the catalog's shared-family wording does not establish universal fit.
- Indesit | Integrated Dishwaher Faq | Indesit ServiceIndesit Service · Official Indesit UK service page for integrated dishwashers only; do not apply its installation assumptions to freestanding or slimline machines.
- Indesit | Dishwasher Faq | Indesit ServiceIndesit Service · Official Indesit UK service page for dishwasher support. Exact access and procedures vary by model; the model manual takes precedence.
- Dishwasher Drain Pump J00173979 - Indesit Spare PartsIndesit Spare Parts · Official Indesit-hosted parts page. It is conditional evidence for flooding or end-of-cycle leaking and does not establish universal pump fit or permit internal DIY repair.
- Dishwasher Door Seal J00115953 - Indesit Spare PartsIndesit Spare Parts · Official Indesit-hosted parts page. Its visible fitment wording is limited to selected compatible models and contains shared brand-family text; use it only as conditional evidence, never as universal Indesit fitment.
Community feedback
Share a repair observation
Share a plain-text repair observation. Accepted observations are published automatically; this page may take a moment to update.