
On this page
Start here
Quick answer
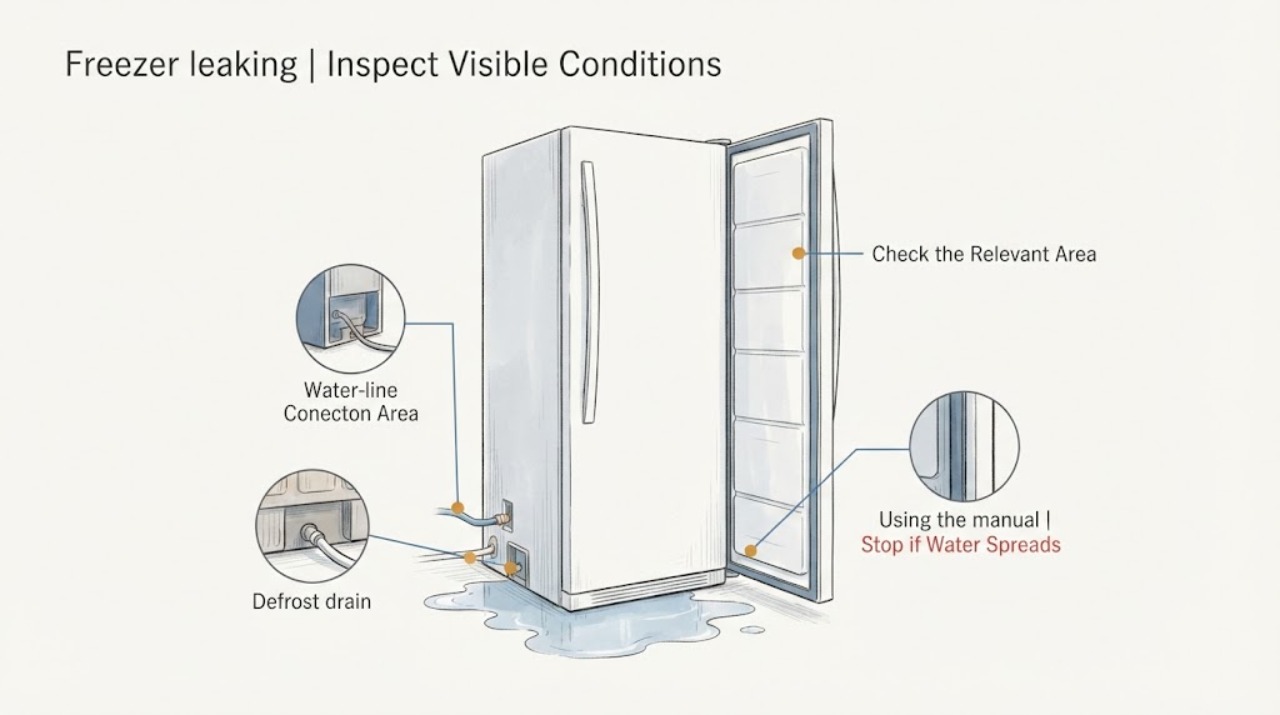
Protect the floor and frozen food, then identify where the water first appears: inside the freezer, at the door/front edge, underneath the cabinet, or near an ice-maker water connection. A sheet of ice or water on the freezer floor commonly points to a defrost drain that is blocked or frozen; frost at the front can follow a door that is not sealing; water underneath can come from the drain pan or a water line. Check only accessible, model-appropriate areas, keep water away from electrical parts, and use the Kenmore manual for the exact freezer model. If the leak is active or recurring, the drain path or pan is damaged, the door will not seal, or inspection requires moving panels, arrange qualified service.
Work through in order
Diagnostic checks
Use only checks that match the exact appliance or system and its official guide.
-
Check 1
Wipe up standing water, keep the freezer door closed, and identify where the leak first appears. Look for water or a sheet of ice on the freezer floor, frost around the front gasket, a drip beneath the rear cabinet, or moisture at an ice-maker or dispenser water connection. If water reaches the plug or outlet, keep clear and isolate power only from a safe external disconnect.
Expected result: The first wet point is inside/front, underneath the rear or center of the cabinet, at a water-line connection, or cannot be located safely.
Next step: Follow the matching branch and note whether the leak appears after a defrost period, after ice production, or continuously. Keep the freezer closed and arrange prompt service for an active or electrical-area leak.
Why this matters
Why: An interior ice sheet often indicates defrost water backing up; front frost suggests a door-seal issue; an underside drip can involve the drain pan or water line. Water near electrical equipment is a safety issue regardless of the original cause.
-
Check 2
Inspect the door and gasket from the outside and accessible interior edge. Remove only a package or bin that prevents closure, and look for a torn, twisted, dirty, or visibly separated gasket and a band of frost around the front opening. Confirm the door or drawer closes evenly without force.
Expected result: The door is obstructed or not sealing, frost is concentrated around the front, or the door and gasket appear intact.
Next step: Remove an accessible obstruction and clean the gasket/contact surface according to the model manual. If the gasket is torn or the door remains misaligned, keep the freezer closed and arrange service.
Why this matters
Why: Warm humid air entering through a poor seal can create excessive frost and meltwater that escapes at the front. A clean, intact seal makes a defrost-drain, drain-pan, or water-line source more likely.
-
Check 3
Using the Kenmore manual for the exact model, inspect only the accessible freezer-floor or drain-trough area for visible ice or debris. If the manual permits a user defrost or drain cleanout, follow its method and keep water contained; do not use sharp tools, boiling water, a heat gun, or a probe into a hidden drain. If the manual does not provide a safe user procedure, stop at visual inspection.
Expected result: A drain opening is visibly iced or blocked, water is pooled on the freezer floor, or the drain area is hidden behind a panel or cannot be reached safely.
Next step: Follow only the model-approved thaw/clean procedure. If the opening is hidden, ice returns, or water continues after the approved procedure, arrange qualified appliance service.
Why this matters
Why: A blocked or frozen defrost path can make meltwater overflow into the freezer and then onto the floor. A hidden or recurring blockage may involve the defrost system or drain routing and requires model-specific service.
-
Check 4
If the freezer has an ice maker or water dispenser, inspect the accessible tubing and shutoff connection for a kink, crack, damp fitting, or drip pattern that changes after ice production or dispensing. Do not loosen a pressurized fitting; close the household water shutoff before any connection inspection described in the manual.
Expected result: The leak occurs after ice or water use, a connection is damp or damaged, or the water-line area is dry and the leak occurs independently.
Next step: Close the water supply and arrange service for a cracked tube, valve, or fitting. Do not keep making ice or dispensing water while a connection leaks.
Why this matters
Why: A water-line, inlet-valve, or ice-maker connection is more likely when the timing follows water demand. A dry water-line area shifts the focus back to defrost drainage, the door seal, or the drain pan.
-
Check 5
After the accessible seal, drain-area, and water-line checks, decide whether the leak stops and stays stopped or returns during normal cooling/defrost or ice-making operation. Record the first wet point, timing, frost pattern, food temperature, and any water shutoff used; do not repeatedly move or power-cycle the freezer to reproduce the leak.
Expected result: The leak resolves after an approved obstruction or drain procedure, or it returns/continues with no safe external explanation.
Next step: For a recurring or unexplained leak, keep the door closed, protect the food, and arrange qualified service using the model number and observations. Use food-safety guidance if the freezer has warmed or lost power.
Why this matters
Why: A resolved spill or accessible blockage may explain a one-time puddle. A recurring leak indicates an unresolved drain, pan, seal, leveling, water-line, defrost, or internal fault.
Use your observations
Decision map
Find the observation that best matches what you see, then follow the next safe action.
-
PATH 01Safety boundary
What you see
Water or a sheet of ice is on the freezer floor, and the door seal appears intact.
Do this next
Use the exact Kenmore manual to locate and safely clear or defrost the accessible drain path if a user procedure is provided. Keep water contained and reconnect only as the manual directs.
Why this path and its safety boundary
Safety stop: Stop if the drain is behind a panel, the ice returns, or the leak continues after the approved procedure; arrange service.
-
PATH 02Safety boundary
What you see
Frost is concentrated around the door, the gasket is damaged, or the door/drawer cannot close firmly.
Do this next
Remove accessible obstructions and clean the seal/contact surface. Arrange model-specific service for a torn gasket, persistent frost, or door alignment problem.
Why this path and its safety boundary
Safety stop: Do not chip ice, force the door, or continue if the cabinet is unstable or water reaches electrics.
-
PATH 03Safety boundary
What you see
The leak appears after ice-maker/dispenser use or at an accessible water-line connection.
Do this next
Close the household water shutoff and arrange qualified appliance service for a leaking tube, valve, or fitting. Keep ice-making and dispensing off until corrected.
Why this path and its safety boundary
Safety stop: Do not loosen pressurized fittings, overtighten plastic connections, or operate with an active leak.
-
PATH 04Safety boundary
What you see
Water is underneath the cabinet, the drain pan appears displaced/cracked, the leak is recurring, or the source cannot be identified safely.
Do this next
Keep the freezer closed and arrange qualified Kenmore appliance service. Provide the model number, first wet point, timing, frost pattern, and whether a water line is installed.
Why this path and its safety boundary
Safety stop: Do not pull or tip a loaded freezer alone, remove rear panels, or touch compressor, wiring, or sealed refrigeration tubing.
-
PATH 05Safety boundary
What you see
Water reaches the plug or outlet, the cord is damaged, the freezer has smoke or burning odor, or frozen food is warming significantly.
Do this next
Keep clear of the electrical hazard and isolate power only from a safe external location; use emergency services for smoke or fire. Keep the freezer door closed and follow food-safety guidance for any thawed food.
Why this path and its safety boundary
Safety stop: Do not touch wet electrical equipment, use water on an electrical fire, or taste food to decide whether it is safe.
Helpful context
Understand the symptom
A Kenmore freezer leak is easier to narrow down by tracing the first wet point instead of starting with a part. Water on the freezer floor can later run out under the cabinet, so note whether there is a sheet of ice, frost near the door, or a drip from the rear or water-line area.
Keep the door closed as much as practical to protect frozen food. The correct defrost-drain location and access vary by model, so use the model number to retrieve the Kenmore manual before removing bins or attempting any drain procedure. Never chip ice with a sharp tool or remove sealed refrigeration panels.
Only after diagnosis
Potential parts
- defrost drain or drain-pan component
Consider this only after a qualified inspection confirms a blocked, cracked, displaced, or repeatedly icing drain or pan as the leak source.
Use the exact Kenmore model manual and fit information before ordering; freezer leak location alone does not identify a part. - freezer door gasket
Consider this only if the gasket is torn or permanently distorted and the door cannot seal after accessible cleaning and obstruction checks.
Confirm the complete model number and manufacturer fit information before ordering; a door alignment issue may need correction instead. - ice-maker water tube or inlet valve
Consider this only when service confirms a leak that is timed with ice-making or dispensing and identifies the failed tubing or valve.
Confirm model-specific fitment and water configuration before ordering; shut off the water supply before service.
When checks do not resolve it
Need a professional?
Arrange qualified service when a Kenmore freezer leak recurs, the defrost drain or pan is hidden or damaged, the door seal cannot be corrected, an ice-maker water connection leaks, the cabinet must be moved, or any panel, wiring, compressor, or sealed-system access is required. Use urgent help for smoke, fire, or water at electrical equipment, and protect or relocate food safely if the freezer has warmed.
Have this ready
- Kenmore model and serial information
- Where the water first appeared and whether it followed defrosting, ice making, dispensing, or door opening
- Photos of accessible, dry areas only, including the gasket and visible tubing or pan
- Whether there is a freezer-floor ice sheet, front frost, cabinet instability, or water near the outlet
- Whether food warmed, the freezer lost power, or the household water supply was shut off
Common questions
FAQ
Why is my Kenmore freezer leaking water onto the floor?
Trace the first wet point. An ice sheet on the freezer floor can indicate backed-up defrost water; front frost can indicate a poor door seal; water underneath can involve the drain pan or a water-line connection.
Can a bad freezer door gasket cause water?
Yes. A door that does not seal can admit humid air, increase frost, and allow meltwater to escape at the front. Check for obstructions and visible gasket damage without forcing the door or chipping ice.
Should I unplug a leaking Kenmore freezer?
If water is near the plug or outlet, keep clear and isolate power only from a safe external disconnect. Otherwise keep the door closed, protect the floor and food, and follow the model manual or arrange service.
How do I know whether the ice maker is causing the leak?
Note whether the drip appears after ice production or dispensing and inspect only accessible, dry tubing and fittings. Close the household water shutoff and arrange service for a cracked or leaking connection.
Read the exact guide
Official sources
- Customer Care & Support | Kenmore AppliancesKenmore · Kenmore product support, manuals, parts, repairs, and service routing
- Find Your Manual | Kenmore Appliance Manuals & GuidesKenmore · Kenmore model-specific appliance manuals, including freezers and refrigerators
Community feedback
Share a repair observation
Share a plain-text repair observation. Accepted observations are published automatically; this page may take a moment to update.