
On this page
Start here
Quick answer
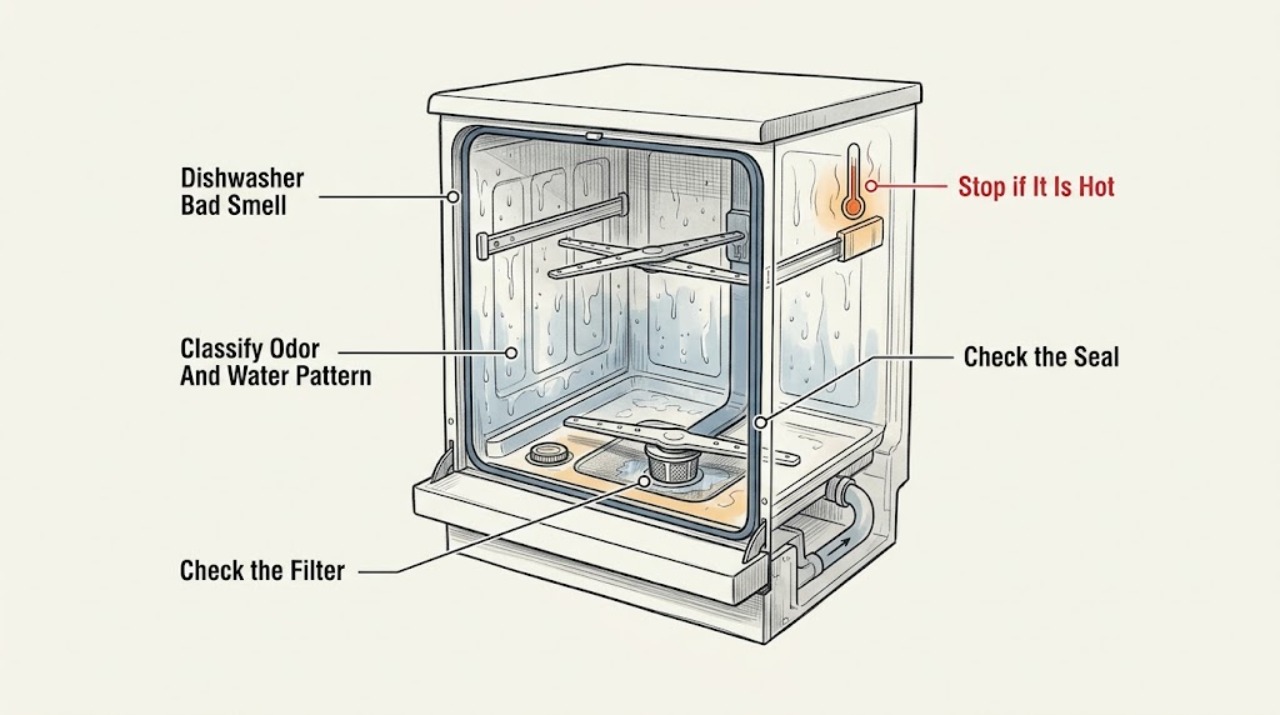
Start by classifying the odor and checking whether water remains after a completed cycle. Rotten-food or fishy smells usually point to food soils in the filter, spray arms, tub, door edges, or drain area; a sewage-like or wet-dog smell makes standing water, a clogged drain path, a kinked or sagging hose, or drain backflow more concerning. With the dishwasher empty and power safely off where the model requires it, clean only the filter style and accessible parts named by the exact KitchenAid manual, wipe the gasket and door edges, and check for visible food or standing water. A removable filter must be fully seated before operation, and not every KitchenAid model has the same filter system. A new plastic, petroleum, or varnish smell may be temporary on some models, but burning odor, visible leaking, damaged wiring, a persistent sewage odor, or an odor that remains after cleaning calls for qualified service.
Before you begin
Safety first
- Owner checks stop at model-approved filter and visible-residue cleaning, gasket wiping, accessible drain or disposer observation, and a model-approved empty cleaning or rinse cycle. Pump, hose disconnection, heater, motor, wiring, latch, control, and electrical-base work requires qualified service.
Work through in order
Diagnostic checks
Use only checks that match the exact appliance or system and its official guide.
-
Check 1
Record the exact KitchenAid model and classify the odor as rotten or fishy, sour or greasy, musty, sewage-like or wet-dog, new plastic, petroleum-like, varnish-like, or burning. After a completed cycle, look for visible food debris, slimy gasket residue, or pooled water without reaching into moving parts.
Expected result: The odor is a temporary new-appliance smell, food or grease smell, musty residue smell, sewage-like smell with standing water, burning smell, or unclear; note whether the floor is wet.
Next step: Use the food/filter path for rotten, fishy, or greasy odors; use the gasket/moisture path for musty residue; use the drainage path early for sewage-like or wet-dog odor or standing water. Use the exact model manual before removing any filter.
Stop if: Stop using the dishwasher for burning odor, smoke, damaged wiring, visible leaking, water near electrical parts, or a strong unexplained chemical smell.
Why this matters
Why: KitchenAid uses different odor clues for food soils, grease, moisture, drainage, and temporary material or motor smells. Water on the floor, burning odor, or an unclear chemical or electrical smell should not be treated as ordinary food residue.
-
Check 2
With the dishwasher stopped and safe to access, check the bottom filter area. Confirm from the exact KitchenAid manual whether the machine has a manual-clean filter or a maintenance-free hard-food-disposer system. If it has a removable filter, remove it only as directed, rinse away food and grease, and reinstall it until it is fully locked.
Expected result: The filter is visibly soiled, the filter area contains food or foreign objects, the filter is absent or not locked, the model has a maintenance-free system, or the filter and area are clear.
Next step: Clean and reseat only the filter the model manual identifies, then inspect the spray-arm openings and tub bottom for visible debris. If a filter will not lock, do not run the dishwasher; arrange model-specific service.
Stop if: Do not use a wire brush or abrasive pad, operate without required filters, force a filter from another model, or reach into the pump area for a dropped object.
Why this matters
Why: KitchenAid says food debris and a dirty filter are common odor sources, but filter architecture varies. A loose or missing required filter can allow debris to circulate or damage the dishwasher; a clear or maintenance-free filter shifts attention to the spray arms, tub, drain, or gasket.
-
Check 3
Empty the racks and inspect the tub bottom, spray-arm openings, door edges, and door gasket for food, grease, slime, or dark residue. Wipe accessible surfaces and the gasket with a damp cloth and mild soap as the model instructions allow, then dry the gasket and surrounding surfaces.
Expected result: Food is trapped in the spray arms or tub, grease is present on the door or gasket, the gasket has slimy or dark residue, the gasket is cracked, or the accessible surfaces are clean.
Next step: Remove only visible residue using the model-approved cleaning method, ensure spray arms can move freely, and run a suitable empty cleaning or rinse cycle. Escalate for a cracked gasket, damaged latch, or odor that remains after cleaning.
Stop if: Do not disassemble the spray-arm or pump assembly, use caustic or mixed cleaners, or operate with a visibly damaged seal or latch.
Why this matters
Why: KitchenAid identifies food in the filter, spray arms, tub, and door edges and residue on gasket seals as odor sources. Cleaning visible residue can remove an odor source, but a cracked gasket or damaged latch can cause leaking and requires service.
-
Check 4
For a sewage-like or wet-dog smell, check whether water remains pooled in the tub after a completed cycle and whether the odor is also present at the sink drain. If the dishwasher connects to a garbage disposer, confirm the disposer is not obstructed and that the installation's knockout-plug and drain routing were handled according to the installation instructions. Inspect only visible, accessible hose sections for kinks or sagging.
Expected result: There is only a small amount of water in the filter area, an inch or more is pooled in the tub, the sink drain also smells, the hose is kinked or sagging, the disposer is obstructed, or the drain path appears normal.
Next step: Run only the model-approved rinse or normal-cycle check and clear an accessible disposer obstruction if safe. If water remains, the hose requires disconnection, the floor is wet, or the odor persists, stop and arrange qualified dishwasher service.
Stop if: Do not remove the lower access panel around standing water, disconnect a pressurized or inaccessible hose, reach into the pump, or continue cycles when leaking or electrical exposure is present.
Why this matters
Why: KitchenAid says a small amount of water in the filter area can be normal, while substantial standing water, a shared sink odor, a clogged or poorly routed hose, or drain backflow can produce sewage-like odors. The observation does not identify a failed drain pump or prove that a hidden blockage is safe to clear.
-
Check 5
After the filter, visible residue, door, and drainage checks are satisfactory, run an empty model-approved cleaning or rinse cycle. Follow KitchenAid's cleaner or vinegar-rinse instructions for the exact model, including whether the dry option is off, and do not combine cleaning chemicals.
Expected result: The odor clears, improves but returns, remains unchanged, or changes to a burning, chemical, or sewage-like smell; note whether the dishwasher drains normally.
Next step: If the odor clears, maintain the filter and interior on the model schedule, avoid overloading, and use a rinse cycle when a partial load will sit. If the odor returns or drainage remains abnormal, arrange service.
Stop if: Stop the cycle for smoke, burning odor, a strong unexplained chemical odor, repeated breaker trips, water on the floor, or abnormal electrical noise.
Why this matters
Why: A cleaning cycle can remove food, grease, and mineral residue, but KitchenAid states that it will not correct a leak, drain blockage, or electrical problem. A temporary plastic, petroleum, or varnish smell may fade on the schedule described for some models; worsening or persistent odor needs a different branch.
-
Check 6
If the odor remains after model-approved cleaning and the dishwasher drains normally, document the odor description, when it appears in the cycle, standing-water or leak evidence, filter type, cleaning steps, and any alarm or breaker behavior. Keep the dishwasher out of service when the odor suggests heat, wiring, sewage backflow, or leaking.
Expected result: The odor is persistent or overwhelming, water pools or reaches the floor, the gasket or latch is damaged, a drain hose or pump would need internal access, or there is burning odor or damaged wiring.
Next step: Stop use, disconnect power only if safe, and arrange qualified KitchenAid dishwasher service with the model and symptom record. Keep food and dishes from relying on a dishwasher whose sanitation or drainage is uncertain.
Stop if: Do not open the electrical base, bypass a latch or heater, perform live tests, pour chemicals into an unknown blockage, or order an internal part from the odor alone.
Why this matters
Why: KitchenAid directs persistent sewage odor, drainage that does not improve, leaks, damaged gasket or latch, burning smell, and damaged wiring to qualified service. These symptoms cannot safely select a pump, hose, heater, motor, or control part from odor alone.
Use your observations
Decision map
Find the observation that best matches what you see, then follow the next safe action.
-
PATH 01Safety boundary
What you see
The smell is rotten, fishy, sour, stale, or greasy and there is visible soil in the filter, spray arms, tub, door edges, or gasket.
Do this next
Clean the model-approved filter and visible residue, ensure spray arms are not blocked, then run an empty model-approved cleaning or rinse cycle. Maintain the filter on the exact manual's schedule.
Why this path and its safety boundary
Why it matters: Food or grease buildup is more likely than an electrical fault. A manual-clean filter, if fitted, can trap particles; a maintenance-free filter design requires a different path.
Safety stop: Escalate for a damaged gasket or latch, standing water, a leak, burning odor, or odor that remains after cleaning.
-
PATH 02Safety boundary
What you see
The smell is musty and the gasket folds, door edges, or tub have slimy or dark residue, without smoke or visible leaking.
Do this next
Wipe and dry accessible seals and surfaces, run the exact model's cleaning guidance, and leave the door slightly ajar after use only if the installation and manual allow it. Arrange service for a cracked seal or continuing odor.
Why this path and its safety boundary
Why it matters: Moisture and residue on seals or interior surfaces are more likely. Frequent door closure without drying can keep moisture trapped, but the odor should not be assumed harmless if it is strong or persistent.
Safety stop: Do not use harsh or mixed cleaners, remove the gasket, or continue operation if water reaches electrical areas.
-
PATH 03Safety boundary
What you see
The odor is sewage-like or wet-dog, the tub has substantial standing water after a cycle, the sink drain also smells, or the visible drain hose appears kinked, crushed, or sagging.
Do this next
Check only visible accessible conditions and the disposer connection as the installation instructions permit. If the hose, drain, pump, leak, or lower access area needs disassembly, keep the dishwasher out of service and call a qualified technician.
Why this path and its safety boundary
Why it matters: A drainage, backflow, or hose-routing problem is more likely than simple interior residue. KitchenAid notes that a small amount of water in the filter area can be normal, but substantial pooled water and persistent sewage odor require attention.
Safety stop: Do not disconnect hoses around water, remove access panels over a wet floor, reach into the pump, or repeatedly run cycles to force drainage.
-
PATH 04Safety boundary
What you see
The smell is a new plastic, petroleum-like, or varnish-like odor that is fading, or it is burning, electrical, chemical, overwhelming, or persistent after cleaning.
Do this next
For a mild, fading new-appliance smell, follow the exact model's owner guidance and monitor it. For burning, smoke, damaged wiring, a strong unexplained chemical odor, or persistent odor, stop using the dishwasher and arrange qualified service.
Why this path and its safety boundary
Why it matters: KitchenAid describes some temporary material or motor smells on certain models, but burning odor, damaged wiring, leaking, or a persistent sewage odor is not a normal deodorizing problem.
Safety stop: Do not mask a burning or chemical smell with cleaner, continue a cycle through smoke or heat, or open the electrical housing.
Helpful context
Understand the symptom
Use the odor to choose the first check
A rotten-food or fishy odor usually starts with food soils and debris. A musty odor with slimy or dark residue points toward moisture and buildup on the gasket or in crevices. A sewage-like or wet-dog smell deserves an early drainage check, especially if water remains in the tub after a completed cycle. Some new dishwashers can have temporary plastic, petroleum, or varnish smells; those should fade over the time KitchenAid describes for the particular smell and model. Do not use a temporary-smell explanation to dismiss smoke, burning odor, leaking, or a persistent sewage smell.
Check the filter only according to the model
KitchenAid documents both manual-clean filter systems and maintenance-free hard-food-disposer systems. If the exact model has a removable filter, remove and rinse it as the owner manual shows, then lock it back in place; do not run the dishwasher with a required filter loose or missing. If the model has a maintenance-free system, do not force a filter-removal procedure from another KitchenAid design. A clean filter does not rule out food in the spray arms, tub, drain, or door edges.
A drain or gasket problem needs a different response
After a cycle, a small amount of water in the filter area may be normal, but pooled water in the tub, a sewage odor, or odor from the sink drain can point to a drainage or backflow problem. KitchenAid describes kinked, crushed, sagging, or improperly routed drain hoses as possible contributors and says a persistent drain-hose clog should be diagnosed and repaired professionally. For a musty odor, wipe visible residue from the door gasket and surrounding surfaces with a damp cloth and dry them; a cracked gasket, damaged latch, floor water, or continuing leak is a service issue.
Clean and prevent odor without creating a new hazard
Run a model-approved cleaning or rinse cycle with no dishes and the dry option handled as the KitchenAid guidance specifies. KitchenAid gives a vinegar-rinse method for some odor paths and recommends a dishwasher cleaner for routine maintenance; follow the product and owner-manual directions rather than mixing cleaners. Scrape large food particles, avoid overloading or blocking the spray arms, and leave the door slightly ajar after use when the model and installation allow it. Cleaning can remove residue, but it cannot repair a leak, drain blockage, failed latch, or electrical problem.
When checks do not resolve it
Need a professional?
Safety scope: Owner checks stop at model-approved filter and visible-residue cleaning, gasket wiping, accessible drain or disposer observation, and a model-approved empty cleaning or rinse cycle. Pump, hose disconnection, heater, motor, wiring, latch, control, and electrical-base work requires qualified service.
Common questions
FAQ
Why does my KitchenAid dishwasher smell like rotten food or fish?
KitchenAid says food soils commonly collect in the filter, spray arms, tub, bottom, or door edges. Check the exact model's filter type, clean only the model-approved parts, inspect visible residue, and run an appropriate empty cleaning or rinse cycle.
Why does my dishwasher smell like sewage or a wet dog?
A sewage-like or wet-dog odor can point to standing water, a clogged or poorly routed drain hose, drain backflow, or a shared sink-drain issue. A small amount of water in the filter area may be normal, but substantial pooled water, floor water, or a persistent odor warrants qualified service.
Can I remove and clean the KitchenAid dishwasher filter?
Only if the exact model has a removable manual-clean filter and its owner manual gives that procedure. KitchenAid says some models use a maintenance-free hard-food-disposer system. A removable filter must be rinsed and fully locked before operation; do not force a procedure from another model.
Is a plastic or petroleum smell from a KitchenAid dishwasher normal?
KitchenAid describes temporary plastic smells on new models and petroleum-like smells from sound-deadening material on some models; a varnish-like motor smell can also fade on some units. These explanations apply only when the smell is mild and fading. Smoke, burning odor, damaged wiring, leaking, or a strong persistent odor requires service.
Will a dishwasher cleaner fix a bad smell?
A model-approved cleaner or vinegar rinse can reduce food, grease, and mineral residue, but KitchenAid says deodorizing will not correct a leak, drain blockage, or electrical problem. If the odor returns after cleaning or drainage remains abnormal, stop and arrange qualified service.
Read the exact guide
Official sources
- ECO Owner's ManualKitchenAid · KitchenAid ECO dishwasher manual W11133227; use as a documented model example and do not generalize its filter geometry or controls to every KitchenAid dishwasher.
- Why Does My Dishwasher Smell? Possible Causes & FixesKitchenAid · KitchenAid dishwasher odor guidance; filter and cleaning procedures vary by brand, model, and dishwasher design, so the exact owner manual controls the procedure.
- Food Odors - DishwasherKitchenAid Product Help · KitchenAid Product Help food-odor article; cycle names and cleaner directions may vary by model.
- How to Clean the Dishwasher FiltersKitchenAid Product Help · KitchenAid filter guidance; exact filter style and removal procedure must be verified against the appliance model.
Community feedback
Share a repair observation
Share a plain-text repair observation. Accepted observations are published automatically; this page may take a moment to update.