
On this page
Start here
Quick answer
A thin, even frost layer can be normal on some KitchenAid freezers, but thick or recurring frost usually means warm humid air is entering or airflow and defrosting are being disrupted. Check that the door closes fully, the gasket is clean and continuous, food is not blocking vents, and the freezer is not overpacked. KitchenAid advises defrosting and cleaning when frost reaches about 1/4 inch if the model requires manual defrosting, and warns never to use a knife or other sharp tool. Follow the exact owner manual before any defrost procedure. If heavy frost returns after a complete manual-approved defrost, the gasket is damaged, the freezer temperature is unstable, or a drain, fan, sensor, heater, or control fault is suspected, stop repeating the defrost and arrange qualified service.
Work through in order
Diagnostic checks
Use only checks that match the exact appliance or system and its official guide.
-
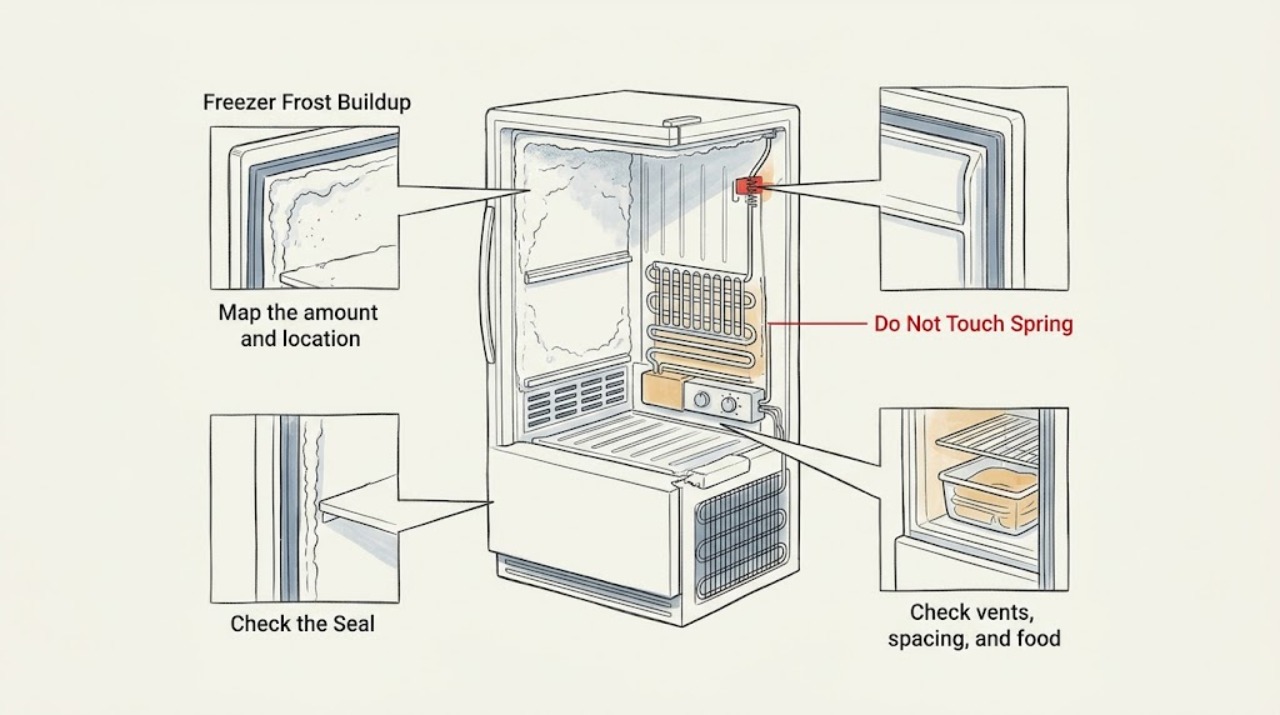
Map the amount and location of the frost
With the door open only briefly, note whether frost is a light even coating, a thick sheet on the back wall, a block around an air vent, a strip around the door gasket, or concentrated near a sensor or ice-maker area. Photograph the pattern and note whether food is still hard frozen and whether the freezer is making unusual sounds.
Expected result: A light layer that clears during an automatic defrost cycle can be normal. Thick frost covering vents or a narrow band near the door points toward airflow restriction or warm-air entry, while a recurring back-wall sheet can indicate a defrost or cooling-system issue.
Next step: Continue with the door, loading, and vent checks. If frost is severe, food is thawing, or the pattern returns quickly after an approved defrost, arrange qualified service rather than repeatedly scraping it.
Why this matters
Why: Frost location distinguishes moisture entering through the door from an internal airflow or defrost problem; the amount also determines whether a model-approved defrost is appropriate.
-
Check door closure and the gasket seal
Remove any package, shelf, or basket that prevents full closure. Inspect the visible gasket around the freezer door for dirt, tears, gaps, hard spots, or sections pulled out of position. Clean it only with the model-approved mild method, dry it, and close the door evenly. A paper-sheet seal check may be used only if the owner manual permits it.
Expected result: KitchenAid says an open or poorly sealed door lets warm humid air enter and can cause frost. Frost or moisture concentrated near a gap, a door that rebounds, or a seal that does not contact the cabinet supports a door-seal branch.
Next step: Correct only an accessible obstruction or cleaning issue. If the gasket is torn, the door is misaligned, or frost continues after the door seals, keep the door closed and arrange qualified service.
Why this matters
Why: A gasket leak can continuously add moisture and make the freezer work harder; cleaning an obstruction cannot repair a torn gasket or misaligned door.
-
Check vents, spacing, and food moisture
Use the exact model manual to locate the freezer vents. Move packages away from the vents and leave the airflow clearance specified by the manual; do not pack food against the back wall. Check whether warm or uncovered food was recently added and whether the door has been opened frequently or left ajar.
Expected result: KitchenAid identifies blocked vents as a cause of moisture buildup and excessive frost. Warm, uncovered food and frequent or prolonged door openings add humidity; overpacking can prevent proper circulation and create temperature and moisture pockets.
Next step: Reorganize items, cool food before freezing it, cover liquids, and minimize door openings. If frost remains thick or the freezer temperature fluctuates, continue to the manual-approved defrost or service branch.
Why this matters
Why: Not all frost indicates a failed defrost part: restricted circulation and humid air can create a self-reinforcing frost pattern that blocks more airflow.
-
Decide whether a manual-approved defrost is appropriate
Check the owner manual to determine whether the KitchenAid model is manual-defrost or automatic-defrost and whether the buildup is beyond the model's allowed operating condition. KitchenAid's general guide uses about 1/4 inch as a manual-defrost cue, but the exact model instructions control. If defrosting is approved, turn off cooling, unplug as directed, remove food, protect the floor, and use only a plastic scraper or the manual-approved method.
Expected result: If all frost melts and airflow and temperature recover, the frost may have been caused by moisture entry, loading, or a one-time blocked vent. If frost will not clear, the model requires a different procedure, or frost returns quickly, the underlying cause remains unresolved.
Next step: Dry the interior completely and reconnect only as the manual directs. Stop and call service if the model is automatic-defrost, the procedure is unclear, water reaches electrical parts, or the frost recurs after one complete approved defrost.
Why this matters
Why: A complete, safe defrost can restore lost airflow, but it does not repair a leaking gasket, blocked drain, defrost heater, sensor, timer, fan, or control.
-
Check condenser access and temperature conditions
If the manual identifies an accessible condenser location, inspect for dust and clean it only as instructed, with power safely disconnected. Confirm required clearance around the cabinet and note whether the freezer is in a hot, cold, or humid location. Do not move a loaded unit or remove a cover to reach a fan or coil.
Expected result: Dirty condenser coils and inadequate clearance can make the cooling system work harder, while temperature and humidity changes can increase frost. If the condenser is clean and the freezer still frosts heavily, an internal defrost or airflow fault is more likely.
Next step: Correct only a manual-approved accessible cleaning or clearance issue, then observe one normal cooling period. Persistent or rapidly returning frost needs qualified diagnosis.
Why this matters
Why: External heat rejection and room conditions can contribute to frost, but they cannot confirm the condition of sealed-system, defrost, or sensor components.
-
Record temperature, sounds, and automatic-defrost behavior
After the external checks or approved defrost, record the control setting, temperature trend, compressor or fan sounds, and whether frost appears during or after a defrost cycle. Note repeated clicking, a fan that stops, water collecting on the floor, or an alarm. Do not remove evaporator panels or test internal parts.
Expected result: KitchenAid notes that loud persistent sounds, a freezer that runs continuously, leaking from frozen evaporator or drain areas, or recurring frost can require professional inspection. No temperature recovery after a defrost suggests more than a simple moisture issue.
Next step: Keep the freezer out of use if temperature is rising or food is thawing, and provide the pattern and observations to a qualified technician. Do not keep cycling power to force a defrost.
Why this matters
Why: Temperature and timing evidence helps distinguish a door or loading cause from fan, drain, defrost, thermostat, control, or sealed-system faults without unsafe disassembly.
-
Run one supervised confirmation after a safe correction
Only after correcting an accessible obstruction, restoring the gasket seal, or completing a model-approved defrost, reconnect the freezer as directed and observe one cooling period without repeatedly opening the door. Stop immediately for smoke, burning odor, sparks, a hot cord or outlet, a refrigerant-like leak, water near electrical parts, or a breaker trip.
Expected result: Stable temperature and no new frost after the correction support a moisture-entry, loading, or airflow cause. Frost that reappears quickly, an alarm that returns, continuous running without cooling, or repeated electrical symptoms indicates an unresolved fault.
Next step: Stop and arrange qualified service when the frost returns or cooling remains unstable. Preserve the frost photos, model number, defrost date, control setting, temperature trend, and any alarm or leak information.
Why this matters
Why: One controlled confirmation shows whether a safe external correction changed the pattern; repeated defrosts or restarts can hide a failed component and increase food or water damage.
Use your observations
Decision map
Find the observation that best matches what you see, then follow the next safe action.
-
PATH 01Next step
What you see
There is only a light, even frost layer that clears during an automatic defrost cycle, with stable temperature and a fully sealing door.
Do this next
Keep vents clear, minimize door openings, and follow the model maintenance guidance. Monitor for thick or recurring buildup.
-
PATH 02Next step
What you see
Frost is concentrated at the door edge, the gasket has a gap or tear, or the door is obstructed or misaligned.
Do this next
Remove the obstruction and clean the gasket only as the manual allows. Arrange service for a damaged gasket or door alignment problem, especially if frost returns.
-
PATH 03Next step
What you see
Frost covers vents or the back wall and airflow or temperature is worsening.
Do this next
Protect food, follow only the exact model's approved defrost procedure, and arrange service if the frost cannot be safely removed or returns after one complete defrost.
-
PATH 04Next step
What you see
Frost returns quickly after a complete approved defrost, or the freezer runs continuously, clicks, leaks, or fails to recover temperature.
Do this next
Keep the freezer out of use and obtain qualified diagnosis of the defrost system, fan, drain, sensor, controls, compressor, or sealed system. Do not remove covers.
-
PATH 05Next step
What you see
Smoke, burning odor, sparks, a hot or damaged cord or outlet, water near electrical parts, a suspected refrigerant leak, or a repeated breaker trip is present.
Do this next
Stop immediately, keep clear, and seek qualified help from a safe location. Do not restart the freezer, pierce tubing, or open electrical panels.
Helpful context
Understand the symptom
Some frost is normal; a pattern tells you more
KitchenAid describes a light, even layer on the back wall of a manual-defrost freezer or a light dusting near vents in an automatic-defrost model as potentially normal. Frost that is thick, concentrated around the door edge, covering vents, returning quickly, or accompanied by temperature swings is more useful as a fault clue. Photograph the location before removing it so a technician can see the pattern.
Protect the freezer before defrosting
Keep the door closed while deciding what to do and move frozen food to a known-safe cold location if the freezer cannot maintain temperature. Never chip ice with a knife, ice pick, screwdriver, or other sharp tool; a puncture can damage concealed refrigeration tubing. Do not remove evaporator covers or test a heater, sensor, or live wiring yourself.
Only after diagnosis
Potential parts
- door gasket or door-alignment hardware
Consider this only when inspection confirms a torn gasket, persistent gap, or door-alignment problem after obstructions are removed.
Gaskets and hinges are model-specific; verify the exact model and do not use a replacement to conceal a cabinet or defrost fault. - defrost heater, sensor, timer, or control
Consider this only when recurring frost after a complete approved defrost is confirmed by qualified testing to be a defrost-system fault.
Defrost components and wiring vary by model; never bypass a heater, sensor, or control. - evaporator fan or airflow component
Consider this only when a technician confirms blocked or absent evaporator airflow after vents and frost have been addressed safely.
Fan assemblies and connectors are model-specific; do not remove covers or reach into a fan. - drain or sealed-system component
Consider this only when qualified inspection finds a recurring drain blockage, compressor fault, or sealed-system cooling problem.
Drain access and sealed-system repairs require the exact model and qualified service; do not pierce tubing.
When checks do not resolve it
Need a professional?
Arrange qualified KitchenAid appliance service when heavy frost returns after one complete model-approved defrost, when the gasket is damaged or the door will not align, when the freezer remains warm or runs continuously, or when frost is paired with a leak, alarm, repeated clicking, or unusual noise. Stop immediately for smoke, burning odor, sparks, a hot or damaged cord or outlet, water near electrical parts, a suspected refrigerant leak, or repeated breaker operation. Never use a sharp tool to remove ice or open the evaporator and electrical covers.
Common questions
FAQ
Is a small amount of frost in a KitchenAid freezer normal?
KitchenAid says a thin, even layer on the back wall of some manual-defrost models or a light dusting near vents in an automatic-defrost model can be normal. Thick, localized, recurring, or airflow-blocking frost needs investigation.
What causes heavy frost in a KitchenAid freezer?
Common contributors include a door left open, frequent openings, warm or uncovered food, a leaking gasket, blocked vents, overpacking, and high humidity. A defrost-system or control fault is possible when frost returns after a complete approved defrost.
Can I use a knife to remove KitchenAid freezer ice?
No. KitchenAid warns against knives, ice picks, and other sharp tools because they can damage the appliance. Follow the exact model's defrost instructions and use only a permitted plastic scraper or other approved method.
How do I know whether the gasket is causing frost?
Look for a gap, tear, dirt, or frost concentrated around the door edge, and check whether a package prevents full closure. Clean only as directed; a damaged gasket or misaligned door needs qualified service if the frost persists.
When does recurring frost require service?
Arrange service when frost returns quickly after one complete model-approved defrost, covers vents, accompanies unstable temperature, causes continuous running or leaks, or occurs with a failed gasket. Stop immediately for smoke, burning odor, sparks, hot electrical parts, or water near wiring.
Read the exact guide
Official sources
- Frosting in the Freezer Section - RefrigeratorKitchenAid Product Help · Door opening, gasket, vent blockage, humidity, and service guidance for frost in the freezer section
- Freezer OperationKitchenAid · Model-specific routing for door closure, excessive frost, condenser cleaning, and air-circulation requirements; not universal to every model
- 9 Possible Freezer Troubleshooting Fixes & TipsKitchenAid · Frost, warm freezer, unusual sounds, continuous compressor operation, fans, defrost components, and service escalation
- How to Manually Defrost a FreezerKitchenAid · Causes of frost, model-specific defrosting, food protection, plastic-scraper safety, and preventing recurrence
- What's Normal Condensation or FrostKitchenAid Product Help · Normal light frost patterns, humidity, gasket, airflow, temperature, and loading guidance
Community feedback
Share a repair observation
Share a plain-text repair observation. Accepted observations are published automatically; this page may take a moment to update.