
On this page
Start here
Quick answer
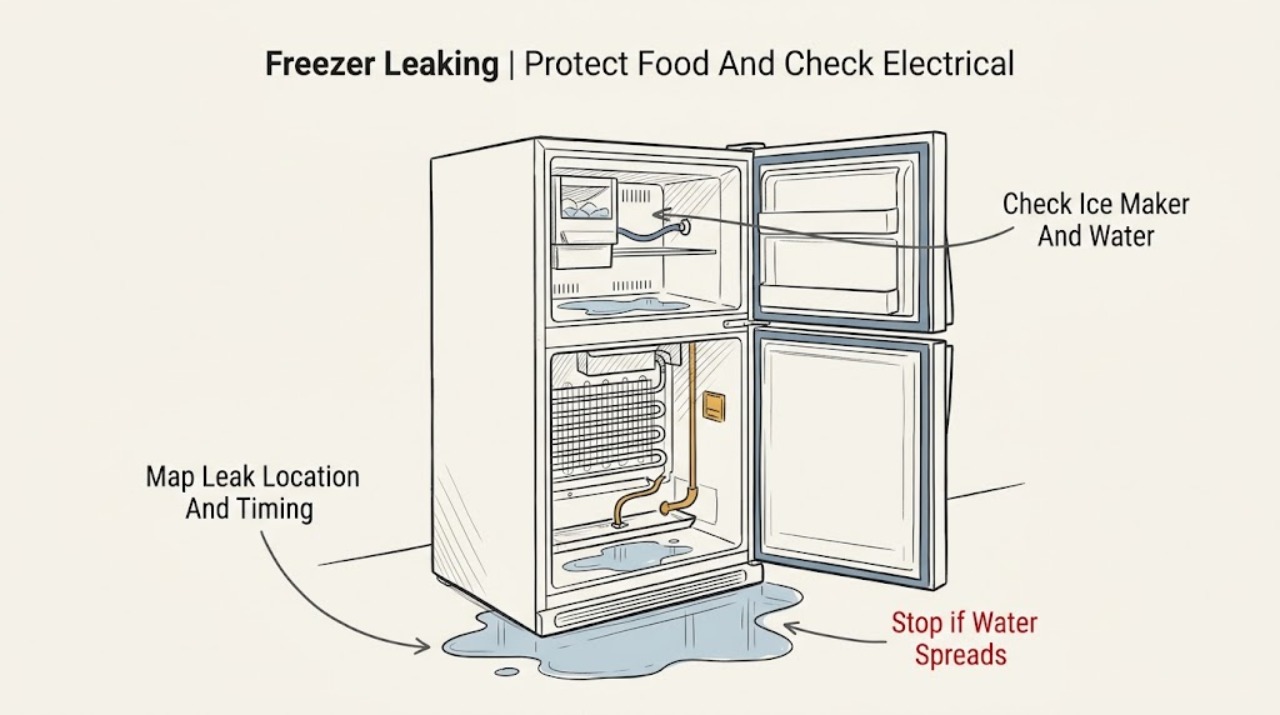
A KitchenAid freezer can produce water during normal automatic defrost, but water inside the compartment or on the floor needs its source identified. Protect frozen food first. From a safe, dry position, note whether water is only in the defrost pan, leaking from an ice maker or water line, pooling at the freezer floor, or appearing at the door or rear. KitchenAid says a freezer leak can be associated with ice-maker frost, frozen evaporator coils, or a blocked drain line, and recommends professional inspection for the coils or drain. If frost is heavy and your model allows manual defrost, unplug the appliance, move food to a cold location, collect meltwater with towels or the model's drain hose, and use only a plastic scraper or wooden spoon; never use a knife or ice pick. Disconnect power from a safe location if water reaches electrical parts, and arrange qualified service for a recurring leak, water-line damage, a blocked or inaccessible drain, cooling loss, or any leak behind the cabinet.
Before you begin
Safety first
- This article covers food protection, ordinary-access visual checks, visible water-line isolation, and model-approved manual defrost only. Qualified service must inspect concealed drains, evaporator and defrost components, ice-maker assemblies, wiring, and cabinet parts.
Work through in order
Diagnostic checks
Use only checks that match the exact appliance or system and its official guide.
-
Check 1
Move vulnerable frozen food to another working freezer or a cooler with ice if cooling is compromised, and inspect the leak from a dry, stable position without touching wet electrical parts.
Expected result: Record whether the freezer is still cold, whether water is near the cord, outlet, controls, light, or wiring, and whether the leak is a small drip or active flow.
Next step: Disconnect power only from a safe location if water can reach electrical parts or the unit is damaged; otherwise keep the door closed as much as possible while locating the source and arranging service.
Stop if: Do not touch wet plugs, outlets, controls, or wiring, and do not move a heavy built-in appliance through water; use qualified electrical or appliance service for an energized wet area.
Why this matters
Why: Food loss and electrical exposure are separate risks. Water near electrical equipment or an active leak raises the stop boundary; a dry electrical area permits only ordinary visual checks.
-
Check 2
With the freezer door or drawer opened only as needed, use a dry cloth to trace the first visible wet point and record when the water appears; do not remove shelves, evaporator covers, or trim to chase the leak.
Expected result: Classify the source as defrost-pan area, freezer floor or rear wall, ice maker or dispenser path, door edge, exterior hose connection, underneath, or behind the cabinet; note whether it follows defrost, ice production, door opening, or idle time.
Next step: Photograph the location, frost, food packages, gasket, and water trail; continue only with the matching ordinary-access check and keep the appliance off for an unexplained external leak.
Stop if: Stop for water behind panels, a cracked liner, active flow, damaged tubing, food contamination, or any need to reach an energized or concealed component.
Why this matters
Why: A pan during automatic defrost can be normal, while a freezer-floor puddle, ice-maker leak, water-line leak, or recurring external trail points to a distinct service path. A wet location alone does not prove a blocked drain.
-
Check 3
If the freezer or refrigerator has an ice maker or water connection, inspect only the visible ice bin, dispenser area, and accessible household water line for frost, an overfilled or stuck ice path, a cracked tube, or a wet connection.
Expected result: Record whether ice production or dispensing is abnormal, frost is building around the ice maker, the water line or fitting is wet or damaged, or the freezer has no water connection.
Next step: Stop the ice maker and close the household water shutoff from a safe location for a water-line leak, then arrange qualified service; for frost in the ice bin, follow the exact model instructions without forcing parts.
Stop if: Do not pull internal tubing, remove the ice-maker module, chip ice with a sharp tool, or continue water supply to a cracked, spraying, or uncontrolled connection.
Why this matters
Why: KitchenAid says frost buildup in the ice maker can contribute to a leak. A wet or cracked water line is a supply leak, not a defrost-drain diagnosis; a freezer without a water connection rules out that source.
-
Check 4
From ordinary access, inspect the freezer door or drawer gasket, closure, visible air vents, and food arrangement for gaps, frost, packages blocking the seal, or items blocking circulation.
Expected result: Record whether the gasket is clean and continuous, the door closes fully, frost is concentrated near the opening or vents, and air passages are clear; note whether the compressor runs unusually often or the freezer is warming.
Next step: Remove only a package that clearly blocks the closure or vent, clean and dry the accessible gasket as directed, and arrange service for a torn seal, persistent frost, warming, or recurring water.
Stop if: Do not force the door, cut or remove the gasket, block vents, or scrape ice from the liner, coils, or drain with a sharp tool.
Why this matters
Why: KitchenAid explains that warm, moist air entering through an ajar door or damaged gasket can create frost, while blocked vents can affect cooling. Frost or warming can increase defrost water but does not prove the drain is accessible to the user.
-
Check 5
From the visible interior and exterior only, look for a sheet of ice at the freezer bottom, a pan that is overflowing, or water returning after a defrost event; do not remove an evaporator cover or force a drain opening.
Expected result: Record whether the leak is steady or periodic, whether ice covers the bottom or rear wall, whether water appears only in the normal drain-pan location, and whether the unit is cooling normally.
Next step: Arrange qualified inspection for a freezer-floor puddle, recurring leak, ice sheet, pan overflow, warming, or any drain or coil that is behind a panel; do not treat a visible ice sheet as permission to chip it away.
Stop if: Do not pierce ice, use a knife, heat gun, open flame, or sharp tool, remove panels, or pour water into a hidden drain to test it.
Why this matters
Why: KitchenAid identifies frozen evaporator coils and a blocked drain line as professional diagnostic possibilities. Normal water in a defrost pan differs from water escaping the pan or pooling inside the freezer.
-
Check 6
If the freezer has heavy frost and the exact model is a manual-defrost design, decide whether you can follow the owner manual's complete safe defrost procedure without opening the cabinet or using sharp tools.
Expected result: Answer yes only when the model manual supports manual defrosting, food can be kept cold, power can be disconnected safely, meltwater can be contained, and the interior can be dried fully; answer no for an automatic-defrost model, inaccessible drain, active external leak, or any uncertainty.
Next step: For yes, unplug, unload, collect water with the model-approved hose or towels, use warm water and a plastic scraper or wooden spoon only, dry completely, and reconnect as directed. For no, keep the freezer off as needed and arrange service.
Stop if: Never use a knife, ice pick, heat gun, open flame, or improvised heater, and do not reconnect while the interior or electrical area is wet.
Why this matters
Why: A controlled manual thaw may remove ordinary frost and water, but it does not repair a recurring blocked drain, defrost failure, damaged pan, or cooling fault.
-
Check 7
After safe external checks or a model-approved manual thaw, decide whether the leak has stopped and cooling is normal, or whether water returns, the source is concealed, or the freezer is warming.
Expected result: Answer yes if the event was a contained, explained defrost or ice-bin condition that stopped and the appliance is dry and cooling normally; answer no for recurrence, floor or rear-wall pooling, pan overflow, water-line damage, cooling loss, or an unknown source.
Next step: For no, keep food protected and arrange qualified KitchenAid appliance service with the model, leak location, timing, frost pattern, water-line status, cooling behavior, and photos.
Stop if: Do not dismantle the freezer, bypass controls, alter the defrost system, reconnect a wet appliance, or keep operating with active leakage near electrical parts.
Why this matters
Why: A yes result supports monitoring but does not prove the drain or defrost system is healthy. A no result requires professional diagnosis of the drain, evaporator, defrost, pan, door seal, ice maker, water line, or controls.
Use your observations
Decision map
Find the observation that best matches what you see, then follow the next safe action.
-
PATH 01Safety boundary
What you see
Water is limited to the defrost pan during automatic defrost, the pan is not overflowing, and the freezer remains dry and properly cold.
Do this next
Leave the pan and defrost system intact, keep the area dry and monitored, and consult the exact owner manual if water escapes the pan.
Why this path and its safety boundary
Why it matters: KitchenAid's freezer manual describes water dripping into the defrost pan during defrost as normal; high humidity can make evaporation take longer.
Safety stop: Stop and arrange service for pan overflow, water on the floor, repeated pooling, warming, or water near electrical parts.
-
PATH 02Safety boundary
What you see
Frost is concentrated around the ice maker, ice dispensing is abnormal, or a visible water line or connection is wet or damaged.
Do this next
Stop the ice maker and close the water supply for a line leak, preserve the frost or fitting evidence, and request model-specific service.
Why this path and its safety boundary
Why it matters: The leak may involve the ice-maker path or water supply rather than the defrost drain.
Safety stop: Do not pull tubing, force ice components, or keep an uncontrolled water connection open.
-
PATH 03Safety boundary
What you see
The door is ajar, packages block closure, the gasket is damaged, or frost is concentrated along the opening or vents.
Do this next
Clear only the package that blocks the seal, clean and dry the accessible gasket, and arrange service for a damaged seal, persistent frost, warming, or recurring water.
Why this path and its safety boundary
Why it matters: Warm moist air may be entering and creating frost that later melts; the seal or installation condition still needs attention.
Safety stop: Do not cut, remove, force, or substitute the gasket without exact model guidance.
-
PATH 04Safety boundary
What you see
Water pools on the freezer floor, an ice sheet forms at the bottom or rear, the leak recurs after defrost, or the drain or evaporator area is behind a panel.
Do this next
Keep the unit off as needed to protect food and arrange qualified refrigeration service; do not chip ice or remove an evaporator cover.
Why this path and its safety boundary
Why it matters: KitchenAid identifies a blocked drain line or frozen evaporator coils as possible causes that require professional inspection.
Safety stop: Do not pierce ice, use sharp tools or open flame, pour water into a hidden drain, or dismantle the freezer.
-
PATH 05Safety boundary
What you see
The exact model supports manual defrosting, frost is ordinary and accessible, meltwater can be contained, and the appliance can be safely disconnected and dried.
Do this next
Follow the model manual's unplug, food-storage, water-collection, non-sharp scraping, drying, and reconnect steps once; monitor for recurrence.
Why this path and its safety boundary
Why it matters: A controlled thaw may clear ordinary frost and water, but recurrence indicates a deeper drain, defrost, sealing, or cooling condition.
Safety stop: Stop for concealed ice, damaged liner, water near electrical parts, active external flow, or any need for heating equipment or panel access.
-
PATH 06Safety boundary
What you see
Water reaches an outlet, cord, controls, or wiring; the appliance is damaged; cooling is lost; or active leakage threatens the floor or cabinet.
Do this next
Disconnect power and water only from safe locations, protect food if possible, keep people away from the wet area, and request qualified appliance or electrical service.
Why this path and its safety boundary
Why it matters: Electrical, property, and food-safety risks take priority over leak diagnosis.
Safety stop: Do not touch wet electrical parts, move a heavy appliance through water, or reconnect until the area and appliance are assessed and dry.
Helpful context
Understand the symptom
Separate normal defrost water from water escaping the freezer
KitchenAid's freezer manual explains that automatic defrost melts frost and sends the water to a drain pan, where it evaporates; water in that pan during defrost can therefore be normal. Water pooling on the freezer floor, leaking onto the kitchen floor, returning after cleanup, or appearing around an ice maker or water line is a different branch. Location, timing, frost pattern, and cooling performance are more useful than guessing a part from the puddle alone.
Use frost and door sealing as clues, not permission to dismantle the freezer
KitchenAid says warm, moist air can enter through a door that is left ajar or a damaged gasket, creating frost that can eventually contribute to water. Check the gasket and door closure from ordinary access, keep air vents clear, and avoid overloading the compartment. A solid sheet of ice at the bottom or a steady leak can involve a drain or evaporator area behind an interior panel; KitchenAid directs that inspection to a professional.
Defrost only within the model's safe boundary
For a freezer without an automatic defrost function, KitchenAid provides a manual-defrost method using power disconnection, protected food storage, towels or a drain hose, warm water, and non-sharp tools. Follow the exact owner manual, keep water away from electrical connections, and reconnect only after the interior is fully dry. Do not use heat guns, knives, ice picks, or panel removal to reach a hidden drain.
Safety boundary
Stop conditions
- Disconnect power from a safe location if water reaches the cord, outlet, controls, wiring, or another electrical area; do not touch wet electrical parts.
- Close the household water supply for a cracked, spraying, or uncontrolled ice-maker line and arrange qualified service.
- Do not use knives, ice picks, heat guns, open flames, or improvised heaters to remove freezer ice, and do not pierce the liner or hidden drain.
- Do not remove evaporator covers, panels, ice-maker modules, or concealed drain parts to locate the leak.
- Do not reconnect a manually defrosted freezer until it is completely dry, and do not keep operating with recurring leakage, warming, pan overflow, or unknown source.
Only after diagnosis
Potential parts
- model-specific defrost drain or drain-pan assembly
Consider this category only if qualified inspection confirms a blocked, damaged, or recurring defrost-drain or pan condition after safe external observations.
Confirm the exact KitchenAid model, freezer configuration, drain design, and manufacturer fit information before ordering; do not select a drain part from appearance alone. - model-specific freezer door gasket
Consider this category only if the exact model's gasket is damaged or cannot seal and qualified diagnosis links warm-air entry and recurring frost or meltwater to the condition.
Confirm the exact KitchenAid model, door configuration, gasket profile, and manufacturer fit information before ordering; do not cut or force the seal. - model-specific ice-maker water component
Consider this category only if a connected ice maker or water line is confirmed as the source of the leak and qualified testing identifies the failed component.
Confirm the exact model, water connection, tubing or valve design, and manufacturer fit information; close the water supply for an uncontrolled leak.
When checks do not resolve it
Need a professional?
Arrange qualified KitchenAid appliance service when water pools on the freezer floor, returns after a model-approved thaw, appears from behind or beneath the cabinet, the defrost pan overflows, the drain or evaporator area is concealed, frost repeatedly rebuilds, the freezer warms, the door seal is damaged, or an ice-maker water line leaks. Treat water near energized parts, active uncontrolled flow, cabinet damage, or food-safety loss as an urgent appliance or electrical matter.
Safety scope: This article covers food protection, ordinary-access visual checks, visible water-line isolation, and model-approved manual defrost only. Qualified service must inspect concealed drains, evaporator and defrost components, ice-maker assemblies, wiring, and cabinet parts.
Common questions
FAQ
Why is my KitchenAid freezer leaking water onto the floor?
Check the first wet location and whether the freezer has an ice maker or water connection. KitchenAid identifies ice-maker frost, frozen evaporator coils, and a blocked drain line as possible causes. Water on the floor or recurring water needs qualified inspection; do not remove panels or chip ice.
Is water in the KitchenAid freezer defrost pan normal?
Yes, KitchenAid's freezer manual says water can drip into the defrost pan during automatic defrost, and high humidity can slow evaporation. Water escaping the pan, pooling inside or on the floor, recurring, or accompanying warming is not a normal-pan branch.
Can a freezer door gasket cause leaking water?
A damaged or poorly sealing gasket can let warm, moist air enter, creating frost that later melts. Check the accessible seal and door closure without cutting or removing the gasket. Arrange service for a damaged seal, heavy recurring frost, warming, or repeated water.
Can I defrost the KitchenAid freezer with a knife?
No. KitchenAid says to unplug for manual defrost, contain meltwater, and use a plastic scraper or wooden spoon; it specifically warns against knives and other sharp tools. Follow the exact manual only for a model designed for manual defrost, and dry the freezer completely before reconnecting.
What should I do if the KitchenAid freezer leak is near the power cord?
Do not touch wet plugs, outlets, controls, or wiring. Disconnect power only from a safe location if possible, keep people away from the wet area, protect frozen food, and arrange qualified appliance or electrical service. Do not reconnect until the appliance and electrical area are assessed and dry.
Read the exact guide
Official sources
- Freezer OperationKitchenAid · An official KitchenAid freezer owner manual used for general automatic-defrost and safety context; exact model manual takes precedence.
- 9 Possible Freezer Troubleshooting Fixes & TipsKitchenAid · KitchenAid general freezer troubleshooting guidance; exact model owner documentation controls.
- How to Manually Defrost a FreezerKitchenAid · KitchenAid general manual-defrost guidance; only models designed for manual defrost should follow that process.
Community feedback
Share a repair observation
Share a plain-text repair observation. Accepted observations are published automatically; this page may take a moment to update.