
On this page
Start here
Quick answer
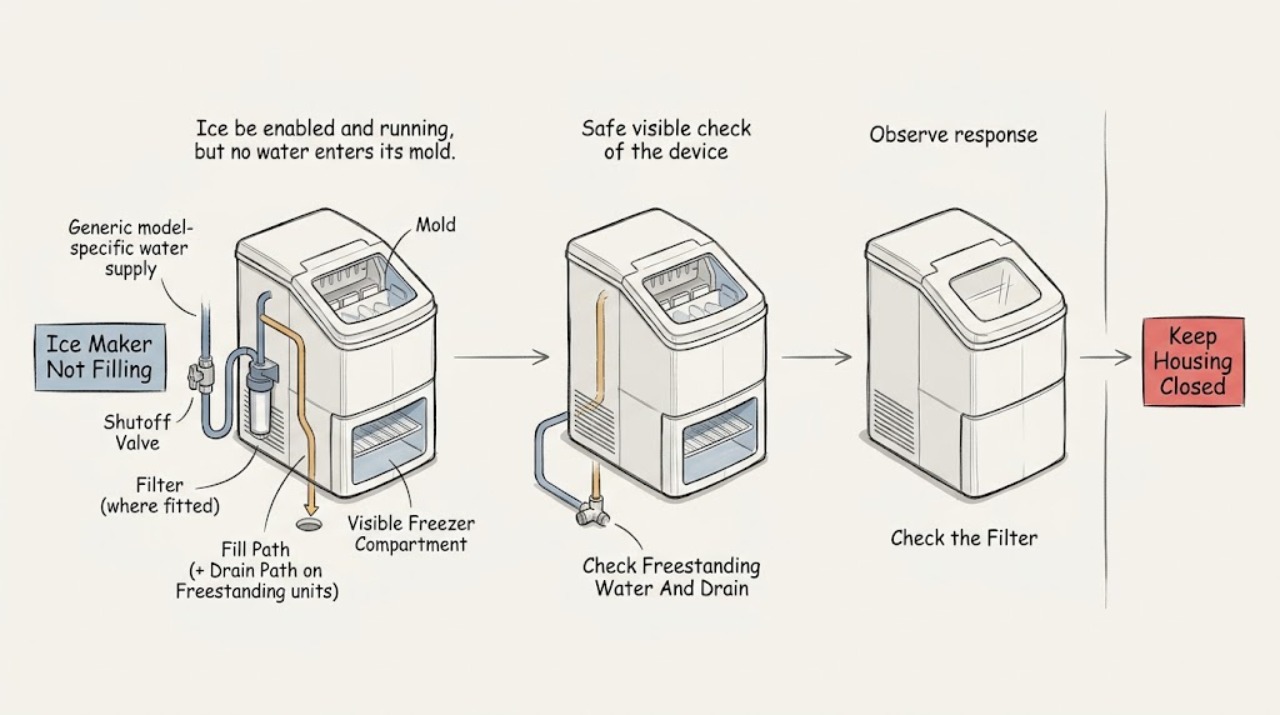
First confirm that the symptom is truly a missing fill—no water enters the ice-maker mold or freestanding water pan—rather than ice being made but not dumped. Record the model and identify a freestanding KitchenAid ice maker versus one built into a refrigerator. For freestanding units, KitchenAid directs owners to check the accessible water line for kinks, the valve position, the applicable filter, water pressure, and the drain arrangement; its newly installed guide gives 30–120 PSI for the applicable freestanding guide. For refrigerator-built-in units, KitchenAid points to the cold-water connection, a kinked line, the ice-maker on/off state, freezer temperature, and a recently installed or clogged filter. Correct only visible, model-documented conditions. If the water path is dry after those checks, or a valve, wiring, inlet assembly, mold, or control would need access, stop and arrange qualified service rather than probing or bypassing the appliance.
Before you begin
Safety first
- Do not remove panels, disconnect internal water tubing or wiring, bypass controls, energize a valve manually, handle refrigerant, or perform live electrical tests. For smoke, sparking, burning odor, a hot or damaged cord, active leaking, or water near an outlet or controls, stop using the appliance and isolate power only if safe before obtaining qualified service.
Work through in order
Diagnostic checks
Use only checks that match the exact appliance or system and its official guide.
-
Check 1
With the appliance safe to approach, record the model number and identify freestanding versus refrigerator-built-in. Confirm whether the mold or freestanding water pan is actually dry after a documented cycle, and note whether the refrigerator dispenser (if present) supplies water.
Expected result: The mold/pan is dry, partially filled, full but not harvested, or the symptom cannot be observed safely; dispenser water is normal, weak, or unavailable.
Next step: Use the architecture-specific checks below and the exact manual. If the mold is full, switch to the model's harvest/not-dumping guidance rather than replacing a water component.
Stop if: Do not force an ejector, remove covers, or touch wet electrical parts to observe a cycle.
Why this matters
Why: A dry mold or pan supports a fill-path investigation. A full mold points toward harvest or ejector behavior instead, while weak or absent dispenser flow makes a refrigerator supply/filter problem more likely but does not prove the ice-maker valve is sound.
-
Check 2
If freestanding, inspect only the accessible water-supply line for a kink, confirm the documented shutoff valve is fully open, check the applicable filter, and inspect the visible drain hose, drain cap, or pump routing exactly as the model manual describes.
Expected result: The supply line is kinked or valve partly closed; the filter is clogged or not applicable; a drain hose/cap/pump route is visibly wrong; or all visible paths appear correct.
Next step: Correct only a clearly visible, manual-supported kink, valve position, filter seating, drain-cap, or hose-routing issue, then observe a complete documented cycle. If the unit must be pulled out, the line is inaccessible, or the issue remains, stop and arrange service.
Stop if: Do not disconnect pressurized tubing, remove a pump, open the cabinet, or reach into internal wiring or the cutter-grid area.
Why this matters
Why: KitchenAid links restricted water flow to low or no ice production and also documents that a kinked drain hose or incorrectly fitted drain path can stop freestanding production. The guide's 30–120 PSI range applies to its documented newly installed freestanding models, not automatically to every model.
-
Check 3
If refrigerator-built-in, verify from the owner's manual that the ice maker is enabled, inspect the accessible cold-water line for a kink and the shutoff valve for the documented open position, and check whether a filter was recently installed or is due for replacement.
Expected result: The ice maker is off, the line is kinked or valve closed, water flow changes when the model's filter is correctly removed or bypassed as documented, the filter is due, or all checks are normal.
Next step: Turn the maker on or correct one visible supply/filter condition only as the model manual allows, then wait through the model's normal cycle. If the mold remains dry with normal supply, arrange service rather than bypassing controls.
Stop if: Do not pull the refrigerator out unsafely, remove a sealed water fitting, bypass a filter housing, or test an energized valve.
Why this matters
Why: KitchenAid identifies the on/off state, restricted water supply, kinked line, and filter installation or condition as refrigerator ice-maker causes. A dispenser-flow change can implicate the filter, but normal dispenser flow does not rule out a fill valve or internal ice-maker fault.
-
Check 4
If the refrigerator or its water filter was newly installed, compare the elapsed time with KitchenAid's model guidance and complete only the documented water-system flush or discard procedure.
Expected result: Less than 24 hours have passed, less than three days have passed since installation, the filter or water source was recently changed, or the documented waiting/flush period is complete.
Next step: Allow the documented period, complete the exact flush/discard step, and reassess whether water enters the mold. If the cycle is complete and the mold is still dry, continue to the service boundary.
Stop if: Do not keep cycling a leaking appliance, dispense water onto electrical parts, or apply a generic gallon/flush quantity to an unidentified filter.
Why this matters
Why: KitchenAid says a newly installed refrigerator ice maker may take 24 hours to begin and three days for full production; its flush guide says the required flush varies by filter and may require three discarded ice containers when there is no dispenser. This explains delayed production but not a leak or unsafe electrical condition.
-
Check 5
After the architecture-specific external checks and normal waiting period, document whether the mold or water pan still remains dry, along with any hum, click, leak, error light, or temperature abnormality.
Expected result: Water now enters normally; the fill remains dry despite normal supply and controls; or a leak, wet electrical area, burning odor, smoke, sparking, or unusual heat is present.
Next step: Return to use only if the model completes a normal cycle without leaks or hazards. Otherwise stop the appliance, preserve the model and observations, and arrange qualified service.
Stop if: For water near controls/outlets, smoke, sparking, burning odor, a hot or damaged cord, or active leaking, stop using the appliance and isolate power only if safe. Do not perform live electrical tests or open panels.
Why this matters
Why: A restored fill supports a supply, filter, control-state, timing, or installation cause. A persistently dry mold/pan after those checks makes an internal inlet valve, fill path, sensor, or control fault more likely, but that component cannot be identified from the symptom alone. Hazard signs override ordinary troubleshooting.
Use your observations
Decision map
Find the observation that best matches what you see, then follow the next safe action.
-
PATH 01Next step
What you see
The mold contains frozen cubes but the owner reports that the ice maker is not filling or the bin is not receiving ice.
Do this next
Use the exact model's harvest or jam guidance and do not order a fill valve from this symptom. If an internal jam or control fault remains, arrange service.
Why this path and its safety boundary
Why it matters: This pattern is more consistent with harvest/ejector or dumping behavior than a water-fill failure. KitchenAid's freestanding troubleshooting distinguishes a jammed ejector from water-supply checks.
-
PATH 02Next step
What you see
The unit is a freestanding KitchenAid ice maker and the water pan stays dry or production is low while a visible line, valve, filter, drain, or pump-routing issue is present.
Do this next
Correct only the documented visible condition, then run the model's complete cycle. Escalate if the line or pump is inaccessible, the condition recurs, or the pan remains dry.
Why this path and its safety boundary
Why it matters: KitchenAid's freestanding guides treat these as separate external causes of low or no production. A drain restriction can mimic a fill fault because the water system cannot complete its cycle.
-
PATH 03Next step
What you see
The ice maker is built into a KitchenAid refrigerator and the mold is dry while the appliance was recently installed, the water line/filter changed, or dispenser flow is weak or absent.
Do this next
Complete the model-specific waiting, filter seating/replacement, and flush procedure. If the mold is still dry afterward, arrange qualified service.
Why this path and its safety boundary
Why it matters: The first pattern fits KitchenAid's installation, supply, and filter guidance; normal dispenser flow and elapsed timing make an internal ice-maker fill path more relevant but do not prove a valve or control failure.
-
PATH 04Safety boundary
What you see
The correct external water path, settings, filter procedure, and waiting period have been completed, but the mold or water pan remains dry, or any leak/electrical hazard is present.
Do this next
Stop using the appliance, isolate power only if safe, and provide qualified service with the model, architecture, observed fill state, supply/filter history, and any noise or leak details.
Why this path and its safety boundary
Why it matters: This pattern is outside safe owner-level diagnosis. It can involve internal plumbing, an inlet valve, sensor, control, wiring, or another model-specific component, and hazard signs require immediate shutdown.
Safety stop: Do not bypass the ice maker, energize a valve manually, remove panels, disconnect wiring, or take live measurements.
Helpful context
Understand the symptom
Confirm that it is a fill problem
Watch or inspect only as the owner's manual allows. A dry mold or dry water pan after a documented harvest attempt is a fill symptom; a full mold whose cubes are not released is an ejector or harvest symptom, and an empty bin can also mean the ice was made but not dumped. Note whether the unit is freestanding or part of a refrigerator, whether the dispenser water works, and whether the issue began after installation, a filter change, or moving the appliance. That distinction prevents applying a refrigerator filter test to a freestanding water-pan system or treating a harvest jam as a water-supply failure.
Freestanding units have their own water and drain path
KitchenAid's freestanding guidance calls out the water line, valve, applicable filter, water pressure, and—in the newly installed guide—the drain hose, drain cap, pump routing, and room conditions. A drain hose problem can stop production even though the complaint sounds like a fill failure. Check only the visible hose and connections identified by the exact manual; do not pull an installed unit out of a cabinet unless it is stable and the manual makes that a user step. Do not infer that a freestanding unit has the same filter, pump, or connection as a refrigerator.
Refrigerator-built-in units depend on the cold-water system
For a KitchenAid refrigerator ice maker, the official troubleshooting pages direct attention to a fully open water supply, a securely connected and unkinked cold-water line, the ice-maker on/off state, freezer temperature, and filter installation or condition. A filter can restrict flow when it is clogged or not seated correctly, but not every refrigerator has the same filter location or bypass behavior. Follow the exact model manual and use the dispenser only as a low-risk indication of water flow; it does not prove that the ice-maker inlet valve or internal fill path is working.
Allow for installation and water-system timing
A newly installed refrigerator ice maker is not necessarily defective immediately: KitchenAid says to allow 24 hours for production to begin and three days for full production. After a filter or water-source change, follow the model's flush instructions; KitchenAid's refrigerator flush guidance says the required water volume varies by filter, and refrigerators without a water dispenser may require three full containers of ice to be filled and discarded. These timing rules are for the documented refrigerator paths, not a reason to ignore a leak, wet electrical area, or an already-obvious dry fill path.
Stop before internal valve or electrical work
If the line is open and correctly routed, the applicable filter is correctly seated, the model's controls are on, and a documented cycle still leaves the mold or pan dry, the remaining possibilities include an inlet valve, fill tube, control, sensor, or other internal component. Do not jumper a valve, bypass a switch, remove the cabinet or refrigerator panels, pierce tubing, or perform a live voltage test. Stop immediately for a wet cord or outlet, leaking filter housing, sparking, smoke, burning odor, or unusual heat; isolate power only if safe and obtain qualified service.
When checks do not resolve it
Need a professional?
Call qualified service when the fill remains dry after model-specific external checks and the documented waiting or flush period, or whenever the suspected cause is behind a panel, in an internal valve, sensor, control, wiring, or inaccessible water path. Stop immediately for leaking near electrical parts, smoke, sparking, burning odor, a hot or damaged cord, or unusual heat.
Safety scope: Do not remove panels, disconnect internal water tubing or wiring, bypass controls, energize a valve manually, handle refrigerant, or perform live electrical tests. For smoke, sparking, burning odor, a hot or damaged cord, active leaking, or water near an outlet or controls, stop using the appliance and isolate power only if safe before obtaining qualified service.
Common questions
FAQ
How do I know whether my KitchenAid ice maker is not filling or not dumping ice?
Inspect only as the owner's manual permits: a dry mold or dry freestanding water pan supports a fill-path issue, while a mold containing frozen cubes points toward harvest or dumping. KitchenAid's freestanding troubleshooting treats an ejector jam as a different check from water supply and filter problems.
What should I check first on a freestanding KitchenAid ice maker that is not filling?
Check the accessible water line for a kink, confirm the documented valve is fully open, and use the exact model guide for the applicable filter and drain path. KitchenAid's newly installed freestanding guide also states a 30–120 PSI range for its applicable models; do not treat that range as universal without the manual.
Why does a new KitchenAid refrigerator ice maker not fill immediately?
KitchenAid says to wait 24 hours after installation for production to begin and three days for full production. Confirm the cold-water line and ice-maker state from the model instructions, and do not continue running an appliance with a leak or unsafe electrical condition.
Can a KitchenAid refrigerator filter stop the ice maker from filling?
It can restrict flow when clogged or incorrectly installed on a refrigerator model that uses that filter. KitchenAid recommends checking the filter installation and comparing water flow with the filter removed only as its documented procedure allows; a filter should be selected by model, not appearance.
Should I test the KitchenAid ice-maker inlet valve myself?
No. A dry fill after the safe external checks may involve an inlet valve, fill path, sensor, control, or wiring, but the source pages do not authorize live testing or bypassing. Stop at the cabinet or electrical boundary and use qualified service.
Read the exact guide
Official sources
- How to Install the Water Supply Line - Product Help | KitchenAidKitchenAid · KitchenAid ice-maker water-supply installation guidance; exact tubing and installation requirements remain model-specific.
- How to Troubleshoot the Freestanding Ice Maker - Product Help | KitchenAidKitchenAid · KitchenAid freestanding ice-maker guidance; control and water arrangements vary by model.
- Ice Maker Not Working - Troubleshooting - Product Help | KitchenAidKitchenAid · KitchenAid refrigerator ice makers; exact refrigerator architecture and controls vary by model.
- How to Flush the Water System in a Refrigerator - Product Help | KitchenAidKitchenAid · KitchenAid refrigerator water systems; flush amount and procedure vary by filter and model.
- Not Making Ice - New Installation - Built In Refrigerator - Product Help | KitchenAidKitchenAid · Newly installed KitchenAid built-in refrigerator ice makers; exact model instructions control installation and reset behavior.
- Does the Water Filter Need to be Replaced? - Product Help | KitchenAidKitchenAid · KitchenAid refrigerator models equipped with the documented water-filter and dispenser arrangement.
- Not Making Ice - Newly Installed - Freestanding Ice Maker - Product Help | KitchenAidKitchenAid · Newly installed freestanding KitchenAid ice makers; water-pressure and drain dimensions are model-family guidance and must be checked against the exact manual.
Community feedback
Share a repair observation
Share a plain-text repair observation. Accepted observations are published automatically; this page may take a moment to update.