
On this page
Start here
Quick answer
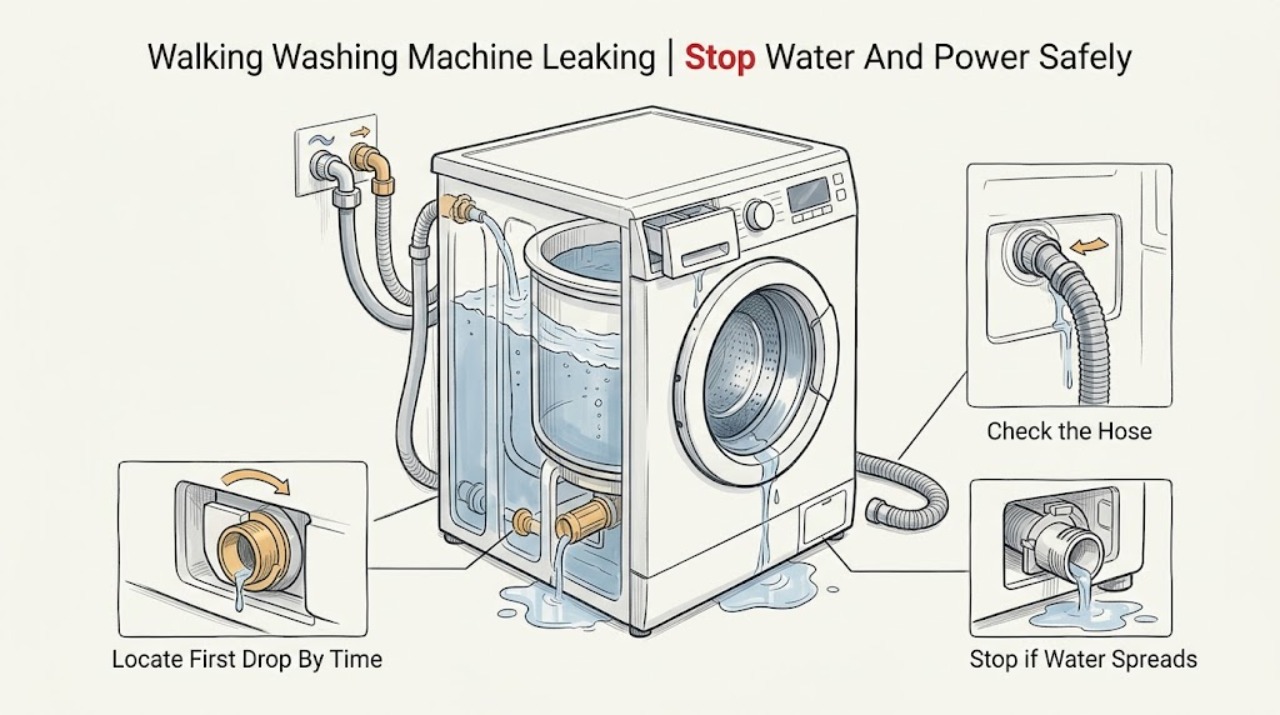
Stop the cycle and contain the water first. From a dry, safe position, turn off the washer's water supply; disconnect power only if the plug or breaker can be reached without touching water. Never step into water to reach an electrical connection. Record whether the leak starts while filling, washing, draining or spinning, or while the KitchenAid washer is idle. A leak at the rear during fill points to an inlet hose or connection; front-load door water points to the door seal or loading; water during drain points to the drain hose, standpipe, pump filter, or internal path; water entering an idle washer points to an inlet valve or supply issue. Check only visible hoses, connections, dispenser, door or lid, load, level, and drain routing as allowed by the exact model manual. Wait for hot water to cool before draining residual water, and do not open a pump filter with a full or hot tub. Persistent leaking, water under the cabinet, a damaged hose or seal, strong vibration, or water near electrical parts needs KitchenAid or qualified appliance service.
Before you begin
Safety first
- Close the water valves from a dry safe position. Do not stand in water to touch electrical equipment, open a filter with hot or uncontrolled water, disconnect a pressurized hose, move a water-filled appliance, reach into moving parts, or open the cabinet.
Work through in order
Diagnostic checks
Use only checks that match the exact appliance or system and its official guide.
-
Check 1
Stop the KitchenAid washer and, from a dry safe position, close both water-supply valves; disconnect power only when the plug or breaker is reachable without touching water or a wet electrical area.
Expected result: If water is continuing, near the outlet or cord, under the appliance, hot, contaminated, or spreading into a walking route, do not approach the electrical connection or restart the washer.
Next step: Keep the area isolated and call an electrician or qualified appliance technician for water near electrical parts, damaged wiring, a persistent leak, or any unsafe access. Do not move the appliance while it is water-filled.
Why this matters
Why: Flooding and electrical contact can turn a leak into a shock or fire hazard. A supply valve can stop incoming water, but it does not make wet electrical equipment safe.
-
Check 2
After the washer is stopped and the area is safe, record whether the first water appears during filling, wash or rinse, drain or spin, after the cycle, or while the washer is idle.
Expected result: Fill-time water favors inlet hoses or connections; wash-time water favors the door or lid, dispenser, load, level, or suds; drain-time water favors the drain route or pump area; water entering while idle favors a supply-side valve or connection.
Next step: Use the timing branch below and provide the observation to KitchenAid support. If the source cannot be seen without moving or opening the cabinet, stop and request service.
Why this matters
Why: Timing narrows the water path even when the floor puddle has spread away from the source. Do not run repeated cycles solely to reproduce a leak.
-
Check 3
For a fill-time or idle leak, inspect the visible hot and cold inlet hoses and their connections from a dry, stable position; look for a kink, bulge, cut, corrosion, missing washer, or water track.
Expected result: Water at a hose coupling or a hose with visible wear supports an external supply-side fault. Water appearing with the washer idle after the valves are open can also indicate an inlet-control problem that is not solved by tightening a random fitting.
Next step: Keep the water valves closed and arrange service for a damaged hose, valve, or connection. Do not disconnect a pressurized hose, move the washer, or open the cabinet to chase a leak.
Why this matters
Why: KitchenAid manuals call for periodic inspection of inlet hoses and replacement when bulges, kinks, cuts, wear, or leaks are found. The correct hose and connection arrangement is model-specific.
-
Check 4
For a front, top, or dispenser-area leak during fill or wash, inspect the door or lid closure, visible seal or gasket, dispenser seating, and the load without reaching into a moving basket.
Expected result: A torn or dirty front door seal, an item caught at the seal, an incompletely closed dispenser, spilled product, or a bulky or water-resistant load that deflects water changes the likely source. A top-load basket that splashes or a cabinet that leans also points to load or level.
Next step: With power off and the basket still, clean or reseat only the user-accessible part named by the manual and reduce or rearrange the load. A torn seal, damaged latch, persistent front leak, or water under the cabinet requires service.
Why this matters
Why: Water can escape at the front or top without a failed internal tub. Features differ between KitchenAid front-load and top-load models, so the manual decides whether a seal or dispenser is user-accessible.
-
Check 5
When the leak appears at the top or front during wash or spin, observe whether the KitchenAid washer rocks, the cabinet is visibly out of level, the basket is off-center, or one bulky item or water-resistant item is in the load.
Expected result: A rocking cabinet, unbalanced load, or splash over the basket links the leak with installation, loading, or leveling; violent movement, a walking washer, or repeated impact is not a condition for another test.
Next step: Stop for violent vibration or a moving appliance. If the manual permits ordinary leveling or load rearrangement, correct only that visible condition after the floor is dry; otherwise arrange service.
Why this matters
Why: KitchenAid top-load guidance explains that an unlevel washer or large, uneven, or water-resistant load can deflect water. Severe vibration can also damage hoses or internal supports.
-
Check 6
For a drain- or spin-time leak, inspect the visible drain hose, standpipe, laundry sink, and nearby plumbing without pulling the washer forward or disconnecting a water-filled hose.
Expected result: A loose or displaced drain hose, backed-up standpipe or sink, cracked external hose, or water emerging from the drain connection points to the drain route. An empty household drain with water under the cabinet points to an internal hose, pump, filter, or tub path.
Next step: Correct only a plainly visible hose placement issue allowed by the model manual. If the drain backs up, the hose is damaged, or the source is underneath the cabinet, close the water valves and call service.
Why this matters
Why: Drain water can travel along the floor and make a rear or underside leak look like a supply leak. The house drain and the washer drain route must both carry water correctly.
-
Check 7
If the exact KitchenAid front-load manual identifies a user-accessible drain-pump filter and the tub water is cool, follow that manual's residual-water and filter procedure only after power is disconnected from a dry safe location.
Expected result: A clogged filter, lint, or foreign material can restrict draining and cause residual water; a filter that is clean, correctly seated, and still leaks or leaves water shifts the problem to a seal, pump, hose, or internal path.
Next step: Do not open a filter on a top-load design, a full or hot tub, or a washer with water near electricity. If the filter will not seat, the leak persists, or internal access is required, stop and arrange service.
Why this matters
Why: KitchenAid's front-load manual warns to switch off and unplug before filter work, wait for recently hot water to cool, and contain residual water. Not every KitchenAid washer uses the same filter access.
-
Check 8
After the leak is contained, review the detergent type and amount against the exact KitchenAid manual and product label, and note whether foam is escaping from the door, dispenser, or tub area.
Expected result: Non-HE detergent where the manual requires HE, excess detergent, an overfilled dispenser, or visible foam can cause poor rinsing and overflow-like water. No foam with a localized leak keeps attention on seals, hoses, drain paths, or internal components.
Next step: Use only the documented product and amount on future controlled loads; do not add another cleaner or chemical to counteract suds. Persistent foaming, overflow, or a leak after correct detergent use requires service.
Why this matters
Why: KitchenAid front-load guidance says low-water washing needs HE detergent and that excess suds can affect rinsing and residue. Suds are not proof that a hose or seal is sound.
-
Check 9
Document the complete model number, leak timing, water temperature, location of the first drop, load and cycle, hose and seal observations, drain result, vibration, detergent, and whether the leak continues while idle.
Expected result: A leak that stops after a visible routing or load correction is a limited user-condition result; a recurring leak, water under the cabinet, damaged seal or hose, internal noise, or a leak while idle is a service result.
Next step: Keep the water valves closed and contact KitchenAid support or qualified appliance repair. Do not use the washer until a persistent or internal leak is cleared.
Why this matters
Why: The technician can use timing and the first-drop location to distinguish supply, door or lid, dispenser, drain, pump, tub, valve, and internal hose faults without asking for an unsafe reproduction.
Use your observations
Decision map
Find the observation that best matches what you see, then follow the next safe action.
-
PATH 01Next step
What you see
Water is near an outlet, cord, plug, breaker, electrical connection, or the person would need to stand in water to disconnect power.
Do this next
Do not touch the wet electrical area or step into the water. Keep the washer off, close the water valves only if safely reachable, and call an electrician or qualified appliance technician.
-
PATH 02Next step
What you see
The first drop appears during filling or the tub slowly gains water while the washer is idle.
Do this next
Keep both water valves closed and arrange service for inlet hoses, washers, connections, or the inlet-control path. Do not disconnect a pressurized hose or open the cabinet.
-
PATH 03Next step
What you see
Water appears at the front or top during wash and the seal, dispenser, load, or level is visibly implicated.
Do this next
With power off and the basket still, clean or reseat only user-accessible parts allowed by the exact manual and reduce or rearrange the load. A torn seal, latch problem, cabinet leak, or repeat leak needs service.
-
PATH 04Next step
What you see
Water appears during drain or spin, the standpipe backs up, or residual water remains in the tub.
Do this next
Inspect only the visible drain route. Use a drain-pump-filter procedure only when the exact front-load manual permits it, the water is cool, and power is safely disconnected; otherwise arrange service.
-
PATH 05Next step
What you see
The tub contains hot or substantial water, the filter or hose cannot be opened safely, or the leak source is under the cabinet.
Do this next
Do not open the filter, disconnect hoses, tilt, or move the washer. Keep the water valves closed and call qualified service; protect people from the wet route.
-
PATH 06Next step
What you see
The washer rocks violently, walks, makes impact or grinding noise, leaks from underneath, or continues leaking after visible checks.
Do this next
Stop use and arrange KitchenAid or qualified appliance repair for leveling, pump, hose, tub, seal, suspension, or other internal diagnosis. Do not run another test load.
Helpful context
Understand the symptom
Make the leak safe before finding its source
Turn the washer off and keep people away from the wet area. If the water supply valves are safely reachable, close them. Do not stand in water to unplug the washer or touch an outlet, cord, or breaker; use a dry, safe location or an electrician. Wipe or contain only what can be reached without moving a water-filled appliance. A continuing leak, water near electrical parts, hot water, or a washer that is moving violently is a stop-and-service condition.
Leak timing is more useful than a puddle's final location
Observe when the first drop appears, not only where the water ends up. Fill-time leaks usually start at the supply side, wash-time leaks can involve a door or lid, dispenser, load, level, or oversudsing, drain-time leaks can involve the drain route or pump area, and an idle washer that slowly fills can have an inlet-control problem. KitchenAid washer designs differ, so use the model number to select the matching manual before opening a filter or removing a dispenser.
Front-load and top-load checks are not interchangeable
A front-load washer has a door seal and, on applicable models, a user-accessible drain-pump filter. A top-load washer may instead splash over the basket or load when it is unlevel, overloaded, or handling bulky or water-resistant items. KitchenAid's manuals cover different model families and explicitly state that parts and features vary, so do not apply a filter, seal, or lid procedure from another design.
Only after diagnosis
Potential parts
- inlet hose with sealing washers
Consider this only when visible wear, a cut, bulge, missing washer, or a confirmed hose-coupling leak is found and the exact model installation guidance supports replacement.
Confirm the complete KitchenAid model and have service handle any pressurized connection or uncertain leak source. - door seal or lid seal
Consider this only after a technician confirms that water starts at the front door or lid seal and not at the dispenser, load, level, or internal tub path.
Front-load and top-load designs differ; verify exact model fit before ordering or replacing. - drain pump filter or drain pump
Consider this only when model-approved filter access and a safe drain-path diagnosis show restriction, pump leakage, or incomplete draining.
Not every model has the same filter or pump access; confirm model fit and use qualified service for internal work. - water inlet valve
Consider this only when a qualified technician confirms water entering while idle or a valve-side fill fault after external hoses and supply connections are checked.
Confirm the exact model and professional diagnosis before selecting a water-control component.
When checks do not resolve it
Need a professional?
Stop using the KitchenAid washer and seek professional help for water near electrical parts, a wet cord or outlet, a leak that continues while idle, a hot or full tub, water under the cabinet, a damaged hose, door seal, lid, or latch, a backed-up drain, violent vibration, unusual impact or grinding, repeated leaking after a visible correction, or any need to move the washer, open the cabinet, or disconnect a pressurized or water-filled path. From a dry safe location, close the water valves; disconnect power only when safely reachable. Never step into water to touch electrical equipment, reach into a moving basket, or open a pump filter with hot or uncontrolled water.
Safety scope: Close the water valves from a dry safe position. Do not stand in water to touch electrical equipment, open a filter with hot or uncontrolled water, disconnect a pressurized hose, move a water-filled appliance, reach into moving parts, or open the cabinet.
Common questions
FAQ
What should I do first when my KitchenAid washing machine leaks?
Stop the washer, close the water valves from a dry safe position, and disconnect power only if safely reachable without touching water or wet electrical parts. Record when the first drop appears and do not move a water-filled appliance.
Why does my KitchenAid washer leak only during filling?
A fill-time leak most often sends the check toward visible inlet hoses, sealing washers, and connections. Keep the valves closed and arrange service for a damaged hose, valve, or connection; do not disconnect a pressurized hose.
Can I clean the KitchenAid washer drain-pump filter when it leaks?
Only if the exact front-load manual identifies a user-accessible filter, the washer is safely powered off, and the residual water is cool and controllable. Do not open a filter on an unfamiliar design, a full or hot tub, or near wet electrical parts.
Can an unbalanced load make a KitchenAid top-load washer leak?
Yes. KitchenAid's top-load guidance links splashing with an unlevel washer or a large, uneven, or water-resistant load. Stop for violent movement, and correct only a visible load or leveling condition allowed by the model guide.
When does a KitchenAid washer leak need service?
Arrange service for water under the cabinet, a leak while idle, a torn seal or hose, incomplete draining, a backed-up drain, repeated leaking, violent vibration, unusual noise, hot or uncontrolled water, or any leak near electrical parts.
Read the exact guide
Official sources
- Customer Service | KitchenAidKitchenAid · KitchenAid appliances and products; use the model-specific support route.
- Owner's ManualKitchenAid · KitchenAid front-load washer manual W11559760A; use the exact model manual for another washer.
- Kitchen Appliance ManualsKitchenAid · KitchenAid appliances; enter the appliance model number to retrieve matching documents.
- Use & Care GuideKitchenAid · KitchenAid top-load models KAWS700G, KAWS750G, KAWS800G, and KAWS850G; use the exact model guide for another washer.
Community feedback
Share a repair observation
Share a plain-text repair observation. Accepted observations are published automatically; this page may take a moment to update.