
On this page
Start here
Quick answer
Stop the cycle and find where the water first appears: door, dispenser, rear inlet connection, drain hose or household drain, lower access panel, or underneath. If water is near the plug or outlet, there is smoke, a burning smell, a damaged cord, or active flooding, keep the washer dryer off and isolate water or power only from a safe dry position. If the area is safe, LG's leak guidance supports checking the door gasket for hair or fabric, the dispenser for buildup and excess detergent, inlet hoses and washers after the water supply is closed, and the drain hose or household drain for a loose connection or backflow. A pump-filter cap or residual-water hose that was not closed after cleaning can also leak. Run a single empty rinse test only when there is no electrical or flooding hazard and the model instructions allow it. A torn gasket, cracked hose, leak from underneath or the rear of the cabinet, a leak that continues after an accessible correction, or any need to open the cabinet requires qualified service.
Before you begin
Safety first
- A user may inspect visible water paths, door gasket, dispenser, supply and drain hoses, and manual-approved access-cover steps from a safe dry position. Internal seals, valves, pumps, cabinet hoses, electrical areas, and live testing require qualified service.
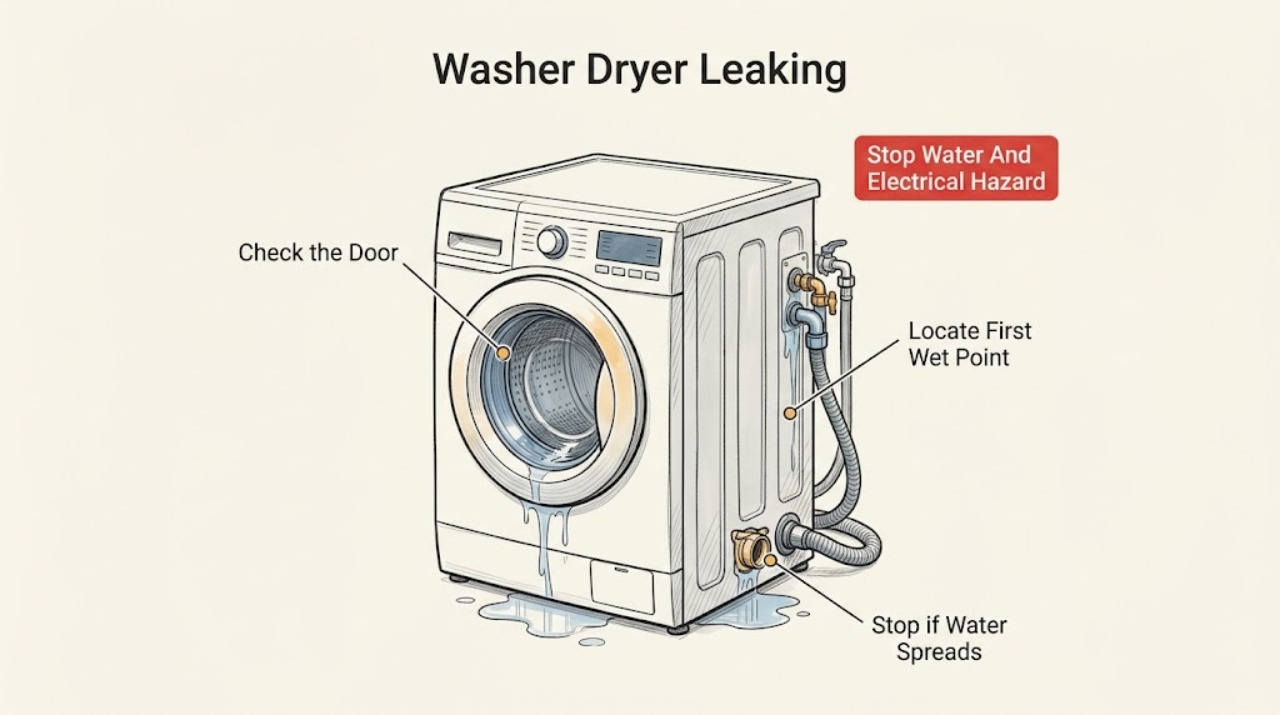
Work through in order
Diagnostic checks
Use only checks that match the exact appliance or system and its official guide.
-
Check 1
Stop the cycle, keep clear of standing water, and from a dry position close the washer dryer's supply faucets; if water is near the plug or outlet, there is smoke, a burning smell, sparking, a hot plug, or a damaged cord, use only a safe disconnect and do not touch the appliance.
Expected result: Record whether the leak is still actively flowing, whether it is close to the power connection, whether the supply faucets stop the incoming flow, and whether any heat, odor, smoke, or electrical protection trip is present.
Next step: Dry and isolate the area only when it is safe to do so, then continue with visible source tracing. For any electrical or flooding hazard, keep the unit off and arrange qualified appliance or electrical help.
Stop if: Stop immediately for water near electricity, smoke, burning odor, sparks, a hot plug, damaged wiring, or uncontrolled flooding.
Why this matters
Why: An active water or electrical hazard takes priority over locating a component. A flow that stops when the faucets close points toward the inlet side; water that continues may be retained tub water or a drain-side problem.
-
Check 2
If there is no hazard and the leak has stopped, dry the accessible floor and inspect the door, dispenser, rear inlet connections, rear drain hose, lower access cover, and cabinet underside without moving the washer dryer or removing a panel.
Expected result: Note the first area that becomes wet and whether the leak begins while filling, washing, draining, spinning, or drying; take a photograph before changing a connection.
Next step: Use the matching door, dispenser, inlet, drain, or access-cover check below. If the first wet point is underneath or inside the cabinet, stop and arrange service.
Stop if: Do not pull the appliance out alone, place hands under a wet cabinet, or run a cycle when water is close to electrical parts.
Why this matters
Why: The first wet point is more useful than the puddle edge. Timing and location separate door, dispenser, inlet, drain, access-cover, plumbing, and internal leaks.
-
Check 3
For water at the front, inspect the visible door glass and gasket for hair, fabric threads, residue, or a torn section, then clean the gasket and glass with a soft cloth; inspect the dispenser drawer and compartment for buildup or an obstruction and use the detergent amount and type specified for the model.
Expected result: A clean intact gasket with no leak on the next permitted test differs from a torn gasket or water that returns under the door. Dispenser residue, thick detergent, or foam that rises at the rear points toward restricted flow or excess suds.
Next step: Remove only accessible debris, clean the drawer as the manual allows, and correct an obvious detergent overfill. If the gasket is torn, the dispenser still overflows, or the leak returns, arrange service.
Stop if: Do not pull the gasket from its channel, pry the dispenser housing, or operate through a torn seal or uncontrolled foam leak.
Why this matters
Why: LG says foreign material between the door and gasket can let water escape, while a torn gasket needs service. LG also links dispenser buildup and excess detergent with overflow or rear leaks.
-
Check 4
For a leak while filling or at the rear, close the water faucets, inspect both inlet hoses and their faucet and washer connections for kinks, cracks, wet threads, or worn connector washers, and reconnect only an accessible loose connection according to the model instructions.
Expected result: Wetness at the faucet connection, washer connection, hose wall, or inlet-valve area identifies a different handoff: a tap or connector, a hose, or the appliance inlet side. A hose that is cracked or punctured is not a tightening problem.
Next step: Replace only a clearly damaged external washer or hose with a model-compatible part after the water is off; if the leak is at the appliance rear, inside the connector, or returns after reconnection, keep the faucets closed and arrange service.
Stop if: Do not disconnect a pressurized hose, open the appliance inlet valve, use force on a seized fitting, or continue filling with a cracked hose.
Why this matters
Why: LG identifies loose or misthreaded connections, damaged hoses, worn washers, and clogged inlet filters as common inlet-side leak causes. A leak that persists at the home's tap may be plumbing rather than an appliance fault.
-
Check 5
For a leak during draining or around the rear drain, check that the drain hose remains securely inserted and is not cracked or kinked, then look for household-drain overflow; for a leak at the lower access cover, follow the model manual to confirm the residual-water hose cap and pump-filter cap are fully closed.
Expected result: Water rising from the household drain points toward backflow; water escaping from a loose or damaged washer hose points toward the hose. A wet access cover after filter work points toward an incompletely closed cap or hose.
Next step: Secure only a visibly displaced drain hose, address a household drain blockage with appropriate plumbing help, or reseat an accessible cap exactly as the manual describes. If the hose is cracked, water remains, or the leak persists, arrange service.
Stop if: Do not open the filter or residual-water hose without a safe water-release procedure, pour chemicals into the washer, reach into a pump, or remove a cabinet panel.
Why this matters
Why: LG explains that a loose drain hose or clogged household drain can spill water during draining, and that an improperly closed residual-water or pump-filter cap can leak down the washer.
-
Check 6
Only when the area is dry, there is no electrical hazard, the supply is controlled, and the model manual permits it, run one empty rinse or equivalent test while observing from a safe position; otherwise skip the test and prepare service details.
Expected result: Record whether water appears at the door, dispenser, inlet, drain, access cover, underside, or not at all, and whether the leak starts during filling or draining. Note whether a nearby tap or drain overflows instead of the washer.
Next step: Stop the test at the first unsafe or uncontrolled leak and arrange qualified service. Provide the model and serial information, code or cycle stage if shown, source photograph, water timing, and the checks already completed.
Stop if: Do not repeat the test, operate with a torn gasket or cracked hose, move a leaking appliance, test live wiring, or dismantle the cabinet.
Why this matters
Why: LG uses a single empty rinse test to distinguish a washer leak from a nearby plumbing or installation leak. A leak during the test, or a leak whose source is underneath or inside, supports service rather than more resets.
Use your observations
Decision map
Find the observation that best matches what you see, then follow the next safe action.
-
PATH 01Safety boundary
What you see
Water is near the plug or outlet, there is smoke, burning odor, sparking, a hot plug, damaged wiring, or uncontrolled flooding.
Do this next
Keep away from the hazard, stop the cycle, and use only a safe dry-position disconnect before arranging qualified appliance or electrical help.
Why this path and its safety boundary
Safety stop: Do not touch the appliance, pull it through water, or continue testing.
-
PATH 02Safety boundary
What you see
Water first appears at the door or dispenser while the tub fills or washes.
Do this next
Clean accessible gasket debris and glass, inspect the dispenser for buildup, and correct an obvious detergent overfill using the model instructions.
Why this path and its safety boundary
Safety stop: A torn gasket, persistent overflow, or a leak from inside the cabinet needs service.
-
PATH 03Safety boundary
What you see
Water appears at the rear during filling or around a faucet, inlet hose, or washer connection.
Do this next
Close the faucets, inspect for cracks and wet connections, and reconnect only an accessible loose connection without force.
Why this path and its safety boundary
Safety stop: A cracked hose, appliance-side leak, or leak at the household tap that persists after reconnection needs service or plumbing help.
-
PATH 04Safety boundary
What you see
Water appears during draining, around the drainpipe, or from the rear drain hose.
Do this next
Check that the drain hose is inserted and secure, and determine whether the household drain is overflowing or backing up.
Why this path and its safety boundary
Safety stop: Do not use chemical drain products in the washer; arrange plumbing or appliance service when the blockage or hose fault is not safely accessible.
-
PATH 05Safety boundary
What you see
Water comes from the lower access cover after pump-filter or residual-water work.
Do this next
With the unit off and drained according to the manual, verify the residual-water cap and pump-filter cap are closed as specified.
Why this path and its safety boundary
Safety stop: If water remains, the hose or cap is damaged, or access requires dismantling, keep the washer dryer off and arrange service.
-
PATH 06Safety boundary
What you see
The first wet point is underneath, inside the cabinet, from a rear valve area, or the leak returns after an accessible check.
Do this next
Stop operating the appliance and preserve the source photograph and timing for qualified diagnosis.
Why this path and its safety boundary
Safety stop: Do not remove panels, test live parts, or keep running cycles to find the leak.
Helpful context
Understand the symptom
Control the water before diagnosing the machine
A small puddle can travel under a washer dryer, so follow the wet trail back to the first wet connection rather than assuming the lowest point is the source. Stop the cycle, keep people away from standing water, and close the washer's supply faucets if you can reach them from a dry position. If water has reached the plug or outlet, do not touch the appliance or electrical connection; use only a safe disconnect and arrange help.
The leak timing is a useful clue
Water at the door while washing points toward the gasket or an obstruction. Water at the dispenser as the tub fills points toward buildup, thick detergent, or too much detergent. A rear leak while filling suggests an inlet hose, connection, tap, or inlet-valve area; a rear leak while draining suggests the drain hose or a household drain that is backing up. Water from the lower access panel after filter cleaning suggests a cap or hose was not reseated.
Keep user checks external and model-specific
LG provides accessible checks for the gasket, hoses, dispenser, drain connection, and some pump-filter areas, but the layout differs across washer dryer models. Use the installed model manual for water-release and filter instructions. Do not remove cabinet panels, reach into a powered pump, or substitute a hose, gasket, cap, or valve without model confirmation.
When a leak becomes a service problem
Arrange service when the gasket or hose is cracked, water comes from underneath or inside the cabinet, a safe correction does not stop the leak, the drain cannot be cleared without plumbing work, or the washer dryer leaks during the empty test. Preserve the exact timing and source photograph so the technician can separate a machine fault from a tap or household drain problem.
Only after diagnosis
Potential parts
- door gasket
Consider only when the gasket is visibly torn, deformed, or unable to seal after accessible debris is removed.
Confirm the exact model and gasket profile; a leak under an intact gasket may come from another path. - inlet hose or connector washer
Consider only when an external hose, connector, or washer is visibly damaged and the water supply is safely closed.
Verify the exact model, connection type, and hose specification; persistent tap leakage may require a plumber. - drain hose
Consider only when the drain hose is cracked, punctured, or cannot remain securely inserted after an accessible correction.
Confirm the exact model and routing requirements; a household drain overflow is a plumbing issue. - pump filter cap or residual-water hose cap
Consider only when a lower access leak follows filter work and the manual-approved reseating check does not restore a seal.
Access and cap design vary by model; do not substitute a cap or open the area with retained water and power present. - inlet valve or internal water path
Consider only when water comes from the rear appliance side or underneath after external hoses, taps, and drain conditions are ruled out by safe checks.
Internal water-path diagnosis and replacement require model confirmation and qualified service.
When checks do not resolve it
Need a professional?
Arrange qualified appliance service for a torn gasket, cracked hose, leak from underneath or inside the cabinet, a rear appliance-side leak, a leak that returns after an accessible correction, a leak during the empty test, or any water near electricity. Contact a plumber when the household tap or drainpipe is the source.
Safety scope: A user may inspect visible water paths, door gasket, dispenser, supply and drain hoses, and manual-approved access-cover steps from a safe dry position. Internal seals, valves, pumps, cabinet hoses, electrical areas, and live testing require qualified service.
Have this ready
- Provide the exact LG model and serial information, source and timing of the leak, cycle stage, photographs of the first wet point and connections, whether water remained in the drum, detergent type and amount, and the safe checks already completed.
Common questions
FAQ
Why is my LG washer dryer leaking from the front door?
Check the visible gasket and glass for hair, fabric, or residue and wipe them clean. A torn gasket or a leak that returns with a clean seal needs qualified service; do not pull the gasket out or force the door.
Why is water leaking from the back of my LG washer dryer?
Observe whether it leaks while filling or draining. Filling points toward the tap, inlet hose, connector, or appliance inlet side; draining points toward the drain hose or a household drain that is backing up. Close the supply faucets before inspecting connections.
Can too much detergent make an LG washer dryer leak?
Yes. LG says excess detergent can create too much suds and contribute to rear leaks, while buildup in the dispenser can restrict flow and cause overflow. Use the detergent type and label dosage specified for the installed model.
Why does my LG washer dryer leak after cleaning the pump filter?
LG says the residual-water hose cap and pump-filter cap must be securely closed after cleaning. Follow the model manual with the unit off and drained; if the leak remains or a cap is damaged, arrange service.
Should I run an empty cycle to find an LG washer dryer leak?
Only when the floor and electrical area are safe, the water is controlled, and the model instructions allow it. LG describes one empty rinse test to locate a leak; stop at the first unsafe or uncontrolled leak and arrange service.
Read the exact guide
Official sources
- [LG front load washer leak] Water leaks from the drain outlet and drain hose during drainageLG Electronics USA Support · Use for drain-hose insertion and household-drain backflow clues, with the installed model and local plumbing conditions controlling the safe remedy.
- LG Washer – Why is My Front Load Washing Machine Leaking?LG Electronics USA Support · The article covers model-dependent leak-source checks for washer dryer combos and front-load washers; use the installed model manual for access and water-release steps.
- LG Washer - Troubleshooting Leaks on A Front Load WasherLG Electronics USA Support · The guide is presented for all models and notes that images and access points can differ; confirm the installed model procedure.
- [LG Front Load Washing Machine] Troubleshooting LeaksLG Electronics USA Support · The guide recommends a single empty rinse test and source-specific checks; run the test only when the floor and electrical area are safe and the model permits it.
Community feedback
Share a repair observation
Share a plain-text repair observation. Accepted observations are published automatically; this page may take a moment to update.