
On this page
Start here
Quick answer
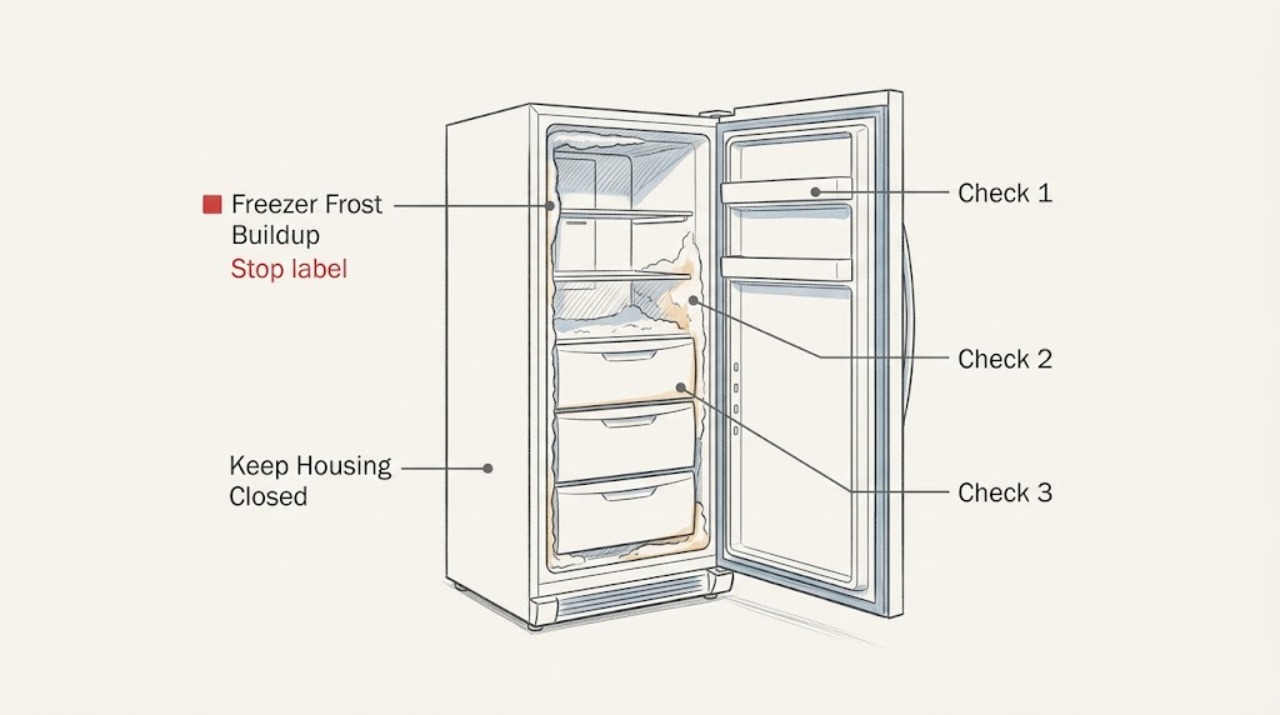
Some frost is expected on Liebherr SmartFrost models, but rapidly returning or thick frost usually means warm, moist air is entering or the model needs a documented defrost. First identify whether frost is limited to the back wall, door edge, gasket, drawer area, or the whole compartment. Check that the door closes fully, the gasket sits in its groove, food is not blocking airflow or the seal, and the ventilation openings are clear. If the exact manual permits manual defrosting, switch the appliance off, protect the food, let the ice melt naturally, and dry the compartment. Never chip ice with a sharp object, apply heat, or remove interior panels. Frost that returns quickly, a damaged seal, or a freezer that cannot hold temperature needs qualified Liebherr service.
Work through in order
Diagnostic checks
Use only checks that match the exact appliance or system and its official guide.
-
Check 1
Photograph the frost before disturbing it and identify whether it is a thin even layer, a ridge around the door, a patch beside a drawer or package, a back-wall sheet, or thick ice throughout the compartment.
Expected result: Frost is concentrated at the gasket or door edge; a package or drawer is in the frost path; frost is limited to a rear wall; or the whole compartment is heavily iced.
Next step: Keep the door closed while you locate the exact model manual and record the current freezer temperature. If food is softening or the temperature alarm is active, protect the food before continuing.
Stop if: Stop if the cabinet, liner, evaporator cover, wiring, or power connection is damaged, or if there is liquid near electrical parts.
Why this matters
Why: The pattern separates likely warm-air entry or obstruction from normal model behavior and from a broader defrost or cooling problem. Frost location alone cannot identify a failed component.
-
Check 2
Close the freezer gently and inspect the accessible gasket all the way around for a package in the way, a section out of its groove, visible tears, flattened areas, or a gap against the cabinet; do not pry or pull the gasket.
Expected result: The gasket contacts the cabinet evenly; a drawer or package prevents closure; the gasket is displaced or damaged; or the door closes but frost keeps forming at one edge.
Next step: Remove only an obvious obstruction and reseat a loose gasket edge gently if the exact manual permits it. If there is damage, a persistent gap, or hinge/door misalignment, arrange qualified service.
Stop if: Do not stretch, glue, cut, heat, or substitute a gasket, and do not adjust hinges or door hardware without the exact model procedure.
Why this matters
Why: An incomplete seal admits humid room air and can create edge frost. A damaged or repeatedly displaced gasket may require model-specific replacement or door-alignment service rather than another defrost.
-
Check 3
Check that drawers and shelves are fully seated, food is not touching the door or blocking its closure, and accessible ventilation grilles or air passages are not covered by packages; do not remove interior covers.
Expected result: A drawer is proud, food holds the door open, a package blocks an air passage, or the interior arrangement is clear while frost remains.
Next step: Reposition only the obstructing item within the model's storage limits, close the door, and observe whether the seal and airflow path are restored. If the drawer, rail, or cover is damaged or cannot seat, call service.
Stop if: Do not force drawers, remove evaporator covers, scrape frost around a fan, or continue operation if the door cannot close securely.
Why this matters
Why: A closure obstruction or blocked airflow can create local frost and temperature differences without proving a refrigeration failure.
-
Check 4
Review the recent use history: frequent or prolonged door openings, warm food loading, a power interruption, a moved appliance, or a recent cleaning or defrost; compare it with the model manual's frost and storage guidance.
Expected result: Frost began after repeated openings or warm loading; the freezer was recently defrosted or moved; there was a prolonged power event; or no triggering event is evident.
Next step: Reduce unnecessary opening and allow the freezer to stabilize only if the temperature is safe. If the temperature is rising or the frost is thick, prepare for a model-approved defrost and protect food first.
Stop if: Do not keep food in an appliance that cannot hold a safe freezing temperature or assume a brief power recovery has fixed recurring frost.
Why this matters
Why: Liebherr identifies frequent opening and warm food as conditions that accelerate frost. If frost appears without those conditions or returns quickly after a correct defrost, an underlying seal, airflow, temperature, or defrost issue is more likely.
-
Check 5
Use the exact Liebherr manual to determine whether manual defrosting applies, then if permitted switch off and defrost with the food removed, natural melting, protected flooring, and a fully dry compartment before restart.
Expected result: The manual provides a defrost procedure; the appliance is a design that should not be manually defrosted by the user; ice is too thick to melt safely in place; or water approaches electrical parts.
Next step: Follow only the exact manual and keep food at a safe temperature. If there is no user defrost procedure, water cannot be controlled, or the ice is around a fan or hidden panel, stop and arrange service.
Stop if: Never chip ice with a sharp object, apply direct heat, pour boiling water, use a hairdryer or heat gun, or remove an interior cover.
Why this matters
Why: Defrosting is model-specific. Thick ice can reduce usable space and increase energy use, but forcing it off can puncture the liner or evaporator and create a larger fault.
-
Check 6
After one model-approved correction or defrost, monitor the door seal, frost pattern, display temperature, and any temperature alarm without repeatedly opening the freezer.
Expected result: Frost remains absent and temperature recovers; frost returns at the same edge; ice returns throughout the compartment; the freezer stays warm; or an alarm or error appears.
Next step: Keep the freezer off or move food if it cannot maintain a safe temperature, and arrange qualified Liebherr service with the model, photos, temperature history, and correction attempted.
Stop if: Stop using the appliance for storage if frost rapidly returns, the door cannot seal, temperature remains unsafe, or electrical, liquid, burning, or refrigerant symptoms appear.
Why this matters
Why: A lasting improvement supports a door-use, obstruction, or documented defrost cause. Rapid recurrence, broad frost, poor cooling, or a returning alarm indicates unresolved sealing, airflow, temperature, or defrost-system trouble.
Use your observations
Decision map
Find the observation that best matches what you see, then follow the next safe action.
-
PATH 01Safety boundary
What you see
Frost is thin and gradual on a Liebherr model that documents SmartFrost behavior, with a fully sealing door and stable temperature.
Do this next
Follow the exact care and defrost interval in the model manual and monitor for change in thickness, location, or temperature.
Why this path and its safety boundary
Why it matters: Some frost can be expected for that design and does not automatically indicate a failed component.
Safety stop: Do not accept rapidly thickening frost, a door-edge gap, or temperature loss as normal SmartFrost behavior.
-
PATH 02Safety boundary
What you see
Frost is concentrated at the gasket or door edge and an obstruction or displaced seal is visible.
Do this next
Remove the accessible obstruction or follow one exact-manual gasket reseating step, then observe the seal and temperature.
Why this path and its safety boundary
Why it matters: Warm moist air may be entering through an incomplete seal.
Safety stop: Do not stretch, glue, heat, cut, or replace the gasket without exact model fitment and instructions.
-
PATH 03Safety boundary
What you see
Frost began after frequent door opening or warm loading, with no damaged seal and stable cooling.
Do this next
Reduce opening and warm loading, keep packages away from the seal and air passages, and follow the manual's maintenance guidance.
Why this path and its safety boundary
Why it matters: The use history matches conditions Liebherr identifies as accelerating frost formation.
Safety stop: Do not continue storing food if temperature rises or frost does not improve after normal stabilization.
-
PATH 04Safety boundary
What you see
The exact manual allows user defrosting and the ice is accessible without force or contact with electrical parts.
Do this next
Protect food, switch off as instructed, let ice melt naturally, dry the compartment, and restart according to the manual.
Why this path and its safety boundary
Why it matters: A controlled manual defrost may remove accumulated ice without diagnosing an internal component.
Safety stop: Do not chip, heat, pour boiling water, use a hairdryer, or remove a panel to accelerate defrosting.
-
PATH 05Safety boundary
What you see
Frost returns quickly after a correct defrost, remains broad, or appears with poor cooling, a temperature alarm, or a repeated error.
Do this next
Move food to known-safe storage as needed and contact qualified Liebherr service with photos and temperature history.
Why this path and its safety boundary
Why it matters: The underlying cause may involve sealing, airflow, temperature sensing, or the defrost/cooling system.
Safety stop: Do not repeat defrosting indefinitely or operate with a blocked fan, damaged liner, or unsafe temperature.
-
PATH 06Safety boundary
What you see
The liner, evaporator cover, gasket, drawer rail, power connection, or cabinet is damaged, or meltwater reaches electrical parts.
Do this next
Keep the appliance disconnected if safe, protect food, keep clear of damaged parts, and arrange qualified service.
Why this path and its safety boundary
Why it matters: The condition exceeds a safe frost-removal check and may cause electrical, refrigerant, or food-storage risk.
Safety stop: Do not restart, puncture ice, remove covers, or touch wet or exposed electrical components.
Helpful context
Understand the symptom
Frost pattern is a useful clue, not a diagnosis
A thin layer that develops gradually can be normal on a SmartFrost freezer. Frost concentrated along the door edge or gasket suggests warm air entering at the seal. Frost around a drawer or package can mean the door is not closing fully. A thick layer across the compartment can follow frequent opening, warm loading, blocked airflow, or a defrost problem. Liebherr model families differ, so use the exact service or serial number to find the correct manual before changing settings or defrosting.
Protect the food and the appliance during defrosting
If manual defrosting is allowed for the model, move frozen food to known-safe cold storage, switch the appliance off as instructed, and let ice melt without force. Keep meltwater away from electrical parts and dry the compartment before restarting. Do not use knives, screwdrivers, boiling water, hairdryers, heat guns, or other improvised methods; a punctured evaporator or wet electrical component can turn a frost problem into a serious repair.
A replacement seal is conditional on model fit
Liebherr lists replaceable door seals on some freezer models, but that does not mean every gasket fits every appliance or that the seal is the only cause. Replace a seal only when the exact model documentation or a qualified diagnosis confirms damage, deformation, or loss of contact. A freezer that frosts again soon after a correct defrost needs diagnosis of sealing, door alignment, temperature control, airflow, and defrost components.
Safety boundary
Stop conditions
- Stop immediately for a punctured liner, suspected refrigerant leak, smoke, sparks, burning odor, exposed wiring, severe heat, or meltwater near electrical parts.
- Never chip or pry ice, apply direct heat, pour boiling water, use a hairdryer or heat gun, remove interior covers, or bypass a fan, sensor, or alarm.
- Stop relying on the freezer for food storage when temperature remains unsafe or frost rapidly returns after one exact-manual correction.
Only after diagnosis
Potential parts
- freezer door gasket
Consider only after exact model documentation or qualified diagnosis confirms a torn, deformed, displaced, or non-sealing gasket.
Confirm the exact Liebherr model, dimensions, profile, mounting method, and manufacturer fit information before selection. - freezer drawer or shelf seal component
Consider only when a damaged drawer, rail, or seal is confirmed to prevent closure or airflow in the exact model.
Confirm exact model, compartment position, dimensions, and manufacturer instructions; do not substitute a generic seal.
When checks do not resolve it
Need a professional?
Call for rapid recurrence, a damaged or misaligned seal, broad ice, poor cooling, a returning alarm/error, or any need to remove covers or diagnose the defrost system.
Have this ready
- Exact Liebherr appliance designation and service or serial number
- Photos showing frost location, gasket contact, drawers, and accessible ventilation
- Current and warmest observed temperature and any display alarm
- Recent door-opening, warm-loading, power, move, or defrost history
- The one documented correction or defrost procedure attempted and its result
Common questions
FAQ
Is frost normal in a Liebherr freezer?
A thin gradual layer can be normal on models with SmartFrost, but thick or rapidly returning frost is not something to ignore. Check the seal and use the exact model manual for care and defrost instructions.
Why is my Liebherr freezer frosting up around the door?
A package, drawer, displaced gasket, or door-alignment problem may allow warm moist air to enter. Check accessible contact and obstructions without forcing the gasket; arrange service for damage or a persistent gap.
Can I scrape ice from a Liebherr freezer?
Do not chip or pry ice with a sharp object. If the exact manual allows manual defrosting, switch off as instructed and let the ice melt naturally with food protected; call service when ice is around a hidden panel or electrical area.
How do I find the correct Liebherr freezer defrost instructions?
Use the appliance service or serial number to locate the exact operating instructions on Liebherr's manual page. Freezer designs differ, so do not copy a defrost procedure from another model.
Why does frost return after I defrost my Liebherr freezer?
Rapid recurrence suggests the original cause remains, such as a non-sealing door, blocked airflow, a temperature problem, or a defrost-system fault. Photograph the pattern, protect food if temperature is unsafe, and arrange qualified service.
Read the exact guide
Official sources
- User Guide base unit freezerLiebherr-Hausgeräte · Applicable to the freezer model covered by the opened user guide; exact model instructions govern.
- Operating instructions of your Liebherr refrigerator or freezerLiebherr-Hausgeräte · Applicable to locating the exact manual using the freezer service or serial number.
- FFFCsg 4001 Perfection Freestanding freezer with SmartFrostLiebherr-Hausgeräte · The opened product page is model-specific; SmartFrost and seal features vary by freezer model.
- Customer service for you: Contact us nowLiebherr-Hausgeräte · Applicable to service escalation and serial-tag identification; regional service channels vary.
Community feedback
Share a repair observation
Share a plain-text repair observation. Accepted observations are published automatically; this page may take a moment to update.