
On this page
Start here
Quick answer
First identify whether the liquid is water and whether it appears only during a Steam cycle. Maytag says a steam dryer can leave a few drips from normal condensation on the door, while a small load can create wet spots or condensation; a leak at the rear points to the steam dryer's water connections and requires checking the inlet hose and connection points. On a vented dryer, restricted exhaust can also leave moisture in the dryer or vent and create a puddle behind the appliance. If the liquid is unexplained, continues after the visible checks, reaches the electrical or gas connection, or the appliance is damaged, stop using the dryer and arrange qualified service with the exact model number.
Before you begin
Safety first
- This article covers ordinary-access observation of the door, floor, visible water connection, lint screen, and visible vent path. It does not authorize cabinet removal, gas or energized work, forced hose disconnection, or internal component testing.
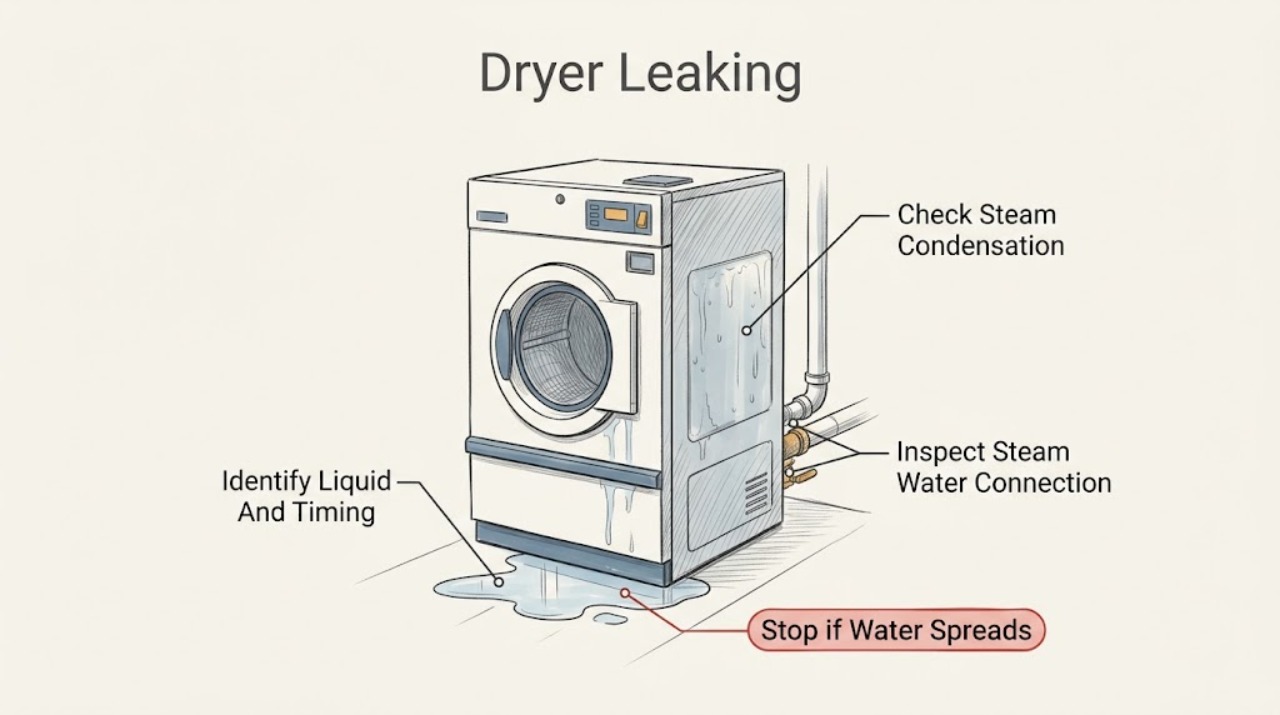
Work through in order
Diagnostic checks
Use only checks that match the exact appliance or system and its official guide.
-
Check 1
With the dryer stopped and cool, identify the liquid and record exactly where the first wet spot appears: on the door or drum, at the rear hose or faucet, beneath the cabinet, behind the vent, or away from the dryer. Note whether a Steam cycle or ordinary heated cycle was running and whether the leak is a few drips or a continuing flow.
Expected result: The wetness is a few clear drips on the door after Steam, starts at a visible rear water connection during Steam, appears behind a vented dryer, comes from underneath or inside the cabinet, or is not clearly from the dryer.
Next step: Follow the matching branch below without opening the cabinet: check load and door condensation, inspect a steam water connection from outside, or check the ordinary-access vent path. If the source is uncertain, keep the dryer out of service and prepare the model number for service.
Stop if: Stop immediately for a steady flow, water near electricity, gas odor, smoke, burning, a damaged hose, or any need to move the appliance or remove a panel.
Why this matters
Why: Door drips after Steam can be condensation; a rear connection implicates the steam water line; a puddle behind a vented dryer can be moisture retained by restricted exhaust. A leak from underneath or inside the cabinet, an ongoing flow, or an external source cannot be safely classified from this symptom alone.
-
Check 2
If the dryer has a Steam cycle and the moisture is limited to the door or interior drum, compare the load and cycle with the model instructions; inspect the door and gasket surfaces from outside after the dryer has cooled, without forcing the door or reaching into the drum.
Expected result: A small Steam load left a few drips or wet spots on the door or drum, or water is pooling beyond the door and the symptom occurs repeatedly or with a normal-sized load.
Next step: For a few post-Steam drips, dry the accessible door area and use the cycle and load guidance in the exact manual. For repeated or larger leaks, stop use and continue only with the water-connection or service branch; do not keep adding cycles to test it.
Stop if: Stop if the door gasket is torn, the door will not close, water is entering the cabinet, or the drum must be accessed while hot or moving.
Why this matters
Why: Maytag says Steam cycles used with smaller loads can produce wet spots or condensation, and steam can condense on the door and produce a couple of drips when it is opened. Repeated pooling, wetness outside the door seal, or a leak independent of Steam is not explained by that normal condensation guidance.
-
Check 3
Only if the Maytag dryer is a steam model, inspect the visible water connection at the faucet, any Y connector, and the dryer's inlet hose and valve connection from outside; look for a wet coupling, drip, kink, bulge, cut, or missing washer, and do not disconnect a pressurized hose.
Expected result: A connection is wet during or after Steam, the hose is kinked or damaged, all visible connections are dry, or the dryer has no steam water line.
Next step: If a connection is wet or damaged, shut off the faucet and leave the dryer unused; arrange service or follow only the exact model installation instructions for a safe hose replacement. If every visible connection is dry but water still appears, stop and request model-specific diagnosis.
Stop if: Stop if water is spraying, the hose is split or bulged, the faucet cannot be shut off, or inspection would require moving the dryer or opening its cabinet.
Why this matters
Why: A wet rear connection makes an inlet hose, washer, coupling, faucet, or inlet-valve connection more likely than door condensation. Maytag's installation guidance says the steam water line connects to the dryer inlet valve and calls for checking leaks around the connector, faucet, and hoses. A dryer without a Steam feature has no basis for this water-line diagnosis.
-
Check 4
For a vented Maytag dryer, inspect the lint screen, the visible vent run between the dryer and wall, and the exterior exhaust hood for lint, debris, crushing, kinks, or little air movement; keep the test to the normal controls and outside-access areas described by the manual.
Expected result: The dryer is warm, drying takes longer, steam or moisture is visible at the door, little lint reaches the screen, the vent run is crushed or blocked, or the vent path appears clear and the leak still occurs.
Next step: If the accessible vent path is restricted, stop using the dryer until the lint screen and vent system are cleaned according to the installation instructions, with internal vent cleaning handled by a qualified person where required. If the path is clear or the puddle continues, arrange service rather than opening the cabinet.
Stop if: Stop if the vent is hot enough to burn, the exterior shows fire damage, airflow is absent with overheating, or cleaning would require unsafe roof, wall, or cabinet access.
Why this matters
Why: Maytag says restricted venting can retain hot wet air, show steam or moisture in the dryer, and cause water to accumulate in the dryer or venting and form a puddle behind the appliance. A clear vent path with a continuing leak makes a vent explanation less likely and does not identify an internal part.
-
Check 5
After the visible check, leave the dryer powered off and the steam faucet closed when applicable, then record the model number, fuel type, Steam capability, leak location, liquid, cycle, load size, and whether the leak stopped; do not run another cycle solely to reproduce the symptom.
Expected result: The moisture was a one-time small post-Steam drip that does not recur, a visible vent or connection issue remains, or the leak is persistent, internal, unexplained, or accompanied by a safety symptom.
Next step: Use the exact model manual or Maytag service channel for the persistent condition and provide the recorded observations. Keep the dryer out of service until a qualified provider determines that it is safe to operate.
Stop if: Stop and seek urgent professional help for water near electrical parts, gas odor, smoke, fire signs, a burst hose, flooding, or a dryer that overheats.
Why this matters
Why: A one-time small door drip can fit Maytag's condensation explanation. A recurring leak, a leak from the cabinet or underside, or a leak with electrical, gas, heat, or structural damage needs model-specific service; the symptom does not select a replacement part by itself.
Use your observations
Decision map
Find the observation that best matches what you see, then follow the next safe action.
-
PATH 01Safety boundary
What you see
Only a few clear drips appear on the door after a Steam cycle, especially with a small load, and no water reaches the floor or cabinet.
Do this next
Dry the accessible door area, follow the exact model's Steam load guidance, and monitor the next appropriate use. Escalate if the amount increases, appears without Steam, or reaches the floor.
Why this path and its safety boundary
Why it matters: This pattern is consistent with Maytag's documented condensation or small-load wet-spot explanation, not proof of a failed water valve.
Safety stop: Do not continue operating if the door seal is damaged, water enters the cabinet, or the drip becomes a steady leak.
-
PATH 02Safety boundary
What you see
Water begins at the faucet, Y connector, visible inlet hose, or rear inlet-valve connection on a Steam dryer during or after a Steam cycle.
Do this next
Close the steam water faucet, leave the dryer unused, photograph the wet connection, and arrange service or use only model-specific installation guidance for the hose and connection.
Why this path and its safety boundary
Why it matters: A water-line connection or hose issue is more likely than condensation on the door, but the exact failed component cannot be identified from an outside drip alone.
Safety stop: Do not pressurize a split, bulged, or spraying hose, and do not open the cabinet to reach the inlet valve.
-
PATH 03Safety boundary
What you see
A vented dryer has long dry times, excess warmth, steam or moisture at the door, little lint on the screen, and a puddle behind the appliance near the vent path.
Do this next
Keep the dryer off until the lint screen and accessible vent path are corrected according to the installation instructions; use qualified vent cleaning when access is unsafe or the restriction is inside the wall or cabinet.
Why this path and its safety boundary
Why it matters: Restricted exhaust is a plausible contributor because Maytag says moisture can accumulate in the dryer or venting and drip onto the floor when hot wet air cannot escape.
Safety stop: Stop for overheating, smoke, fire signs, absent airflow, or any cleaning task that requires unsafe access or cabinet removal.
-
PATH 04Safety boundary
What you see
The dryer has no Steam feature, the vent path is clear, or liquid comes from underneath or inside the cabinet, recurs independently of the cycle, or cannot be localized safely.
Do this next
Keep the dryer out of service, check only for an obvious external source without moving the appliance, and arrange model-specific qualified diagnosis with the full model number and leak observations.
Why this path and its safety boundary
Why it matters: The documented Steam water-line and vent-condensation explanations do not establish this leak. An internal component, installation source, or unrelated household leak remains possible.
Safety stop: Do not run another cycle, remove panels, bypass a safety device, or order a water valve, pump, gasket, or other part without a diagnosis.
Helpful context
Understand the symptom
A Maytag dryer does not have one universal leak path
Maytag's dryer support separates steam-function symptoms from general venting symptoms. A steam model has a cold-water inlet, so water at the rear or wetness that begins during a Steam cycle needs a different check from a conventional vented dryer. A few drips on the door after steam can be condensation, while a puddle behind a vented dryer can be moisture that was not exhausted. Do not assume a water tank, steam valve, or internal leak applies to a model that does not have that feature.
Keep the first checks to ordinary-access areas
Stop the cycle and let the dryer cool before examining the door, floor, lint screen, visible vent run, faucet, and hose connections. Do not remove a panel, reach into a moving drum, bypass a safety device, or keep running the dryer to reproduce an unexplained leak. Record where the first drop appears, whether the liquid is clear or contaminated, and whether the leak occurs during steam, while venting, or only after the cycle.
When the symptom is not a normal drip
A steady flow, a leak from inside the cabinet, a wet electrical connection, a gas odor, scorching, smoke, or a damaged hose is not an ordinary condensation check. Keep the dryer out of service and arrange qualified repair. Give the technician the full model number, fuel type, whether the dryer has a Steam option, the leak location, and the cycle state when it occurred.
Safety boundary
Stop conditions
- Do not run another cycle to reproduce an unexplained leak or use a dryer with water near electrical parts.
- Do not open the cabinet, reach into a moving or hot drum, bypass a safety device, or work on gas or energized components.
- For a Steam dryer, close the water faucet and stop for a split, bulged, kinked, or spraying inlet hose or connection.
- Stop for a steady flow, flooding, smoke, fire signs, gas odor, scorching, overheating, or a damaged door or seal.
- Do not order a replacement valve, hose, gasket, condenser, or other part until the exact model and failed component are confirmed.
Only after diagnosis
Potential parts
- steam dryer inlet hose or connection washer
Consider this category only when the exact model has a Steam water connection and inspection or diagnosis confirms a leaking, damaged, or failed hose connection; a door drip or vent puddle alone does not justify ordering it.
Confirm the exact Maytag model and installation instructions before ordering; do not substitute a hose or washer by appearance alone. - door gasket or seal
Consider this category only if the exact model's door seal is visibly damaged or a qualified diagnosis identifies it as the source of water escaping at the door; normal post-Steam condensation is not evidence of a failed seal.
Confirm the exact model and seal design before ordering, and have service perform any repair that requires cabinet or door disassembly.
When checks do not resolve it
Need a professional?
Arrange qualified Maytag or appliance service if the leak is steady, recurring, internal, unexplained after the visible checks, reaches the electrical or gas connection, occurs with a damaged or spraying hose, or continues after the applicable Steam connection or vent issue is corrected. Keep the dryer off for flooding, smoke, fire signs, gas odor, overheating, or any condition requiring panel removal or moving the appliance.
Safety scope: This article covers ordinary-access observation of the door, floor, visible water connection, lint screen, and visible vent path. It does not authorize cabinet removal, gas or energized work, forced hose disconnection, or internal component testing.
Common questions
FAQ
Why does my Maytag dryer leave a few drops on the door after Steam?
Maytag says steam can condense on the door and produce a couple of drips when the door is opened. Smaller Steam loads can also create wet spots or condensation. Treat a small post-Steam drip as potentially normal only when no water reaches the floor or cabinet; recurring or increasing water needs diagnosis.
Where should I look if water is leaking from the back of a Maytag steam dryer?
With the dryer stopped and cool, look from outside at the faucet, Y connector, inlet hose, and dryer's water inlet connection. Maytag says those connection points should be checked for leaks. Close the faucet and stop using the dryer if a hose or connection is wet, damaged, or spraying.
Can a blocked vent make a Maytag dryer look like it is leaking?
Yes. Maytag explains that restricted venting can keep hot, wet air inside the dryer or venting material, where moisture can accumulate and form a puddle behind the appliance. Check the lint screen and ordinary-access vent path, but arrange qualified cleaning or repair for unsafe or inaccessible sections.
What if my Maytag dryer is not a Steam model but still leaks?
Do not apply Steam water-line guidance to a dryer without that feature. First distinguish an external or vent-related moisture source from liquid coming from underneath or inside the cabinet. If the source is not obvious and safe to inspect, keep the dryer off and use the exact model manual or qualified service.
Read the exact guide
Official sources
- Dryer Vent may be Blocked or Restricted - Product Help | MaytagMaytag · Official Maytag guidance for vented dryer exhaust symptoms; exact installation and model instructions apply.
- Installation of Water Line - Dryer - Product Help | MaytagMaytag · Official Maytag installation guidance for Steam dryers; not applicable to dryers without a Steam water line.
- Owner's ManualMaytag · Official Maytag owner manual covering model-dependent Steam features and troubleshooting; use the exact model manual for the appliance being serviced.
- Water on the Door - Dryer - Product Help | MaytagMaytag · Official Maytag Product Help for Steam dryers and door wetness; exact model instructions still apply.
- Leaking During Steam Cycle - Dryer - Product Help | MaytagMaytag · Official Maytag Product Help for Steam dryers; it does not establish a leak path for a non-Steam model.
Community feedback
Share a repair observation
Share a plain-text repair observation. Accepted observations are published automatically; this page may take a moment to update.