
On this page
Start here
Quick answer
If the washer side of your Maytag washer-dryer leaves water in the tub, first identify whether the cycle stopped before draining or completed with a wet load. Check the door or lid, load balance, selected spin setting, and detergent amount, then inspect the external drain hose for kinks, blockage, incorrect routing, or a sealed connection. On front-load models that provide an accessible pump filter, clean it only by the model manual's procedure and prepare for water. A code such as drn points to a drain problem, but codes vary by model. Stop for burning odor, damaged wiring, repeated breaker trips, a leak you cannot control, or unsafe access; if the hose and user-accessible checks do not restore draining, keep the appliance out of use and arrange qualified washer service.
Work through in order
Diagnostic checks
Use only checks that match the exact appliance or system and its official guide.
-
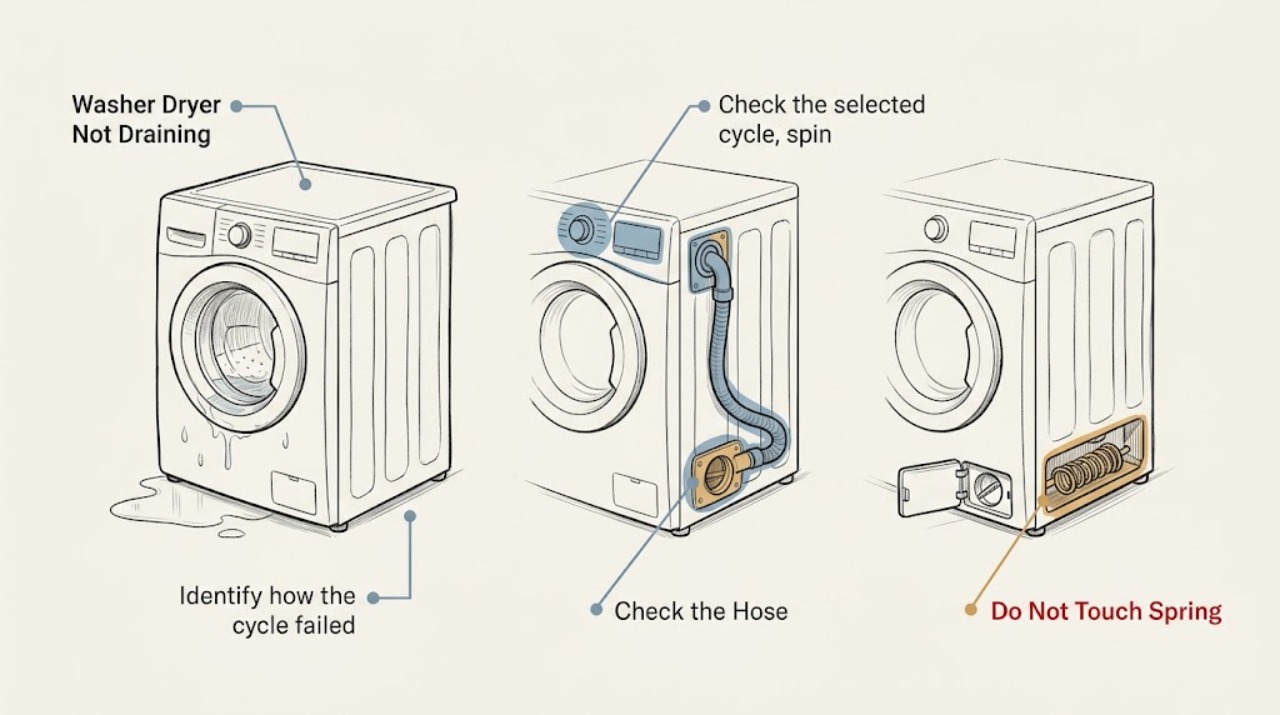
Identify how the cycle failed
Record whether the tub is full, partly full, or empty; whether the cycle stopped before the drain phase; whether the clothes are merely wetter than expected; whether the pump hums; and whether the door or lid remains locked. Note any displayed code before clearing it.
Expected result: A full tub with no drain sound points toward a blocked or non-running drain path. A wet load after the cycle can instead reflect a slow spin, an unbalanced load, or excessive suds. A locked door or lid can be a normal safety response to water remaining in the tub.
Next step: If there is smoke, burning odor, damaged wiring, uncontrolled leaking, or repeated breaker operation, stop and arrange service. Otherwise continue with the cycle, load, and hose checks without forcing the door or lid.
Why this matters
Why: The symptom determines whether to check cycle and load conditions first or move toward the drain hose and model-specific pump-filter branch.
-
Check the selected cycle, spin, and load
With the washer stopped safely, review the selected cycle and spin speed, then redistribute a tightly packed or uneven load according to the owner's manual. Do not add more water or detergent to make the load balance. If the model offers a drain-and-spin or rinse-and-spin function, choose it only after confirming the door or lid is secure and the manual permits that cycle for the current condition.
Expected result: Gentle or delicate settings can use slower spin and leave more water in fabrics. An overloaded or unbalanced load can interrupt or reduce spinning, while excessive detergent can create suds that interfere with pumping and spinning.
Next step: Run one appropriate drain-and-spin or rinse-and-spin check after correcting the setting or load. If water remains in the tub, or the washer stops again with a drain code, inspect the drain path rather than repeatedly restarting it.
Why this matters
Why: The machine may have drained correctly but removed too little water because the selected cycle, load distribution, or suds level limited the spin or pump routine.
-
Inspect the external drain hose and standpipe
Following the installation instructions, inspect the accessible drain hose for a kink, crushing, visible blockage, or an end inserted too far into the standpipe or laundry tub. Confirm that the supplied U-shaped form is used, the hose is secure without being sealed shut, and the drain destination is routed within the model's stated height range. Do not pull a loaded appliance away from the wall if doing so could strain water or power connections.
Expected result: A kink or clog restricts flow. Incorrect insertion, a sealed connection, or an improperly high or low drain can cause siphoning, backflow, or failure to pump out. Maytag's exact insertion and height requirements differ by model and installation type.
Next step: Correct only an obvious, manual-approved routing issue and secure the hose. If the path is clear and correctly installed but the tub still will not drain, continue to the model-specific filter and code checks; do not force water through an uncertain connection.
Why this matters
Why: A drain problem that began after installation, moving the appliance, or plumbing work is more likely to be routing or standpipe related than an internal pump fault.
-
Check detergent and suds conditions
Review the detergent label and the Maytag owner's manual for the washer's detergent requirement. Use the correct high-efficiency detergent where the model calls for it and measure it for the load and water conditions. Look for persistent suds or a cycle that slows, pauses, or leaves clothes very wet rather than assuming the drain pump has failed.
Expected result: Maytag explains that non-HE detergent or too much detergent can create excessive suds. Suds can reduce spin speed and interfere with pumping, leaving a wet load even when the hose is not blocked.
Next step: Use the manual's method for clearing or completing a suds-affected cycle, then use the recommended amount on a later load. If the tub still retains water with correct detergent, return to the drain-hose and pump-filter branch.
Why this matters
Why: A suds-related wet load is different from a tub that never moves water; the remedy is detergent and cycle correction, not immediate pump replacement.
-
Use the pump-filter branch only on applicable models
If the exact Maytag front-load model has an accessible drain-pump filter or drain tube, follow its owner's manual to make the appliance safe, place a shallow container and towels, and open only the user-accessible filter or tube as directed. Remove visible lint or debris without forcing the cap. Do not assume a top-load or washer-dryer model has the same filter access.
Expected result: Maytag says some front-load models have a cleanable pump filter that can collect dirt, lint, or other items. Some models provide a drain tube and some do not; a top-load washer may not offer an easy manual-drain path.
Next step: Reinstall the filter exactly as the manual describes and clean up any water before a brief supervised test. If the model has no accessible filter, the filter is clear, or water still does not move, stop disassembly and arrange service.
Why this matters
Why: Filter access is model-dependent. A clean filter with no draining still leaves the hose, pump, controls, or installation as possible causes; a filter that cannot be opened safely is a service boundary.
-
Interpret the displayed code by model
Write down the exact code or message and compare it with the owner's manual for this Maytag model. For a top-load washer, Maytag lists drn as a washer-not-draining condition; other codes can indicate a system error, lid state, overload, or excessive suds. Do not apply a top-load code table to a front-load machine without checking the model guide.
Expected result: A code that returns after the hose and load checks is evidence of a persistent condition. A code that clears but the tub remains full still requires the physical drain path to be checked; clearing a message does not remove a blockage.
Next step: Perform only the model-documented clear or restart step once. If the code returns, the pump does not engage, or the washer will not drain, keep it out of use and provide the code to a qualified technician.
Why this matters
Why: Maytag warns that its published code list may not include every code for every model, so the exact manual is needed before choosing a reset or test.
-
Run one controlled verification
After an obvious hose, setting, detergent, or user-accessible filter issue has been corrected, run one short model-approved drain or rinse-and-spin test with no new laundry. Stay nearby and watch the hose destination, tub level, leaks, and control display. Stop the test if water backs up, a hose connection leaks, the pump makes a grinding sound, the breaker trips, or the washer stops with a code.
Expected result: A clear drain with no leak indicates that the corrected external condition may have caused the original symptom. Continued standing water, a silent pump, grinding, repeat codes, or backflow indicates an unresolved drain-system or control fault.
Next step: If the test fails or leaks, stop using the washer and arrange service. Do not run additional loads or remove panels to test the pump or wiring yourself.
Why this matters
Why: One supervised verification distinguishes a corrected installation or cycle issue from a component problem without repeatedly stressing a washer full of water.
Use your observations
Decision map
Find the observation that best matches what you see, then follow the next safe action.
-
PATH 01Next step
What you see
The tub is empty but clothes are wet, and there is no leak, code, or unusual noise.
Do this next
Check the selected spin speed, load balance, and detergent amount before treating the issue as a blocked drain.
-
PATH 02Next step
What you see
The drain hose is kinked, blocked, incorrectly inserted, sealed, or routed outside the model's installation guidance.
Do this next
Correct only the obvious installation issue using the manual, then run one supervised drain test.
-
PATH 03Next step
What you see
A front-load model has an accessible pump filter and the manual provides a safe cleaning procedure.
Do this next
Prepare for standing water, clean the filter as directed, reinstall it correctly, and test once. If access is unclear or the problem remains, call service.
-
PATH 04Next step
What you see
The washer tub remains full, the pump is silent or grinding, the code returns, or the drain path is already correct.
Do this next
Keep the appliance out of use and arrange qualified washer service for pump, control, wiring, or internal obstruction diagnosis.
-
PATH 05Next step
What you see
There is burning odor, damaged wiring, repeated breaker operation, uncontrolled leaking, or unsafe access to the water or power connections.
Do this next
Stop immediately, keep clear of the appliance, and obtain qualified service from a safe location.
Helpful context
Understand the symptom
Confirm that the washer side is the problem
A washer-dryer can contain a washer and a separate dryer function. This guide addresses water left in the washer tub or clothes that remain unusually wet. A dryer that does not dry has a different airflow and heating diagnosis. Do not start another wash with a full tub until you know where the water will go.
Water and electrical safety boundary
Keep water away from controls and outlets. Before accessing a model-approved filter or hose connection, follow the owner's manual for stopping the cycle and making the appliance safe. Do not remove electrical panels, reach into a running pump, force a locked door or lid, or keep operating the appliance if you smell burning, see damaged wiring, or the breaker trips repeatedly.
Only after diagnosis
Potential parts
- drain pump
Consider this only after a qualified diagnosis confirms that the hose, filter, controls, and internal path are not the cause.
Pump shape and electrical connection vary by model; verify the exact model and service diagnosis before ordering. - drain hose or filter housing
Consider this when the hose or filter housing is damaged, restricted, or cannot seal after a qualified inspection.
Routing, length, filter access, and fittings are model-specific; use the owner's manual and exact model information. - lid or door interlock
Consider this only when the washer's documented drain sequence is being prevented by a confirmed interlock or latch fault.
Do not bypass the interlock; confirm the exact model and have installation or replacement handled according to service instructions.
When checks do not resolve it
Need a professional?
Arrange qualified washer service when the tub remains full after the hose, cycle, detergent, and model-approved filter checks; when the pump is silent or makes grinding noises; when a drain code returns; or when a supervised test leaks or backs up. Stop immediately for burning odor, damaged wiring, repeated breaker trips, uncontrolled water, or unsafe access. Do not remove electrical panels or continue running loads to see whether the problem resolves.
Common questions
FAQ
Why is my Maytag washer-dryer leaving water in the washer tub?
Start with the drain hose, cycle and spin setting, load balance, detergent or suds, and any model-accessible pump filter. If the hose is correct and the tub remains full, a pump, internal obstruction, control, or interlock may need qualified diagnosis.
Can too much detergent make a Maytag washer stop draining?
Excessive suds can reduce spinning and interfere with pumping, leaving clothes very wet. Use the detergent type and measured amount specified for the washer and water conditions, then follow the model manual for completing a suds-affected cycle.
Does every Maytag washer have a drain-pump filter I can clean?
No. Maytag says an accessible, cleanable pump filter is present on some front-load models, while top-load models may not provide an easy manual-drain path. Check the exact owner's manual before opening anything.
What does drn mean on a Maytag washer?
Maytag's top-load high-efficiency guidance lists drn as a washer-not-draining condition. Codes are model-dependent, so record the message and compare it with the exact owner's manual rather than repeatedly restarting the washer.
Read the exact guide
Official sources
- Error Codes in Top Load HE WashersMaytag Product Help · Model-dependent error-code interpretation including drn, system errors, overload, and excessive suds
- Washer Not Draining or Spinning? Troubleshooting GuideMaytag Product Help · Drain hose, standpipe, load, door or lid, suds, spin, and some front-load pump-filter checks
- Not Draining - Front Load WasherMaytag Product Help · Model-dependent pump-filter access, drain-hose insertion, air gap, and standpipe routing
- Not Draining - WasherMaytag Product Help · Top-load drain-hose routing, HE detergent, load balance, spin, and service guidance
- HOW TO DRAIN A WASHING MACHINEMaytag · Drain hose, spin, load balance, pump, model-specific manual draining, and service boundary
Community feedback
Share a repair observation
Share a plain-text repair observation. Accepted observations are published automatically; this page may take a moment to update.