
On this page
Start here
Quick answer
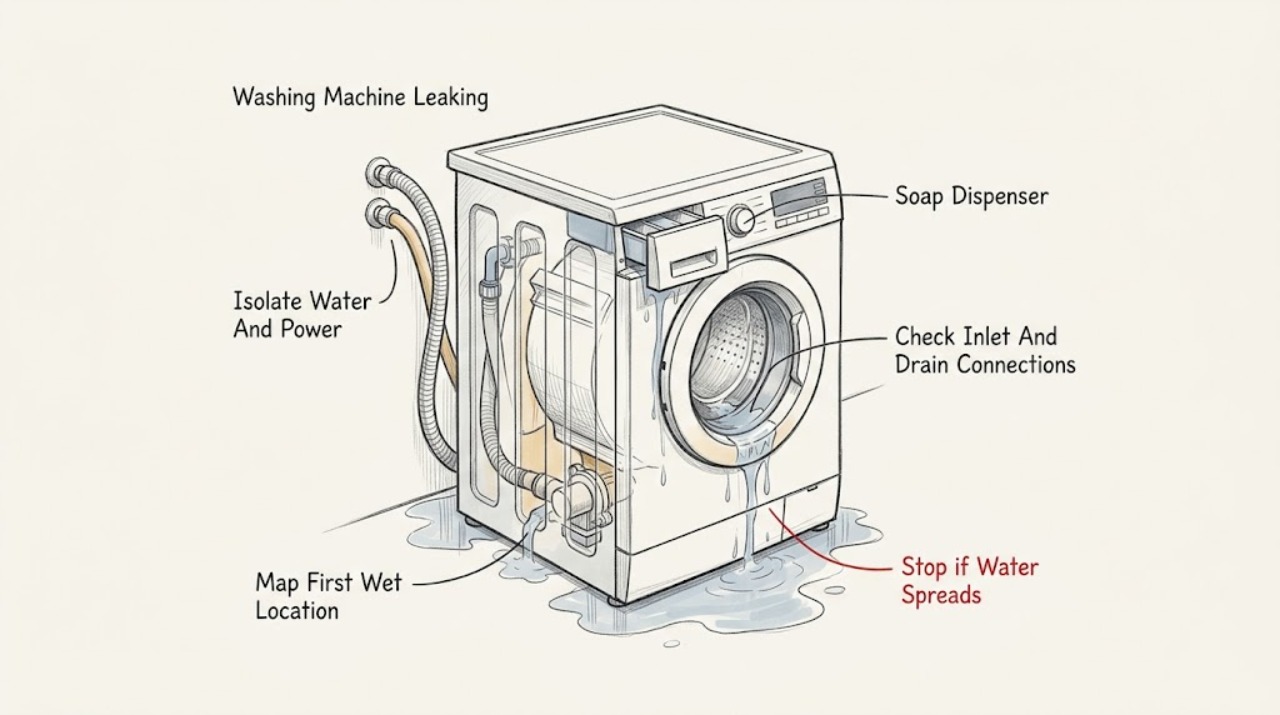
Stop the cycle and keep water away from the plug, outlet, controls, and wiring. If it is safe to do so, close the household water valves and isolate power only from a dry, reachable connection; do not reach into standing water, tilt the washer, or pull a wet plug. Note where the water first appears and whether it happens during fill, wash, drain, or spin. From the outside, check inlet and drain hose connections, a clogged dispenser, a door gasket or load caught in the seal, excessive suds, an overloaded or unlevel washer, and a slow household drain. A hot or moving washer, a large leak, water near electricity, severe vibration, smoke, burning smell, damaged hose, or a leak that continues while the washer is off requires urgent qualified service.
Before you begin
Safety first
- This article covers safe external observation and model-documented user cleaning only. Do not step into standing water, touch wet electricity, tilt or move a water-filled washer, open panels, access a wet pump filter, or perform live electrical work.
Work through in order
Diagnostic checks
Use only checks that match the exact appliance or system and its official guide.
-
Check 1
Stop the cycle and observe from a dry position. If reachable without stepping into water or touching a wet connection, close the hot and cold supply valves; isolate power only from a cool, dry, intact, reachable plug or clearly labeled breaker. Do not move or tilt the washer.
Expected result: The leak stops when the cycle stops, water continues while the washer is off, the area is wet near the outlet or cord, or the washer is hot, moving, or overflowing.
Next step: Keep water and power isolated as safely possible, keep people away, and use qualified appliance, plumbing, or electrical help for a continuing or unsafe leak. If no hazard is present, continue with external source mapping without restarting yet.
Stop if: Do not step into standing water, pull a wet plug, touch controls with wet hands, move a water-filled washer, or restart an overflowing machine.
Why this matters
Why: A leak that continues while off points toward the inlet or household supply, while a cycle-linked leak may involve fill, wash, drain, spin, or load conditions. Water near electricity or a moving or hot machine makes further inspection unsafe.
-
Check 2
After the machine is stopped and the area is safe, record the first wet location and the phase when it appeared: rear during fill, front door or dispenser during wash, bottom during drain or spin, or top of a top-load basket during spin. Use a towel only from a dry safe position to mark the outside edge; do not reach beneath the cabinet.
Expected result: The water begins at an inlet connection, drain hose or household drain, dispenser, door seal, top-load basket, or the cabinet bottom; the phase is unknown.
Next step: Follow the matching branch. Photograph the first wet location and provide the phase history to service if the source is hidden or the leak is substantial.
Stop if: Do not run repeated cycles to make the leak appear, slide hands under the cabinet, or remove panels to trace water.
Why this matters
Why: The location and timing narrow the check: supply and fill paths at the rear, dispenser or door seal at the front, splash or level at the top, and drain hose, pump, or tub-related paths at the bottom. An unknown origin needs service if it cannot be safely observed.
-
Check 3
With water and power safely isolated, inspect the visible hot and cold inlet hose connections, hose washers, drain hose, standpipe or laundry sink, and any accessible clamps for looseness, kinks, cracks, disconnection, or household drain backup. Do not disconnect a pressurized or wet hose and do not crawl behind the appliance.
Expected result: An inlet connection is wet, a hose is cracked or kinked, the drain hose is loose or blocked, the household drain backs up, or all visible connections are dry and secure.
Next step: Keep the supply valves closed and request qualified repair for a cracked hose, active connection leak, hidden hose, or drain backup. Do not reconnect or run the washer until a wet or damaged connection has been corrected and checked.
Stop if: Stop for a burst hose, water under the outlet, a loose pressurized connection, a drain overflow, or any need to tilt or move the washer.
Why this matters
Why: Maytag identifies missing hose washers, loose or damaged external hoses, and a slow or blocked household drain as bottom or rear leak causes. A dry external path does not clear a pump, tub, valve, or internal hose.
-
Check 4
For a front-load model, inspect the inner door glass and gasket for hair, lint, coins, a garment caught under the seal, drainage-hole blockage, deposits, cracks, or tears. Check that the dispenser drawer is closed and, only if the manual permits, clean accessible detergent residue. Review whether the detergent is HE and measured for the load; never put a single-dose packet in the dispenser drawer.
Expected result: A garment or debris is caught in the seal, the glass or gasket is dirty or damaged, the dispenser is open or clogged, or excessive suds are present.
Next step: Remove only a loose accessible item and clean the documented user-accessible area with a soft damp cloth. Leave the washer off and arrange service for a torn seal, cracked glass, hidden obstruction, dispenser fault, or leak that returns.
Stop if: Do not pull a trapped garment, stretch or remove the gasket, use sharp tools, open a wet dispenser assembly, or run a cycle with cracked glass or a torn seal.
Why this matters
Why: Maytag says door-seal contamination, an item caught in the seal, an open or clogged dispenser, and excess suds can allow water to escape. A torn gasket, cracked glass, or persistent suds problem is not cleared by wiping alone.
-
Check 5
Review the load and cabinet without moving the washer: note whether a front-load drum was tightly packed, clothing sat outside the basket, or a top-load cycle used oversized, water-resistant, or unevenly distributed items. Look for rocking or a visibly unlevel cabinet and record whether the leak started during fill, agitation, drain, or spin.
Expected result: The load was overpacked or uneven, water splashed from the top of a top-load basket, the washer rocks or is unlevel, or the load and cabinet appear normal.
Next step: Do not operate a rocking or leaking machine. Once the source is corrected and the model manual permits, use an appropriate load and documented leveling method; otherwise arrange qualified service.
Stop if: Stop for severe vibration, cabinet movement, a tipped machine, water reaching electrical parts, or a leak that worsens during spin.
Why this matters
Why: Maytag links clothing outside a front-load basket with door-seal leaks and links oversized or uneven top-load items and an unlevel washer with splash. A bottom leak that continues with a suitable load points toward drain, pump, tub, or seal service.
-
Check 6
If safe external checks do not identify a loose connection or user-accessible cause, record the model, front-load or top-load design, first wet location, cycle phase, water temperature, detergent type, load, drain behavior, level, and any error message. Keep the washer isolated while requesting qualified service.
Expected result: The leak stopped after a clearly removed obstruction or corrected external connection, or it remains unexplained, recurs, comes from the bottom, continues while off, or involves water near electricity.
Next step: Provide the evidence to Maytag or qualified appliance service. A technician should inspect the water path, pump, seals, drain, cabinet stability, and electrical safety before selecting a component.
Stop if: Do not tilt the washer, remove panels, open a pump filter with water present unless the exact manual defines a safe method, or run another cycle to confirm a hidden leak.
Why this matters
Why: A corrected external cause may explain a one-time leak, but persistent or hidden water can involve the inlet valve, pump, tub seal, drain system, internal hose, cabinet, or control. A water or electrical hazard cannot be cleared by a test cycle.
Use your observations
Decision map
Find the observation that best matches what you see, then follow the next safe action.
-
PATH 01Safety boundary
What you see
Water is pooled near the plug, outlet, controls, wiring, or another energized appliance, or the washer is actively overflowing.
Do this next
Do not enter the water or touch the connection. Isolate power and water only from a dry, safe position and obtain qualified emergency, electrical, plumbing, or appliance help.
Why this path and its safety boundary
Why it matters: The immediate risk is electrical shock, fire, or further water damage, not leak localization.
Safety stop: Do not pull a wet plug, touch a breaker from standing water, mop around an energized connection, or restart the washer.
-
PATH 02Safety boundary
What you see
Water first appears at an inlet hose, valve connection, rear hose, or the household water supply during fill, or continues while the washer is off.
Do this next
Keep the supply valves closed and request qualified service or plumbing help for a cracked, loose, wet, or inaccessible connection. Do not run the washer to compare hot and cold paths.
Why this path and its safety boundary
Why it matters: A supply hose, washer, valve, or household plumbing path may be leaking under pressure.
Safety stop: Stop for a burst hose, water near electrical parts, or any need to disconnect a pressurized hose.
-
PATH 03Safety boundary
What you see
Water starts at the front door or gasket, a dispenser drawer, or the front cabinet during fill or wash.
Do this next
After isolation and cooling, inspect and clean only accessible areas according to the model instructions. Leave the washer off for a torn gasket, cracked glass, persistent dispenser leak, or recurring water.
Why this path and its safety boundary
Why it matters: A seal obstruction or damage, clothing outside the basket, open or clogged dispenser, detergent or suds problem, or load condition may be allowing water out.
Safety stop: Do not force the door, stretch the gasket, use sharp tools, or operate with damaged glass or a leaking seal.
-
PATH 04Safety boundary
What you see
A top-load Maytag washer splashes over the basket during fill or spin, especially with a large, bulky, water-resistant, or uneven load, or the cabinet rocks.
Do this next
Stop using the washer until the load and installation are corrected according to the manual. If it still splashes or rocks with a suitable load, arrange service.
Why this path and its safety boundary
Why it matters: Load distribution, water-resistant fabric, overpacking, or an unlevel cabinet can direct water over the basket rather than into the tub.
Safety stop: Do not operate a rocking machine, hold the lid down, or move a water-filled washer.
-
PATH 05Safety boundary
What you see
Water appears under the cabinet during drain or spin, the drain hose or household drain backs up, or the pump or tub area is suspected.
Do this next
Keep water and power isolated and request qualified appliance or plumbing service. A drain pump filter is present only on some models and should be accessed only by the exact manual's safe procedure.
Why this path and its safety boundary
Why it matters: A drain hose, clamp, pump, tub seal, internal hose, or blocked household drain may be involved; the source may be inaccessible from the outside.
Safety stop: Do not tilt the washer, reach beneath it, remove a pump filter with water present, or run another drain cycle to reproduce the leak.
-
PATH 06Safety boundary
What you see
The visible hoses, load, level, seal, and dispenser are clear, but water continues or returns, comes from inside the cabinet, or appears while the washer is off.
Do this next
Keep the Maytag washer out of use and provide the timing and first wet location to qualified appliance service. Do not select a part until the exact model and leak path are confirmed.
Why this path and its safety boundary
Why it matters: An inlet valve, tub, pump, internal hose, seal, cabinet, or other model-specific fault needs service diagnosis.
Safety stop: Do not open panels, perform a test cycle, or keep the appliance connected while water reaches electrical parts.
Helpful context
Understand the symptom
Make the area safe before locating the leak
Cancel the cycle and wait for the drum or basket to stop. If water is near the cord, outlet, controls, or another energized appliance, do not step into it or touch the connection. Close the water valves only from a dry, safe position. If the washer is hot, moving, badly overflowing, or leaking heavily, keep people away and arrange qualified help rather than attempting a hands-on check.
The first wet spot is more useful than the largest puddle
Water can travel along the cabinet or floor, so record the first visible location and the cycle phase: rear during fill, front during wash, dispenser area during fill, bottom during drain, or top during spin. Maytag's guidance treats front-load door seals and dispensers differently from top-load splash, hoses, drain paths, pumps, and tub seals. This distinction keeps a safe external check from becoming a random part replacement.
Use only model-appropriate cleaning and drain checks
A front-load owner can clean an accessible door seal or dispenser according to the manual, and a top-load owner can review load size, level, and splash. A pump filter is present only on some models and may hold water; do not open it unless the model instructions define a safe procedure and the washer is isolated. Hoses, pumps, tub seals, and cabinet panels belong to qualified service when the external cause is not clear.
Safety boundary
Stop conditions
- Stop immediately for water near a plug, outlet, control, wiring, or another energized appliance; do not enter standing water or touch a wet connection.
- Stop for a large leak, overflow, water that continues while the washer is off, hot water or glass, severe vibration, a tipped cabinet, or a leak that worsens during spin.
- Stop for smoke, burning smell, sparks, a hot cord or outlet, exposed wiring, or a repeated breaker trip.
- Do not tilt or drag a water-filled washer, remove panels, open a pump filter with water present unless the exact manual defines a safe procedure, or run repeated cycles to reproduce a leak.
- Keep the Maytag washer out of use when the leak persists after safe external checks or the source is hidden; arrange qualified appliance, plumbing, or electrical service.
Only after diagnosis
Potential parts
- washer inlet or drain hose
Consider this category only when a qualified inspection confirms a cracked, split, kinked, or failed hose or connection after the water path is isolated.
Confirm the exact Maytag model and hose specification; do not disconnect a pressurized hose or use a new hose to test an unsafe connection. - washer door gasket or tub seal
Consider this category only when the exact model's seal is torn, displaced, worn, or confirmed by qualified diagnosis as the source of a front or bottom leak.
Confirm the exact Maytag model and seal design; do not pull the gasket from its groove or open the cabinet as a leak test. - washer drain pump or inlet valve
Consider this category only after qualified inspection links the leak timing and location to a pump or inlet valve rather than an external hose, drain, load, or detergent condition.
Confirm the exact model and diagnosis; pump or valve work may expose water and electrical hazards and is not a trial replacement.
When checks do not resolve it
Need a professional?
Request qualified service for any leak that continues while the Maytag washer is off, comes from the cabinet bottom or an inaccessible path, returns after cleaning or connection checks, or involves the inlet valve, pump, tub, internal hose, gasket, glass, or electrical area. Use urgent local help for overflow, water near electricity, smoke, fire, burning smell, hot water or glass, or severe vibration.
Safety scope: This article covers safe external observation and model-documented user cleaning only. Do not step into standing water, touch wet electricity, tilt or move a water-filled washer, open panels, access a wet pump filter, or perform live electrical work.
Common questions
FAQ
What should I do first if my Maytag washer is leaking?
Stop the cycle and keep water away from electricity. From a dry, safe position close the supply valves and isolate power only when the connection is cool, dry, intact, and reachable. Record the first wet location and cycle phase; do not move or tilt the washer.
Why is my Maytag washer leaking from the front door?
A garment or debris under the door seal, dirty glass or gasket, a torn seal, clothing outside the basket, overloading, a dispenser problem, or excess suds can allow water out. Clean only accessible areas as the manual permits and arrange service for damage or a recurring leak.
Why is my Maytag washer leaking from underneath?
A loose or cracked inlet or drain hose, household drain backup, pump, tub seal, internal hose, or another cabinet fault may be involved. Inspect visible connections only after safe isolation; do not reach under, tilt, or open the washer.
Can too much detergent make a Maytag washer leak?
Yes. Maytag says non-HE detergent or more than the recommended amount can create excessive suds that contribute to leaking and drain concerns. Use only the detergent and amount specified for the exact model, and stop if suds or water return.
Can an unlevel Maytag washer cause leaking?
Yes. Maytag links an unlevel washer and large, bulky, water-resistant, or uneven top-load items with water splashing from the basket. Stop using a machine that rocks and use the exact installation instructions or qualified service for leveling.
When should I call for Maytag washer leak service?
Call when the leak continues while off, comes from the bottom or inside the cabinet, returns after safe external checks, or involves a damaged seal, hose, pump, valve, glass, drain, or electrical area. Seek urgent local help for overflow, water near electricity, smoke, burning smell, hot water, or severe vibration.
Read the exact guide
Official sources
- Not Draining - Front Load Washer - Product HelpMaytag Product Help · Official Maytag support guidance for applicable front-load models; pump-filter access varies by model.
- Leaking from Dispenser - Front Load Washer - Product HelpMaytag Product Help · Official Maytag support guidance for front-load washers with applicable dispensers; drawer design varies by model.
- Leaking from Front or Top - Washer - Product HelpMaytag Product Help · Official Maytag support guidance for top-load washers; exact basket and leveling instructions vary by model.
- Leaking from Underneath or Bottom - Front Load Washer - Product HelpMaytag Product Help · Official Maytag support guidance for front-load washers; external connections and model-specific access vary.
- How to Fix a Leaking Washing MachineMaytag · Official Maytag consumer guidance for washing machines; exact model instructions control user checks.
- Cleaning a Front Load Washer Door Seal - Product HelpMaytag Product Help · Official Maytag support guidance for front-load door seals; use the exact model manual for cleaning products and access.
- Leaking from Front - Front Load Washer - Product HelpMaytag Product Help · Official Maytag support guidance for front-load washers; model hardware and controls vary.
Community feedback
Share a repair observation
Share a plain-text repair observation. Accepted observations are published automatically; this page may take a moment to update.