
On this page
Start here
Quick answer
A Maytag washing machine that appears not to fill may be waiting for sensing, using a low-water cycle, paused by an open lid, or receiving too little water. Start by recording the cycle, delay or sensing status, exact display or fill code, and whether the tub is empty or slowly receiving water. Then check that the household hot and cold supplies are open, both hoses are connected and not kinked, and the drain hose is not siphoning water out. Inspect inlet screens or disconnect hoses only when the model instructions permit it, with the water supply off and power isolated. Stop for hot water, a leak or wet electrical area, smoke, burning smell, sparking, or a repeated breaker trip; a clean supply path with persistent no-fill or a valve, pressure, sensor, or lid-lock symptom needs qualified service.
Before you begin
Safety first
- This article covers ordinary external controls, visible plumbing, model-permitted hose or screen care, and safe drain inspection only. Do not touch wet electrical equipment, bypass the lid or pressure system, open the cabinet, perform live testing, or work on household plumbing beyond safe visible adjustments.
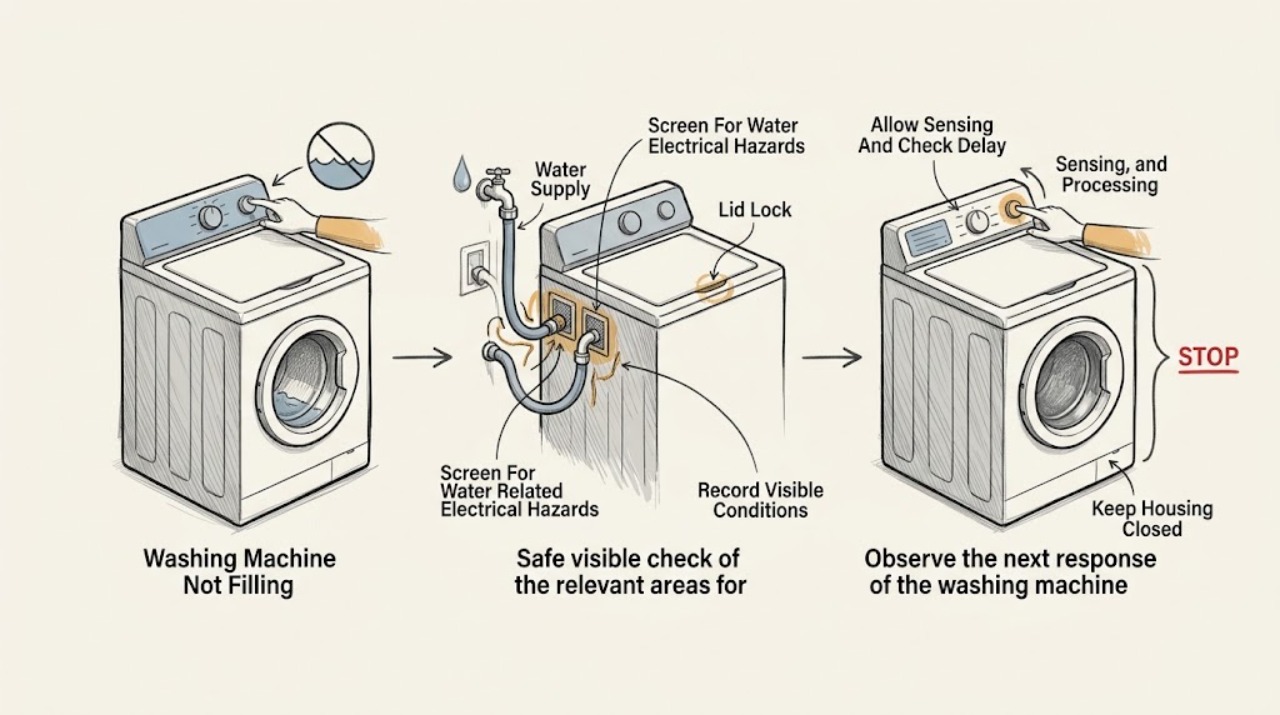
Work through in order
Diagnostic checks
Use only checks that match the exact appliance or system and its official guide.
-
Check 1
Before touching the washer, check for hot water where it should not be, a leaking hose or tub, water near the plug or outlet, smoke, burning smell, sparking, damaged wiring, or a breaker that trips again.
Expected result: Classify the washer as safe for ordinary external checks, or record the specific leak, heat, odor, electrical, or breaker warning.
Next step: If safe, continue with the display and supply record. If water is near electrical equipment, stop using the washer and isolate power only from a dry, safe position; shut the water supplies if that can be done safely. Arrange qualified appliance or electrical service for the hazard.
Stop if: Do not touch a wet plug or outlet, reach into standing water, run the washer, or repeatedly reset a tripping breaker.
Why this matters
Why: A wet electrical area, overheating, or electrical symptom is a safety event, not a routine no-fill branch. Hot water can also create a burn risk.
-
Check 2
Record the washer type, selected cycle, water-level option, delay or pause state, sensing or fill indicator, exact error code or flashing lights, lid position, and whether the drum or tub has any water.
Expected result: Note whether the washer is silent, humming, sensing, briefly filling, filling and immediately losing water, showing a low-flow or long-fill alert, or waiting for a lid or Start command.
Next step: Keep the display record and model number. Follow the matching cycle, supply, drain, lid, or code branch instead of replacing a valve from the symptom alone.
Stop if: Do not guess an error-code meaning across models or open the console to inspect a control or pressure circuit.
Why this matters
Why: A low visible level can be normal on a sensing cycle, while a fill alert, no inlet sound, immediate siphoning, or a code that returns points to a different branch. Exact model identity is needed for code meaning.
-
Check 3
With the lid or door closed as the model requires, verify that the intended cycle has been selected, the Start command has been accepted, no Delay Start is active, and the washer has been allowed to complete its initial sensing period.
Expected result: Determine whether the washer begins sensing or slowly adds water, remains in a delayed or paused state, or does not respond after a correct Start command.
Next step: Cancel an unintended delay or pause and start the documented cycle once. If the washer still does not respond or does not progress, retain the display record and continue to the lid and supply branches.
Stop if: Do not open a moving top-load lid, defeat a lock, or keep restarting a cycle when water is leaking, hot, or near electrical parts.
Why this matters
Why: Sensing cycles can pause, move the load, and add water in stages; Delay Start or an unaccepted command can look like no fill. No response after the correct sequence points toward lid, control, power, or service checks.
-
Check 4
From the wall side without moving the washer, confirm that the household hot and cold valves are open and that both inlet hoses are connected to the intended supplies; check whether another nearby fixture has normal water flow.
Expected result: Record an off valve, weak household flow, only one connected supply, a reversed or uncertain connection, or both supplies fully open with normal household pressure.
Next step: Restore only an obviously closed valve or correct an accessible hose connection according to the model instructions. Arrange plumbing service for weak household pressure or a valve that will not operate; continue to the hose and screen check when supplies are normal.
Stop if: Do not force a seized valve, disconnect a pressurized hose, or continue if a connection leaks or sprays.
Why this matters
Why: Maytag guidance says both hot and cold supplies generally need to be connected and open for the washer to operate correctly, even though the selected cycle may manage temperature internally. Weak flow at the household fixture is upstream of the washer.
-
Check 5
With the washer off, water supplies closed, and residual water contained, inspect accessible hot and cold hoses for kinks, crushing, bulges, or blockage. Inspect inlet screens only if the exact model instructions permit hose removal; do not remove or disturb a screen that the instructions say to leave in place.
Expected result: Record a kinked or damaged hose, a visibly restricted screen, mineral or debris buildup, a hose that passes water poorly when safely checked as the manual directs, or a clear inlet path.
Next step: Straighten an accessible kink and clean a screen only by the model-approved method; replace a hose only after confirming the exact connection and fit. If the path is clear but fill remains absent, arrange service rather than opening the washer.
Stop if: Do not disconnect a hose with water on, use force or sharp tools on a screen, remove a fixed screen, spill water onto power equipment, or continue with a cracked or bulging hose.
Why this matters
Why: A kink, blocked screen, or restricted hose can reduce or stop flow before the washer's valve. A clear path with no fill shifts the diagnosis toward the valve, control, pressure sensing, lid signal, or wiring.
-
Check 6
Inspect the visible drain hose installation against the model instructions: it should not be sealed airtight, inserted too far into the standpipe, kinked, or installed below the required height; observe whether water leaves while the washer is trying to fill.
Expected result: Record a drain hose that siphons, is too deep or too low, is taped or sealed, is kinked, or is correctly formed and positioned with no immediate water loss.
Next step: Correct only the visible hose routing allowed by the installation instructions, preserving an air gap and the required height. Request plumbing service for a blocked standpipe, hidden drain issue, or persistent siphoning.
Stop if: Do not reach into a drain with chemicals, seal the drain hose airtight, pull the washer forward unsafely, or continue a cycle that is leaking or overflowing.
Why this matters
Why: Siphoning can make a washer appear not to fill because incoming water drains away at the same time. Correct supply flow cannot overcome an incorrectly installed drain path.
-
Check 7
Compare the observed water level with the selected cycle, load size, and water-level setting in the exact owner's manual; do not add water manually to an active cycle.
Expected result: Record a sensing or normal low-water cycle, a cycle that should use a deeper fill but remains dry, or a level that rises and then falls through the drain path.
Next step: If the level matches the manual and the cycle advances, no fill repair is established. If the intended cycle remains dry or the water falls away, use the supply, drain, code, and service branches.
Stop if: Do not defeat the water-level control, add water by hand, run a cycle with an overflow or leak, or assume a deeper-fill option is available on every model.
Why this matters
Why: Maytag top-load high-efficiency cycles can use less water and may not submerge the load; Quick or Express and Normal-type cycles can have different expected levels. A truly dry tub after the sensing window is not explained by normal low-water operation.
-
Check 8
Confirm the lid or door is completely closed and latched, inspect the visible strike and lock area for lint, clothing, or detergent buildup, and check whether Control Lock or a lid-lock light is active; do not bypass the lock.
Expected result: Record a lid that latches and shows the expected indicator, an open or misaligned lid, an unresponsive Control Lock, an obstruction, or a lock light that remains abnormal.
Next step: Remove only visible debris with the washer off and follow the model-specific Control Lock or lid-lock instructions. If the lid will not latch or the light/code returns, arrange qualified service.
Stop if: Do not tape, press, magnetize, pry, or otherwise defeat the lid lock, and do not reach into a moving basket.
Why this matters
Why: Some Maytag washers will not fill until the lid locks, while others may fill but will not advance with the lid open. A stuck or damaged lock can block the cycle independently of water pressure.
-
Check 9
If the display shows a fill alert such as the model's F8 E1 or LF guidance, record the exact code and follow the model-specific supply and drain checks; only when there is no leak or electrical hazard, perform the documented single control reset once.
Expected result: Record whether the code clears, whether both supplies and the drain installation are correct, whether the lid locks and the washer pumps out, and whether the same code returns.
Next step: Provide the exact code, model, supply result, drain result, lid behavior, and reset result to a qualified technician. Do not substitute a code from another washer platform.
Stop if: Do not repeatedly reset, bypass a pressure or lid sensor, open the console, or continue when water is hot, leaking, or near electrical equipment.
Why this matters
Why: A long-fill alert can reflect low water supply, an incorrectly installed drain hose that siphons, or a model-specific pressure-sensing condition. A returning code after the documented checks is service evidence, not a reason to keep resetting.
-
Check 10
Prepare a service handoff with the full model number, front-load or top-load design, selected cycle, water-level setting, delay status, fill light or exact code, household supply result, hose and screen result, drain routing, lid behavior, and any water or electrical safety symptom.
Expected result: Confirm that the record distinguishes no water, slow water, water that immediately drains, a normal low-water cycle, and a washer that cannot start because of the lid or control.
Next step: Arrange qualified appliance service when the supply and installation path are sound but the washer still will not fill, when a valve or sensor needs testing, or when an error persists. Use qualified plumbing service for household pressure or drain defects.
Stop if: Do not order or install an inlet valve, screen, pressure sensor, lid lock, hose, or control solely from a no-fill symptom; do not perform live electrical or internal water-valve tests.
Why this matters
Why: Those observations separate household plumbing and hose restrictions from siphoning, normal sensing, lid-lock or control problems, and a possible inlet valve, pressure sensor, or wiring fault.
Use your observations
Decision map
Find the observation that best matches what you see, then follow the next safe action.
-
PATH 01Safety boundary
What you see
The washer is in a sensing or low-water cycle, the lid is closed, water enters in stages, and the level matches the exact model's cycle guidance.
Do this next
Allow the documented sensing period and cycle to advance. Do not add water manually or switch to a deeper-fill option unless the model provides and the load requires it.
Why this path and its safety boundary
Why it matters: The appearance of an incompletely filled tub may be normal for that cycle and load size.
Safety stop: Stop for no water after the sensing window, an error code, leaking, overflowing, or water near electrical equipment.
-
PATH 02Safety boundary
What you see
The washer does not begin filling because Delay Start, Pause, Control Lock, an unaccepted Start command, or an open lid is shown.
Do this next
Cancel the unintended delay or pause, unlock the controls using the model instructions, close the lid or door, and start the cycle once.
Why this path and its safety boundary
Why it matters: The control is waiting for a permitted start condition rather than proving a failed inlet valve.
Safety stop: Stop if the lid will not latch, the lock indicator or code returns, or the washer needs a bypass.
-
PATH 03Safety boundary
What you see
A hot or cold household valve is closed, household flow is weak, one supply is missing, or a supply connection leaks.
Do this next
Restore only an obviously closed valve if safe and arrange plumbing service for weak pressure, a seized valve, or a leaking connection.
Why this path and its safety boundary
Why it matters: The restriction is upstream of the washer or at the household connection; replacing an internal valve will not restore absent household water.
Safety stop: Do not force a valve, disconnect a pressurized hose, or continue near a spray or hot-water leak.
-
PATH 04Safety boundary
What you see
A hose is kinked, crushed, clogged, damaged, or an inlet screen is visibly restricted where the model instructions allow inspection.
Do this next
Turn off water, isolate power, contain residual water, and follow the exact model's approved hose or screen cleaning or replacement procedure. If the screen is fixed or the hose is damaged, use qualified service when fit is uncertain.
Why this path and its safety boundary
Why it matters: Water is being restricted before or at the washer inlet.
Safety stop: Do not remove a fixed screen, use sharp tools, handle a bulging hose, or spill water onto electrical parts.
-
PATH 05Safety boundary
What you see
Water enters but immediately drains, the fill remains low, or an F8 E1 or LF alert appears with a drain hose that is too low, too deep, kinked, or sealed.
Do this next
Correct only visible drain-hose routing allowed by the installation instructions, preserving the required height and air gap; arrange plumbing service for a hidden or persistent drain defect.
Why this path and its safety boundary
Why it matters: The washer may be siphoning rather than failing to admit water.
Safety stop: Do not seal the drain opening, push the hose farther into the standpipe, or continue with overflow or leaking.
-
PATH 06Safety boundary
What you see
An exact model code or fill light persists after both supplies, hose path, drain path, and lid state are checked.
Do this next
Record the code exactly and arrange qualified Maytag appliance service with the full observation log.
Why this path and its safety boundary
Why it matters: The code is unresolved and may involve model-specific pressure sensing, inlet control, wiring, or another condition; the code is not a universal part number.
Safety stop: Do not apply a code definition from another model or repeatedly reset the washer.
-
PATH 07Safety boundary
What you see
The lid or door will not latch, the lock indicator is abnormal, or the washer will not start or fill until a lock signal is received.
Do this next
Remove only visible lint or clothing from the latch area with the washer off, follow model-specific lock instructions, and arrange service if the lock remains abnormal.
Why this path and its safety boundary
Why it matters: The safety interlock may be preventing operation; different models may fill before locking or require the lock first.
Safety stop: Never bypass, tape, magnetize, pry, or hold the lid-lock switch closed.
-
PATH 08Safety boundary
What you see
Both household supplies are normal, hoses and permitted screens are clear, drain routing is correct, the cycle and lid are correct, but no or very little water enters or the issue recurs.
Do this next
Keep the washer off if water or electrical safety is uncertain and arrange qualified appliance service for model-specific testing.
Why this path and its safety boundary
Why it matters: An inlet valve, pressure-sensing, control, wiring, or model-specific water-system fault is possible, but the symptom does not identify one part.
Safety stop: Do not open the cabinet, perform live tests, bypass a sensor, or replace a valve or control by guesswork.
-
PATH 09Safety boundary
What you see
A hose, valve, tub, or drain leaks; water reaches the plug or outlet; water is unexpectedly hot; smoke, burning smell, sparking, or repeated breaker trips occur.
Do this next
Stop the washer, close water valves from a safe dry position, isolate power only if safe, keep people away from the hazard, and arrange qualified appliance, plumbing, or electrical service.
Why this path and its safety boundary
Why it matters: The immediate priority is water, burn, fire, or electrical safety, not restoring the fill cycle.
Safety stop: Do not touch wet electrical equipment, run the washer, repeatedly reset the breaker, or continue a hot-water or leak test.
Helpful context
Understand the symptom
First decide whether the washer is actually trying to fill
A high-efficiency top-load washer may pause for sensing, briefly move the load, and add water in stages. Some cycles intentionally leave clothing partly above the water, while a front-load washer may use a shallow visible level. Record the cycle, water-level setting, sensing or fill light, delay status, and whether any water enters before calling it a supply failure.
Check both supplies and the drain path
Maytag guidance commonly starts with fully open household hot and cold valves, both connected hoses, and hoses free of kinks. A low or missing fill can also be confused by a drain hose installed too low, too far into the standpipe, sealed with tape, or otherwise allowing siphoning. Check visible plumbing against the model installation instructions and do not open the cabinet to test a valve.
Treat the lid and display as part of the fill decision
Depending on the Maytag model, the lid must latch before filling or before the cycle can advance. Control Lock, a delayed start, an unacknowledged Start command, or an exact fill alert can make the washer appear inactive. Read the code and model manual rather than applying a code from another Maytag platform; an error that returns after the documented reset needs service.
Stop before turning a water problem into an electrical one
Water and electricity require a clear boundary. Turn off water before any permitted hose or inlet-screen inspection, contain residual water, and keep plugs, outlets, and controls dry. Do not touch a wet electrical area, continue with a leak, or repeat a breaker reset after smoke, burning smell, sparking, or a trip.
Safety boundary
Stop conditions
- Stop for a leaking or ruptured hose, uncontrolled water, hot water that can burn, or water near a plug, outlet, control, or other electrical equipment.
- Stop for smoke, burning smell, sparking, damaged wiring, a hot plug or outlet, or a breaker that trips again; do not run or repeatedly reset the washer.
- Do not open the washer cabinet, perform live electrical or valve tests, bypass a lid lock or pressure sensor, or replace a control from the no-fill symptom alone.
- Turn off water and isolate power before any model-permitted hose or inlet-screen inspection; contain residual water and keep the electrical area dry.
- Do not remove or disturb an inlet screen unless the exact model instructions permit it, and do not use sharp tools, force, or chemicals to clear a screen or hose.
- Stop after the documented supply, drain, lid, cycle, and one-time reset checks when the washer still does not fill or an exact error returns; arrange qualified service.
Only after diagnosis
Potential parts
- washer fill hose
Consider this category only if an inspection confirms a kinked, cracked, bulging, or restricted hose and the exact model installation permits replacement.
Confirm the exact washer connection, hose type, length, and approved installation guidance; close the water supplies before handling. - washer water inlet valve
Consider this category only after both supplies, hoses, permitted screens, drain routing, lid state, and the cycle have been checked and qualified testing points to the inlet valve.
Verify the exact model and valve configuration; do not infer valve failure from a no-fill symptom or replace it without safe water and electrical isolation. - washer lid-lock assembly
Consider this category only when the exact model will not receive a valid lid-lock signal, the latch is damaged, and qualified diagnosis rules out visible obstruction and control settings.
Confirm the exact washer model and lock design; never bypass or defeat the safety interlock. - washer water-level or pressure-sensing component
Consider this category only when a persistent fill alert or incorrect water-level behavior remains after supply, drain, hose, lid, and cycle checks and model-specific testing supports it.
Confirm the exact model and service diagnosis; this category is not a universal interpretation of a fill code.
When checks do not resolve it
Need a professional?
Arrange qualified Maytag appliance service when both household water supplies are open, the permitted hose and screen checks are clear, the drain hose is correctly installed, and the washer still will not fill or repeatedly displays a fill alert. Use plumbing service for weak household flow, a seized supply valve, a blocked standpipe, or persistent siphoning. Use qualified electrical or appliance service for water near electrical equipment, smoke, burning smell, sparking, damaged wiring, or repeated breaker trips. A lid-lock, inlet-valve, pressure-sensor, control, or wiring diagnosis requires the exact model and should not be guessed from a no-fill symptom.
Safety scope: This article covers ordinary external controls, visible plumbing, model-permitted hose or screen care, and safe drain inspection only. Do not touch wet electrical equipment, bypass the lid or pressure system, open the cabinet, perform live testing, or work on household plumbing beyond safe visible adjustments.
Common questions
FAQ
Why is my Maytag washing machine not filling with water?
It may be sensing or using a low-water cycle, waiting for the lid or Start command, or receiving too little water. Check the exact cycle and display first, then both household supplies, kink-free hoses, the permitted inlet screens, and drain routing. Persistent no-fill after those checks needs qualified service.
Do both hot and cold hoses need to be connected?
Maytag guidance commonly requires both hot and cold supply lines to be connected and open for proper operation, even when a cold-water cycle is selected. Follow the exact model's installation instructions; do not improvise a connection or force a valve.
Can a low water level be normal in a Maytag washer?
Yes. High-efficiency and sensing cycles can use less water, add it in stages, and leave the load partly above the water. Compare the observed level with the exact cycle and owner's manual. A truly dry tub after the sensing window or a returning fill alert is not explained by normal low-water operation.
Can a drain hose make a washer look like it is not filling?
Yes. If the drain hose is too low, inserted too far, sealed, or otherwise installed incorrectly, water can siphon out while it enters. Check visible routing against the installation instructions and do not seal the drain opening.
Should I clean the water inlet screens?
Only if the exact model instructions permit inspection. Turn off water, isolate power, contain residual water, and follow the approved procedure; never remove or disturb a fixed screen or use sharp tools. A clear screen with persistent no-fill points to service rather than more cleaning.
What do F8 E1 or LF mean on a Maytag washer?
On the Maytag guidance for applicable top-load models, those alerts can indicate a long fill, supply problem, or drain-hose siphoning. Record the exact code and model, check both supplies and the drain installation, and arrange service if the alert returns. Do not apply the code meaning to another model without its manual.
Can an open lid stop a Maytag washer from filling?
Depending on the model, the lid must be closed and latched before filling, or the washer may fill but pause and fail to advance while the lid is open. Do not bypass the lock; remove only visible debris with the washer off and use the model instructions.
When should I stop using a Maytag washer that is not filling?
Stop for a leak, hot water that can burn, water near electrical equipment, smoke, burning smell, sparking, damaged wiring, or a breaker that trips again. Also stop after supply, hose, drain, lid, and one-time reset checks fail; a valve, pressure sensor, control, or wiring diagnosis requires qualified service.
Read the exact guide
Official sources
- Fill or Sensing Light OnMaytag · Maytag top-load washer guidance for models with a Sensing or Fill indicator; exact cycle behavior varies.
- Lid Locking on a Top Load High Efficiency WasherMaytag · Maytag top-load high-efficiency washer guidance; exact lid and fill behavior varies by model.
- Not Filling or Filling Slowly - Front Load WasherMaytag · Maytag front-load washer Product Help; use the exact model manual for access and installation details.
- LF - Error CodeMaytag · Maytag top-load washer error-code guidance; codes and behavior are model-specific.
- Water Levels by Cycle - WasherMaytag · Maytag top-load washer water-level guidance; cycles and options vary by model.
- Not Filling or Long Fill - WasherMaytag · Maytag top-load washer Product Help; water levels and options vary by model.
- Checking the Fill Hoses if the Washer is not FillingMaytag · Maytag washer Product Help; exact hose access and installation requirements vary by model.
- Not Starting - WasherMaytag · Maytag top-load washer operation guidance; control and lid behavior varies by model.
Community feedback
Share a repair observation
Share a plain-text repair observation. Accepted observations are published automatically; this page may take a moment to update.