
On this page
Start here
Quick answer
Unplug or switch off the Miele freezer before water can reach plugs, wiring, lights, or electronic controls, and protect the food while the door stays closed as much as possible. First identify whether the water is meltwater from frost, a blocked or misdirected drain, a damaged door seal, or—only if the appliance has one—an external ice-maker or water connection. Miele's instructions warn against sharp tools, unapproved heaters, steam, and de-icers during defrosting; a persistent leak, damaged seal, blocked internal drain, or water near electrical parts needs model-specific appliance service.
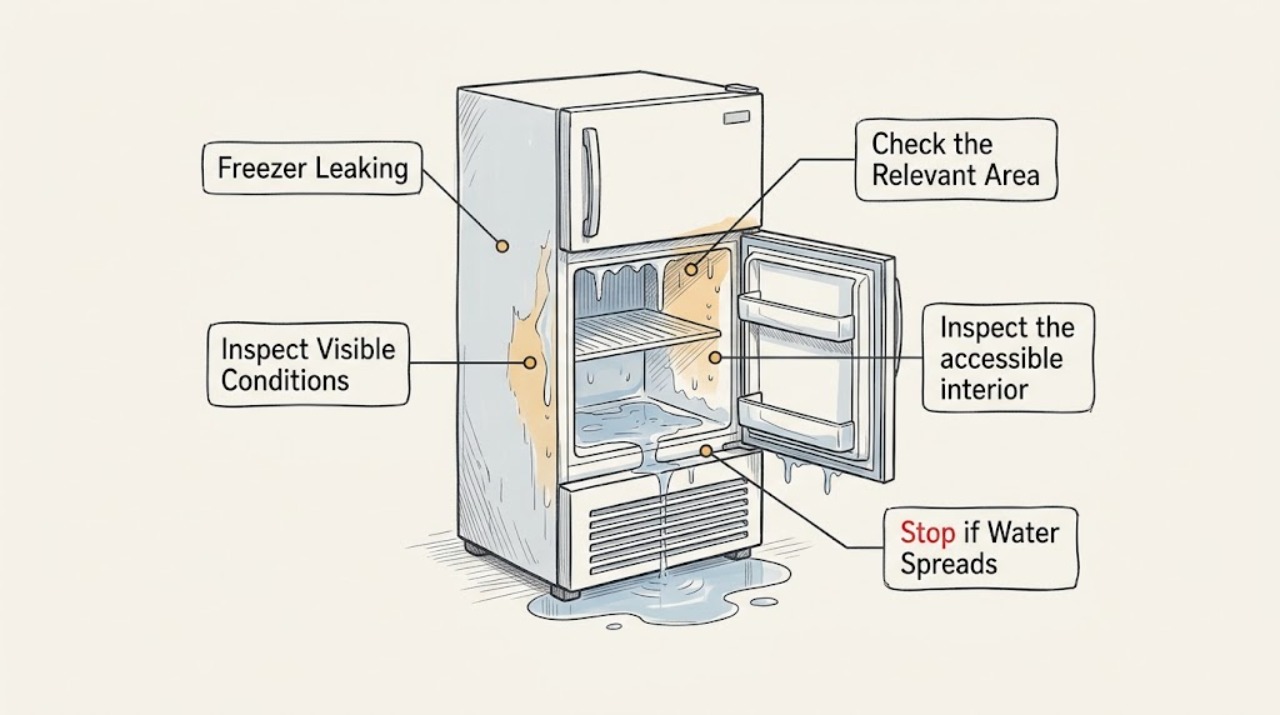
Work through in order
Diagnostic checks
Use only checks that match the exact appliance or system and its official guide.
-
Check 1
Look at the water without moving the appliance: note whether it is inside the freezer, at the door threshold, beneath the cabinet, or behind the unit. Keep towels clear of the plug and do not touch standing water around electrical parts.
Expected result: Water is clear and near melting frost, follows the front edge, appears from a rear/bottom channel, or is concentrated near an optional ice-maker/water connection.
Next step: Photograph the source and dry the safe surrounding area. Do not pull out the appliance or remove panels until power and water hazards are controlled.
Why this matters
Why: The location narrows the source, but water can travel along shelves and cabinet seams. A front-edge trail suggests seal or condensation; a rear/bottom trail suggests drainage or an external connection; meltwater alone does not prove a failed compressor.
-
Check 2
Check the door from the outside: confirm it closes fully, inspect the visible gasket for a split or section out of its groove, and look for a package or ice ridge preventing closure. Clean the gasket with clean water and dry it; do not apply oil or grease.
Expected result: The door does not close evenly, the gasket is damaged or displaced, or there is a visible obstruction; alternatively, the gasket is intact and the door seals normally.
Next step: Remove only the safe obstruction and reseat nothing that would require dismantling the seal. Arrange a model-specific seal or hinge inspection if the gap remains or the leak returns.
Why this matters
Why: Miele documents that a damaged or displaced seal can prevent proper closure, reduce cooling, and allow condensation and ice to build up. An intact seal shifts attention toward drainage, defrosting, temperature, or a fitted water circuit.
-
Check 3
Inspect the accessible interior for a thick frost layer, an ice bridge, a blocked visible channel, or food packages touching the rear wall or blocking air passages. Do not probe a drain, scrape ice, or open a concealed panel.
Expected result: Frost is thick, water is pooling below a frost area, the manual identifies a visible drain route, or no accessible obstruction is present.
Next step: Use only the model manual's safe, powered-off defrost procedure. If the drain is concealed, blocked after thawing, or immediately refreezes, stop and call appliance service.
Why this matters
Why: Excess frost can reduce cooling and create meltwater when it thaws. Miele's instructions say the freezer should be defrosted at the specified ice thickness for the model and warn that sharp or unapproved defrosting methods can damage the evaporator.
-
Check 4
If the freezer is fitted with an ice-maker or water dispenser, inspect the visible tubing, shutoff connection, and floor area for a fresh bead or spray pattern without loosening a fitting. If no water feature is fitted, skip this check.
Expected result: Water is clearly coming from an external tube or connection, the connection is wet only during ice-making, or there is no external water source.
Next step: Close the appliance's accessible water shutoff if it is clearly identified and safe to reach; do not disconnect tubing. Keep the freezer off if water can reach electricity and arrange appliance service.
Why this matters
Why: A leaking external water circuit is different from condensation or defrost water and can continue while the freezer still cools normally. Absence of a water feature rules out that branch but not an internal drain or seal issue.
-
Check 5
If it is safe to do so, switch the appliance off at its control and disconnect power before a full manual-directed defrost. Leave the door open, place towels or a shallow container away from electrical components, and allow ice to melt without scraping or applying direct heat.
Expected result: Water stops after the complete thaw, the leak continues while powered off, or the leak returns quickly after the freezer is restarted.
Next step: Clean and dry only as the manual allows. If the path is not obvious or water returns, keep the freezer off and give the technician the location and timing of the leak.
Why this matters
Why: A one-time meltwater event may be explained by accumulated frost, but continued or rapidly recurring water points to a blocked drain, door-seal/closure problem, temperature issue, or water connection that a thaw did not repair.
-
Check 6
Protect and assess the frozen food without tasting it: keep the door closed, note any appliance-thermometer reading, and separate packages contaminated by leaking raw-food juices or floodwater. Use official food-safety guidance for items that have partially thawed.
Expected result: Food still has ice crystals or is at or below 40°F (4°C), or food has warmed above that threshold for more than the stated safe period, contacted dirty water, or cannot be assessed.
Next step: Refreeze or cook only food that meets the official guidance; discard food that exceeds the guidance or has been contaminated. Keep the service appointment focused on the water path and temperature loss.
Why this matters
Why: Food safety depends on temperature and contamination, not smell or a taste test. A leak that warmed the compartment can be a food-safety event even if the water itself looks clean.
Use your observations
Decision map
Find the observation that best matches what you see, then follow the next safe action.
-
PATH 01Next step
What you see
Water is at the front edge and the door does not close or the gasket is split/displaced
Do this next
Treat door sealing and closure as the first repair branch.
-
PATH 02Next step
What you see
Thick frost melts during the manual-directed powered-off defrost and the leak does not return
Do this next
The immediate water may have been meltwater from accumulated frost, not a confirmed component failure.
-
PATH 03Next step
What you see
Water continues while powered off, returns quickly after thawing, or collects below a concealed panel
Do this next
Do not keep repeating defrost cycles; suspect a drain, seal/closure, control, or internal water-path fault.
-
PATH 04Next step
What you see
A fitted external ice-maker or water connection is visibly wet
Do this next
Treat it as a water-supply branch, separate from condensation or frost melt.
-
PATH 05Next step
What you see
Water reaches the plug, socket, wiring, display, or lighting, or the cable is damaged
Do this next
Stop handling the appliance and do not restore power while the hazard remains.
Helpful context
Understand the symptom
A leaking freezer is a water-source problem first. Clear meltwater can come from frost or a defrost cycle, while water at the front edge can follow a door that is not sealing. Water that appears at the rear or underneath may come from a drain path, an ice-maker or water connection if fitted, or thawing food. Because Miele freezer layouts differ, use the model's own manual for any internal access instruction.
Protect electricity and food before troubleshooting
Keep water away from the socket, plug, lighting, display, and control area. If water is near electrical components, the plug, or a damaged cable, do not reach through the water; isolate power only if it can be done without contact with the hazard and arrange service. Keep the freezer door closed while deciding what to do with food. If food has thawed, never taste it to test safety.
Defrosting is not the same as repairing a leak
For the Miele manual used here, frost in the freezer is removed by switching the appliance off, disconnecting it, leaving the door open, and absorbing water with a sponge or towel. That manual specifically says not to scrape ice, use sharp objects, steam, electric heaters, candles, or defrosting sprays. A complete thaw can reveal the path, but recurring water after a safe thaw means the drain, seal, temperature control, or a fitted water circuit needs inspection.
Safety boundary
Stop conditions
- Stop immediately if water is near the plug, socket, cable, lighting, display, or electronic controls, or if there is smoke, burning odor, sparking, or damaged insulation.
- Do not scrape or chip ice, insert sharp tools into a drain, use steam, candles, electric heaters, direct high heat, or unapproved defrosting sprays.
- Do not remove sealed panels, loosen a water fitting, or dismantle the refrigeration system; model-specific service is required when the source is concealed or the leak recurs.
Only after diagnosis
Potential parts
- freezer door gasket
Only if the gasket is torn, permanently displaced, or fails a model-appropriate closure inspection.
Match the exact Miele model and door configuration; do not order from a leak symptom alone. - defrost drain or drain-path component
Only if service confirms a blocked, damaged, or incorrectly routed drain path after safe thawing.
The freezer design and drain arrangement vary by model; internal access and replacement require the model documentation or a technician. - ice-maker or water-inlet tubing component
Only if the appliance is equipped with a water feature and the leak is traced to that circuit.
Confirm the exact model, connection type, and water-feature configuration before any part decision.
When checks do not resolve it
Need a professional?
Call appliance service when the leak persists after a safe, model-directed thaw, returns quickly, comes from a concealed drain or panel, or is accompanied by poor cooling or heavy frost., Arrange prompt service for a damaged door seal, repeated door-closure problem, external water connection leak, or water near electrical components., Protect or discard food according to FoodSafety.gov guidance when the freezer warmed or leaking water may have contaminated packages.
Common questions
FAQ
Is water under a Miele freezer always a blocked drain?
No. Check the water location and door seal first. Frost melt, a door that does not seal, an internal drain, or a fitted water connection can produce similar trails.
Can I scrape the ice away to stop the leak?
No. Miele warns that sharp tools and scraping can damage the evaporator. Use only the model's powered-off defrost procedure and stop if the source is concealed or returns.
What should I do with food after a leaking freezer warms up?
Keep the door closed, do not taste food to test it, and use the official temperature and ice-crystal guidance. Discard food that exceeded the safe limits or was contaminated by dirty water.
When should I unplug a leaking freezer?
Switch it off and disconnect power before a safe manual-directed defrost, but do not touch a wet plug, socket, or damaged cable. If water is near electrical parts, keep clear and obtain qualified help.
Read the exact guide
Official sources
- K 31222 Ui, K 31242 UiF GB 10838150-03 Operating and installationMiele · Miele freezer defrosting, drain, door-seal, moisture, cleaning, and electrical safety instructions for the documented model family
- Food Safety During Power OutageFoodSafety.gov · safe handling of frozen food after freezer warming, ice crystals, temperature checks, and discard decisions
Community feedback
Share a repair observation
Share a plain-text repair observation. Accepted observations are published automatically; this page may take a moment to update.