
On this page
Start here
Quick answer
First identify what is escaping and where it lands. Steam or a small amount of condensation around the vent or door can be normal during moist cooking, while water that pools outside the cavity, returns after the oven is dry, reaches controls or electrical equipment, or comes from a damaged door or seal needs the oven taken out of service. A Monogram model may have features that differ by model, so use its exact Owner's Manual before using a steam function. If the oven has a gas odor or hissing, smoke, scorching, arcing, a damaged glass door, or water near electrical parts, stop, keep clear, and obtain qualified help rather than testing it again.
Before you begin
Safety first
- Do not operate a leaking or wet oven to reproduce the symptom, remove the door or panels, open gas or electrical compartments, block the vent, add unapproved liquids, or test gas or live electrical parts.
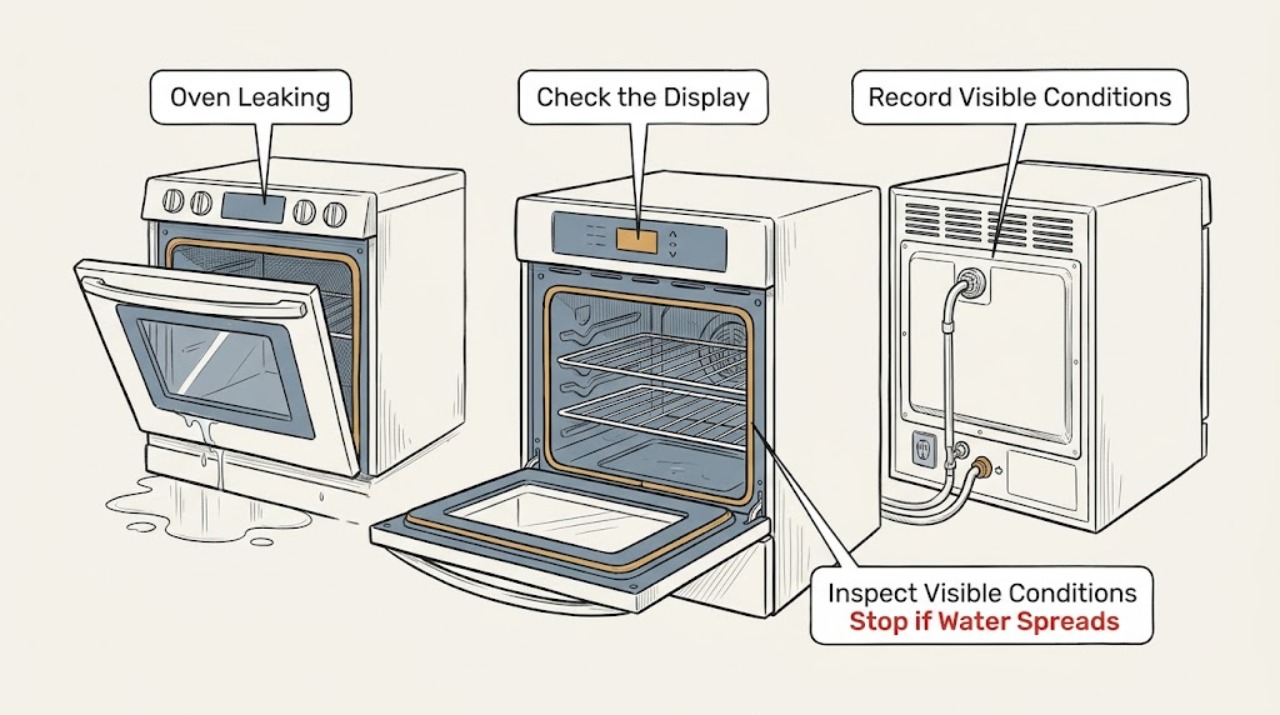
Work through in order
Diagnostic checks
Use only checks that match the exact appliance or system and its official guide.
-
Check 1
Stop the oven, allow it to cool, and from a dry position identify whether the material is steam, clear water, grease, food liquid, or cleaning product; note whether it is inside the cavity, between door panes, on the door face, under the oven, or near the controls.
Expected result: Only vapor or light condensation appears during cooking, or a liquid pool, repeated drip, residue trail, or moisture near controls is present.
Next step: Keep the oven off until the surface is cool; wipe only accessible, non-electrical surfaces and continue with the matching branch without opening panels.
Stop if: Stop for smoke, scorching, a burning smell, gas odor, arcing, damaged glass, or water near electrical equipment.
Why this matters
Why: Vapor and condensation can be normal in moist cooking, but pooled or recurring liquid outside the intended cavity path points to a spill, steam feature, door or vent issue, or a leak that needs model-specific assessment.
-
Check 2
Record the selected cooking or cleaning mode, food moisture, door position, amount of liquid, and the moment the material appears: during preheat, cooking, venting, door opening, a supported steam-clean cycle, or after the oven is turned off.
Expected result: The moisture appears only with high-moisture food or venting, only after a model-specific steam cycle, or continues as a drip or pool after the oven is cool and dry.
Next step: Give the timing and mode to service; do not repeat a cycle solely to reproduce a leak, especially if water or heat has reached controls.
Stop if: Stop for a leak that increases, reaches the floor, enters the control area, or cannot be traced without removing the oven or door.
Why this matters
Why: High-moisture cooking and venting can create expected vapor, and a supported steam-clean cycle can leave some cavity water; a continuing external drip or unexplained pool is not established as normal by those observations.
-
Check 3
If the model has a Steam Clean or similar water-assisted feature, read the Monogram Owner's Manual and compare the observed water with the model's instructions; use the feature only as documented and only when the oven is cool and hazard-free. Do not add unapproved liquids or cleaners.
Expected result: The model manual supports the feature and the water is confined to the intended cavity, or the feature is absent, unclear, or water escapes outside the cavity.
Next step: For a supported, contained cycle, wipe remaining moisture when cool as directed; for an unclear feature or external escape, leave the oven off and arrange service.
Stop if: Stop for an unapproved liquid or cleaner, a locked hot door, steam directed at controls, or any water outside the intended cavity.
Why this matters
Why: GE's general steam-clean guidance uses water in the cavity and says some water may remain afterward, but that does not authorize a water cycle on a model without the feature or explain water escaping from the appliance.
-
Check 4
With the oven completely cool, inspect the accessible door glass, frame, hinge area, gasket, and contact surfaces for food or cleaner residue, a displaced seal, cracked glass, a bent frame, or a door that does not close evenly; do not remove the door or gasket.
Expected result: The door closes evenly with no visible damage, or there is a gap, damaged seal, misalignment, cracked glass, scorching, or residue preventing closure.
Next step: Wipe only cool, accessible residue with the model-approved method; leave the oven off and arrange service for damage, misalignment, scorching, or a seal that will not seat.
Stop if: Stop for cracked glass, a broken hinge, scorching or smoke stains, a loose seal, or any need to dismantle the door.
Why this matters
Why: Moisture around a door can be normal during moist cooking, but a damaged or misaligned door or gasket can let heat and moisture escape abnormally and may create a safety hazard.
-
Check 5
Observe the vent area only from a safe distance while the oven is operating normally, and after cooling check whether moisture was limited to the vent or door surface; never block the vent or wipe a hot control panel. Note any moisture behind a timer or control display.
Expected result: Brief vapor comes from the vent during moist cooking and clears, or moisture persists behind the control/timer, drips from a seam, or leaves scorching or residue.
Next step: If moisture is in or behind controls, keep the oven off and arrange service; if it is only transient vent vapor, use the model manual and record the cooking conditions.
Stop if: Stop for moisture behind controls, an obstructed or displaced vent, smoke, scorching, electrical odor, or a hot or wet control surface.
Why this matters
Why: GE guidance describes visible vapor at an oven vent as normal in several cooking modes, but persistent moisture behind a timer or control suggests an installation, venting, sealing, or service issue rather than ordinary surface condensation.
-
Check 6
If the oven is a gas model, treat any gas odor, hissing, delayed ignition, or unusual flame as an emergency and leave without operating switches or creating a flame; for any model, stop for smoke, arcing, a burning smell, or a breaker trip. Do not perform a leak test or open gas or electrical compartments.
Expected result: There is no gas or electrical warning and the suspected leak is limited to cool, accessible surfaces, or a gas or electrical warning is present.
Next step: For a warning, keep clear and contact appropriate qualified emergency, gas, electrical, or appliance help from a safe location; otherwise continue only with cool, external observations.
Stop if: Stop immediately for gas odor, hissing, abnormal flame, smoke, fire, arcing, exposed wiring, or a wet energized connection.
Why this matters
Why: A gas odor or electrical warning changes the task from ordinary moisture identification to immediate safety response; the absence of an odor does not make wet electrical equipment safe to operate.
-
Check 7
Arrange qualified appliance service when liquid returns after the oven is cool and dry, escapes from a seam or door, reaches the controls or cabinet, follows a steam feature without model support, or persists despite a sound accessible door and vent observation; provide the model and the complete timing record.
Expected result: The leak is recurring, the source cannot be identified without disassembly, a door or vent component is damaged, or a safety warning occurred.
Next step: Keep the oven out of service and give the technician photos taken only from a safe, cool position, the mode, liquid type, timing, model, and any safety event; do not order a part from the symptom alone.
Stop if: Stop all user troubleshooting for persistent water, internal moisture, damaged glass or seals, smoke, gas odor, arcing, or any need for panels or door removal.
Why this matters
Why: The remaining possibilities include a door or gasket problem, vent or installation issue, steam-system fault, cavity or drain path issue, or gas/electrical damage that cannot be selected safely from the word leaking alone.
Use your observations
Decision map
Find the observation that best matches what you see, then follow the next safe action.
-
PATH 01Next step
What you see
Only brief steam or condensation appears at the vent or door during moist cooking and it clears without an external pool.
Do this next
Arrange qualified service and follow the exact model guidance.
Why this path and its safety boundary
Why it matters: Treat it as a possible normal operating condition, compare with the exact Monogram manual, and monitor; stop if it becomes liquid, persistent, scorched, or reaches controls.
-
PATH 02Next step
What you see
A documented model-specific steam-clean cycle leaves a small amount of water inside the cool cavity.
Do this next
Arrange qualified service and follow the exact model guidance.
Why this path and its safety boundary
Why it matters: Wipe the cooled cavity as the manual directs; do not add unapproved liquids and do not treat water outside the cavity as normal residue.
-
PATH 03Next step
What you see
Water, food liquid, grease, cleaner, or a recurring drip appears on the door exterior, under the oven, at a seam, or on the floor.
Do this next
Arrange qualified service and follow the exact model guidance.
Why this path and its safety boundary
Why it matters: Leave the oven off and arrange appliance service; do not remove panels or continue cycles to find the source.
-
PATH 04Next step
What you see
The door is misaligned, does not close evenly, has a damaged gasket or hinge, cracked glass, or scorching around the face.
Do this next
Arrange qualified service and follow the exact model guidance.
Why this path and its safety boundary
Why it matters: Do not operate or force the door; obtain model-specific service for the door, gasket, hinge, or frame.
-
PATH 05Next step
What you see
Moisture enters or persists behind the timer or control display, or the control becomes wet or unresponsive.
Do this next
Arrange qualified service and follow the exact model guidance.
Why this path and its safety boundary
Why it matters: Keep the oven off and arrange qualified service; do not energize it to dry or test the control.
-
PATH 06Next step
What you see
A gas odor, hissing, delayed ignition, or abnormal flame is present on a gas oven.
Do this next
Arrange qualified service and follow the exact model guidance.
Why this path and its safety boundary
Why it matters: Leave immediately without operating switches or creating a flame, and contact appropriate local emergency or gas assistance from outside or another safe location.
-
PATH 07Next step
What you see
Smoke, burning smell, arcing, exposed wiring, a hot connection, or a breaker trip occurs.
Do this next
Arrange qualified service and follow the exact model guidance.
Why this path and its safety boundary
Why it matters: Stop using the oven and keep clear; qualified electrical or appliance assessment is required before any further operation.
-
PATH 08Next step
What you see
The oven is cool and appears intact, but liquid returns or the source cannot be identified from safe, accessible observations.
Do this next
Arrange qualified service and follow the exact model guidance.
Why this path and its safety boundary
Why it matters: Keep the oven out of service and arrange qualified appliance diagnosis with the model, mode, liquid description, photos, and timing record.
Helpful context
Understand the symptom
A wet-looking oven is not always leaking
Steam, condensation, and a small amount of water deliberately used by a supported steam-clean program are different from liquid escaping onto the floor or into the control area. Note the source, amount, timing, and whether the surface is water, grease, food liquid, or cleaner. Do not assume a general GE support article applies to every Monogram model; use the model number and Owner's Manual for feature-specific instructions.
Make the oven safe before looking closer
Let the cavity and door cool before wiping or inspecting accessible surfaces. Keep liquids away from controls and electrical connections. A little visible vapor from a vent can be expected, but smoke, scorching, a persistent pool of water, or moisture inside the timer or control area is a service condition.
Safety boundary
Stop conditions
- Gas odor, hissing, delayed ignition, or an abnormal flame is present.
- Smoke, fire, scorching, burning or electrical odor, arcing, exposed wiring, a hot connection, or a breaker trip occurs.
- Water or another liquid reaches the controls, timer, outlet, wiring, cabinet, or floor under the oven.
- The door glass, hinge, frame, or gasket is cracked, broken, badly misaligned, or cannot close normally.
- A leak persists after cooling or requires removing panels, removing the door, opening gas or electrical compartments, or blocking a vent to investigate.
- The model manual does not support the suspected steam or water feature, or the liquid includes an unapproved cleaner.
Only after diagnosis
Potential parts
- oven door gasket
Only consider a gasket after a qualified diagnosis or model-specific inspection confirms that the seal is damaged or no longer seats correctly; condensation alone does not establish a failed gasket.
Confirm the exact Monogram model and the manufacturer's fit information before ordering or replacing any seal. - oven door or vent component
Only consider door or vent hardware after service identifies damage, misalignment, or an installation-related moisture path; do not dismantle the door or vent as a user test.
Door and vent construction varies by Monogram model; a technician should identify the compatible component.
When checks do not resolve it
Need a professional?
Liquid pools outside the cavity, drips from a seam, returns after the oven is cool, or reaches the cabinet or floor., Moisture enters the timer or control area, or the display becomes wet or unreliable., The door, gasket, hinge, frame, or glass is damaged or does not close evenly., The model-specific steam or cleaning feature is unclear, unsupported, or produces water outside the intended cavity., Any gas odor, smoke, arcing, scorching, burning smell, hot connection, breaker trip, or other electrical warning occurs.
Safety scope: Do not operate a leaking or wet oven to reproduce the symptom, remove the door or panels, open gas or electrical compartments, block the vent, add unapproved liquids, or test gas or live electrical parts.
Common questions
FAQ
Is water around a Monogram oven always a leak?
No. Moist cooking can create vent vapor and condensation, and a model-supported steam-clean cycle may leave some water inside the cool cavity. A recurring external drip, pool, moisture behind controls, or water near electrical equipment is not something to keep testing and needs service.
Why does steam appear around the oven door or control panel?
GE Appliances says moist foods and oven venting can produce visible vapor near the door or control-panel area. It should not be confused with liquid escaping from a seam or persistent moisture behind a display; use the exact Monogram manual and arrange service for the latter.
Can I run Steam Clean to see whether the leak goes away?
Only if the exact model manual documents that feature and the oven is cool and hazard-free. The general GE guidance uses water in the cavity and says to wipe remaining moisture afterward; water outside the cavity or near controls is a reason to leave the oven off and call for service.
Can a damaged oven gasket cause moisture outside the door?
A damaged or misaligned gasket or hinge can change how heat and moisture escape, but condensation alone does not prove the gasket failed. Inspect only when the oven is cool and obtain model-specific service for a damaged seal, misalignment, scorching, smoke stains, or a door that will not close normally.
What should I do if the oven smells like gas while it is leaking?
Treat the gas odor or hissing as an emergency: leave without operating switches or creating a flame, and contact the appropriate local gas or emergency assistance from a safe location. Do not return to test ignition or search inside the oven.
Read the exact guide
Official sources
- Range & Wall Oven - Steam CleanGE Appliances · Supports water-only, model-feature-dependent steam cleaning and the possibility of residual cavity water; it does not authorize the feature on an unspecified Monogram model or explain water outside the cavity.
- Range - Moisture Build-Up on Cooktop Surface or Around the DoorGE Appliances · Supports the distinction between normal moisture during moist cooking and a persistent external leak; exact Monogram model behavior remains manual-specific.
- CPSC Urges Flood Victims to Take Steps to Prevent CO Poisoning, Electrocution, Explosion and FiresU.S. Consumer Product Safety Commission · Supports not touching wet plugged-in appliances, professional evaluation of water-affected electrical equipment, and leaving immediately for suspected gas leakage; it does not diagnose a Monogram oven.
- User Manual & Care for ZET2SHSS | GE AppliancesMonogram / GE Appliances · Confirms the official Monogram owner-center path and model-specific manual/support boundary; it does not establish that every Monogram oven has the same steam or leak behavior.
- Range & Wall Oven - Oven Gasket Not Sealing ProperlyGE Appliances · Supports normal door airflow versus major leakage signs such as scorching or smoke stains and service for damaged gasket or hinge; exact Monogram construction remains model-specific.
- Range & Wall Oven - Steam or Smoke Near Control PanelGE Appliances · Supports that visible steam or vapor at a vent can occur during baking, roasting, convection, or broiling; persistent control moisture or actual liquid escape needs service.
- Moisture Accumulation Behind Range Timer GlassGE Appliances · Supports professional service when steam or moisture accumulates behind a wall-oven timer or control display; it is not a user disassembly guide.
Community feedback
Share a repair observation
Share a plain-text repair observation. Accepted observations are published automatically; this page may take a moment to update.