
On this page
Start here
Quick answer
Stop the cycle, close the washing machine's water supply, and keep clear of any water near the plug, socket or other electrical parts. If the floor is dry and access is safe, switch the appliance off at its normal control and isolate its power; never reach through standing water. Do not open a door with visible water behind it, tilt the machine, or remove a filter while the drum may contain hot water. Photograph the first wet point rather than only the largest puddle: a leak during filling usually points to an inlet hose or valve area, a front leak during washing points to the door seal or detergent drawer, and a leak during draining points to the drain hose, waste connection or pump path. Check the exact Russell Hobbs model manual before touching a hose, filter or service flap; Russell Hobbs provides model-specific manuals through its support pages. Clean, dry, loose external connections can be inspected without dismantling, but a leak from underneath the cabinet, a damaged hose or seal, or any water that reached electrics needs qualified service before another cycle.
Before you begin
Safety first
- Owner checks are limited to dry, visible external observations and only the filter or service-flap procedure clearly authorized by the exact Russell Hobbs manual. Do not open panels, tilt or move the washer through water, work on a pressurised hose, handle hot residual water, or touch electrics in wet conditions.
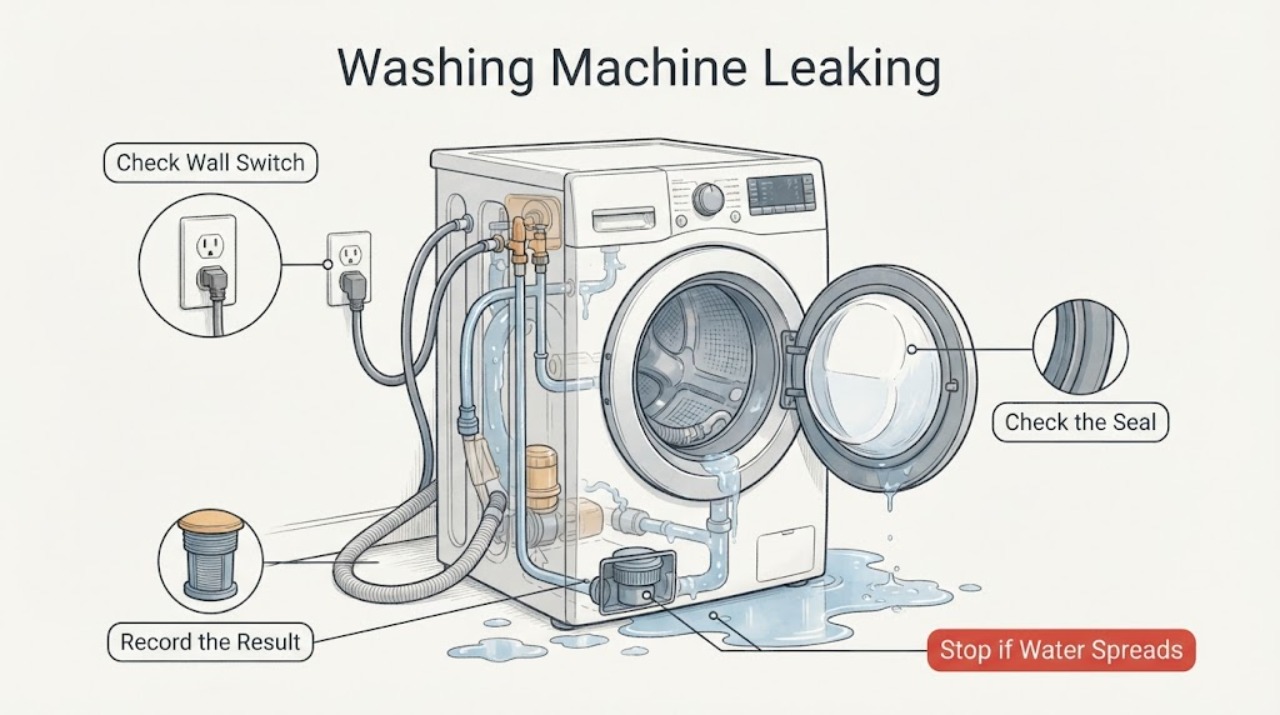
Work through in order
Diagnostic checks
Use only checks that match the exact appliance or system and its official guide.
-
Check 1
Stop the programme and note whether water is still entering, then close the washer's dedicated water tap or the household stop tap if the appliance tap cannot be reached. If the floor is dry and the plug and socket are dry, switch the washer off and isolate its power; if water is near electrics, keep away and isolate electricity only from a dry, safe position.
Expected result: The flow stops when the water supply is closed, or it continues despite the washer being idle; the display, plug, socket and floor may also be dry or wet.
Next step: If water is fast-moving, cannot be isolated, or is near electrics, contain it only from a safe dry position and call emergency property or qualified service help. Otherwise continue only with dry external observations; do not restart the machine.
Why this matters
Why: A continuing flow with the washer idle suggests a supply-side valve or hose problem rather than a drain leak. Water near electrical parts changes this from a routine inspection to an immediate safety and service issue.
-
Check 2
Identify the first wet point without moving or tilting the washer: inspect the tap-to-inlet-hose end, the rear hose connection that is visible without pulling the machine, the detergent drawer front, the door glass and seal edge, the drain-hose outlet, and the floor perimeter.
Expected result: One area becomes wet before the others, or the origin remains hidden below the cabinet; water may be clear, sudsy, or carry lint or detergent residue.
Next step: Photograph the point and its hose or seal before wiping it. If the origin is below the cabinet or inaccessible without moving the machine, stop and arrange service rather than tilting it.
Why this matters
Why: The first wet point is more diagnostic than the puddle boundary. A rear or tap-side point favours the inlet path; a front upper point favours the drawer or door seal; a rear or drain-stage point favours the waste path; an unseen underside point favours an internal fault.
-
Check 3
Compare the leak with the fill phase using the saved timing from the last cycle; inspect only the visible inlet hose ends and tap connection for a loose-looking joint, split outer surface, displaced washer, or water tracking down from above.
Expected result: The leak starts as the drum fills and is concentrated at a hose end or tap, or the inlet area stays dry while water appears later in the cycle.
Next step: Keep the supply closed. Follow the exact Russell Hobbs manual for any permitted external hose inspection; a cracked hose, persistent joint leak, or leak from the rear cabinet requires qualified service and no further cycle.
Why this matters
Why: A fill-timed leak at an external joint points to the inlet connection or hose. A dry inlet area moves the investigation to the door, drawer, drain or internal paths; it does not prove that an internal valve is safe to replace.
-
Check 4
For a front leak, open the detergent drawer only when the machine is stopped, cool, dry around the controls, and the manual permits access; inspect the drawer lip, visible channels, door glass and the full visible rubber seal for a trapped garment edge, residue, distortion or tear.
Expected result: Residue or foam is present at the drawer, an item is caught at the seal, the door does not sit evenly, or the rubber is torn or distorted; alternatively these areas are clean and dry.
Next step: Remove only loose visible residue or fabric with the appliance safe and follow the model manual. Do not stretch, glue or replace the seal without model confirmation; any tear, deformation or recurring front leak goes to service.
Why this matters
Why: A blocked drawer path, excessive or unsuitable detergent, or an obstructed or damaged door seal can route water over the front. A clean intact front does not rule out a leak behind the seal or inside the cabinet.
-
Check 5
For a drain-stage leak, inspect the visible drain hose route and its waste connection for a kink, split, loose retention or water backing up at the household waste. Do not pull the machine forward through wet flooring or detach a hose that may contain water.
Expected result: Water appears only while draining or spinning, the waste connection backs up, the hose outlet is displaced or damaged, or the external drain route looks dry.
Next step: Leave the water and power isolated. Clear only an obvious external obstruction if the manual and safe access allow it; a split hose, recurring backup, pump-area leak or hidden source requires a plumber or appliance technician.
Why this matters
Why: A drain-phase leak at the outlet or waste connection points to installation or household drainage. A dry external route with water below the washer points toward the pump, filter housing or another internal path.
-
Check 6
Use the exact model manual to determine whether the washer has an owner-accessible pump-filter cover or emergency drain arrangement. Before opening any cover, confirm the appliance is isolated, the area is dry, and the drum water is cool and safely contained; if any requirement is uncertain, do not open it.
Expected result: The manual identifies a permitted access point and the area is safe, or there is residual water, a blocked cover, no clear manual instruction, or a leak from behind the panel.
Next step: Follow only the documented model procedure. Stop for hot water, a blocked or damaged cover, uncontrolled flow, or any water near electrics and arrange qualified service; never tilt the washer to drain it.
Why this matters
Why: A model-specific filter procedure may explain a drain restriction, but residual water can flood the floor and a damaged housing is not an owner repair. Lack of clear model instructions is itself a stop condition.
-
Check 7
Check whether the leak occurs while the machine is idle, immediately after the supply is opened, or only during a particular programme stage; record the load, detergent type and any recent installation, hose change, movement or service.
Expected result: A stationary washer leaks with the supply open, the leak follows one programme stage, or the symptom began after installation, movement or a repair.
Next step: Give this timeline and photographs to Russell Hobbs support or a qualified technician. Do not run repeated cycles to reproduce a leak, especially when the first wet point is hidden.
Why this matters
Why: An idle leak with supply open favours the inlet side. A stage-specific leak narrows the path to filling, washing, draining or spinning. A recent installation or movement raises the priority of checking the exact connection and installation instructions.
-
Check 8
Prepare the service record: exact model and region, front-load or top-load configuration, first wet point, cycle phase, whether the supply shutoff stopped the flow, water temperature if safely known, photographs, and any display or fault message.
Expected result: The record identifies an external connection that can be handled by the documented manual, or it identifies a recurring, inaccessible, electrical or internal leak.
Next step: Keep the washer out of use until the manual-authorized step or qualified repair is complete. Use Russell Hobbs' support and manual lookup with the model number.
Why this matters
Why: A complete symptom record lets the technician distinguish plumbing, door, drawer, pump and cabinet paths without unsafe trial-and-error. A recurring or internal leak is not validated by one dry observation.
Use your observations
Decision map
Find the observation that best matches what you see, then follow the next safe action.
-
PATH 01Safety boundary
What you see
Water continues entering while the washer is off or the cycle has stopped
Do this next
Keep the water supply closed and do not reconnect power. Treat the inlet valve or supply hose as a service issue; call qualified appliance service if the flow cannot be isolated safely.
Why this path and its safety boundary
Safety stop: Use the cycle-phase and first-wet-point checks to separate inlet, front, drain and internal paths.
-
PATH 02Safety boundary
What you see
Water is near the plug, socket, controls or another electrical appliance, or the floor is flooded
Do this next
Do not step into uncertain standing water or touch the plug. Isolate electricity only from a dry safe location and obtain urgent qualified help.
Why this path and its safety boundary
Safety stop: Continue only with dry, visible external checks and keep the washer out of service.
-
PATH 03Safety boundary
What you see
The first wet point is at the tap or visible inlet hose and appears during filling
Do this next
Keep the supply closed; follow the exact model manual for a permitted external inspection. A split hose or recurring joint leak needs replacement or qualified service.
Why this path and its safety boundary
Safety stop: Compare the leak with the door, drawer, drain and idle states.
-
PATH 04Safety boundary
What you see
The first wet point is at the front door seal or detergent drawer
Do this next
Inspect only the visible cool seal and drawer surfaces for trapped fabric, residue, distortion or a tear. Stop for damage or a recurring leak.
Why this path and its safety boundary
Safety stop: Do not assume the puddle is a front leak; check drain timing and the underside only from a safe standing position.
-
PATH 05Safety boundary
What you see
The leak appears during draining or spinning at the drain outlet or waste connection
Do this next
Keep power and water isolated, check only the visible route for displacement or damage, and escalate a split hose, backup or recurring leak to a plumber or appliance technician.
Why this path and its safety boundary
Safety stop: If the external drain route is dry, suspect a pump-area or internal path and do not remove panels.
-
PATH 06Safety boundary
What you see
The source is below the cabinet, behind a panel, or cannot be located without moving the washer
Do this next
Do not tilt, drag through water or open the cabinet. Leave the appliance isolated and arrange qualified service.
Why this path and its safety boundary
Safety stop: Follow only a clearly documented model-manual inspection and stop if the result is not conclusive.
-
PATH 07Safety boundary
What you see
There is smoke, burning smell, scorching, arcing, a hot socket, repeated breaker operation, uncontrolled water, or hot residual water
Do this next
Stop immediately, keep away from the hazard, and use emergency or qualified electrical/appliance service as appropriate. Do not test the appliance again.
Why this path and its safety boundary
Safety stop: Continue with the written record and model-specific service route; do not resume routine washing until the cause is corrected.
Helpful context
Understand the symptom
Start with the leak pattern, not the puddle
Water can travel along a floor or the underside of the cabinet, so the largest puddle may be downstream from the fault. Record whether the first water appears while the machine fills, tumbles, drains, spins, or sits idle. A dry towel placed on the floor outside the appliance can help show the direction of travel, but do not push the machine through water or put hands under a wet cabinet. Keep the model number and a photograph of the hose connections for the Russell Hobbs manual or service request.
External checks are the stopping point for most owners
The safe owner-level checks are visual: hose ends, the visible door seal, the detergent drawer, the drain outlet and any accessible pump-filter cover named by the exact manual. Do not undo a pressurised inlet connection, remove a filter with residual water, or open the cabinet. A clean connection that still leaks, or a leak whose first wet point is underneath, is evidence for service rather than a reason to keep running test cycles.
When the leak is contained
Only after the area is dry, the water supply is isolated, and the appliance is electrically safe should you follow the exact model manual for any permitted cleaning or reseating step. If the manual does not clearly cover the step, stop. Never use tape as a substitute for a damaged hose or seal, and never resume normal laundry until a qualified person has confirmed that a leak involving the cabinet, wiring, pump or door assembly is resolved.
Safety boundary
Stop conditions
- Stop immediately for water near a plug, socket, controls or other electrics; never enter standing water when the electrical supply is uncertain.
- Keep the water supply closed for a fast, uncontrolled or recurring leak, and obtain urgent qualified help if the shutoff cannot be reached safely.
- Do not tilt, drag, open the cabinet, bypass a door lock, or remove a filter or hose when water may be hot, pressurised or uncontrolled.
- Stop for a split hose, torn or distorted door seal, leak from underneath or behind a panel, smoke, burning smell, scorching, arcing, a hot socket or repeated breaker operation.
- Do not run repeated cycles to reproduce a leak; keep the washer out of use until the exact manual-authorized step or qualified repair confirms it is safe.
Only after diagnosis
Potential parts
- water inlet hose or sealing washer
Consider this category only when the first wet point is a damaged or leaking external inlet connection and the exact model manual confirms the connection or hose specification.
Confirm the exact model, connector and regional installation requirements; do not substitute tape or an unverified hose. - door seal
Consider this category only when the visible seal is torn or distorted and a qualified diagnosis confirms that the seal is the source of the front leak.
Match the exact model and door configuration; do not stretch, glue or bypass the door seal. - drain hose or pump housing component
Consider this category only after the drain-stage leak is localized to the hose, pump filter housing or pump path by the exact manual or a qualified technician.
Confirm model fitment and service diagnosis before ordering; do not open the cabinet or tilt the machine to reach the part.
When checks do not resolve it
Need a professional?
Use Russell Hobbs support and the exact model manual for model identification and documented care steps. Arrange qualified appliance service for an internal, inaccessible, recurring or cabinet leak, a damaged hose or door seal, pump or valve symptoms, or any leak that reached electrical parts. Use a qualified electrician for a wet or damaged socket, scorching, arcing, a hot plug or repeated breaker operation. Use a plumber when the household waste connection or drain is backing up.
Safety scope: Owner checks are limited to dry, visible external observations and only the filter or service-flap procedure clearly authorized by the exact Russell Hobbs manual. Do not open panels, tilt or move the washer through water, work on a pressurised hose, handle hot residual water, or touch electrics in wet conditions.
Common questions
FAQ
Why is my Russell Hobbs washing machine leaking only during a wash?
Record the first wet point and the programme phase. A wash-stage front leak can involve the door seal or detergent drawer, while a leak that appears only during draining points toward the drain route; the exact model manual determines permitted checks.
Should I run another cycle to find where the leak starts?
No. Keep the water and power isolated until the area is dry and the cause is known. Use the timing and photographs from the last cycle, and arrange service if the origin is hidden or recurring.
Can I open the pump filter when the washer is leaking?
Only if the exact Russell Hobbs manual authorizes the procedure and the appliance is isolated, cool, dry around the controls and safely able to contain residual water. Otherwise stop and use qualified service; never tilt the machine.
What if the washing machine leaks while it is switched off?
Close the water supply. If flow continues with the supply open, the inlet side may be involved. Do not reconnect power or run a cycle; arrange qualified appliance service if the flow cannot be isolated safely.
Is a wet plug or socket a washing-machine repair problem?
Treat it as an electrical safety issue. Do not touch it while wet or enter standing water; isolate electricity only from a dry safe location and have the socket and appliance assessed by a qualified professional.
What information should I give Russell Hobbs support?
Provide the exact model and region, load and detergent details, first wet point, programme phase, whether closing the water supply stopped the flow, photographs and any electrical or fault-message symptoms.
Read the exact guide
Official sources
- Search User ManualsRussell Hobbs · Use the exact product name or model number; controls and maintenance differ by model.
- Problems with your water supply and leaksOxford City Council · General household leak safety, including leaks from appliances; local procedures may vary.
- Russell HobbsRussell Hobbs · Brand support entry point for Russell Hobbs appliances; model-specific information must be checked in the manual.
- User ManualsRussell Hobbs · Regional Russell Hobbs manual support; select the correct country and product identity.
- Worker received shock whilst using a pressure water washing machineHealth and Safety Executive · Regulator warning that water equipment can expose users to serious electrical shock; it is not a Russell Hobbs repair manual.
- Washing machinesElectrical Safety First · General consumer safety guidance for washing machines and their plugs, sockets and electrical supply.
Community feedback
Share a repair observation
Share a plain-text repair observation. Accepted observations are published automatically; this page may take a moment to update.