
On this page
Start here
Quick answer
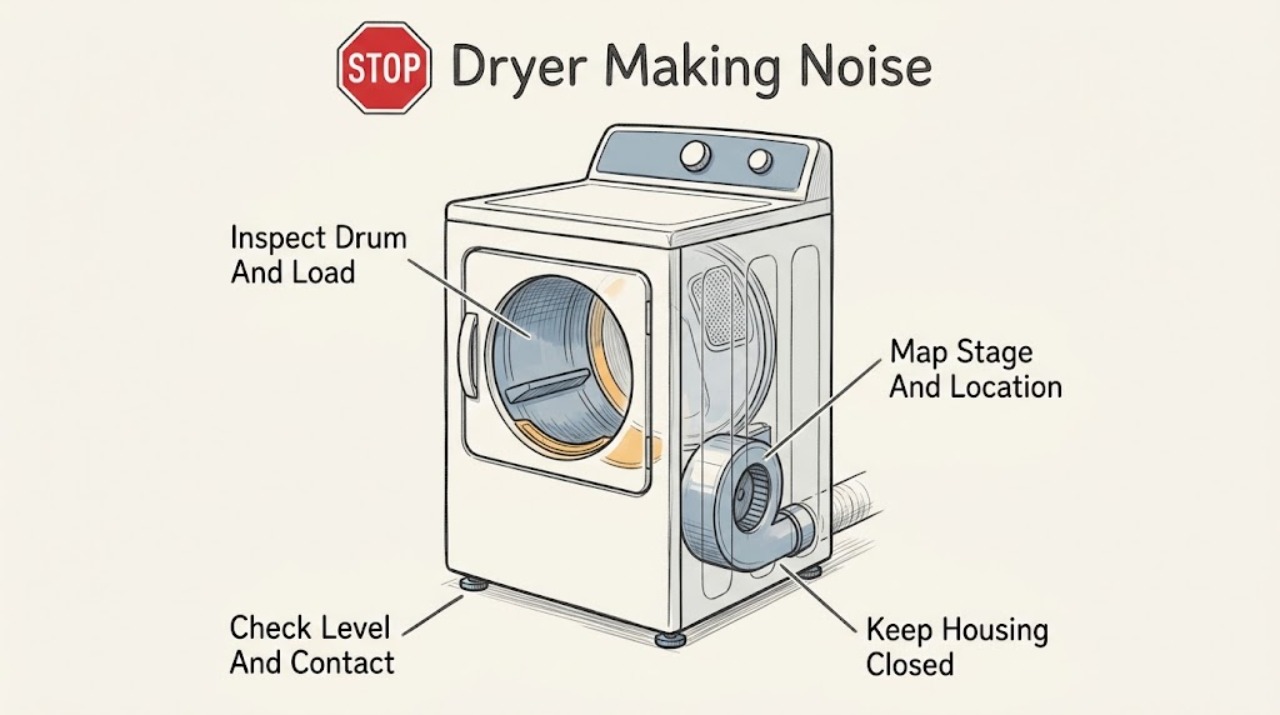
A Speed Queen dryer sound is easier to diagnose by when it occurs and where it is loudest. A brief timer tick, a heat-source cycle, or a steady rush of air can be normal; a new squeal, rhythmic thump, metal scrape, heavy vibration, or noise that continues after the drum stops is not a reason to keep running the dryer. Turn the controls off, let the unit come to a safe stop, and check only ordinary-access areas: loose objects in the drum, clothing hardware, visible lint or contact at the door, level and stable feet, and the accessible exhaust route. Speed Queen identifies belt, drum, roller, and level issues as possible noise causes, while belt and roller inspection may require service. Stop immediately for smoke, burning smell, sparks, abnormal heat, a gas odor, severe vibration, or an electrical trip.
Before you begin
Safety first
- This article covers listening, visible ordinary-access checks, and manual-approved maintenance only. Do not remove panels, reach into the blower, work on gas or electrical connections, lubricate internal rollers, or adjust a belt.
Work through in order
Diagnostic checks
Use only checks that match the exact appliance or system and its official guide.
-
Check 1
With the dryer empty of people and the controls off, note whether the noise occurs at startup, during drum rotation, while warm air is moving, when the drum slows, or after the cycle ends; from outside the cabinet, compare the front, drum area, rear, vent exit, and floor contact point.
Expected result: The sound is a brief click or hum, a rotation-synchronous thump or squeal, a rear or vent rush, a cabinet rattle, a scrape, or a noise that remains after the drum stops.
Next step: Write down the stage, location, whether the dryer is gas or electric, and whether heat or airflow was present. Use that record for the next ordinary-access check and service handoff.
Stop if: Stop use for smoke, burning smell, sparks, gas odor, uncontrolled heat, severe vibration, a repeated electrical trip, or a sound that suggests metal-on-metal contact.
Why this matters
Why: A timing or airflow sound can be normal on the cited Speed Queen guidance. A sound that follows rotation or is tied to one location narrows the check toward the load, drum support, drive path, blower path, leveling, or external contact.
-
Check 2
After the drum has stopped and the controls are off, remove the load and inspect pockets, zippers, buckles, buttons, coins, clips, and the visible drum surface for a loose object or contact mark; do not reach behind the drum or remove a cover.
Expected result: A loose metal or plastic object is present, a garment feature is striking the drum, the drum surface looks clear, or there is a scratch, dent, sharp edge, or object that cannot be removed without force.
Next step: Remove only a loose item that is plainly accessible, then make one brief empty-drum observation only if no hazard is present. If a mark, sharp edge, trapped item, or internal noise remains, leave the dryer out of use and arrange service.
Stop if: Do not pry, spin a damaged drum, reach through a gap, remove panels, or run the dryer with a sharp object, loose part, smoke, odor, or scraping noise.
Why this matters
Why: Speed Queen lists coins, paper clips, and other objects as possible drum-noise sources. If the drum is clear but a rotation-synchronous noise remains, a support, belt, roller, or blower issue becomes more plausible than a pocket item.
-
Check 3
From outside the machine, inspect whether the dryer sits firmly on all feet, is level front-to-back and side-to-side, and is touching a wall, vent, shelf, or adjacent appliance; move only a loose external item that can be removed without shifting the dryer or disturbing connections.
Expected result: The dryer rocks, a foot is loose or missing, the level is off, or the cabinet or vent contacts another surface; alternatively, the dryer is stable with clearance and the sound remains.
Next step: If the unit is stable and the model instructions permit it, have a qualified installer or service person correct leveling or foot contact. Do not drag a connected dryer or adjust a foot while it is unstable.
Stop if: Stop for rocking, a damaged floor, a strained vent, a gas connection that would move, severe vibration, or any need to pull the dryer out or access its underside.
Why this matters
Why: Speed Queen identifies an unlevel dryer and loose feet as possible squeak or vibration causes. Stable clearance with persistent noise points away from simple floor contact and toward the load, drum, drive, or blower path.
-
Check 4
If the noise is loudest at the rear or vent exit, inspect the accessible lint filter, external vent hood, and visible duct route for lint, a kink, or a flap blocked by debris; do not dismantle the blower or enter the duct.
Expected result: The noise is a normal soft airflow hum or rush, airflow is weak or rattling, lint or debris is visible, the hood flap is obstructed, or the airflow path is clear but the rear noise persists.
Next step: Clean only the user-accessible lint filter and visible external obstruction as the manual allows. If the vent path is clear but noise, heat, or airflow remains abnormal, stop and request qualified dryer or vent service.
Stop if: Do not insert tools into the blower, run the dryer with a blocked vent, remove ductwork near a gas connection, or continue for smoke, heat damage, or a burning smell.
Why this matters
Why: Speed Queen's troubleshooting guidance distinguishes the hum of air moving through the dryer and exhaust system from a dryer that is noisy because of an object or level problem. A persistent rear rattle or weak airflow can involve the blower or exhaust installation.
-
Check 5
Compare the sound record with the model manual and Speed Queen service guidance: note whether it began suddenly, is rhythmic with drum rotation, changes with load weight, or is a high-pitched squeal that remains after visible objects and leveling are addressed; do not remove the front or top panel.
Expected result: The noise is gone after a loose-object or contact correction, remains only under load, remains with an empty drum, or is a squeal, grinding sound, or repeated thump from inside the cabinet.
Next step: Stop running the dryer if the sound remains internal or becomes louder. Give the technician the model number, sound file if available, stage, location, load condition, and visible checks.
Stop if: Do not remove cabinet panels, lubricate internal rollers, adjust a belt, or operate to reproduce a squeal, scrape, grinding sound, smoke, or abnormal heat.
Why this matters
Why: A changed sound after removing an accessible object or correcting external contact supports that cause. A persistent internal sound can involve the belt, drum, rollers, blower, motor, or another part that requires model-specific service; Speed Queen specifically says belt inspection involves panel removal and roller lubrication should be done by a service technician.
-
Check 6
Turn the dryer off and document the model, cycle, load, gas or electric type, noise stage, location, and any heat or airflow change; keep it out of use when the cause is not clear or the sound returns after an ordinary-access correction.
Expected result: The dryer is quiet after a plainly accessible object or external contact is corrected, or the noise returns, worsens, or is accompanied by heat, odor, smoke, sparks, gas odor, vibration, or a trip.
Next step: Arrange a factory-authorized or otherwise qualified dryer service assessment and provide the recorded symptom map. For fire, gas, or electrical danger, leave the area when needed and seek appropriate emergency help from a safe location.
Stop if: Do not restart the dryer for another test after a hazardous symptom, and do not bypass a thermal, door, gas, or electrical safety device.
Why this matters
Why: A repeat or hazardous symptom is not a harmless operating sound. Speed Queen advises not running a squeaking dryer when damage may result and directs unclear cases to appliance service.
Use your observations
Decision map
Find the observation that best matches what you see, then follow the next safe action.
-
PATH 01Next step
What you see
The sound is a brief timer tick, heat-source cycle, or steady airflow hum with no vibration, damage, odor, smoke, or abnormal heat.
Do this next
Monitor without placing hands near the drum and keep the lint filter and vent path maintained as the manual directs. Escalate if the character, volume, or stage changes.
Why this path and its safety boundary
Why it matters: Speed Queen lists these as normal operating sound categories on the cited troubleshooting material.
-
PATH 02Next step
What you see
The sound follows drum rotation and a coin, clip, buckle, zipper, or other loose item or garment feature is visible.
Do this next
Remove only the plainly accessible item, then make one brief safe observation. Stop if a scratch, dent, sharp edge, or trapped item remains.
Why this path and its safety boundary
Why it matters: A load or loose-object source is plausible and is distinct from an internal drive diagnosis.
-
PATH 03Next step
What you see
The dryer rocks, a foot is loose, or the cabinet or vent touches a wall or adjacent object.
Do this next
Keep the dryer out of use if it rocks or the vent or gas connection would be disturbed. Have qualified service or installation personnel restore stable clearance and level.
Why this path and its safety boundary
Why it matters: An external stability or contact issue can create squeak, rattle, or vibration without proving an internal part failure.
-
PATH 04Safety boundary
What you see
Noise is loudest at the rear or vent exit, airflow is weak, or lint and duct obstruction are visible.
Do this next
Clean only the user-accessible filter or external obstruction allowed by the manual. Arrange qualified dryer or vent service for persistent rattle, weak flow, or heat buildup.
Why this path and its safety boundary
Why it matters: The exhaust or blower path needs attention, while a soft airflow hum can be normal.
Safety stop: Stop for smoke, burning smell, abnormal heat, or a blocked vent that cannot be cleared from ordinary access.
-
PATH 05Safety boundary
What you see
A squeal, grinding sound, rhythmic thump, or scrape remains with the drum empty and external checks complete.
Do this next
Stop running the dryer and arrange qualified service. Give the technician the stage, location, sound character, load condition, and model number.
Why this path and its safety boundary
Why it matters: The belt, drum, rollers, blower, motor, or support path may need model-specific diagnosis; a panel-level inspection is not an owner test here.
Safety stop: Do not remove panels, lubricate rollers, adjust a belt, or run repeated tests.
-
PATH 06Next step
What you see
Noise occurs with smoke, burning smell, sparks, gas odor, severe vibration, uncontrolled heat, a hot cord, or an electrical trip.
Do this next
Stop using the dryer, keep people away, leave the area when needed, and seek appropriate emergency, gas, electrical, or appliance help from a safe location.
Why this path and its safety boundary
Why it matters: This is a fire, gas, mechanical, or electrical safety event rather than a noise diagnosis.
Helpful context
Understand the symptom
Use the sound's stage and location as the first split
Listen from a safe position without placing hands near the drum. A click or tick at control changes may be timer or relay activity; a soft hum or rush from the rear or vent may be moving air; a thump that follows drum rotation points toward the load, drum seam, support, or drive path. A squeal that begins as the drum turns, a scrape at one cabinet corner, or a noise that appears only as the motor stops deserves a different service note than a normal operating hum.
What Speed Queen supports as an ordinary check
The Speed Queen dryer troubleshooting material lists foreign objects, level, and normal operating sounds as separate considerations. Its knowledge article also points to coins or other metal objects in the drum, belt or drum concerns, rollers, and loose leveling feet. Keep the check to the drum, clothing, exterior, floor, and accessible exhaust area; do not remove cabinet panels to inspect a belt or roller.
A noise with heat or electrical symptoms changes the decision
Noise together with smoke, a burning smell, sparks, an unusually hot cabinet, a gas odor, a repeated trip, or violent movement is a stop-use event. Turn the dryer off, keep people away, and arrange appropriate qualified help. Do not restart it to reproduce the sound or lubricate, tighten, or replace an internal part from a generic instruction.
Safety boundary
Stop conditions
- Stop use for smoke, a burning smell, sparks, gas odor, uncontrolled heat, a hot cord, an electrical trip, or severe vibration.
- Do not keep running a dryer with a new squeal, grinding sound, metal scrape, repeated thump, or noise that worsens; continued operation can cause further damage.
- Do not remove cabinet panels, lubricate internal rollers, adjust a belt, reach into the blower, or work near gas or electrical connections.
- Do not run with a blocked exhaust path, a damaged drum or sharp edge, a loose foot, a strained vent, or an unstable machine.
- Do not restart the dryer only to reproduce a hazardous sound; provide the sound stage, location, and model information to qualified service.
Only after diagnosis
Potential parts
- dryer belt
Consider this category only when qualified diagnosis confirms a worn, frayed, stretched, or damaged belt that matches the noise stage and exact model.
Confirm the exact Speed Queen model and service diagnosis; do not remove panels or order by appearance alone. - dryer drum roller or support
Consider this category only when a persistent rotation-synchronous squeal, thump, or scrape is traced to the drum support by a qualified technician.
Confirm the exact model and support arrangement; internal lubrication or replacement is service work. - dryer blower or exhaust component
Consider this category only when noise remains loudest at the rear or vent after the accessible lint and obstruction checks and qualified diagnosis identifies the blower or exhaust path.
Confirm the exact model, vent configuration, and component fit before any repair; do not dismantle the blower or gas-connected installation as a test.
When checks do not resolve it
Need a professional?
Arrange qualified Speed Queen dryer service when noise persists after accessible object, load, level, contact, and vent checks; when it is rotation-synchronous, internal, or loudest at the blower or cabinet; or when a belt, drum, roller, motor, support, or exhaust diagnosis is needed. Stop immediately and seek appropriate emergency, gas, electrical, or appliance help for smoke, burning smell, sparks, gas odor, abnormal heat, severe vibration, or an electrical trip.
Safety scope: This article covers listening, visible ordinary-access checks, and manual-approved maintenance only. Do not remove panels, reach into the blower, work on gas or electrical connections, lubricate internal rollers, or adjust a belt.
Common questions
FAQ
Which Speed Queen dryer sounds can be normal?
Speed Queen troubleshooting material lists a timer tick, heat-source cycling, and a hum of air moving through the dryer and exhaust system as normal sound categories. A new squeal, grinding sound, repeated thump, metal scrape, severe vibration, or noise with heat or odor needs a stop-use decision.
Why does my Speed Queen dryer thump when the drum turns?
First remove the load and check pockets, zippers, buckles, coins, clips, and the visible drum surface. If the thump remains with an empty drum, or follows every rotation, stop running the dryer and arrange service for drum support, belt, roller, motor, or another internal cause.
Can an unlevel Speed Queen dryer make noise?
Yes. Speed Queen identifies an unlevel dryer and loose feet as possible squeak or vibration sources. Check stability and external contact from outside the machine, but do not drag a connected dryer or disturb a gas or vent connection to adjust it.
What if the noise is loudest at the back or vent?
A soft airflow hum can be normal. Check only the user-accessible lint filter, external hood, and visible duct route for debris, kink, or a blocked flap. Persistent rear rattling, weak airflow, heat buildup, smoke, or a burning smell needs qualified dryer or vent service.
Should I remove the panel to inspect a squeaking belt?
No. Speed Queen's knowledge article notes that belt inspection involves panel removal and directs belt replacement to appliance service. Keep the dryer out of use and provide the model, sound stage, location, and visible checks to a qualified technician.
When is a dryer noise an emergency?
Stop immediately for smoke, burning smell, sparks, gas odor, uncontrolled heat, severe vibration, a hot cord, or an electrical trip. Keep people away, leave the area when needed, and seek appropriate emergency, gas, electrical, or appliance help from a safe location.
Read the exact guide
Official sources
- Manuals & DownloadsSpeed Queen · Speed Queen residential and commercial document portal; the exact manual controls model-specific sound, vent, and service instructions.
- What To Do About Your Dryer SqueakingSpeed Queen · Speed Queen manufacturer knowledge article; model-specific manuals control the exact repair procedure.
- ADE3TR BLACK and ADG3TR BLACK Dryer TroubleshootingSpeed Queen by Alliance Laundry Systems · Official Speed Queen Australia troubleshooting guide for the identified electric and gas models; use its sound categories as guidance and the assigned model manual for exact fit and operation.
Community feedback
Share a repair observation
Share a plain-text repair observation. Accepted observations are published automatically; this page may take a moment to update.