
On this page
Start here
Quick answer
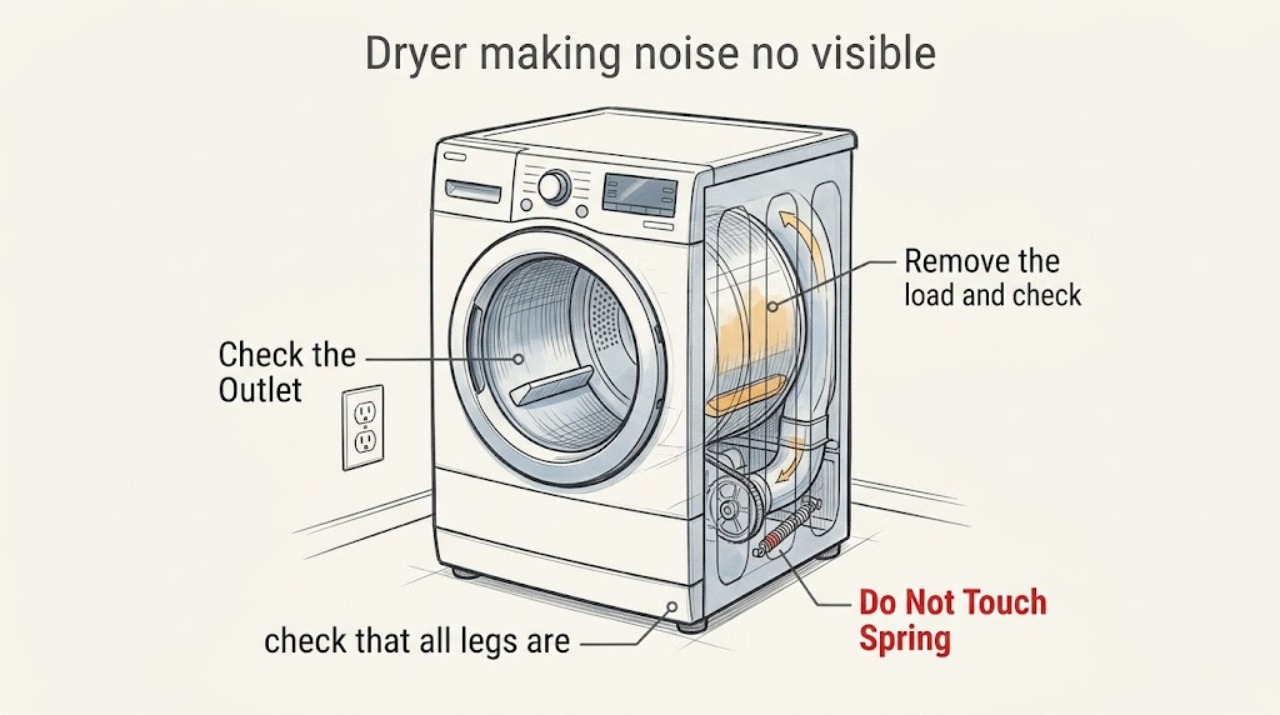
A dryer can make noise even when no damage is visible from the outside. Common explanations include a twisted load, coins or fasteners in the drum seam, a missing or unlevel leg, an exhaust tube or pedestal vibrating, rollers that temporarily flatten after storage, or internal wear in the drum rollers, glides, idler pulley, belt, motor, blower wheel, or bearings. First stop the dryer, remove the load, clear pockets, check that the appliance is stable, and listen only from a safe position during one controlled observation. A brief startup squeak or a light thump after a long period of non-use may settle, but grinding, humming, heated squealing, metal scraping, repeated chirping, loud banging, a drum that does not turn, or noise that returns after warm-up needs service even if the cabinet looks intact. Do not open the cabinet, reach through sharp drum or lint-screen openings, touch moving or electrical parts, or keep cycling the dryer to reproduce the sound. If the noise persists, changes, affects drying, or is accompanied by heat, smoke, burning smell, sparks, or a breaker event, disconnect the dryer safely and arrange qualified appliance service.
Before you begin
Safety first
- A qualified servicer should inspect the drum rollers, glides, idler, belt, motor, blower wheel, heater, thermal components, wiring, gas ignition if applicable, cabinet lint, and exhaust path. Homeowner checks should remain limited to power-safe load and pocket checks, leveling and clearance, lint-screen cleaning, visible vent observations, and documentation.
Work through in order
Diagnostic checks
Use only checks that match the exact appliance or system and its official guide.
-
Check 1
Stop the dryer and disconnect power from a dry, safe position if the sound includes smoke, sparks, burning odor, a hot plug or outlet, a repeated breaker trip, metal grinding, or a drum that binds; keep the door and area clear.
Expected result: The noise is a mild brief startup sound with no heat or damage, or it is persistent, worsening, heat-dependent, or accompanied by smoke, electrical heat, or abnormal movement.
Next step: For smoke, sparks, electrical heat, or a burning smell, leave the dryer disconnected and arrange qualified appliance or electrical service; use emergency help for active fire. Do not restart to obtain more data.
Why this matters
Why: Some short startup sounds can be normal, but persistent or heat-related noise can indicate internal wear, lint contact, heater, motor, or electrical trouble even when no damage is visible.
-
Check 2
Remove the load and check pockets, zippers, buckles, buttons, coins, and small hardware; look along the front and rear drum edges for a reachable object with power off, keeping gloves on and hands away from sharp seams.
Expected result: A foreign object is visible, the load was bunched or included shoes, the drum edge is clear, or the sound occurs with an empty drum.
Next step: Remove only a loose, reachable object and redistribute or air-dry items that are unsuitable for tumbling. If the noise remains with an empty drum or the object is trapped, stop and arrange service; do not pry the drum seam or remove panels.
Why this matters
Why: Objects and balled fabric can cause rattling, clicking, scraping, or thumping without a damaged appliance. Noise with an empty drum keeps rollers, glides, belt, blower, motor, or cabinet causes in consideration.
-
Check 3
With the dryer stopped, check that all legs are present and firmly contacting a solid, level floor; make sure nothing rests on top, the washer is not touching it, a pedestal drawer is not rattling, and the visible exhaust tube is not pushed too far into the cabinet.
Expected result: The dryer rocks, a leg is missing, an object or pedestal item vibrates, the washer contacts the cabinet, the exhaust tube is displaced, or the installation appears stable.
Next step: Remove external objects and restore safe spacing; correct only an obvious leg or leveling issue according to the owner instructions. If leveling requires moving a stacked or gas dryer, or noise persists, arrange service rather than opening the cabinet.
Why this matters
Why: An unlevel dryer, external object, shared vibration, pedestal item, or exhaust-tube position can create pounding or rattling that looks like an internal fault. A stable installation makes internal drive or blower wear more likely.
-
Check 4
Record when the sound occurs: only at startup, during drum rotation, after the dryer warms, when the blower runs, when the gas valve cycles, during cool-down, or throughout the cycle; perform no more than one observation with the area clear.
Expected result: The sound fades after a few seconds, is a normal gas-valve click, starts after heating, repeats as a short chirp, follows drum speed, or continues regardless of load and temperature.
Next step: Stop for grinding, metal scraping, a persistent heat-dependent squeak, or any worsening sound. Otherwise save the timing and a safe recording for service; do not run repeated cycles to compare temperatures.
Why this matters
Why: A brief startup squeak or gas-valve click can be normal. A squeak that starts after heating, repeated chirping, persistent thump, grind, scrape, or drum-speed-related noise keeps internal wear, belt, roller, glide, idler, motor, blower, or heater-contact causes in consideration.
-
Check 5
Inspect and clean the lint screen and look at the accessible lint-screen opening and exterior exhaust hood with power off; check whether lint accumulation, weak exhaust, long drying, or excess heat accompanies the noise, without reaching deep into the cabinet.
Expected result: Lint is heavy, the exhaust hood is blocked, drying is slow, the cabinet is unusually hot, the vent alert appears, or airflow and lint look normal.
Next step: Clean the screen and arrange professional vent cleaning for heavy buildup, weak exhaust, a concealed run, or excess heat. Stop using the dryer if the noise is joined by a burning smell; do not operate without the lint screen.
Why this matters
Why: Lint and restricted exhaust can make the blower work harder, create vibration, and increase heat, but normal airflow does not rule out a blower wheel or drum-drive fault. Sharp edges and hidden lint make deep access unsafe.
-
Check 6
With power disconnected, note whether the drum turns freely by the model-approved user check and whether the door seal, baffles, and visible drum edges show a loose object, rubbing mark, or unusual gap; do not remove the front or rear panels.
Expected result: The drum is difficult to turn, the belt appears not to drive the drum, a seal or baffle is loose, rubbing is visible, or the drum turns normally with no visible defect.
Next step: Remove only a loose, reachable object if the manual permits; do not pull on the belt or reach behind the drum. Stop for drag or rubbing and arrange qualified service for internal mechanical inspection.
Why this matters
Why: Drag, a loose baffle or seal, or an object at the drum edge can create noise. A drum that turns normally does not rule out worn rollers, glides, idler, motor, blower, or bearings hidden behind panels.
-
Check 7
Gather the dryer brand, model, fuel type, sound recording, load and cycle, timing, startup or heat relationship, leveling and vent observations, error codes, recent move or repair, and whether the sound has changed or affected drying.
Expected result: The dryer was recently moved, the noise began after a repair, it occurs only after heating, it is intermittent, or it persists with an empty drum and normal airflow.
Next step: Provide the record to a qualified appliance servicer and request inspection of the drum supports, idler, belt, blower, motor, heater, wiring, and vent path. Do not order a part based solely on a noise description.
Why this matters
Why: A move or repair keeps leveling, exhaust-tube, cabinet, fastener, and installation issues in consideration. Heat-dependent or empty-drum noise keeps internal drive, blower, heater, and motor parts in consideration. Intermittent noise requires timing documentation because the cabinet may look normal.
Use your observations
Decision map
Find the observation that best matches what you see, then follow the next safe action.
-
PATH 01Next step
What you see
A short startup squeak fades within seconds, the dryer is level, there is no heat or electrical warning, and the sound does not return during the cycle.
Do this next
Monitor the next normal load without repeated testing. Arrange service if the sound persists, returns after warm-up, becomes a grind or scrape, or the dryer develops drag or vibration.
Why this path and its safety boundary
Why it matters: A normal startup sound or temporary post-storage roller flat spot is more likely than a persistent mechanical fault.
-
PATH 02Next step
What you see
Rattling or thumping changes with the load, disappears with an empty drum, or is traced to pockets, a pedestal, washer contact, an object on top, or a pushed-in exhaust tube.
Do this next
Remove the object, untangle the load, restore clearance, or correct the safe visible installation issue. If noise remains with an empty drum, arrange service rather than assuming the cause is solved.
Why this path and its safety boundary
Why it matters: An external or load-related vibration is more likely than a damaged internal part.
-
PATH 03Next step
What you see
Noise appears after the dryer warms, repeats as a chirp, or follows drum speed despite a clear filter, stable floor, and no visible damage.
Do this next
Stop using the dryer if the sound is persistent or worsening and arrange qualified service for internal mechanical inspection. Do not lubricate or disassemble the cabinet by guesswork.
Why this path and its safety boundary
Why it matters: A hidden roller, glide, idler pulley, belt, motor, bearing, blower, or heat-related component is more likely; the absence of visible damage does not clear internal wear.
-
PATH 04Next step
What you see
Noise is grinding, scraping, banging, or accompanied by smoke, burning smell, excessive heat, sparks, a hot plug, or a breaker event.
Do this next
Disconnect the dryer from a safe position and arrange qualified appliance or electrical service; use emergency help for active fire. Do not reconnect or run an empty cycle to reproduce the sound.
Why this path and its safety boundary
Why it matters: An internal mechanical, heater, lint, motor, wiring, or electrical hazard is more likely than a harmless vibration.
-
PATH 05Next step
What you see
The dryer is quiet with an empty drum but becomes noisy with heat, a full load, or longer operation, while the cabinet and accessible vent appear normal.
Do this next
Stop repeated testing and arrange service with the exact load, cycle, and warm-up timing. Do not run smaller loads or lower heat as a workaround for an unresolved mechanical or thermal symptom.
Why this path and its safety boundary
Why it matters: A load-sensitive drum support, belt, idler, motor, blower, bearing, heater, or hidden lint issue is more likely than an external object.
Helpful context
Understand the symptom
No visible damage does not clear the internal drive
The cabinet can look normal while a drum roller, glide, idler pulley, belt, blower wheel, motor, or bearing is worn inside. A sound that begins only after the dryer heats, repeats every few seconds, or follows drum rotation is especially useful evidence. The goal is to identify timing and safe external clues, not to expose the mechanism by removing panels.
Rule out the load and the room first
Coins, zippers, buttons, and other objects can rattle or scrape. Sheets and other large items can bunch into a ball and thump, while shoes can vibrate the drum. A dryer that rocks, a pedestal drawer, an object on top, a washer touching the cabinet, or an exhaust tube pushed too far into the unit can create noise without appliance damage.
Some short sounds are normal, but patterns matter
A gas dryer may click as its valve operates, a brief startup squeak may stop after a few seconds, and a light thump after long storage may fade as support rollers recover. A thump that persists, grinding, metal scraping, humming, a heat-dependent squeak, or a frayed belt sound is not explained by a normal startup event.
Keep the repair boundary clear
With power disconnected, users can remove the load, clear pockets, clean the lint screen, inspect the drum edges for a reachable object, check level and spacing, and observe the exterior vent. Internal belt, roller, motor, blower, heater, wiring, and electrical repairs require model-specific access and should be handled by a qualified servicer.
Safety boundary
Stop conditions
- Disconnect power and arrange service for grinding, metal scraping, loud banging, smoke, burning smell, sparks, a hot or discolored plug or outlet, excessive heat, a breaker event, a drum that binds, or a dryer that stops mid-cycle.
- Do not open the cabinet, reach deep through a lint-screen or drum opening, touch the heater, motor, belt, idler, wiring, or gas components, or lubricate or adjust internal parts by guesswork.
- Do not operate without the lint screen, use a dryer with a blocked or damaged exhaust, repeatedly cycle the dryer to reproduce noise, or continue drying items contaminated with flammable chemicals or oil.
- Arrange qualified appliance or vent service when the noise persists with an empty drum and normal visible conditions, appears after warm-up, affects drying, or cannot be safely localized.
Only after diagnosis
Potential parts
- dryer drum roller or support
Consider this only when a technician confirms a worn, flat-spotted, seized, or damaged drum support; a thump can also be caused by a load, level, belt, idler, or blower.
Match the exact dryer model, roller dimensions, shaft, support arrangement, and manufacturer repair instructions. - dryer belt or idler pulley
Consider this only after inspection confirms belt wear, pulley drag, or tension failure; squeal or thump alone cannot identify which drive part is at fault.
Confirm the exact dryer model, belt routing, pulley design, drum arrangement, and approved installation procedure; cabinet access is service work. - dryer blower wheel or motor
Consider this only when professional testing confirms a loose, obstructed, unbalanced, or worn blower or motor causing rumble, humming, weak airflow, or noise.
Match the exact dryer model, blower wheel, motor, connector, rotation, airflow, and electrical requirements. - dryer heating or thermal safety component
Consider this only when a technician confirms a heater, thermostat, thermal fuse, or related component is overheating or failing; a heat-dependent squeak is not proof of a heater fault.
Match the exact electric or gas dryer model, component ratings, mounting, wiring, and safety sequence; never bypass a thermal device. - dryer exhaust duct or vent component
Consider this only when inspection confirms a crushed, punctured, blocked, or incompatible exhaust path contributing to vibration, heat, or long drying.
Match dryer fuel type, approved duct material and routing, outlet and hood arrangement, and applicable installation requirements.
When checks do not resolve it
Need a professional?
Safety scope: A qualified servicer should inspect the drum rollers, glides, idler, belt, motor, blower wheel, heater, thermal components, wiring, gas ignition if applicable, cabinet lint, and exhaust path. Homeowner checks should remain limited to power-safe load and pocket checks, leveling and clearance, lint-screen cleaning, visible vent observations, and documentation.
Common questions
FAQ
Why is my dryer making noise even though there is no visible damage?
Internal drum rollers, glides, an idler pulley, belt, motor, blower, or bearings can wear without visible cabinet damage. Loads, foreign objects, leveling, pedestal vibration, exhaust-tube position, and temporary post-storage roller flat spots can also make noise. Note timing and sound type, check only safe external clues, and arrange service for persistent noise.
Is a brief squeak when a dryer starts normal?
GE says a startup squeak that disappears after the first few seconds can be normal. A squeak that persists, repeats every few seconds, begins after the dryer heats, or is joined by grinding, scraping, vibration, or poor drying is not explained by a normal startup sound and needs service.
Why does my dryer thump after not being used for a while?
Whirlpool explains that drum support rollers can develop temporary flat spots during non-use, causing a light initial thump that may fade as they run. Persistent thumping, a thump with an empty drum, or thumping with drag, vibration, or poor drying needs qualified inspection of rollers, belt, idler, drum supports, and leveling.
Can clothes or objects cause a noisy dryer?
Yes. Bunched sheets, curtains, or bedspreads can thump, shoes can vibrate, and coins, zippers, buttons, and other small objects can rattle or scrape. Remove the load, clear pockets, inspect the reachable drum edges with power off, and arrange service if the sound remains with an empty drum or the object is trapped.
Can a clogged dryer vent make the dryer noisy?
A restricted vent can reduce airflow, lengthen drying, increase heat, and strain or disturb the blower, while lint buildup can create a fire hazard. Clean the lint screen, inspect only accessible exhaust conditions, and arrange vent service for heavy buildup, weak exhaust, excessive heat, or a burning smell. Do not operate without the lint screen.
When should I stop using a noisy dryer?
Stop for grinding, metal scraping, loud banging, smoke, burning smell, sparks, a hot or discolored plug or outlet, excessive heat, a breaker event, a binding drum, or a noise that worsens. Also stop when noise persists with an empty drum and normal external conditions; arrange qualified appliance or vent service before another heated cycle.
Read the exact guide
Official sources
- 6 Reasons a Dryer is Making Loud NoisesWhirlpool · Whirlpool maps grinding, squeaking, rumbling, rattling, and thumping to possible internal parts, load, leveling, exhaust-tube, and post-storage conditions and directs complex repairs to professionals.
- Sounds or Noises in a DryerWhirlpool Product Help · Whirlpool identifies normal gas-valve clicks and post-storage thumps, and gives checks for loads, shoes, level, drum-edge objects, cabinet vibration, and pedestal or external items.
- How to Clean a Dryer Vent from Inside & OutsideWhirlpool · Whirlpool connects slow drying, a hot dryer, and burning scent to possible vent blockage and advises cleaning the lint screen and exhaust path with power disconnected.
- Dryer - NoisesGE Appliances · GE distinguishes brief startup squeaks and gas-valve sounds from persistent heat-dependent squeaks, thumps, humming, scraping, or damaged belt sounds and advises unplugging before maintenance.
- Parts of a Dryer: A Guide to Repair or Replace Common Gas or Electric Dryer PartsMaytag · Maytag describes the locations and roles of drum rollers, slides, idler, belt, motor, blower, heater, thermal fuse, thermostat, and control parts and indicates when professional diagnosis is recommended.
- Dryer - How to Clean Exhaust / Vent DuctGE Appliances · GE says a partially clogged exhaust lengthens drying and heavy lint can create a fire hazard, and provides power-off duct and exterior-hood checks.
Community feedback
Share a repair observation
Share a plain-text repair observation. Accepted observations are published automatically; this page may take a moment to update.