
On this page
Start here
Quick answer
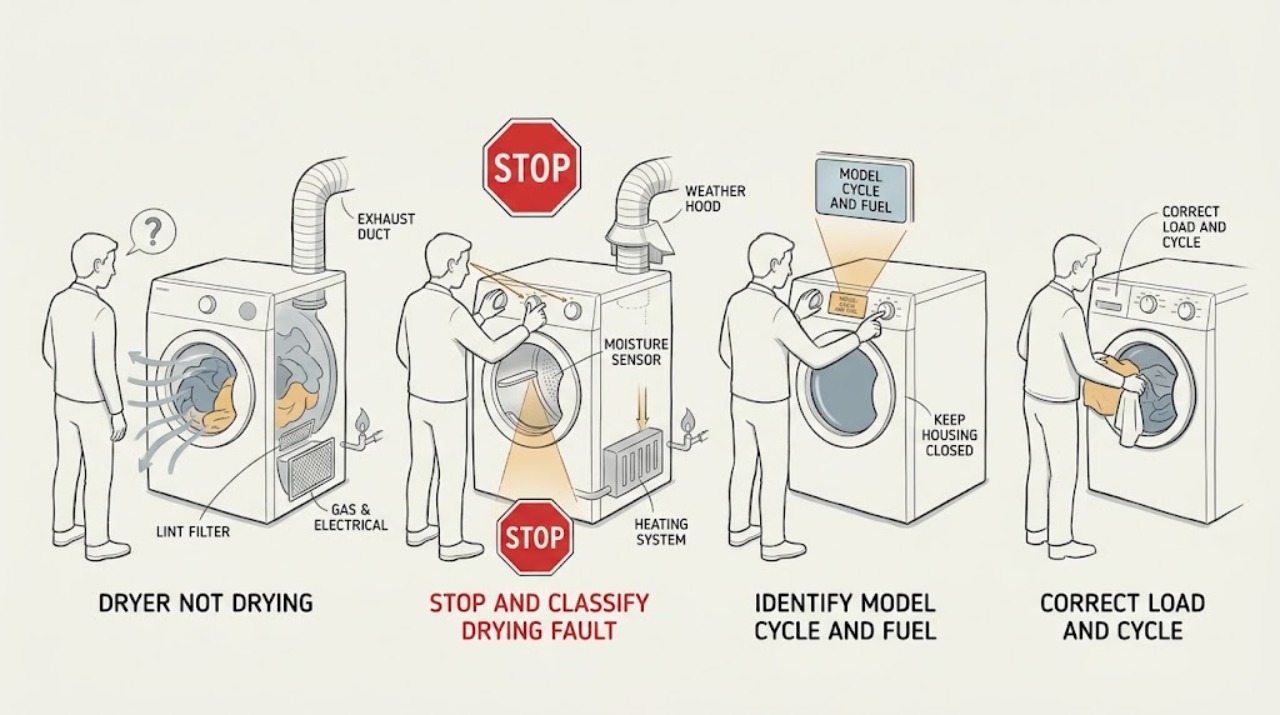
First decide whether clothes remain damp, the automatic timer advances slowly, the dryer has no heat, or the cycle ends with heat but wet items. Use the exact Speed Queen manual for the model, cycle, and fuel type. Start with a suitable load and heat setting, clean the lint filter, check the accessible exhaust path and outside hood for blockage, and use the correct automatic dryness selection or timed duration. For gas models, the equipment and main gas valve must be on; for electric models, the required supply and breakers must be stable. Stop for smoke, scorching, a burning or gas odor, unusual heat, damaged wiring, repeated breaker trips, or clothes that show heat damage. If safe checks do not restore drying, keep the dryer off and arrange qualified service.
Before you begin
Safety first
- This article supports cool external observations, load and cycle correction, lint-filter care, safe accessible airflow checks, and model-approved fuel-supply observations only. A qualified professional should handle panels, heaters, gas valves, ignitors, wiring, motors, thermal devices, sensors, and duct work requiring disassembly or tools.
Work through in order
Diagnostic checks
Use only checks that match the exact appliance or system and its official guide.
-
Check 1
Stop the dryer and let the drum and clothes cool before handling them; classify the complaint as clothes still damp, automatic timing unusually long, no heat, or heat with a damaged or scorched load.
Expected result: Record smoke, a burning or melting odor, gas odor, unusual cabinet or plug heat, abnormal flame or combustion sound, a hot or damaged cord, repeated breaker trips, drum movement, and whether the clothes or drum show heat damage.
Next step: For smoke, active fire, gas odor, or a dangerous electrical condition, stop use and leave or seek emergency help from a safe location as appropriate. Otherwise record the model and proceed with cool, external checks.
Stop if: Do not restart to reproduce smoke, gas odor, scorching, overheating, arcing, or a breaker trip.
Why this matters
Why: A safety symptom overrides drying diagnosis. Without a hazard, the symptom class determines whether to check cycle and load, airflow, fuel-specific supply, or internal service.
-
Check 2
With the dryer off, record the exact model and serial information, fuel type, cycle, fabric or temperature selection, load size, and whether the cycle is automatic, timed, cool-down, or no-heat.
Expected result: Note whether the drum tumbles, whether the timer advances slowly or normally, whether the selected cycle has a moisture sensor, and whether the complaint affects every load or only heavy, mixed, or very small loads.
Next step: Use the matching Speed Queen user guide and compare the selected cycle with the fabric care label; do not apply a mechanical-model instruction to an electronic model without confirmation.
Stop if: Do not change several settings at once, use an unsupported heat setting, or assume every Speed Queen dryer has the same sensor or fuel system.
Why this matters
Why: Speed Queen models use different controls and some offer moisture sensing. Automatic timing depends on moisture and load characteristics, while a cool-down or no-heat selection can look like failed heating.
-
Check 3
Empty pockets, separate heavy items from lightweight items, avoid an extremely small or packed load, and select the cycle and fabric heat appropriate for the garments; on an automatic model, adjust the dryness selection only one step for the next load.
Expected result: Compare dryness across the load: all items damp, only dense items damp, light items overdry, or the timer ending before the load is dry. Note whether a normal mixed load tumbles freely.
Next step: Run one correctly sorted, appropriately sized load using the matching automatic or timed setting. If a normal load remains damp or the dryer has no heat, continue to airflow and fuel-specific checks.
Stop if: Do not dry items with a prohibited heat or fabric label, foam rubber with heat, or garments that are already scorched, melted, or unusually hot.
Why this matters
Why: A small load may not tumble or dry evenly, heavy textiles need longer than light items, and automatic dryness selection changes when the cycle advances. These results do not prove a failed heater.
-
Check 4
With the dryer stopped and power disconnected as the manual directs, clean the lint filter, inspect the accessible exhaust hose for a kink, crush, disconnection, or blockage, and observe the outside weather hood only from a safe position.
Expected result: Record a loaded filter, lint below the filter, a pinched or displaced duct, a hood flap that cannot move freely, weak outside airflow, or no visible airflow restriction.
Next step: Restore the filter and duct only as the model instructions permit and run one normal load while present. If the duct needs tools, internal cleaning, roof access, or repeated blockage, arrange qualified vent service; if airflow is clear but drying remains poor, continue to service diagnosis.
Stop if: Do not operate without the lint filter, run with a disconnected or crushed duct, use sharp objects in the duct, or clean electrical areas while powered.
Why this matters
Why: Restricted exhaust airflow can lengthen drying and increase fire risk. A clean filter and clear, correctly connected duct shift concern toward load, heat supply, sensor, or internal service.
-
Check 5
If the dryer is gas, check only from a safe external position that the equipment and main gas-line valve are on; if it is electric, confirm the cord is fully seated and the required supply fuses or breakers are stable. Do not move the dryer or open a connection.
Expected result: Record gas odor or hissing, a recently moved or serviced appliance, one or more open breakers or fuses, a tripping circuit, a warm or damaged cord, and whether the drum runs with no heat.
Next step: If gas supply is uncertain, stop and use qualified gas service. If the electrical supply is unstable or damaged, keep the dryer off and use qualified electrical or appliance service. If supply is stable, continue to the model-specific heat and sensor branch.
Stop if: Do not adjust gas fittings, test leaks with flame, use an extension cord, reset a tripping breaker repeatedly, or perform live electrical testing.
Why this matters
Why: The manual separates gas and electric heat sources. An unavailable gas supply or incomplete electric supply can produce no heat, while a repeat trip or damaged connection is an electrical safety fault.
-
Check 6
For a model equipped with moisture sensing, follow the user guide for its sensor-care and dryness selection; for a timed model, compare the selected time and heat setting with the load and fabric label. Do not assume a sensor exists on every model.
Expected result: Note whether the automatic cycle ends too early with damp clothes, advances slowly with a wet load, works on timed dry but not automatic, or produces the same result in both modes.
Next step: Use one correctly sized, sorted load and the appropriate cycle for final verification. If both cycle types remain poor, or a sensor indication or error persists, keep the dryer off and arrange service.
Stop if: Do not scrape sensor surfaces, bypass a control, run an unattended test, or continue if clothing shows scorching or the cabinet becomes abnormally hot.
Why this matters
Why: A sensor-cycle result can reflect load contact, selected dryness, or moisture-sensing behavior; timed-cycle results help separate cycle logic from heat or airflow. The comparison cannot safely identify a sensor part.
-
Check 7
After the filter, duct, load, cycle, and applicable supply checks are normal and no hazard is present, make one supervised verification run with a suitable load; stop at once if heat, airflow, drum action, and clothing condition are abnormal.
Expected result: Record whether the drum tumbles, warm air reaches the load, the cycle advances appropriately, clothes dry without scorching, the outside hood moves, and any error or protective shutdown returns.
Next step: Keep the Speed Queen dryer off and arrange qualified service with the model, fuel type, cycle, load, filter and duct observations, and any error or safety event.
Stop if: Do not repeat verification runs after smoke, gas odor, scorching, overheating, arcing, a damaged cord, or a breaker trip.
Why this matters
Why: Normal tumbling, airflow, controlled heat, and a suitable drying result support a use or maintenance cause. Persistent dampness, no heat, an error, protective shutdown, or heat damage requires professional diagnosis.
Use your observations
Decision map
Find the observation that best matches what you see, then follow the next safe action.
-
PATH 01Safety boundary
What you see
Smoke, burning or gas odor, scorching, a hot or damaged cord or outlet, arcing, abnormal combustion, severe overheating, or a repeated breaker trip is present.
Do this next
Stop use. Leave for active smoke, fire, or suspected gas and contact emergency or gas professionals from a safe location; use qualified electrical or appliance service before reuse.
Why this path and its safety boundary
Why it matters: The dryer presents a fire, gas, thermal, or electrical hazard rather than an ordinary drying problem.
Safety stop: Do not restart, reset the breaker repeatedly, pull a hot plug, use a flame to test gas, or return to an unsafe area.
-
PATH 02Safety boundary
What you see
The dryer tumbles and heats normally, but only dense items, very small loads, mixed loads, or selected low-dryness cycles finish damp.
Do this next
Use the correct cycle, heat, load size, sorting, and one-step dryness adjustment from the model guide, then verify with a suitable load.
Why this path and its safety boundary
Why it matters: Load size, sorting, fabric selection, or automatic dryness settings are more likely than a failed heater.
Safety stop: Stop if clothing scorches, heat becomes uncontrolled, or the drum or cabinet is abnormally hot.
-
PATH 03Safety boundary
What you see
An automatic cycle advances slowly while the load contains substantial moisture, but the result improves with the correct load and the dryer has normal heat and airflow.
Do this next
Allow the automatic cycle to complete and use the model's dryness selection for the next comparable load; use timed dry only when appropriate for the fabric and manual.
Why this path and its safety boundary
Why it matters: Speed Queen documents slower automatic timing as dependent on load type, size, and moisture; slow timing alone is not proof of a fault.
Safety stop: Stop for no heat, poor airflow, overheating, odor, scorching, or a recurring error.
-
PATH 04Safety boundary
What you see
The lint filter is loaded, the duct is kinked or blocked, or the outside hood flap cannot move freely.
Do this next
Clean the filter and perform only safe, permitted duct care; arrange qualified vent cleaning when access or tools are needed, then verify airflow.
Why this path and its safety boundary
Why it matters: Restricted exhaust can lengthen drying and increase fire risk, even when the drum still tumbles and produces heat.
Safety stop: Do not run without the filter, operate with a disconnected or crushed duct, or use the dryer if heat damage or smoke is present.
-
PATH 05Safety boundary
What you see
The dryer tumbles but produces no heat, and the load and airflow checks are normal.
Do this next
Confirm only the accessible gas-valve or electric-supply condition described by the manual. If supply is normal, keep the dryer off and arrange service.
Why this path and its safety boundary
Why it matters: A gas supply or ignition path may be involved on gas models; a supply circuit, heating element, or control path may be involved on electric models. The fuel type and model manual control the next step.
Safety stop: Do not adjust gas parts, open panels, perform live electrical tests, bypass thermal protection, or repeatedly run a no-heat cycle.
-
PATH 06Safety boundary
What you see
A correctly loaded and sorted test load still remains damp, both suitable cycle types perform poorly, a protective shutdown or error returns, or the dryer has normal airflow but no controlled heat.
Do this next
Keep the dryer off and arrange qualified Speed Queen service with the model, fuel, cycle, load, error, and safety observations.
Why this path and its safety boundary
Why it matters: An internal heater, gas-valve or ignition component, sensor, motor, thermal device, or control fault remains possible and cannot be confirmed safely by external checks.
Safety stop: Do not open panels, bypass a thermal or door safety, or order an internal part from the symptom alone.
Helpful context
Understand the symptom
Wet clothes and a slow timer are different symptoms
An automatic cycle can advance more slowly when the load contains more moisture, and a selected dryness level may leave heavy items damp or overdry light items. A timed cycle behaves differently, while a no-heat or cool-down setting can create a no-heat complaint. Record the model, fuel type, cycle, selected temperature, load size, and whether the drum tumbles before changing anything.
Airflow is part of the heat system
A clean lint filter does not rule out a blocked, kinked, crushed, or displaced exhaust duct or an outside weather hood whose flap cannot move. Disconnect power before any exhaust cleaning, and keep combustible material away from the dryer. Duct work that needs tools or access beyond safe user maintenance should be handled by a qualified service person.
Do not diagnose internal heat parts by repeated runs
A persistent no-heat symptom can involve fuel supply, an electric heating circuit, ignition or gas-valve components, sensors, airflow protection, or controls. These possibilities differ by model and fuel type. Do not open panels, bypass thermal protection, inspect live wiring, or keep testing after an odor, smoke, overheating, scorching, or power event.
Safety boundary
Stop conditions
- Stop immediately for smoke, a burning or gas odor, scorching or melted clothing, abnormal flame or combustion, a hot or damaged cord or outlet, arcing, severe overheating, or a repeated breaker trip.
- Do not operate without the lint filter, with a crushed or disconnected exhaust path, with combustible vapors nearby, or after a protective shutdown until the cause is resolved.
- Do not open panels, perform live electrical work, adjust gas fittings, test a leak with flame, bypass thermal protection, or replace an internal part without qualified diagnosis.
- Disconnect power before exhaust cleaning as the manual directs; have duct work requiring tools, roof access, or disassembly handled by a qualified service person.
- Arrange qualified Speed Queen service when safe load, cycle, filter, airflow, and applicable fuel-supply checks do not restore controlled drying or when an error returns.
Only after diagnosis
Potential parts
- electric dryer heating element or heating circuit
Consider this category only when a qualified diagnosis confirms an electric model has a failed heating circuit after supply and airflow checks.
Confirm exact Speed Queen model, fuel type, and technician diagnosis; do not open panels or infer a heater failure from damp clothes alone. - gas dryer ignition or valve component
Consider this category only when a qualified diagnosis confirms a gas model has an ignition or valve fault after safe supply and airflow checks.
Confirm exact model and gas configuration; gas and ignition work require qualified service and must not be bypassed. - dryer moisture sensor or control component
Consider this category only when the exact model has the feature and professional testing links early termination or cycle behavior to the sensor or control.
Confirm the exact model and diagnosis; not every Speed Queen dryer uses the same moisture-sensing system.
When checks do not resolve it
Need a professional?
Arrange qualified Speed Queen service when a suitable load remains damp after the lint-filter, exhaust, cycle, and applicable supply checks; when the dryer tumbles without heat; when a protective shutdown or error returns; or when the sensor, heater, gas ignition, control, motor, or thermal system may be involved. Use qualified vent service for restricted duct work that needs tools or access. Stop and use emergency or gas professionals from a safe location for smoke, fire, gas odor, abnormal combustion, or carbon-monoxide concern, and use qualified electrical help for hot connections, arcing, or repeated breaker trips.
Safety scope: This article supports cool external observations, load and cycle correction, lint-filter care, safe accessible airflow checks, and model-approved fuel-supply observations only. A qualified professional should handle panels, heaters, gas valves, ignitors, wiring, motors, thermal devices, sensors, and duct work requiring disassembly or tools.
Common questions
FAQ
Why are my Speed Queen dryer clothes still damp?
Check load size and sorting, the automatic dryness selection or timed duration, the lint filter, and the exhaust duct and outside hood. Heavy items take longer than light items, and restricted airflow can lengthen drying. If a suitable load remains damp after these checks, arrange service.
Why does a Speed Queen automatic cycle take so long?
Speed Queen documents that automatic timing depends on load type, size, and moisture. A very wet or heavy load can advance more slowly. Confirm the correct cycle and dryness selection; persistent long timing with poor heat or airflow needs service.
What should I check if my Speed Queen dryer has no heat?
Confirm the cycle is not cool-down or no-heat, clean the lint filter, check the exhaust path, and verify the applicable gas supply or electric breakers from a safe external position. Do not open panels or adjust gas parts. Persistent no heat needs qualified service.
Does every Speed Queen dryer have a moisture sensor?
No. Speed Queen describes moisture sensing as a feature available on some models. Check the exact model guide before interpreting early stopping or automatic-cycle behavior, and do not replace a sensor based only on damp clothes.
When should I stop using a Speed Queen dryer?
Stop for smoke, a burning or gas odor, scorching or melted clothing, abnormal flame, severe heat, a hot or damaged connection, arcing, or repeated breaker trips. Leave for active smoke, fire, or suspected gas and seek emergency help from a safe location; arrange qualified service for other hazards.
Read the exact guide
Official sources
- User's GuideSpeed Queen by Alliance Laundry Systems · Official Speed Queen user guide for a documented dryer family; exact model instructions control where controls or construction differ.
- Tricks your washer or dryer might be playing on you (and how to solve them!)Speed Queen · Official Speed Queen laundry guidance for general drying symptoms; model manual controls.
- Moisture SensingSpeed Queen · Official Speed Queen product guidance; feature availability varies by dryer model and region.
Community feedback
Share a repair observation
Share a plain-text repair observation. Accepted observations are published automatically; this page may take a moment to update.