
On this page
Start here
Quick answer
If a dryer is not drying, first separate clothing that is still damp from a cycle that runs too long and from a dryer that produces no heat. Stop using it for smoke, a burning or gas smell, sparking, an unusually hot cabinet or connection, repeated breaker trips, or clothes that show scorching. With the dryer stopped and cool, record the cycle, load size, moisture result, model, and whether the appliance is vented, condenser, heat-pump, electric, or gas. Clean and replace the lint filter as the manual permits, check only the accessible exhaust outlet for airflow on a vented model, and check the water tank or drain path only on a condenser or heat-pump model. The U.S. Consumer Product Safety Commission links damp clothes or longer-than-normal drying to a possible blocked lint screen or exhaust duct, while ENERGY STAR explains that heat-pump dryers use a closed air loop and collect moisture for a tank or drain. If airflow, supply, or the applicable water path is clear but the dryer still does not dry, arrange qualified service rather than opening the cabinet or testing live heating or gas parts.
Before you begin
Safety first
- This article supports cool, stopped-machine observation and model-approved user maintenance only. Do not run a damaged or hazardous dryer, open panels, test live heating or gas parts, bypass safety devices, handle refrigerant, or use an improvised vent or power connection.
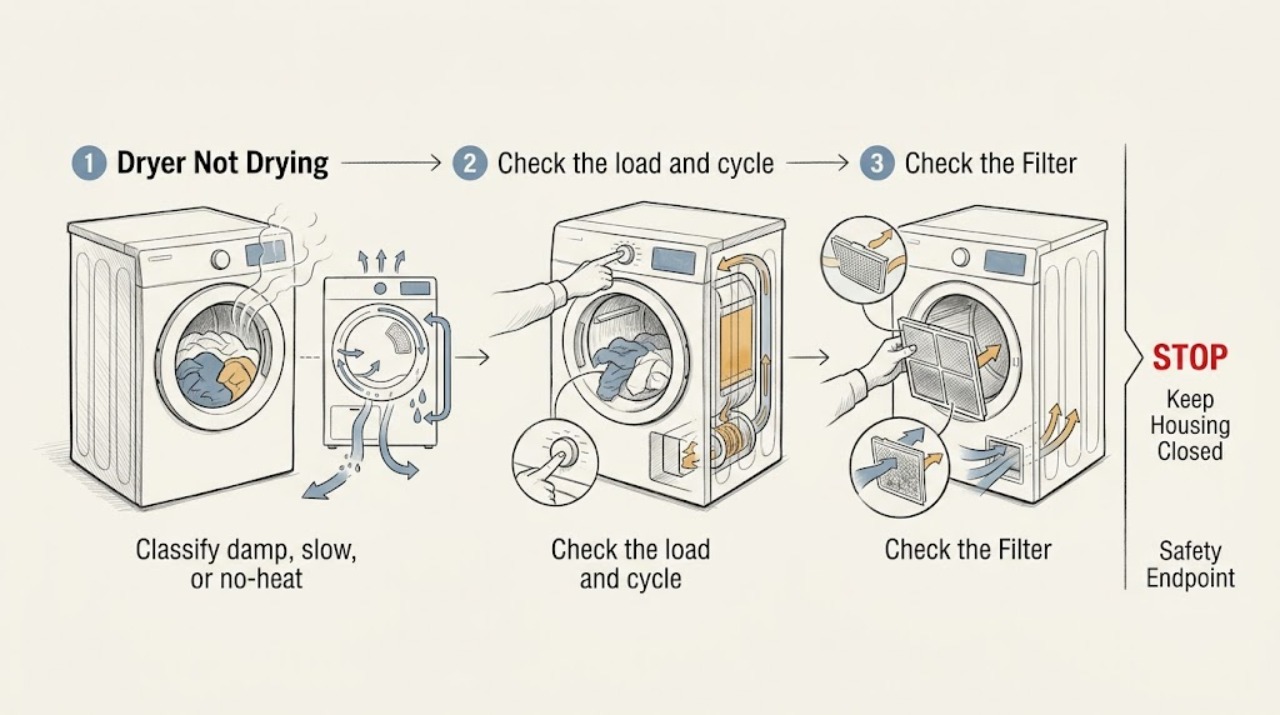
Work through in order
Diagnostic checks
Use only checks that match the exact appliance or system and its official guide.
-
Classify damp, slow, or no-heat behavior
With the dryer stopped, record whether clothes are slightly damp or soaked, whether the cycle ends normally or runs longer than expected, whether the drum tumbles, and whether the load feels warm at the end. Record the cycle selected, load size and fabric mix, and whether any code or indicator appeared.
Expected result: The load is damp after a normal cycle, the cycle is unusually long, the drum tumbles with little or no warmth, the dryer does not tumble, or the control will not start.
Next step: Write the exact model, dryer type, cycle, and symptom and follow only the applicable branch below; keep the appliance stopped if any hazard sign is present.
Stop if: Stop for smoke, burning smell, gas odor, sparking, scorching, unusual heat, a hot or damaged connection, water near electrical equipment, or a repeated breaker trip.
Why this matters
Why: Damp or slow drying prioritizes load, filter, airflow, sensing, and moisture-drain checks. Tumble-without-heat adds an applicable electrical or gas heating branch. No tumble or no start is a separate power, door, control, or motor branch and should not be diagnosed as a vent blockage alone.
-
Check the load and cycle choice
After the drum is cool and stopped, compare the load with the cycle and temperature selected in the exact owner's manual. Note whether the drum is tightly packed, nearly empty, made up of heavy absorbent items, or mixed with light fabrics; do not exceed the manual's load guidance and do not dry items contaminated with flammable substances.
Expected result: The load is overfilled, a single heavy item, too small to tumble freely, made of mixed-thickness fabrics, or appropriate for the chosen cycle; or the load is damaged or contaminated.
Next step: Use a safe load size and the model's cycle guidance for the fabric, then compare the result without changing any wiring or safety device. If drying remains poor with a suitable load, inspect the filter and applicable air or water path.
Stop if: Do not dry clothing with gasoline, oil, solvents, or other flammable contamination; do not overload, run with a damaged drum, or continue if clothes are scorching or smoking.
Why this matters
Why: ENERGY STAR says a load that is too large can take longer and that a very small load may lack tumbling benefit. Different fabrics can finish at different moisture levels, so a sensor cycle may stop or extend based on its measurement rather than a failed heater.
-
Clean the lint filter and inspect the accessible filter housing
With the dryer off and cool, remove and clean the lint screen exactly as the model manual permits. Look at the screen, frame, and immediately accessible housing for a mat of lint or a dryer-sheet film; do not operate the dryer without its required filter and do not push tools into the housing.
Expected result: The screen is blocked, coated, damaged, missing, or clean but the load still dries poorly.
Next step: Restore the filter only as directed and document its condition. If it is damaged or missing, stop use for the correct model-specific replacement; if it is clean and the symptom remains, continue with the dryer-type airflow or water-path check.
Stop if: Do not run without the lint filter, scrape deep inside, vacuum around energized parts, use a wet filter, or continue if lint is burning, the housing is scorched, or smoke is present.
Why this matters
Why: CPSC says damp clothes or longer drying can indicate a blocked lint screen or exhaust duct. ENERGY STAR also notes that residue on a filter can reduce airflow. A clean screen does not clear a blocked duct, internal lint accumulation, heater, sensor, or ventless heat-exchanger path.
-
Check the exterior airflow only on a vented dryer
If the exact model is vented to the exterior, inspect the visible duct connection and outside termination from safe access. During ordinary operation only if no hazard is present, observe whether the exterior flap opens and warm moist air exits; do not reach into the duct, disconnect it while running, or enter a crawlspace or roof area.
Expected result: Airflow is weak or absent, the flap does not open, the duct is kinked or crushed, the outlet is obstructed, or airflow appears normal.
Next step: Stop the dryer if airflow is absent or lint is accumulating and arrange qualified vent cleaning or service. Do not modify duct material or reconnect an unsafe or disconnected duct without the model and installation guidance.
Stop if: Do not disconnect or run a vented dryer with the exhaust path open, use crushed plastic or foil ducting as a repair, climb to an unsafe termination, or continue for smoke, scorching, or abnormal heat.
Why this matters
Why: CPSC and DOE guidance link restricted exhaust paths to damp clothes, longer cycles, excess heat, and fire risk. Normal outlet airflow makes a complete blockage less likely but does not rule out a partial restriction, internal lint, heating fault, sensing issue, or load problem.
-
Check the tank, drain, filter, or heat exchanger only when applicable
If the model is condenser or heat-pump/ventless, identify the water tank, drain hose, filters, and user-accessible heat-exchanger area from the exact manual. With power off and the unit cool, note whether the tank is full, the drain hose is kinked, a user-cleanable filter is blocked, or water is leaking; do not remove sealed panels or touch refrigerant or electrical parts.
Expected result: The tank is full, the drain path is blocked or leaking, a manual-approved filter is obstructed, the model has no tank because it is vented, or the applicable water and filter paths appear clear.
Next step: Empty or restore only the manual-approved tank, filter, or drain path, then document the result. If water remains, leaks, or the ventless unit still does not dry, leave it out of service for qualified diagnosis.
Stop if: Do not open sealed heat-pump or condenser panels, handle refrigerant, run with a missing filter or leaking tank, or touch water near a plug, outlet, or electrical component.
Why this matters
Why: ENERGY STAR explains that heat-pump dryers remove moisture into a holding tank or drain and that filters help maintain performance. A full tank or blocked user-accessible path can interrupt drying, while a clear path shifts attention to sensing, airflow inside the loop, heat generation, or service.
-
Check controls and supply without internal testing
Read the model and serial label and record the display, cycle, temperature setting, door or start response, and whether the appliance is electric or gas. From a dry, ordinary-access position, look for a tripped breaker, damaged cord or plug, or an obvious supply shutoff; do not remove a panel, use an extension cord, take energized electrical readings, or open a gas connection.
Expected result: The dryer has no display or tumble, a door/control lock or delay is active, a breaker has opened, a cord or connection is damaged, or the controls and supply appear normal while heat is absent.
Next step: Use only model-specific control guidance for a lock or delay. For a tripped circuit, damaged connection, no heat, or uncertain fuel path, keep the dryer isolated and arrange qualified appliance and electrical or gas service as applicable.
Stop if: Do not repeatedly reset a breaker, use an extension cord or adapter, relight a gas appliance, bypass a door or thermal switch, or continue for gas odor, smoke, sparking, burning smell, or a hot connection.
Why this matters
Why: A no-start or no-tumble symptom is not established as a drying-airflow fault. A gas or electric supply concern needs qualified assessment; normal controls with no heat adds a heating-system or sensor branch that cannot be confirmed from outside.
-
Escalate when the safe external checks do not restore drying
Prepare a service handoff with the model, dryer type, vented or ventless configuration, cycle and load, damp or slow result, filter and airflow observations, tank or drain result if applicable, display code, and any power, heat, odor, water, or noise symptom. Keep the dryer out of service until the unresolved fault is assessed.
Expected result: Drying improves after an appropriate load or user-approved filter/air/water-path correction, or the dryer remains damp, slow, cold, non-starting, or unsafe.
Next step: Arrange qualified dryer service; use an electrician for supply, breaker, cord, or receptacle concerns and qualified gas service for a gas odor or gas-line concern. Use emergency help for smoke or fire.
Stop if: Do not run repeated cycles to prove the fault, bypass a safety device, dismantle the dryer, touch live parts, or resume use after smoke, scorching, gas odor, arcing, or water near electricity.
Why this matters
Why: Improvement supports the corrected load or maintenance branch. Persistence after the applicable checks can involve a sensor, heater, thermal protection, motor, fan, control, gas system, or sealed heat-pump system and is not a reason to open the cabinet.
Use your observations
Decision map
Find the observation that best matches what you see, then follow the next safe action.
-
PATH 01Safety boundary
What you see
Clothes remain damp after a normal cycle or the cycle takes longer than it used to, but there is no smoke, odor, sparking, or abnormal heat.
Do this next
Check the load and cycle, clean the lint screen, then check the applicable vented exhaust or ventless tank/drain/filter path.
Why this path and its safety boundary
Why it matters: CPSC identifies a blocked lint screen or exhaust duct as a possible explanation, and load, cycle, sensor, and ventless water-path conditions can also matter.
Safety stop: Stop if the result is accompanied by scorching, smoke, burning smell, a hot connection, or an opened breaker.
-
PATH 02Safety boundary
What you see
The drum tumbles but clothes stay cold or no heat is felt at the end, after the load and applicable airflow or water path are checked.
Do this next
Leave the dryer out of service and arrange qualified appliance diagnosis, with electrical or gas service when the supply is implicated.
Why this path and its safety boundary
Why it matters: An electric heating circuit, gas supply or ignition system, thermal protection, sensor, control, or ventless heat-pump system may be involved; the symptom cannot identify the part.
Safety stop: Do not bypass a thermal device, open the cabinet, relight a gas appliance, or run repeated cycles to test for heat.
-
PATH 03Safety boundary
What you see
A vented dryer has weak or absent airflow at the exterior termination, a closed flap, or a visibly kinked, crushed, or obstructed duct.
Do this next
Stop using the dryer and arrange qualified vent cleaning or correction using the manufacturer's installation requirements.
Why this path and its safety boundary
Why it matters: Restricted exhaust can extend drying and allow heat and lint to accumulate, creating a fire-safety concern.
Safety stop: Do not run with the duct disconnected, reach into an inaccessible duct, or continue when lint, scorching, smoke, or abnormal heat is present.
-
PATH 04Safety boundary
What you see
A condenser or heat-pump dryer has a full tank, blocked user-accessible filter or drain, or water leakage.
Do this next
Use only the exact manual's safe tank, filter, or drain procedure. Keep the dryer isolated and request service if water remains, leaks, or the path is sealed.
Why this path and its safety boundary
Why it matters: ENERGY STAR says heat-pump dryers remove moisture into a drain or holding tank; a full or blocked path can prevent normal drying and may create a water hazard.
Safety stop: Do not open sealed panels, handle refrigerant, run with a leak or missing filter, or touch a wet electrical connection.
-
PATH 05Safety boundary
What you see
Drying improves with a suitable load, an appropriate cycle, or an exact manual-approved filter/air/water-path correction.
Do this next
Keep the model-specific maintenance routine and load guidance, and monitor only during attended, normal use.
Why this path and its safety boundary
Why it matters: The corrected operating condition likely contributed, but recurrence or any new heat, odor, water, or electrical symptom requires stopping again.
Safety stop: Do not treat a temporary improvement as clearance for a damaged cord, restricted vent, leak, scorching, smoke, gas odor, sparking, or repeated trip.
-
PATH 06Safety boundary
What you see
The dryer does not start or tumble, even though the complaint was reported as not drying.
Do this next
Record the control and supply state without internal testing and arrange qualified service when the normal model-specific control checks do not restore operation.
Why this path and its safety boundary
Why it matters: Power, door interlock, control lock or delay, motor, or another model-specific control branch must be separated from heat and airflow problems.
Safety stop: Do not repeatedly reset a breaker, use an extension cord, bypass a door or thermal switch, or open the dryer.
-
PATH 07Safety boundary
What you see
There is smoke, fire, burning or gas odor, sparking or arcing, scorching, a hot plug or outlet, repeated breaker trips, or water near electrical equipment.
Do this next
If safe, stop the dryer and isolate gas or power only from a safe location; leave the area for smoke, fire, or gas odor and contact emergency, gas, electrical, or qualified appliance help from a safe location.
Why this path and its safety boundary
Why it matters: This is a stop-use and safety response, not a drying diagnosis.
Safety stop: Do not operate switches near gas odor, touch a hot/wet/damaged connection, relight gas, or re-energize the dryer for a test.
Helpful context
Understand the symptom
Start with the symptom, not a guessed part
Damp clothes after a normal cycle, a cycle that keeps extending, and a drum that tumbles without heat are related but different observations. Load size, fabric thickness, moisture sensing, lint and airflow, supply type, and—in a condenser or heat-pump model—water collection can all change the result. Record the exact model and dryer type before interpreting a display code; a code or control behavior must be read in that model's manual.
Vented and ventless dryers need different airflow checks
A conventional vented dryer moves warm moist air through an exhaust duct. A condenser or heat-pump dryer may not use an exterior vent and instead removes water into a tank or drain. ENERGY STAR says heat-pump dryers use a closed loop and require water drainage, while CPSC and DOE guidance connect restricted lint or exhaust paths with longer drying and fire risk. Do not remove a vent from a ventless model or search for an exterior vent that the model does not have.
Heat, gas, and electrical warning signs end troubleshooting
A dryer that is merely low-temperature by design is not the same as one with a burning odor, smoke, sparking, a hot plug or receptacle, an abnormal gas smell, or a breaker that keeps opening. Stop and leave the dryer out of service for those symptoms. Do not open the cabinet, bypass a thermal device, use a meter on energized parts, relight a gas appliance, or keep running it to prove a theory.
Safety boundary
Stop conditions
- Stop immediately for smoke, fire, burning or gas odor, scorching, sparking, arcing, abnormal heat, a hot or damaged plug/outlet, or repeated breaker trips.
- Stop for water near the cord, receptacle, cabinet base, tank, or other electrical equipment; do not touch a wet connection.
- Do not operate a dryer without its required lint filter, with a vent duct disconnected, or with a damaged filter, cord, door, drum, tank, or drain path.
- Do not open the cabinet, probe live wiring, bypass a thermal or door safety, handle refrigerant, or relight or alter a gas connection.
- Do not dry items contaminated with gasoline, oils, solvents, or other flammable substances, and do not leave a dryer operating unattended.
- Do not use an extension cord, improvised adapter, crushed or unsuitable duct, or repeated test cycles to work around a no-dry symptom.
Only after diagnosis
Potential parts
- lint filter or filter frame
Consider this category only if the exact model's filter is missing, damaged, or confirmed to be restricting airflow after approved cleaning.
Confirm the exact model and filter dimensions with the manufacturer or technician; do not operate without the required filter. - exhaust duct or vent component
Consider this category only for a vented model when qualified inspection confirms a damaged, crushed, or unsuitable duct or termination.
Follow the exact installation requirements and have inaccessible or concealed duct work assessed professionally; do not choose a duct by appearance alone. - dryer heating or thermal-control assembly
Consider this category only after qualified diagnosis confirms a heating or thermal-control failure following safe load and airflow checks.
Confirm the exact model and electric or gas configuration; do not bypass thermal protection or substitute a part as a live test. - condenser or heat-pump filter and drain component
Consider this category only on a condenser or heat-pump model when the manual-approved water or filter path is damaged and qualified diagnosis supports replacement.
Confirm the exact model and sealed-system boundaries; do not open a heat-pump circuit or handle refrigerant.
When checks do not resolve it
Need a professional?
Arrange qualified dryer service when a suitable load, cycle, lint-filter check, and applicable vent or ventless water-path check do not restore drying; when the dryer tumbles without heat; when it will not start or tumble; when a code returns; or when a sealed condenser, heat-pump, sensor, motor, heater, gas, or control system may be involved. Use an electrician for supply, breaker, cord, plug, or receptacle concerns and qualified gas service for gas-line or ignition concerns. Treat smoke, fire, gas odor, burning smell, sparking, scorching, abnormal heat, repeated trips, or water near electrical equipment as an immediate stop condition.
Safety scope: This article supports cool, stopped-machine observation and model-approved user maintenance only. Do not run a damaged or hazardous dryer, open panels, test live heating or gas parts, bypass safety devices, handle refrigerant, or use an improvised vent or power connection.
Common questions
FAQ
Why is my dryer running but clothes are still damp?
Start with the load and cycle, then check the lint filter and the applicable vented exhaust or ventless tank/drain/filter path. CPSC says damp clothes or longer-than-normal drying can indicate a blocked lint screen or exhaust duct. If the path is clear and the dryer remains damp, arrange qualified service.
How can I tell whether my dryer has no heat or poor airflow?
Record whether the drum tumbles, whether the load is warm at the end, and whether a vented model's outside flap and airflow appear normal during safe attended operation. Do not touch internal parts or run a vented dryer with the duct disconnected. A tumble-without-heat symptom needs service after safe external checks.
Do condenser and heat-pump dryers need an outside vent?
Not usually in the same way as a conventional vented dryer. ENERGY STAR describes heat-pump dryers as closed-loop systems that remove moisture into a drain or holding tank. Use the exact model manual to identify its tank, drain, filters, and heat-exchanger access; do not apply vented-dryer steps to a ventless model.
Can an almost empty load take longer to dry?
Yes. ENERGY STAR notes that very small loads may not benefit from the tumbling effect, while oversized loads restrict free movement and airflow. Follow the model's load and cycle guidance, and stop for any scorching, smoke, odor, abnormal heat, or electrical symptom.
Should I keep using a dryer that smells hot or trips the breaker?
No. Stop using it for a burning or gas smell, smoke, scorching, sparking, a hot or damaged connection, repeated breaker trips, or water near electrical equipment. Do not reset repeatedly or open the cabinet; arrange qualified appliance, electrical, or gas help from a safe location.
What part should I replace when the dryer does not dry?
The symptom does not identify a part. A filter, vent, heater, thermal control, sensor, motor, fan, gas system, condenser, heat-pump, or drain may be involved depending on the model and observations. A qualified technician should confirm the fault and model compatibility before any replacement.
Read the exact guide
Official sources
- Overheated Clothes Dryers Can Cause FiresU.S. Consumer Product Safety Commission · General clothes-dryer safety alert; exact product instructions control the model-specific maintenance procedure.
- Clothes DryersENERGY STAR · General clothes-dryer technology and efficiency guidance; exact model features and operating instructions vary.
- Clothes Dryer & Washing Machine SafetyU.S. Department of Energy / NFPA Public Education Division · General dryer safety guidance for electric and gas installations; manufacturer instructions control model details.
- Heat Pump DryerENERGY STAR · Heat-pump dryer technology only; do not apply its tank, drain, or no-exterior-vent behavior to a conventional vented dryer.
Community feedback
Share a repair observation
Share a plain-text repair observation. Accepted observations are published automatically; this page may take a moment to update.