
On this page
Start here
Quick answer
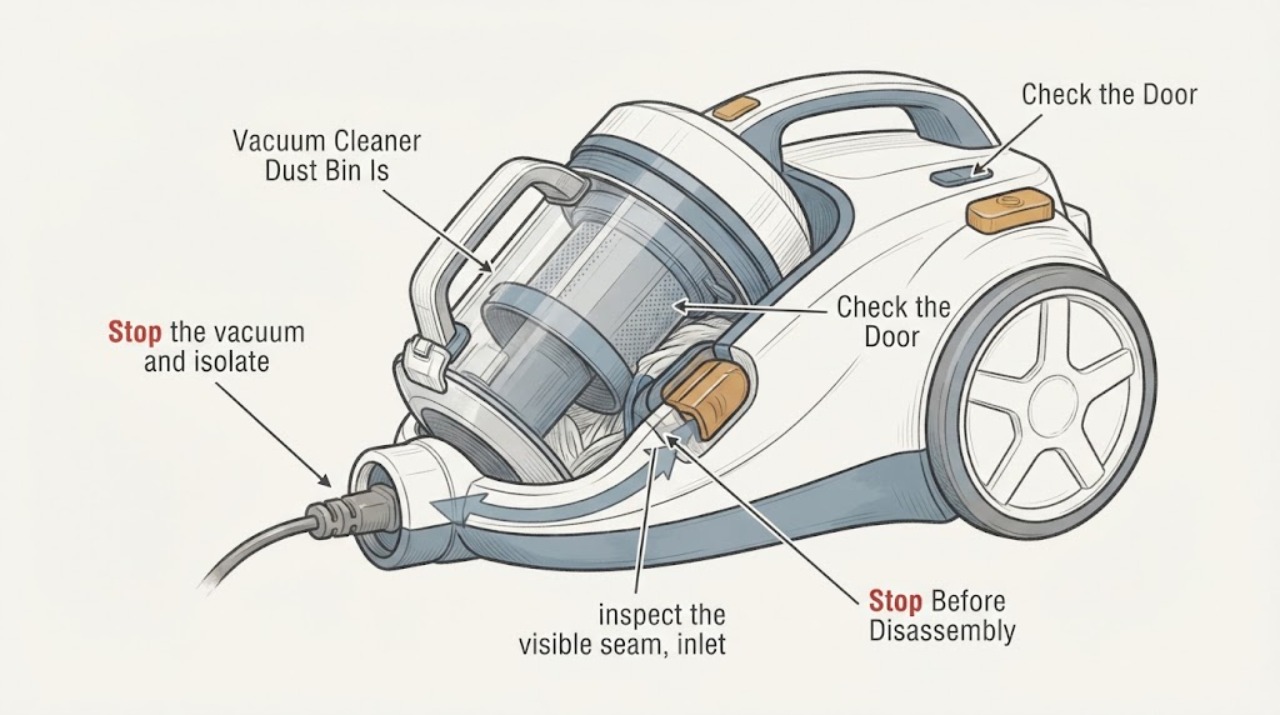
Do not force a vacuum cleaner dust bin, pry its latch, insert a tool into the cyclone or turn the machine on while it is jammed. Switch the vacuum off, unplug a corded unit or remove the battery/charger connection from a cordless unit, and let it cool if it stopped hot. Because no brand or model is supplied, first find the rating label and the matching manual: dust-bin releases differ between designs. Then inspect only the visible bin opening and nearby airflow path for loose, reachable hair or debris, wearing protection around sharp material. If the latch or bin remains stuck, the bin is cracked, the obstruction is deep, the unit smells burnt, or the vacuum was wet, stop and arrange model-specific service rather than forcing the mechanism.
Work through in order
Diagnostic checks
Use only checks that match the exact appliance or system and its official guide.
-
Check 1
Stop the vacuum and isolate its power before touching the bin: unplug a corded unit, remove the battery where the design permits, and disconnect it from a charger. If it stopped hot or has a burning smell, leave it off and let it cool without trying to reproduce the fault.
Expected result: The vacuum is cool and odor-free, or there is heat, smoke, a burning smell, water exposure or electrical damage.
Next step: For any hazard, keep the vacuum isolated and arrange qualified service. If there is no hazard, continue with identification and a visual check only; do not power the vacuum to release the bin.
Why this matters
Why: Heat, burning, smoke, water or electrical damage is a safety stop condition; a cool, dry unit still needs its model-specific release procedure.
-
Check 2
Find the rating label and exact model manual before operating the bin release. Compare the manual's illustrations with the actual dust-bin door, catch, release button or slider; do not assume that a lever, direction or release location from another vacuum applies.
Expected result: The exact manual shows a normal release path, the model cannot be identified, or the manual's release does not match the physical bin.
Next step: Follow only the matching manual's normal release path without extra force. If the model cannot be confirmed or the release does not move normally, stop and use manufacturer or qualified service support.
Why this matters
Why: A matching manual can establish the intended user release and which parts are removable. An unknown or mismatched design means the jam cannot be safely narrowed to a latch, overfill or obstruction.
-
Check 3
With power isolated and the bin still closed, inspect the visible seam, inlet and any user-accessible opening for loose hair, lint, paper or a sharp object. Remove only material that is plainly loose and reachable without prying, twisting the bin, opening the cyclone or inserting a tool.
Expected result: Loose debris is visible at the opening, a sharp object or compacted plug is present, or no obstruction is visible.
Next step: Remove only the loose material and retry the exact manual release gently. If the obstruction is sharp, compacted, deep or not removable without force, close the area as safely as possible and arrange model-specific service.
Why this matters
Why: A visible loose obstruction may explain why a door or flap cannot move, but a compacted or deep obstruction can damage the bin or release mechanism if forced. No visible obstruction leaves the cause unresolved.
-
Check 4
Inspect the outside of the bin, release area and surrounding hose or inlet for a crack, broken hinge, bent catch, unusual gap or blockage that can be seen without disassembly. Do not wash the bin, filter or cyclone unless the exact manual permits it, and do not reinstall damp parts.
Expected result: The bin or latch is cracked/damaged, a surrounding path is visibly blocked, or the visible assembly is intact but the bin remains jammed.
Next step: Do not operate or force the bin. Photograph the condition, keep the vacuum isolated, and contact the manufacturer or a qualified repairer with the exact model and the observations.
Why this matters
Why: Physical damage or a persistent jam may involve the release mechanism or an internal obstruction, neither of which can be safely diagnosed from an unidentified design.
Use your observations
Decision map
Find the observation that best matches what you see, then follow the next safe action.
-
PATH 01Next step
What you see
The vacuum is hot, smells burnt, shows smoke or electrical damage, has been exposed to liquid, or the bin is cracked or sharp.
Do this next
Keep it unplugged or battery-isolated, move it away from combustible material when safe, and arrange qualified service. Use emergency help for smoke or fire.
Why this path and its safety boundary
Why it matters: The equipment has crossed the ordinary emptying and blockage-check boundary; continued operation or force could increase injury or electrical risk.
-
PATH 02Next step
What you see
The exact manual identifies a normal release and the bin opens with that release after loose visible debris is removed.
Do this next
Empty and reassemble only the components the matching manual identifies, ensuring all parts are dry and securely seated before any use. Stop if the door will not close normally.
Why this path and its safety boundary
Why it matters: The obstruction or overfill may have prevented normal release, but this does not prove that the filter, cyclone or motor is undamaged.
-
PATH 03Next step
What you see
The bin remains stuck, the release does not match the manual, or only a compacted/deep obstruction is visible.
Do this next
Do not pry, drill, cut, force or insert tools. Keep the vacuum isolated and contact the manufacturer or qualified vacuum service with the model and photos.
Why this path and its safety boundary
Why it matters: The cause cannot be safely separated into overfill, latch damage or an internal clog without model-specific access and service information.
-
PATH 04Next step
What you see
The bin opens, but the vacuum has a clogged inlet/filter, damp component or abnormal heat after reassembly.
Do this next
Follow only the exact manual for cleaning and drying that model, reinstall every part securely, and arrange service if heat, odor, weak airflow or repeated blockage remains.
Why this path and its safety boundary
Why it matters: The bin release issue may be resolved while an airflow or moisture problem remains; the opened sources do not support running with a wet or incorrectly reassembled part.
Helpful context
Understand the symptom
A jammed bin is an identity problem before it is a release problem
The task does not identify a brand, model, battery system or bin design. Official Dyson material uses a particular release catch and lever, while Hoover's general FAQ describes a different dirt-cup and clog-check sequence. Those pages are useful safety evidence, but their buttons, directions and removable parts cannot be transferred to an unknown vacuum. Find the rating label and exact manual before trying to release the bin.
Only remove what is visibly loose and safely reachable
The opened manufacturer guidance consistently places power isolation before emptying or blockage checks and warns about sharp objects and overheating. With the machine isolated, look at the bin opening, door seam and any user-accessible inlet for loose material; do not pry the door, twist a release beyond its normal travel, or push a screwdriver or other object into the cyclone. A deep or compacted obstruction needs the exact manual or service route.
Keep wet or damaged equipment out of service
A bin that will not open may be a simple overfill or visible clog, but the symptom does not establish that the latch, cyclone, filter or motor is defective. Do not wash an unidentified bin or filter until the exact manual says that component is washable, and do not reinstall any damp filter or part. Burning odor, heat, a cracked bin, water exposure or a jam that remains after safe visible checks is a service boundary.
Common questions
FAQ
Can I pry a severely jammed vacuum bin open with a screwdriver?
No. Isolate power first and use only the exact model manual's normal release. A screwdriver or force can break the bin, latch, filter housing or cyclone and may expose sharp debris; use qualified service for a persistent jam.
Should I turn the vacuum on to help release the bin?
No. Manufacturer guidance places power isolation before emptying or blockage checks. Keep a jammed unit unplugged or battery-isolated and do not use motor operation to clear a bin obstruction.
What can I safely remove from a stuck dust bin?
Only loose material plainly visible and reachable without prying, twisting the release beyond normal travel or inserting a tool. Sharp, compacted, deep or wet obstructions require the exact manual or service; do not guess which parts can be washed.
Why is the exact vacuum model important?
Bin catches, release levers, filters and removable paths vary by model. The opened Dyson and Hoover instructions use different designs, so an unidentified vacuum cannot safely inherit either brand's release sequence.
Read the exact guide
Official sources
- 6 Emptying the clear bin™Dyson · Opened the official Dyson DC15 manual PDF. It warns to turn power off and unplug before emptying or checking blockages, warns about sharp objects, requires parts to be refitted securely and describes a DC15-specific catch/bin design. The model-specific release steps are deliberately not transferred to the unidentified task.
- Frequently Asked QuestionsHoover · Opened Hoover's official FAQ. Its bagless-upright clog guidance says to unplug first, inspect the dirt cup, elbow pipe, filter, hose and wand, and contact support when needed. The page describes a Hoover family design and is used only to show the kind of accessible check that must be confirmed against the unidentified vacuum's own manual.
- How to clean your Dyson vacuum cleanerDyson · Opened Dyson's official cleaning guidance. It supports unplugging or switching off before cleaning, uses a specific bin-release example, requires components to be dry before reassembly and says model manuals vary. It is used as manufacturer-safety evidence, not as a release sequence for the unidentified vacuum in this task.
Community feedback
Share a repair observation
Share a plain-text repair observation. Accepted observations are published automatically; this page may take a moment to update.