
On this page
Start here
Quick answer
A Viking oven that is not cleaning may be a manual-clean model, a self-clean model whose controls or door latch were not accepted, a cycle that was interrupted before cooling finished, or an oven with soil that needs hand cleaning before or after the cycle. First identify the exact model and whether its manual describes manual, self-clean, or another cleaning program; Viking says cleaning instructions depend on the oven type and model. For a self-clean model, remove racks and other items, wipe away large spills, avoid foil or liners and commercial oven cleaner inside the cavity, and follow the model manual for starting or cancelling the cycle. Do not force a locked door or keep testing an oven with smoke, fire, a gas odor, electrical arcing, abnormal heat, or a breaker that trips. After a cycle, ash or residue may still require a cool, approved wipe-down; persistent failure, a latch that will not release after the documented cool-down, or any hazard needs qualified Viking appliance service.
Before you begin
Safety first
- The servicer determines whether the issue is a model-specific control, door-latch, heating, cavity, or installation fault and selects safe testing. The homeowner should not force the latch, open panels, test live wiring, work on gas components, or repeat a hazardous cycle.
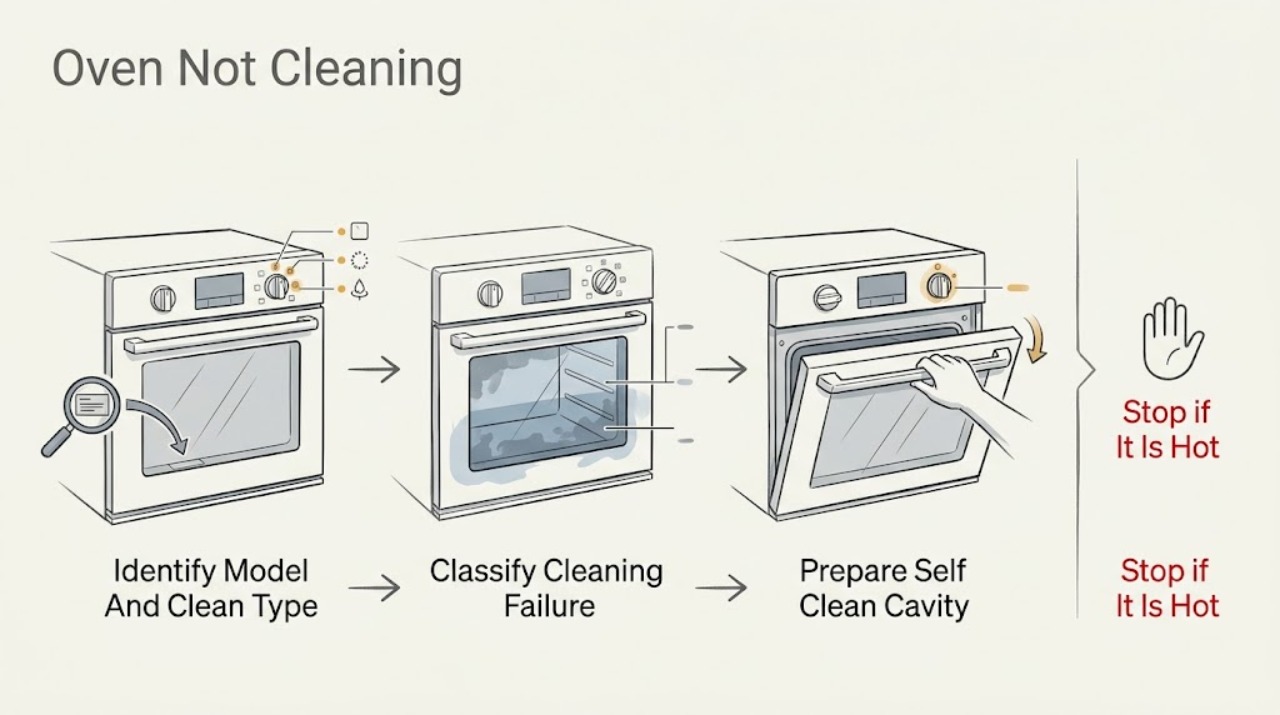
Work through in order
Diagnostic checks
Use only checks that match the exact appliance or system and its official guide.
-
Check 1
With the oven controls off and the oven cool, record the Viking model and note whether the control panel or manual identifies manual clean, self-clean, or another model-specific cleaning program.
Expected result: The model clearly has manual cleaning; a self-clean control is present; a cleaning option is absent; or the model and program type cannot be confirmed.
Next step: Open the matching Viking use and care manual or product documentation and use its cleaning section; arrange service if the model identity or control behavior remains unclear.
Stop if: Stop if the oven is hot, the display is abnormal, wiring is exposed, the door or glass is damaged, or the model cannot be safely identified without removing panels.
Why this matters
Why: A missing self-clean option is not evidence of a failed cleaner. The model determines which surfaces, products, rack steps, latch behavior, and controls apply, so a generic sequence can damage the oven or leave soil behind.
-
Check 2
From the normal control panel, record what failed: the cleaning option is not listed, the control will not accept the selection, the cycle never starts, the cycle stops early, the door remains locked, or the cycle completes but soil remains.
Expected result: The problem is a missing option, rejected control entry, no start, early stop, locked door, or incomplete soil removal.
Next step: Photograph any display message, record the selected program and when it stopped, then follow only the matching model manual section.
Stop if: Stop for smoke, flames, gas odor, electrical arcing, uncontrolled heat, a damaged door, or repeated breaker trips; do not restart the cycle to reproduce a hazard.
Why this matters
Why: Each symptom points to a different check: model or control mode, door closure and control entry, power or control diagnosis, interruption or fault, latch cool-down, or cleaning preparation and residue. Do not choose a part from the broad phrase not cleaning.
-
Check 3
Only for a confirmed self-clean model and only when the oven is cool, remove racks, rack supports or other loose items only where the model guide requires it, and visually check for large spills, foil, liners, or utensils without scraping the cavity.
Expected result: Large food deposits, foil or a liner, racks left inside, or another item is present; the cavity is prepared; or a part cannot be removed without force.
Next step: Follow the exact manual for the applicable rack and spill preparation, or stop and ask qualified service when an item is stuck, the cavity is damaged, or the model instruction is unavailable.
Stop if: Do not use foil, liners, commercial oven cleaner, abrasive tools, or force to remove a rack, support, door part, or cavity component.
Why this matters
Why: Preparation affects what the cycle can safely clean and what residue remains. Viking warns that racks and items can be damaged by self-clean heat and that foil or liners can damage the oven; a part that will not come out normally is a service boundary.
-
Check 4
With the cavity prepared and the oven cool, check from ordinary access that the door closes fully, no item or soil blocks the frame, the control panel responds, and the selected self-clean or manual-clean instruction is the one listed for the exact model.
Expected result: The door closes and the control accepts the documented selection; the door will not close; the control rejects the selection; a lock indicator remains; or an error or blank display appears.
Next step: Use the model manual's single documented start, cancel, or reset sequence when applicable; if the same symptom returns, preserve the display information and arrange Viking-qualified service.
Stop if: Do not force the door, defeat or bypass a latch, insert tools into the lock, remove panels, or repeat a start attempt after smoke, fire, abnormal heat, or arcing.
Why this matters
Why: A closed-door or documented control condition can prevent a cycle from starting, while a persistent lock, error, or unresponsive display needs service diagnosis. The latch must not be treated as a lever or overridden.
-
Check 5
After the documented cycle and cool-down are complete, inspect the cool cavity and record whether there is loose ash, baked-on residue, an unchanged large spill, a new damaged surface, or no visible cleaning effect; do not touch hot surfaces.
Expected result: Fine ash is present; only a localized spill remains; heavy soil remains throughout; the surface or gasket is damaged; or the cavity is clean but the display or latch is abnormal.
Next step: When the manual permits it, wipe ash with the specified cool, damp method; otherwise document the residue and arrange service for persistent soil, damage, or abnormal controls.
Stop if: Do not run another high-heat cycle to chase residue, use an unapproved chemical, scrape the liner or gasket, or handle the cavity before it is fully cool.
Why this matters
Why: Ash can be a normal result of self-clean. Localized or heavy remaining soil may reflect preparation, model-specific hand-clean areas, or a cycle problem; damage or abnormal latch behavior is not a cleaning result to correct with more heat.
-
Check 6
For a confirmed manual-clean model, compare the exact Viking cleaning tips with the soil location and identify whether the product, surface, and removable item are specifically covered; keep controls off and surfaces cool while observing.
Expected result: The soil is on an approved hand-clean surface; the product or surface is not covered; residue is near a special broiler or gasket; or the soil will not release without force.
Next step: Use only the exact manual's permitted method, rinse or wipe as instructed, and arrange qualified service when the manual excludes the surface or the residue remains.
Stop if: Do not use commercial cleaner in a self-clean cavity, apply cleaner to a special broiler screen or gasket unless the manual explicitly allows it, mix products, or scrape the interior.
Why this matters
Why: Manual-clean instructions are not interchangeable with self-clean instructions. An uncovered surface, special broiler area, gasket, or stubborn residue needs manufacturer or professional direction rather than a stronger chemical or abrasive.
-
Check 7
Prepare the service handoff with model and serial information, cleaning type, selected controls, display message, start and stop behavior, door-latch state, rack and spill preparation, residue photos, and any smoke, odor, heat, or breaker history.
Expected result: The record shows whether the failure is model selection, control entry, door/latch, interrupted cycle, residue, or a safety symptom.
Next step: Keep the oven out of service when a hazard, persistent latch fault, repeated cycle failure, or abnormal heat is present, and request authorized or qualified appliance service.
Stop if: Do not open the control area, test live wiring, bypass a safety device, force the latch, or continue operating after smoke, fire, gas odor, arcing, or repeated trips.
Why this matters
Why: This information lets a qualified Viking servicer choose a model-specific control, latch, heating, or cavity diagnosis without guessing from the words not cleaning. A service decision is safer than repeated high-heat tests.
Use your observations
Decision map
Find the observation that best matches what you see, then follow the next safe action.
-
PATH 01Safety boundary
What you see
The model has no self-clean cycle or the manual specifies hand cleaning.
Do this next
Follow only the Viking manual and cleaning tips for the applicable interior surfaces, products, racks, and special areas; arrange service for residue that remains or a damaged surface.
Why this path and its safety boundary
Safety stop: Do not start a self-clean sequence that the model does not document or use a product on an excluded surface.
-
PATH 02Safety boundary
What you see
The model supports self-clean, but the selection is rejected or the cycle does not begin.
Do this next
Confirm cool cavity preparation, rack and item requirements, full door closure, control mode, and the exact model start sequence once; arrange service if the control, display, door, or latch remains abnormal.
Why this path and its safety boundary
Safety stop: Do not force the door, bypass the latch, remove panels, or keep retrying after an error or hazard.
-
PATH 03Safety boundary
What you see
The cycle was interrupted, power was lost, or the lock indicator remains after a recent cycle.
Do this next
Leave controls off and allow the model-documented cool-down and latch-release process to finish; if the latch does not release afterward, arrange qualified service rather than forcing it.
Why this path and its safety boundary
Safety stop: Do not pry the door, insert tools into the latch, or restart a hot or interrupted cycle.
-
PATH 04Safety boundary
What you see
The door releases normally and the cavity is cool, but residue is visible.
Do this next
Treat loose ash as a possible normal result and follow the model manual's cool wipe-down and approved hand-clean steps; request service for heavy unchanged soil, damage, or repeated ineffective cycles.
Why this path and its safety boundary
Safety stop: Do not use another high-heat cycle, foil, liner, unapproved chemical, or abrasive tool to force a result.
-
PATH 05Safety boundary
What you see
A fire, gas, electrical, or severe heat symptom is present.
Do this next
Stop using the oven, keep the door closed for an oven fire when safe, leave the area for a fire or gas concern, and obtain emergency or qualified service help from a safe location.
Why this path and its safety boundary
Safety stop: Do not open the door into flames, relight or test a gas oven, reset a tripping breaker repeatedly, or touch damaged or energized parts.
-
PATH 06Safety boundary
What you see
The documentation or symptom identity is uncertain, or a check would require disassembly or force.
Do this next
Stop the cleaning attempt, preserve photos and model information, and request Viking-qualified service or model-specific support.
Why this path and its safety boundary
Safety stop: Do not guess across Viking series, use another model's sequence, or open panels to obtain missing evidence.
Helpful context
Understand the symptom
Start with the cleaning type, not a replacement part
Viking makes manual-clean and self-clean ovens, and the owner FAQ says the correct method depends on the exact model. A manual-clean oven will not respond to a self-clean sequence, while a self-clean model can appear stuck when the control entry, door position, lock, or cooling phase is not complete. Record the model from the rating information and use the matching Viking manual before selecting a control, latch, gasket, or heating component.
What a normal self-clean cycle leaves behind
Viking describes self-clean as a high-temperature cycle that burns soil and deposits to ash. Racks and other loose items must be removed first, large spills should be wiped away, and foil or liners and commercial oven cleaner do not belong in the cavity during self-clean. The door latch remains engaged until the cycle and safe cool-down are complete. Ash or a small amount of residue after the oven is fully cool is not by itself evidence that the cycle failed.
Manual cleaning is model-specific too
If the Viking model is manual-clean, use only the products and surfaces listed in its cleaning guidance. Viking's cleaning tips distinguish manual-clean interiors from self-clean interiors and warn that some areas, such as a special broiler screen on applicable models, must not be cleaned with a general oven product. Never assume that a product safe for one Viking series is safe for another.
Heat, gas, and electrical symptoms change the job
Cleaning is not a reason to keep operating an oven that produces smoke, flames, a persistent burning or gas odor, electrical arcing, uncontrolled heat, or repeated breaker trips. Keep the door closed for an oven fire if it is safe to do so, leave the area when there is a fire or gas concern, and obtain emergency or qualified service help from a safe location. A door that stays locked after the exact documented cool-down, or a cycle that starts and stops abnormally, should be diagnosed by an authorized professional rather than forced.
Safety boundary
Stop conditions
- Stop immediately for smoke, fire, persistent gas odor, electrical arcing, uncontrolled heat, damaged glass, or a breaker that trips again.
- Stop and allow the documented cool-down for a recently completed or interrupted self-clean cycle; never force a locked door or defeat its latch.
- Stop for a cleaning product, foil, liner, rack, or other item that is not approved for the exact model or will not come out without force.
- Stop before using a chemical or abrasive on a gasket, special broiler area, self-clean cavity, or any surface not covered by the exact Viking manual.
- Stop when diagnosis would require panel removal, live electrical testing, gas-path work, or another professional procedure.
Only after diagnosis
Potential parts
- door latch or latch actuator
Consider this only if a qualified diagnosis confirms a latch or actuator fault after the documented cool-down and model-specific control checks.
Confirm the exact Viking model, revision, and service documentation before ordering; a locked door is not proof that this part is defective. - oven control or selector component
Consider this only if the exact model's control does not accept a documented cleaning selection and qualified testing identifies the control as the cause.
Verify model-specific fit and configuration with Viking documentation or qualified service; do not replace a control from a display symptom alone. - oven temperature-sensing or heating component
Consider this only when a qualified servicer confirms that the cycle's heating or temperature feedback is abnormal rather than a preparation or control issue.
Confirm the model, fuel type, electrical configuration, and approved repair procedure before any part decision.
When checks do not resolve it
Need a professional?
Use Viking's model-specific support or an authorized qualified appliance servicer for a persistent cleaning failure, latch or control fault, repeated ineffective cycle, damaged cavity, or any safety symptom. Report fire, gas, electrical, smoke, or severe heat conditions before discussing routine cleaning.
Safety scope: The servicer determines whether the issue is a model-specific control, door-latch, heating, cavity, or installation fault and selects safe testing. The homeowner should not force the latch, open panels, test live wiring, work on gas components, or repeat a hazardous cycle.
Have this ready
- Viking model and serial information and whether the oven is manual-clean or self-clean
- Selected cleaning function, display message, start or stop behavior, and time in the cycle
- Door and latch state after the cycle and whether the documented cool-down completed
- Photos of racks, large spills, foil or liners before cleaning and residue after the oven cooled
- Any product used, including its label, and the exact surface where it was applied
- Smoke, gas odor, burning odor, arcing, abnormal heat, power interruption, or breaker history
Common questions
FAQ
Why will my Viking oven not clean itself?
First confirm the exact model and whether it has a documented self-clean cycle. A rejected control entry, door that is not fully closed, an interrupted cycle, a latch still in its cool-down period, or a manual-clean model can all look like a cleaning failure. Use the model's Viking manual before choosing a part or repeating a cycle.
Can I leave the racks in during a Viking self-clean cycle?
Do not assume so. Viking cleaning guidance says to remove racks and other items for applicable self-clean models because high heat can damage them. Follow the exact model manual for rack supports and any exception.
Can I use oven cleaner in a Viking self-cleaning oven?
Viking's cleaning guidance says not to use oven cleaner inside a self-cleaning oven or on specified raised door areas. If a product was already used, do not add another product or start a high-heat cycle; keep the label information and ask qualified service for the model-specific next step.
Why is the Viking oven door still locked after cleaning?
The self-clean latch is designed to remain engaged while the cavity is hot and during the documented cool-down. Leave the controls off and wait for the model's release conditions. If the door remains locked afterward, do not force it or insert a tool; arrange qualified service.
What should I do if my Viking oven smokes during self-clean?
Stop treating it as a routine cleaning issue. For an oven fire, keep the door closed when safe and leave the area if the hazard is not controlled; for gas odor, arcing, uncontrolled heat, or repeated breaker trips, stop use and obtain appropriate emergency or qualified help from a safe location.
Read the exact guide
Official sources
- Viking Range, LLC | Support and Docs | DocumentationViking Range, LLC · Supports locating the exact Viking manual and documentation for the oven model before selecting a cleaning sequence or part.
- Viking Oven Use and Care ManualViking Range, LLC · Supports the documented self-clean sequence, automatic door latch, cool-down before release, ash residue, and safe preparation boundaries for applicable Viking models.
- Educational Messages Desk ReferenceNational Fire Protection Association · Supports keeping ovens and combustibles managed safely, following manufacturer cleaning instructions, and seeking professional service after an oven fire.
- Cleaning TipsViking Range, LLC · Supports manual-clean versus self-clean preparation, removing racks and supports, wiping large spills, avoiding foil or liners and oven cleaner in self-clean cavities, and protecting special surfaces.
- Viking Range, LLC | Owners | Support FAQs for OwnersViking Range, LLC · Supports the distinction between manual-clean and self-clean Viking ovens and the need to follow the model's use and care instructions.
Community feedback
Share a repair observation
Share a plain-text repair observation. Accepted observations are published automatically; this page may take a moment to update.