
On this page
Start here
Quick answer
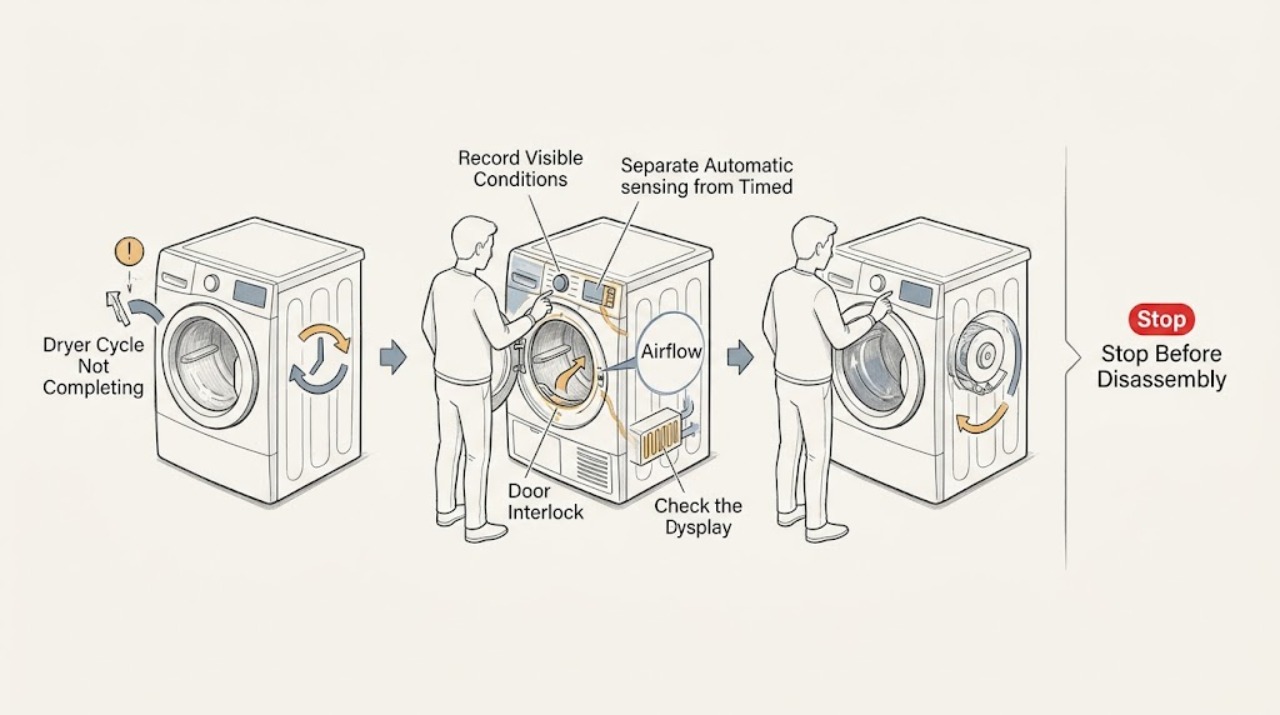
When a Whirlpool dryer cycle does not complete, first record the cycle type, where it appears to stop or extend, what the display shows, and whether the load or cabinet is still hot. Automatic cycles adjust their estimate from load moisture and dryness, while Timed Dry follows a selected time. Wrinkle Prevent can periodically tumble after End, and Cool Down tumbles without heat. Check the lint screen, visible vent path, door latch, load, and applicable status or error code without opening the cabinet. If heat continues after the expected end, the drum ignores the door or stop control, or there is overheating, scorched clothing, smoke, a burning odor, gas odor, sparking, or a breaker trip, stop using the dryer and arrange qualified service. Use any reset only once and only when the exact model instructions permit it; do not retest a hazardous symptom.
Work through in order
Diagnostic checks
Use only checks that match the exact appliance or system and its official guide.
-
Record the cycle stage and what remains active
Without starting another load, write down whether the dryer stopped during Sensing, Wet, Damp, Dry, Cool Down, or after End. Record the selected cycle, displayed remaining time, whether the drum is still tumbling, and whether heat is still present. Note whether the issue is a cycle that stops early, a time estimate that rises, or a dryer that never stops.
Expected result: The drum tumbles without heat in Cool Down or Wrinkle Prevent, the estimate changes during an Automatic cycle, or the drum or heat continues beyond the expected end.
Next step: Follow the matching branch below. If the dryer is hot beyond normal cooling, the heater stays on, or any smoke, burning odor, gas odor, spark, or breaker trip occurred, stop immediately and skip further powered checks.
Why this matters
Why: Whirlpool describes no-heat Cool Down and periodic Wrinkle Prevent tumbling as normal options, and says Automatic time can move up or down with load moisture. Continued heat, an expired Timed Dry period, or an unresponsive stop condition is not explained by those options.
-
Separate Automatic sensing from Timed Dry
Read the cycle name and display without changing to a new test cycle. For Automatic or Sensor cycles, note whether the estimate changes as the load dries and whether the dryer eventually reaches the selected dryness. For Timed Dry, note the selected time and whether the actual countdown reaches its end. Do not add wet items or extend the time to test a suspected fault.
Expected result: The Automatic estimate changes but the heater and drum follow the cycle, or the Timed Dry countdown ends while the dryer continues running or heating.
Next step: If only the estimate changes and heat stops normally, use the model guide for cycle expectations. If the timer or control continues past its end, leave the dryer out of service and arrange qualified diagnosis.
Why this matters
Why: Whirlpool says sensing cycles adjust remaining time from load size, material, moisture, and drying rate, then shut off at the selected dryness. A Timed Dry cycle is different: it follows the selected duration. A timer that does not end or a dryer that ignores its end state needs service.
-
Check Wrinkle Prevent and Cool Down indicators
Look at the display for End, Cool Down, Wrinkle Prevent, or a periodic-tumble status. If the dryer is cool enough and no hazard is present, note whether opening the door normally places the cycle in standby or stops the drum; do not force a door or bypass its switch. Do not mistake a no-heat tumble for continued heating.
Expected result: End is displayed while Wrinkle Prevent is active, Cool Down is lit with no heat, or the drum keeps turning with heat or ignores the normal door response.
Next step: Allow a documented no-heat option to finish or use the model's normal stop control once. If heat remains, the option cannot be cancelled, or the door response is abnormal, stop use and request service.
Why this matters
Why: Whirlpool manuals state that Wrinkle Prevent can continue tumbling after End and that Cool Down tumbles without heat. Heat after End, failure to stop when the door is opened, or an extension that never ends is a service condition.
-
Inspect the accessible lint and airflow path
After the dryer has stopped and cooled, clean the lint screen as directed by the model manual and look at the visible vent run and outside hood for a crushed, kinked, blocked, or lint-filled path. Do not run the dryer for an airflow test after an overheat, spark, smoke, burning odor, or scorched-load event, and do not open the cabinet or dismantle the vent system.
Expected result: The Check Vent or AF indication is present, lint or a visible obstruction is found, the vent path looks clear, or the cycle has no airflow indication.
Next step: If the path can be cleared safely from accessible locations, follow the model's cleaning guidance and arrange vent cleaning when the full run is not accessible. If the cycle still fails to finish, the dryer is too hot, or any hazard occurred, keep it out of service for qualified inspection.
Why this matters
Why: Whirlpool links Check Vent or AF with restricted airflow and says poor airflow can affect drying time and performance while the dryer continues to operate. Restricted airflow can extend a cycle, but it does not explain persistent heating, smoke, or an electrical hazard.
-
Check the load, moisture, and door state
With the dryer off and cool, record whether the load was very small, tightly packed, mixed in fabric weight, added after the cycle began, or still unusually wet. Check that the door closes and latches without clothing caught at the seal. Do not reach into a moving drum or hold the door switch closed.
Expected result: The load changed after start, the sensor cycle estimate rose, the load was too small or packed, the door was not latched, or the load and door appear normal.
Next step: Document the load and latch behavior rather than running another cycle. If the door does not control the drum normally, the dryer remains hot, or the cycle still does not finish with a normal load, arrange qualified service.
Why this matters
Why: Whirlpool says adding damp items can change the sensing estimate, and load contact with sensors, size, fabric, and moisture affect automatic timing. A door that cannot latch can prevent normal operation, while a door or stop control that fails during operation needs service.
-
Record the exact code and fuel or power clues
Photograph the complete display, including every letter, number, and status light, and record whether the dryer is gas or electric. Note AF or Check Vent, PF, L2, F# E#, ERR, or any model-specific message without guessing at a code that is not shown. Do not repeatedly restore power or substitute another model's code table.
Expected result: A restricted-airflow, power-failure, low-voltage, door, or service code is shown, or the display is blank or has no code.
Next step: Use the exact model manual to identify the code. If it documents a one-time low-risk reset and no hazard is present, follow it once only; if the code returns, heat or motion remains abnormal, or the dryer has sparked or overheated, stop and request service without a confirmation load.
Why this matters
Why: Whirlpool assigns different meanings and actions to different dryer codes. AF or Check Vent concerns airflow, PF indicates an interrupted cycle, L2 can indicate a power-supply condition on covered models, and an alternating F# E# indicates a control problem requiring service. A blank display after a trip does not prove the dryer is safe to restart.
-
Stop at the professional-help boundary
Leave the dryer disconnected or otherwise safely isolated and arrange qualified service when a Timed Dry cycle will not end, the drum or heater ignores normal controls, a door interlock is abnormal, the same error returns, or an airflow check does not explain the symptom. Give service the model, cycle, stage, display, heat behavior, load, vent, door, and power or gas details.
Expected result: The dryer can remain safely out of service while a qualified technician inspects it, or an immediate fire, gas, or electrical hazard remains.
Next step: Use the emergency branch for smoke, fire, gas odor, burning odor, arcing, sparking, severe heat, scorched clothing, or a breaker trip. Do not perform internal electrical or gas work.
Why this matters
Why: An incomplete cycle can involve the timer, moisture sensor, control, door switch, motor, heater, gas control, or supply. These causes cannot be distinguished safely by opening panels, bypassing protection, or running more cycles.
Use your observations
Decision map
Find the observation that best matches what you see, then follow the next safe action.
-
PATH 01Next step
What you see
The dryer is in Cool Down or Wrinkle Prevent, the heat has stopped, and the display shows the corresponding status or End.
Do this next
Treat the no-heat tumble as a possible normal cycle extension, allow it to finish, and use the exact model manual for the option's expected behavior.
-
PATH 02Next step
What you see
An Automatic or Sensor cycle changes its estimate with the load, but it eventually reaches the selected dryness and stops heat normally.
Do this next
Use the correct load and dryness guidance in the model manual. A changing estimate alone is not proof that the timer is stuck.
-
PATH 03Next step
What you see
A Timed Dry cycle reaches its selected end while the drum or heater continues, or the cycle remains active indefinitely.
Do this next
Do not start another load. Keep the dryer out of service and arrange qualified diagnosis of the timer, control, motor, heater, and door interlock.
-
PATH 04Next step
What you see
Check Vent or AF is displayed, or visible lint, a kink, or an obstruction is found in the accessible airflow path.
Do this next
After the dryer is cool and no hazard occurred, follow the model's lint and vent maintenance guidance. If the cycle remains abnormal or the dryer is hot, stop use and arrange qualified vent or appliance service.
-
PATH 05Next step
What you see
A door latch or control-lock state prevents normal operation, or the drum does not stop with normal door opening.
Do this next
Use only the model-specific safe control or unlock instruction once. Never bypass the door switch. If the dryer continues running or the status returns, remove it from use and request service.
-
PATH 06Next step
What you see
A code returns, the display is blank after a power event, or an L2, PF, F# E#, or other model-specific message remains.
Do this next
Record the exact code and model. Use one documented reset only if the exact manual permits it and no hazard is present; otherwise keep the dryer isolated and arrange qualified service.
-
PATH 07Next step
What you see
The dryer is excessively hot, heat continues after Off or End, clothing is scorched, or there is smoke, burning odor, gas odor, sparking, arcing, or a breaker trip.
Do this next
Stop immediately and do not retest. Leave the area for fire or suspected gas danger and contact emergency or gas assistance from a safe location; otherwise keep power isolated and arrange qualified appliance and electrical service.
Helpful context
Understand the symptom
A cycle that seems not to finish can be an expected post-cycle action or a fault. Whirlpool uses Cool Down and Wrinkle Prevent to tumble without heat after the main drying period, while Sensor cycles can change their estimate as the moisture reading changes. The important distinction is whether the heater has stopped, whether the display says End or a status such as Cool Down, and whether the machine eventually responds to its normal stop controls.
Whirlpool dryer controls and options vary by model. Automatic, Timed Dry, heat-pump, gas, and electric platforms do not share every cycle or code. Record the model number and use the matching owner's manual before applying a button sequence or interpreting an error.
Do not continue a dryer that is excessively hot, keeps heating after the expected end, has scorched clothing, emits smoke or a burning or gas odor, sparks, or trips a breaker. Do not bypass the door switch, reach into a moving drum, open panels, or run a new load to reproduce the behavior.
Only after diagnosis
Potential parts
- moisture sensor or sensor strips
Only relevant when qualified diagnosis links early ending or abnormal sensor timing to the sensor circuit after load and airflow causes are excluded.
Confirm the exact Whirlpool model and diagnosis before any part decision. - timer or electronic control
Only relevant when a timed cycle does not end or the control ignores a documented stop command after qualified testing.
Do not infer a control failure from a changing Automatic estimate or Wrinkle Prevent extension. - door switch or latch assembly
Only relevant if the drum fails to stop with normal door opening or the latch state is confirmed abnormal by qualified service.
Never bypass the door switch; verify the exact model before any service decision. - heating element or gas heat-control assembly
Only relevant after qualified diagnosis identifies a fault in the applicable electric heating or gas heat-control circuit.
Electric and gas models use different systems; confirm fuel type and model before any part decision.
When checks do not resolve it
Need a professional?
Request qualified dryer service when a Timed Dry cycle will not end, a Sensor cycle remains abnormal after airflow and load observations, the drum or heater ignores normal controls, the door interlock fails, a code returns after one documented recovery, or the display and behavior do not agree. Stop immediately for overheating, scorched clothing, smoke, burning odor, gas odor, sparking, arcing, or a breaker trip. Do not bypass the door switch, open the cabinet, or perform live electrical or gas work.
Common questions
FAQ
Why does my Whirlpool dryer keep running after End?
Wrinkle Prevent or Wrinkle Shield can periodically tumble after End, and Cool Down can tumble without heat. Check the status and heat behavior. Continued heat, an extension that never ends, or an unresponsive stop control is not normal.
Why does the time increase on my Whirlpool Automatic cycle?
Whirlpool says Automatic cycles adjust their estimate from load size, fabric, moisture, drying rate, and added damp clothing. If the dryer eventually reaches the selected dryness and stops heat, the changing estimate can be expected.
Can a blocked vent keep a Whirlpool dryer cycle from completing?
Yes. Whirlpool links AF or Check Vent with restricted airflow and says poor airflow can affect performance and extend drying. Clean only accessible areas as the model manual directs; stop for service if the dryer is excessively hot or the cycle remains abnormal.
What if the Whirlpool dryer keeps heating after the cycle should end?
Stop using it immediately. Persistent heat is different from no-heat Cool Down or Wrinkle Prevent. Do not run another load, bypass the door switch, or open the cabinet; arrange qualified service.
Should I reset a Whirlpool dryer that does not complete its cycle?
Only use a one-time reset if the exact model manual documents it, the dryer is cool, and there is no hazard. Do not repeatedly restore power or run a confirmation load. A returning code or incomplete cycle requires service.
When should I stop using a Whirlpool dryer immediately?
Stop for overheating, scorched clothing, smoke, burning odor, gas odor, sparking, arcing, a hot or damaged connection, or a breaker trip. Leave for fire or suspected gas danger and contact emergency assistance from a safe location when needed.
Read the exact guide
Official sources
- Error Codes in Dryers - Product Help | WhirlpoolWhirlpool Product Help · Whirlpool dryer error categories listed by the Product Help article; exact code meaning and recovery vary by model.
- AF or Check Vent - Dryer - Product Help | WhirlpoolWhirlpool Product Help · Whirlpool dryer models with AF or Check Vent indicators; indicator availability and steps vary by model.
- Dryer Turns On after Cycle is Complete - Product Help | WhirlpoolWhirlpool Product Help · Whirlpool dryer models with Wrinkle Shield, Wrinkle Control, or equivalent options; names and duration vary by model.
- ERR - Error Code - Dryer - Product Help | WhirlpoolWhirlpool Product Help · Whirlpool dryer models that display ERR for a door-latch condition; controls and safe recovery vary by model.
- Use and Care GuideWhirlpool · Whirlpool dryer models represented by this owner manual; options, labels, and sequences vary by model.
- Dryer Too Hot - Product Help | WhirlpoolWhirlpool Product Help · Whirlpool dryer models covered by the Product Help article; temperature options and components vary by model and fuel type.
- Dry Time Keeps Going Up - Dryer - Product Help | WhirlpoolWhirlpool Product Help · Whirlpool dryer Automatic cycles covered by the Product Help article; exact options vary by model.
Community feedback
Share a repair observation
Share a plain-text repair observation. Accepted observations are published automatically; this page may take a moment to update.