
On this page
Start here
Quick answer
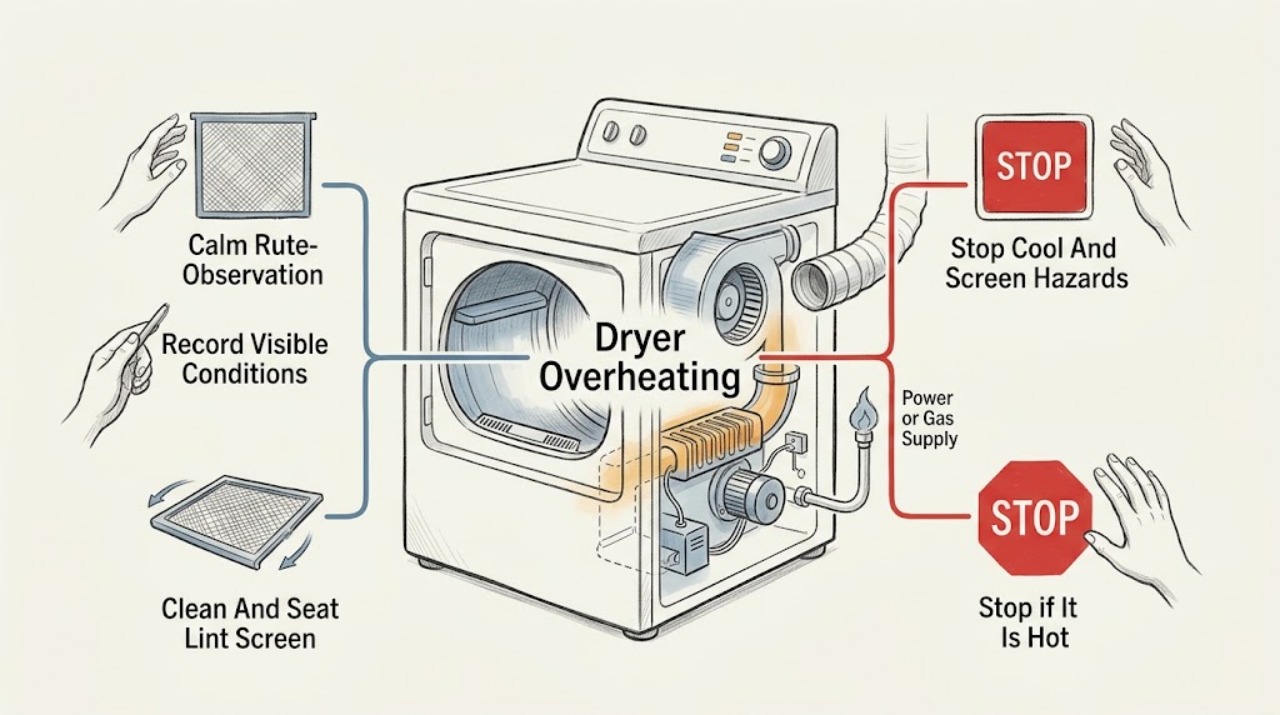
Stop the Whirlpool dryer and let it cool if the cabinet, clothes, plug, or exhaust feels abnormally hot. Treat smoke, a burning or melting smell, scorch marks, sparks or arcing, a hot or damaged cord or outlet, a gas smell, a tripped breaker, or a fire as an immediate stop condition; do not run another test. If no hazard is present and the dryer is cool, clean and correctly reseat the lint screen, inspect the visible transition duct for crushing or kinks, check the outside hood for a strong unobstructed exhaust, and confirm the cycle is not Air Only or an unsuitable high-heat setting. Whirlpool identifies restricted airflow as a common cause of excessive heat and says the entire vent run may need professional cleaning. A dryer that overheats again after the vent path is clear, stops on a thermal protection event, has a motor or blower problem, or has a damaged heating or gas system needs qualified service.
Work through in order
Diagnostic checks
Use only checks that match the exact appliance or system and its official guide.
-
Check 1
Stop the cycle normally if it responds, keep the door closed if there is a suspected internal fire, and let the dryer cool without touching hot surfaces; from a safe position look for smoke, flames, scorching, burning or melting odor, sparks, a hot/discolored connection, gas odor, or a tripped breaker.
Expected result: Classify the symptom as ordinary warm operation, excessive heat without odor, fabric scorch or melting, smoke or fire, electrical arcing or heat, gas odor, or an uncontrolled shutdown.
Next step: For smoke or fire, leave the area and follow emergency fire procedures; do not open the door to feed a fire. For gas odor, leave immediately without operating lights, switches, electronics, or the dryer and contact gas emergency help from outside. For electrical heat or a breaker event, isolate power only from a dry safe position and obtain qualified help. Continue only when the dryer is cool and no hazard exists.
Stop if: Do not restart, reset a breaker repeatedly, touch a hot or wet plug, pull a damaged cord, open the door on a suspected internal fire, or continue after gas odor, smoke, flames, sparks, scorch marks, or a melting smell.
Why this matters
Why: Smoke, flame, scorch, gas, electrical, and severe overheating symptoms can turn a diagnostic run into a fire, explosion, or shock hazard.
-
Check 2
After cooling, record when the heat becomes excessive: immediately, only after several minutes, near the end of a cycle, after a restart, or only with a particular load; note whether the top, rear, drum, clothing, or outside vent is hottest without touching it.
Expected result: Record long dry time or Check Vent/AF, heat that builds then causes a shutdown, a hot rear transition duct, little outside exhaust, hot clothing with poor airflow, or heat concentrated at a cord, outlet, motor area, or control.
Next step: Use the pattern to choose the lint and vent checks first. Keep the dryer isolated for electrical, motor, smoke, odor, or repeated thermal-shutdown symptoms.
Stop if: Do not place a thermometer inside, touch a hot cabinet or connection, run an empty cycle to reproduce an unsafe temperature, or dismiss a hot spot with smoke, scorch, odor, sparks, or a trip.
Why this matters
Why: A heat pattern tied to low exhaust suggests airflow restriction; heat at an electrical connection or motor points to a service hazard. A thermal shutdown is a protective symptom, not proof that the dryer is safe to reset.
-
Check 3
With the dryer off and cool, remove the lint screen, roll off visible lint, inspect it for tears or distortion, clean detergent or fabric-softener residue with the model-appropriate method, dry it completely, and push it firmly back into place.
Expected result: Record a clean intact screen, a lint mat, residue that blocks the mesh, lint falling into the screen housing, a loose or damaged screen, or a screen that cannot seat correctly.
Next step: Replace a damaged screen through model-appropriate service or parts support and gently remove accessible lint from the housing. Inspect the exhaust path next even if the screen was dirty, because a screen correction does not clear a blocked home vent.
Stop if: Do not run the dryer with a missing, loose, torn, wet, or blocked screen, scrape the mesh with a sharp object, or use the dryer to dry a screen that is still wet.
Why this matters
Why: Whirlpool says a blocked or residue-coated screen reduces airflow and that operating without a loose, damaged, blocked, or missing screen can cause overheating and damage to the dryer and fabrics.
-
Check 4
With power isolated and the dryer cool, inspect the visible duct between the dryer and wall for crushing behind the appliance, sharp kinks, sagging lint traps, loose joints, unsuitable plastic or foil material, and lint accumulation; do not pull a hard-wired or gas appliance aggressively.
Expected result: Record a short, intact model-compliant transition duct, a crushed or kinked run, lint at a joint, a loose connection, a blocked concealed run, or a duct material that collapses when the dryer is pushed back.
Next step: Correct only a safe, obvious external displacement according to the installation instructions and keep the duct connected before operation. Have a qualified venting specialist clean or inspect concealed sections and replace unsuitable or damaged ducting.
Stop if: Do not operate with the duct disconnected, insert screws or improvised screens into the exhaust, crawl into an unsafe space, move a gas dryer to inspect its connector, or continue when lint is packed into a hidden run.
Why this matters
Why: Whirlpool says crushed or nonrecommended ducting reduces airflow and increases drying time; restricted airflow can keep heat in the dryer and accelerate lint buildup.
-
Check 5
Only if the dryer is cool, the screen and visible duct are intact, and there is no safety symptom, use one brief model-permitted airflow observation while standing clear: check whether the outside exhaust hood opens and whether warm air moves strongly from it.
Expected result: Record a clearly opening hood with strong airflow, weak or absent airflow, lint or a nest at the hood, an obstructed termination, condensation or water behind the dryer, or airflow that improves only when the dryer is pulled away from the wall.
Next step: Stop the dryer and arrange cleaning or inspection of the full vent run when airflow is weak, the hood is blocked, or condensation collects. Clear only loose exterior debris from a safe standing position and follow local and model instructions.
Stop if: Do not run repeatedly to measure heat, climb or reach into an unsafe hood, remove concealed ducting without a safe method, or continue with smoke, odor, scorch, sparks, or a hot electrical connection.
Why this matters
Why: Whirlpool identifies a blocked hood, restricted home vent, excessive elbows, and crushed duct as airflow faults; weak outside discharge supports a vent restriction rather than a part replacement diagnosis.
-
Check 6
Review the cycle, temperature, dryness setting, load size, tumbling space, fabric care labels, and what was washed into the clothing; identify Air Only, an unnecessarily high setting, tightly packed or knotted items, rubber or foam, or clothing contaminated with oil, fuel, solvent, or cleaning chemicals.
Expected result: Record a suitable load and heated cycle, Air Only or low heat selected, a tightly packed load, fabric with scorch marks, or a load with flammable residue or a material not approved for heated drying.
Next step: Remove an unsuitable load only when safe, follow the care label and Whirlpool model guidance, and use a normal or lower-temperature cycle for an appropriate load after the vent path is known to be clear. A normal load that still overheats needs service.
Stop if: Do not re-dry scorched or chemically contaminated clothing, overload the drum, use high heat to compensate for slow drying, or keep testing a load with a burning smell, smoke, melting, or excessive heat.
Why this matters
Why: Air Only produces no heat, while a dense or unsuitable load can retain heat. Clothing contaminated with volatile substances can ignite even when the dryer itself appears normal.
-
Check 7
From a dry external position, identify the dryer model's electric or gas configuration and inspect only the visible cord, plug, outlet, or gas shutoff area for normal placement; do not remove covers, alter wiring, adjust gas components, or move the appliance.
Expected result: Record an intact cool connection, a tripped breaker, a loose or discolored outlet, damaged cord, a gas dryer with an external supply issue, or an odor, hiss, or heat at the supply connection.
Next step: For a normal, clearly identified breaker event with no hazard, follow the home's reset procedure once and then stop if it trips again. Keep the dryer off and call qualified electrical or gas-appliance service for damage, absent supply, heat, smell, or recurrence.
Stop if: Do not repeatedly reset a breaker, test live terminals, use an extension cord or adapter, touch a hot or wet plug, move a gas dryer, or relight or adjust gas equipment.
Why this matters
Why: Whirlpool notes that electric dryers can tumble with abnormal heating supply and gas dryers need an open supply to heat. A damaged connection or suspected leak is a qualified electrical or gas-safety problem.
-
Check 8
Only after the lint screen is correctly seated, the connected vent path and hood are clear, the load is suitable, the dryer is cool, and no hazard exists, perform at most one short model-permitted heated-cycle observation while remaining nearby and ready to stop.
Expected result: Record normal cycling and exhaust, heat that remains excessive, a Check Vent/AF indication, a motor or blower noise, an early thermal shutdown, a hot rear panel, or any odor, smoke, scorch, spark, gas symptom, or trip.
Next step: Stop immediately for any abnormal result and keep the dryer isolated. Provide the technician the model, cycle, load, vent observations, display code, shutdown timing, and exact safety symptom.
Stop if: Do not repeat a test after overheating, thermal shutdown, a hot spot, odor, smoke, fabric damage, sparks, a gas symptom, severe noise, or a breaker trip.
Why this matters
Why: A recurrence after airflow correction points to a blower, motor, heating control, thermostat, sensor, gas valve, or wiring fault; it is not safe to identify that part through repeated operation.
-
Check 9
Prepare a service handoff with the full model, electric or gas type, cycle and temperature, load and fabric condition, lint-screen result, duct and hood observations, airflow behavior, display code, shutdown timing, and photographs of safe external areas.
Expected result: Classify the evidence as lint screen, external or concealed vent restriction, cycle/load, power or gas supply, blower/motor, heating system, thermostat/sensor, or fire/electrical/gas hazard.
Next step: Use Whirlpool model-specific support, a qualified appliance technician, a professional venting specialist, or qualified electrical/gas service as indicated. Keep the dryer off until it passes a safety and airflow assessment.
Stop if: Do not return the dryer to service while it overheats, the vent is restricted, the screen is damaged, the source of heat is unexplained, or there has been smoke, scorch, odor, sparks, gas, damaged wiring, or a breaker trip.
Why this matters
Why: A precise pattern helps a technician separate restricted exhaust from an internal heating or protection fault without owner disassembly.
-
Check 10
After repair or professional vent cleaning, verify that the lint screen is present and clean before each load, the outside hood opens during normal operation, the area around and behind the dryer is clear, and the appliance is never left running while the home is unattended.
Expected result: Record stable normal drying, strong exhaust, no recurring Check Vent indication, no cabinet or clothing scorch, and no odor or electrical/gas symptom; or record any recurrence.
Next step: Stop use and request service for recurrence. Maintain the screen and have the home vent cleaned or tested at the interval and whenever performance decreases, following the model and local requirements.
Stop if: Do not normalize repeated overheating, leave a dryer operating unattended, operate without the screen, or store combustibles against a hot dryer.
Why this matters
Why: A clean screen and open exhaust reduce, but do not eliminate, risk. Recurring heat after maintenance indicates an unresolved dryer or vent fault.
Use your observations
Decision map
Find the observation that best matches what you see, then follow the next safe action.
-
PATH 01Safety boundary
What you see
There is smoke, fire, burning or melting odor, scorch marks, sparks or arcing, a hot/discolored outlet or cord, gas odor or hissing, a tripped breaker, or clothing that appears to be burning.
Do this next
Leave the area for smoke, fire, or gas and contact emergency help from a safe location. Isolate power only if it can be done without touching wet or hot equipment or crossing danger, then obtain qualified service. Keep the dryer off.
Why this path and its safety boundary
Why it matters: This is an immediate fire, gas, burn, or electrical hazard; a vent check or reset is not appropriate.
Safety stop: Do not open a dryer door during an internal fire, restart, operate switches during suspected gas leakage, touch the connection, or repeatedly reset power.
-
PATH 02Safety boundary
What you see
The screen is lint-matted, residue-coated, torn, loose, missing, wet, or cannot seat correctly.
Do this next
Clean and dry an intact screen using the model's method, gently remove accessible lint, and replace a damaged screen before any use. Continue to the vent check because screen cleaning does not clear the home exhaust.
Why this path and its safety boundary
Why it matters: Restricted or missing screen airflow can contribute to overheating and can allow lint into the dryer.
Safety stop: Do not run without a correctly seated intact screen or scrape its mesh with a sharp tool.
-
PATH 03Safety boundary
What you see
The transition duct is crushed or kinked, the hood is blocked, outside airflow is weak, condensation collects behind the dryer, or Check Vent/AF remains present.
Do this next
Keep the dryer off, correct only a safe external displacement, and arrange full vent cleaning or inspection by a qualified venting specialist. Confirm the run length and elbows against the installation instructions.
Why this path and its safety boundary
Why it matters: The exhaust path is restricting warm humid air and can drive long dry times and excessive heat.
Safety stop: Do not operate with a disconnected duct, improvised screen, concealed lint blockage, or a recurrence after a brief airflow correction.
-
PATH 04Safety boundary
What you see
Air Only or a low-temperature setting was selected, the drum is overloaded or tightly packed, the load contains foam/rubber/plastic, or clothing has oil, fuel, solvent, or cleaning-chemical residue.
Do this next
Remove unsafe or unsuitable items when safe, follow care labels and the exact model's cycle guidance, and do not use a high-heat cycle to compensate for restricted performance.
Why this path and its safety boundary
Why it matters: The cycle or material can cause poor drying, retained heat, fabric damage, or ignition risk independently of a dryer part.
Safety stop: Do not re-dry scorched or chemically contaminated items, overload, or continue when clothing, drum, or exhaust smells burned.
-
PATH 05Safety boundary
What you see
An electric model has a breaker, outlet, cord, or supply abnormality, or a gas model has an external supply concern without an active leak.
Do this next
Keep the dryer off and arrange qualified electrical or gas-appliance service. A normal breaker event may be reset once only when no hazard exists; recurrence ends testing.
Why this path and its safety boundary
Why it matters: The dryer may tumble or control normally while the heating supply is abnormal; a supply problem is not a homeowner component diagnosis.
Safety stop: Do not open terminal covers, test live voltage, repeatedly reset a breaker, move a gas dryer, or adjust gas equipment.
-
PATH 06Safety boundary
What you see
The screen and complete vent path are clear, the load and cycle are appropriate, but the dryer overheats again, stops on thermal protection, has a hot spot, abnormal blower/motor noise, no normal heat cycling, or a recurring code.
Do this next
Keep the dryer isolated and request qualified appliance service with the model, symptom timing, airflow result, display code, and safety observations.
Why this path and its safety boundary
Why it matters: A blower, motor, heating element, gas valve, thermostat, sensor, control, wiring, or internal lint fault is possible and cannot be safely isolated by repeated operation.
Safety stop: Do not bypass thermal protection, open panels, probe live components, or keep running to identify the failed part.
Helpful context
Understand the symptom
Overheating usually means heat cannot leave safely
A Whirlpool dryer creates heat and must move warm, humid air through the lint screen, blower and exhaust duct to the outdoors. Lint, a crushed transition duct, a blocked hood, an overly long or sharply bent vent run, or lint inside the chassis can reduce that airflow. The result may be a hot cabinet, long dry times, a Check Vent or AF indication, damp loads, or a thermal shutdown. Clear, external airflow checks come before a heating-element, gas-valve, motor, or thermostat diagnosis.
A warm load is not the same as an unsafe hot dryer
Some heat and a hot load are normal during a heated cycle, but scorching, fabric damage, a cabinet that is too hot to approach, or heat that continues without normal cycling is not a condition to verify by repeated runs. Do not rely on a hand-temperature test inside a hot drum. Let the appliance cool and use the visible airflow, filter, display, and odor observations described below.
Electric and gas Whirlpool dryers need different supply checks
An electric dryer can tumble while its heating supply is abnormal, while a gas dryer needs both electrical controls and an open gas supply. The model's installation instructions control the supply and vent requirements. Do not open the terminal area, adjust a gas valve, or move the appliance to inspect a gas connector; those are qualified-service tasks.
Lint and the load can create fire risk after the cycle ends
Lint should be removed from the screen and dryer area, and the dryer should not be operated with a loose, damaged, blocked, or missing screen. Do not dry items contaminated with gasoline, cooking oils, cleaning agents, or other volatile substances unless the care instructions and a qualified safety assessment make the method appropriate. Remove hot or suspect clothing to a safe noncombustible location only when it is safe to do so; do not pile it in a basket while it may still be hot.
Safety boundary
Stop conditions
- Stop immediately for smoke, fire, burning or melting odor, scorch marks, a hot or damaged cord/outlet, sparks or arcing, gas odor or hissing, severe overheating, a repeated thermal shutdown, or a breaker trip.
- For suspected gas leakage, leave without operating lights, electronics, or the dryer and contact gas emergency help from outside; do not move the dryer to inspect its connector.
- For an internal dryer fire, keep the door closed, leave, and obtain emergency help; do not open the door to add air or attempt a repeated test.
- Do not operate with a missing, loose, damaged, wet, or blocked lint screen, a disconnected or crushed vent, unsuitable exhaust material, or a concealed lint blockage.
- Do not open panels, test live wiring, bypass thermal protection, adjust gas components, or repeat a heat test after any unsafe result.
Only after diagnosis
Potential parts
- lint screen
Relevant only when the exact model's screen is torn, warped, blocked by permanent damage, or cannot seat after safe cleaning.
Confirm the full Whirlpool model and screen design before ordering; do not operate without the correct screen. - dryer exhaust duct
Relevant only when the transition duct is damaged, crushed, unsuitable, or cannot meet the model's routing requirements; concealed home vent cleaning may be a service instead.
Confirm approved material, diameter, length, elbows, and local installation requirements. - blower wheel or motor
Consider only after qualified diagnosis finds abnormal blower or motor operation with the external airflow path clear.
Confirm exact model and have internal disassembly and testing performed by qualified service. - heating or temperature-control component
Relevant only when a qualified diagnosis identifies a failed heating element, thermostat, thermal cutoff, sensor, or related control after airflow is verified.
Do not bypass protection or infer fit from a similar dryer; confirm the exact model and component specification.
When checks do not resolve it
Need a professional?
Arrange Whirlpool or qualified appliance service when overheating returns after the screen and complete vent path are clear, the dryer shuts down on thermal protection, the motor or blower is abnormal, the heating system does not cycle normally, a code returns, the cord or outlet is hot or damaged, a gas supply or ignition concern exists, or smoke, scorch, odor, sparks, gas, or a breaker event occurs. Use a professional venting specialist for a concealed, long, crushed, or repeatedly restricted exhaust run.
Common questions
FAQ
Why is my Whirlpool dryer overheating?
Start with restricted airflow: clean and seat the lint screen, inspect the visible duct for crushing or kinks, and check that the outside hood opens and exhausts strongly. Also verify the cycle and load. If heat returns after the full vent path is clear, an internal blower, motor, heating, sensor, gas, or control fault needs service.
Can a clogged lint screen make a Whirlpool dryer too hot?
Yes. Whirlpool says a blocked or residue-coated screen reduces airflow and warns not to run with a loose, damaged, blocked, or missing screen. Clean and dry an intact screen using the model's method, then inspect the entire exhaust path rather than assuming the screen was the only restriction.
How do I know if my Whirlpool dryer vent is blocked?
Weak outside airflow, a hood that does not open, a crushed or kinked transition duct, long dry times, condensation, lint at joints, or a Check Vent/AF indication support a restriction. Keep the dryer off and have the complete home vent run cleaned or inspected when the problem is not an obvious safe external correction.
Is it normal for a Whirlpool dryer to feel warm?
Some warmth is normal during a heated cycle, but scorching, fabric damage, a cabinet that becomes excessively hot, a persistent hot spot, smoke, or a burning smell is not normal. Stop and let it cool; do not run repeated tests to compare temperatures.
Can the wrong cycle cause a Whirlpool dryer to overheat?
Air Only does not add heat, while an unsuitable high-temperature cycle, a tightly packed load, or materials not approved for heated drying can create poor results or excessive retained heat. Follow the exact model and fabric-care instructions, and never re-dry clothing contaminated with volatile substances.
Why does my Whirlpool dryer overheat and then shut off?
Restricted airflow can make heat build up and trigger a protective shutdown, but a motor, blower, sensor, heating control, gas system, or wiring fault can also be involved. After one cool-down, external screen and vent checks, keep the dryer off if the shutdown returns and arrange qualified service.
Should I reset the breaker when my Whirlpool dryer is overheating?
Only a normal, isolated breaker event with no heat, odor, smoke, damage, or wet equipment may be reset once using the home's safe procedure. Do not repeatedly reset a breaker or restart after a hot connection, burning smell, sparks, scorch marks, gas odor, or a thermal shutdown.
When is a Whirlpool dryer overheating an emergency?
Treat smoke, flames, scorch marks, melting, a burning smell, sparks or arcing, a hot or damaged cord or outlet, gas odor or hissing, clothing that appears to be burning, or a repeated breaker trip as an immediate stop condition. Leave or isolate the area safely and contact the appropriate emergency or qualified service help.
Read the exact guide
Official sources
- Dryer Too Hot - Product Help | WhirlpoolWhirlpool Product Help · Whirlpool support guidance for dryers; exact controls and installation requirements vary by model.
- Clothes Dryer Fire SafetyU.S. Fire Administration · Government fire-safety guidance for household dryers; it does not diagnose Whirlpool components.
- Clothes Dryers and Washing MachinesNational Fire Protection Association · NFPA research and safety guidance; it does not diagnose a Whirlpool dryer.
- How to Check Venting - Product Help | WhirlpoolWhirlpool Product Help · Whirlpool support guidance; model installation instructions govern the exact vent system chart.
- AF or "Check Vent" - Dryer - Product Help | WhirlpoolWhirlpool Product Help · Whirlpool support guidance; Check Vent is available only on certain models and automatic cycles.
- Appliance and Electrical Fire SafetyU.S. Fire Administration · Government fire-safety guidance for major appliances including dryers; it does not diagnose Whirlpool parts.
- Dryer is Not Heating - Product Help | WhirlpoolWhirlpool Product Help · Whirlpool support guidance; electrical and gas configurations and controls vary by model.
- Cleaning the Dryer Lint Filter - Product Help | WhirlpoolWhirlpool Product Help · Whirlpool support guidance; screen location varies by model.
- Why does my dryer keep stopping? 8 possible reasonsWhirlpool · Whirlpool consumer guidance; it is not a substitute for the exact model manual.
Community feedback
Share a repair observation
Share a plain-text repair observation. Accepted observations are published automatically; this page may take a moment to update.