
On this page
Start here
Quick answer
Start by locating where and when the Frigidaire freezer leaks. Water on the freezer floor after frost or defrost points toward a blocked or frozen defrost drain; a steady drip from the rear, dispenser, ice-maker area, filter, or water connection is a different path. Check the door or lid seal, closure obstructions, visible frost, drain opening, pan, and accessible water connections without moving a loaded appliance or removing hidden panels. If the exact model permits a user defrost, disconnect power, protect food and flooring, let ice melt, and use only the documented drain route. Never pierce ice, force a tube clear, use a knife or heat gun, or work near energized wiring. Arrange service for recurring leaks, hidden drain access, a damaged pan or line, warming food, or water near electrical parts.
Before you begin
Safety first
- This article covers ordinary-access leak mapping, gasket and closure observation, model lookup, visible drain inspection, and only the exact manual's documented defrost steps. A technician must handle hidden drains, panels, water-line disconnection, defrost parts, electrical testing, and sealed-system work.
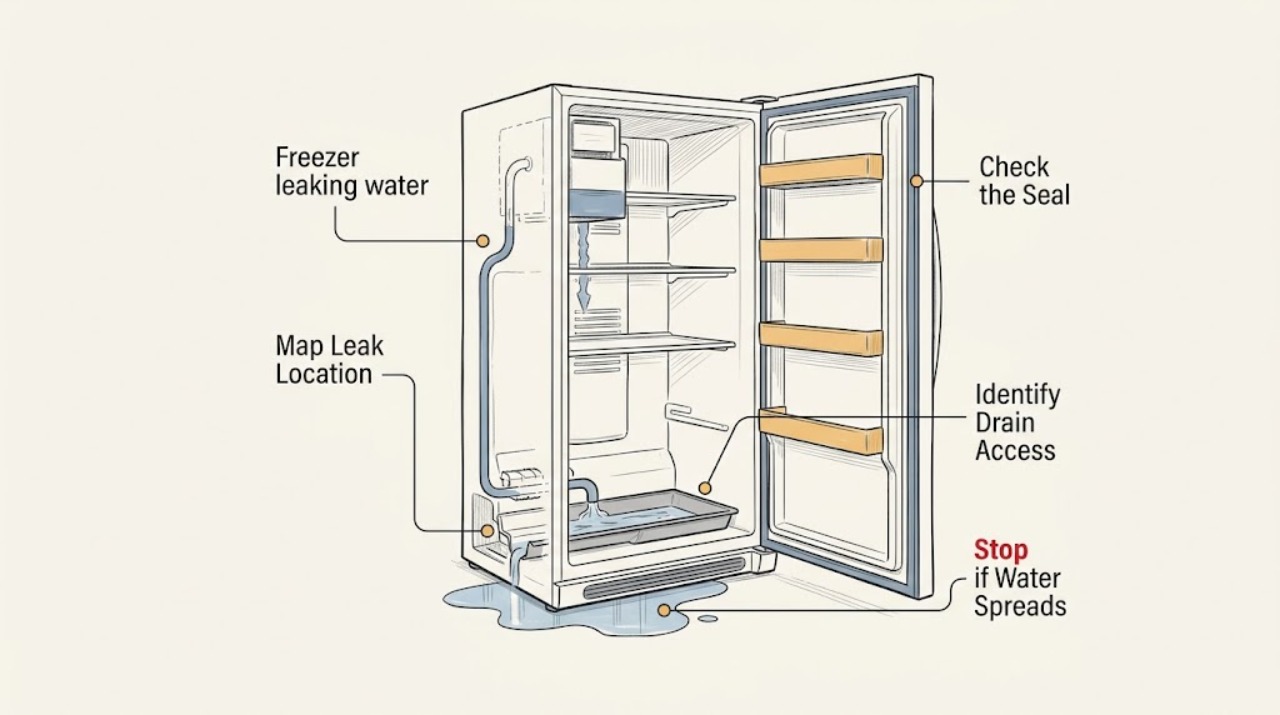
Work through in order
Diagnostic checks
Use only checks that match the exact appliance or system and its official guide.
-
Check 1
Dry the floor and accessible freezer surfaces, keep the door closed, and observe from a dry position. Place a dry towel or paper towel at separate safe points to see whether the first moisture appears on the freezer floor, front seal, rear underside, drain pan, water connection, dispenser, or ice-maker area.
Expected result: Water is tied to frost or defrost, is a steady rear or supply drip, appears near an ice-maker or dispenser, or the source cannot be located without moving or opening the appliance.
Next step: Photograph the first wet point and continue only with the model-appropriate branch. Stop and arrange service for an active leak near wiring or a water source that cannot be isolated safely.
Stop if: Stop for flooding, water near electrical parts, smoke, burning smell, a damaged cord, a tripped breaker, or a freezer that is warming.
Why this matters
Why: Defrost-timed water supports a drain or ice-melt branch. A steady supply or ice-maker leak is not a defrost-drain diagnosis; an unknown source needs service rather than repeated drying.
-
Check 2
Inspect the door or lid closing path, gasket, frame, vents, and nearby food for a gap, dirt, tear, frost ridge, or package that prevents closure. Clean the gasket with the model-approved method and, if appropriate, use a paper or bill test around the perimeter.
Expected result: The gasket grips evenly and the door closes, or the paper releases easily, a gap is visible, frost is concentrated at the edge, or an item blocks the seal.
Next step: Remove only a loose obstruction, clean the seal, close the door, and monitor for renewed water. If the gasket is damaged or the gap remains, arrange service before ordering a seal.
Stop if: Do not force the door, stretch or heat the gasket, chip frost, or remove hinges or panels to improve contact.
Why this matters
Why: Frigidaire links a non-sealing door with unstable temperature and frost. A weak seal can admit moisture that later melts and leaks, while an even seal shifts attention to the drain, pan, water path, or defrost system.
-
Check 3
Use the exact Frigidaire model number to read the owner's manual and determine whether a defrost drain, drain cap, pan, or hose is user-accessible. Look only at the visible opening or drain path named by the manual; do not remove an evaporator cover.
Expected result: The manual gives a visible drain and defrost procedure, identifies no user-accessible drain, or requires panel, fan, heater, or electrical access.
Next step: Follow only the documented user steps for an accessible drain. If access requires a cover or the model procedure is unclear, stop and arrange service.
Stop if: Do not use a generic diagram, probe a hidden tube, or open a panel not identified as user-removable for the exact model.
Why this matters
Why: Drain and defrost layouts vary by freezer type. A hidden drain may be blocked by ice behind an evaporator cover, but its access and diagnosis are professional work.
-
Check 4
Only when the exact manual permits user defrosting, protect or relocate the frozen food, disconnect power as directed, place towels or the specified pan at the drain, and allow the frost to melt by the documented method. Keep electrical devices outside the wet freezer.
Expected result: Water exits through the intended drain, water stays in the trough or freezer, the pan begins to overflow, or the manual provides no user defrost step.
Next step: Keep collecting water, dry the interior, replace every cap or plug, and restore power exactly as instructed. If water remains or the route is hidden, arrange service.
Stop if: Never use a knife, ice pick, screwdriver, metal tool, heat gun, open flame, boiling water, or electrical device inside a wet freezer.
Why this matters
Why: Free flow after a complete documented melt supports a temporary ice blockage. Backflow, overflow, or no user procedure points to a deeper drain, pan, routing, or defrost issue.
-
Check 5
If the freezer has an ice maker, dispenser, filter, or rear water connection, inspect only the accessible tubing, fittings, filter housing, and pan from a dry position. Do not strain the line or pull the freezer out unless the manual and installation allow it safely.
Expected result: A fitting, filter, valve, dispenser chute, ice-maker area, or pan is visibly wet, cracked, displaced, or dry while water continues to appear elsewhere.
Next step: Stop the accessible water supply only if the setup provides a safe identified shutoff, protect the floor, and arrange service for a cracked fitting, filter housing, valve, pan, or hidden line.
Stop if: Do not disconnect a pressurized or hidden water line, tighten a cracked fitting, pull a loaded appliance, or operate with active leakage.
Why this matters
Why: Frigidaire identifies loose water connections, a cracked filter, ice in a dispenser chute, and an open door that ices the evaporator as separate leak causes. A dry water path makes the drain or defrost branch more likely.
-
Check 6
After one safe documented check, keep the door closed and monitor the next cooling period. Record whether the floor stays dry, frost returns rapidly, water reappears without a defrost event, the compressor runs excessively, or food temperature rises.
Expected result: The leak stops and cooling remains stable, or water returns, frost rapidly builds, the door will not seal, a supply drips, or the freezer is warming.
Next step: Arrange qualified appliance service for recurrence, hidden access, poor cooling, a damaged component, or any leak that cannot be contained. Provide the model, leak location, timing, and photos.
Stop if: Stop use when food is warming, water reaches electrical parts, smoke or burning odor appears, the cord is damaged, or protection trips.
Why this matters
Why: A stable result supports a one-time melt, opening, or visible obstruction. Recurrence or warming indicates unresolved seal, defrost, drain, pan, water-path, airflow, or cooling trouble.
Use your observations
Decision map
Find the observation that best matches what you see, then follow the next safe action.
-
PATH 01Safety boundary
What you see
Water appears on the freezer floor or below the cabinet after frost or a defrost event, the visible drain area has ice, or meltwater does not reach its pan.
Do this next
Use only the exact model's documented defrost and drain procedure. Verify the safe drain result once, then arrange service if water backs up or returns.
Why this path and its safety boundary
Why it matters: A frozen or blocked defrost path is plausible, but the blockage may be in a hidden tube or defrost area.
Safety stop: Do not probe the drain, remove a hidden cover, force water, or chip ice near cooling parts.
-
PATH 02Safety boundary
What you see
The door or lid has a gap, the gasket is dirty or damaged, the paper test is loose, or frost is concentrated along the seal.
Do this next
Clear the closing path, clean and test the gasket, and arrange service for a persistent gap or damaged seal; monitor for renewed frost or water.
Why this path and its safety boundary
Why it matters: Warm humid air entry is more likely and can create frost that later melts or prevents proper drainage.
Safety stop: Do not stretch, heat, glue, or cut the gasket or force the door shut.
-
PATH 03Safety boundary
What you see
Water is steady rather than defrost-timed, a rear connection, filter, dispenser, ice-maker area, or pan is wet, or the pan is cracked or out of position.
Do this next
Use only an identified safe shutoff, keep the floor dry, and arrange service for a cracked, pressurized, hidden, or recurring leak.
Why this path and its safety boundary
Why it matters: A supply, filter, ice-maker, dispenser, or pan problem is more likely than a defrost drain clog.
Safety stop: Do not disconnect hidden lines, strain fittings, pull the appliance alone, or operate with water near electrical parts.
-
PATH 04Safety boundary
What you see
A complete model-directed check stops the first leak, but frost returns quickly, vents are blocked, the compressor runs excessively, or the freezer remains warm.
Do this next
Stop DIY access and arrange qualified appliance service with the model number, frost pattern, temperature trend, and leak timing.
Why this path and its safety boundary
Why it matters: A defrost heater or control, airflow, gasket, drain, or cooling-system fault may remain. Repeating a surface melt will not identify it.
Safety stop: Do not remove evaporator panels, bypass controls, test live parts, or continue operation while food is warming.
-
PATH 05Safety boundary
What you see
The leak was tied to one opening or defrost event, the drain or pan handled water normally, the gasket closes evenly, and the freezer returns to stable temperature.
Do this next
Keep the door closed, keep vents and the closing path clear, and monitor for renewed water or frost without repeated openings.
Why this path and its safety boundary
Why it matters: A temporary frost or meltwater event is more likely than a persistent component failure, but the next defrost cycle should be watched.
Safety stop: Stop if water returns, the door loses its seal, frost builds rapidly, or cooling becomes unstable.
Helpful context
Understand the symptom
Map the leak before trying to clear a drain
A defrost drain is only one possible water path. A puddle inside the freezer or below the cabinet that follows frost melt is different from a steady water-line drip or an ice-maker leak. Frigidaire advises checking the location and the appliance's manual. Wipe the area dry, note the first place that becomes wet, and avoid pulling the unit out if doing so would strain a water line or require moving a loaded cabinet.
Door sealing and frost are linked
A door or lid left slightly open lets warm humid air enter. That air can form frost on the evaporator or around the frame; when ice melts, the water can overflow a trough or run to the floor. Check packages, shelves, the gasket, and the visible vents. If frost is thick or returns quickly, repeated melting is not a complete repair because a seal, airflow, defrost, or hidden drain fault may remain.
Use the exact model's defrost boundary
Some Frigidaire freezers permit ordinary defrosting, while frost-free models route water behind a panel. Disconnecting power and collecting meltwater may be appropriate only when the model instructions say so. Do not remove an evaporator cover, probe a drain with wire, apply flame or high heat, or test a water valve or defrost component while energized.
Safety boundary
Stop conditions
- Stop for flooding, water near electrical parts, smoke, burning odor, a damaged cord, a tripped breaker, a freezer that is warming, or food whose safe temperature is uncertain.
- Do not remove evaporator covers, bypass defrost controls, test live wiring, or work on heaters, timers, sensors, valves, fans, or sealed cooling parts.
- Never pierce ice or a drain with a knife, ice pick, screwdriver, wire, or other sharp or rigid tool; do not chip frost near cooling lines.
- Do not use a heat gun, flame, boiling water, chemicals, compressed air, or pressure to force a drain or water line clear.
- Do not force the door, gasket, drain cap, pan, fitting, or water connection, and do not move a loaded freezer alone.
- Stop after one exact-model inspection or documented defrost when water returns, the source is hidden, frost recurs, or cooling does not recover; arrange qualified appliance service.
Only after diagnosis
Potential parts
- defrost drain tube or drain pan
Consider this category only when service confirms that the exact model's drain tube or pan is blocked, cracked, displaced, or unable to carry meltwater after safe defrosting.
Confirm the exact Frigidaire model, drain routing, pan dimensions, connections, and manufacturer's fit information before ordering. - door or lid gasket
Consider this category only when the exact model's gasket is torn, distorted, or fails the perimeter seal test after cleaning and closure obstructions are removed.
Confirm the exact model, freezer type, seal profile, mounting method, and manufacturer's fit information before ordering. - defrost system component
Consider this category only after a qualified technician confirms that recurring frost or water is caused by a failed heater, sensor, timer, or control rather than a seal or drain issue.
Confirm the exact model, defrost design, electrical rating, connectors, and manufacturer's fit information; do not bypass or live-test the component.
When checks do not resolve it
Need a professional?
Arrange qualified appliance service when the leak source is hidden, water backs up after a model-directed defrost, the drain pan or water line is damaged, a door or gasket does not seal, frost returns quickly, the freezer warms or runs continuously, or the source is a filter, valve, ice-maker, defrost, electrical, or sealed cooling component. Use the exact manual for any user procedure; panel removal, pressurized line work, and live testing require a technician.
Safety scope: This article covers ordinary-access leak mapping, gasket and closure observation, model lookup, visible drain inspection, and only the exact manual's documented defrost steps. A technician must handle hidden drains, panels, water-line disconnection, defrost parts, electrical testing, and sealed-system work.
Common questions
FAQ
Why is my Frigidaire freezer leaking water?
The leak may be a blocked or frozen defrost path, frost caused by a weak door gasket, a drain pan, or a water-line, filter, dispenser, or ice-maker source. First note where and when water appears; a steady supply drip is not the same as water after frost or defrost.
Can a bad freezer door gasket cause water to leak?
Yes. A gap admits warm humid air, which can create frost and later melt or overflow. Clean and test the gasket around the full perimeter, clear the closing path, and arrange service if the gap remains or frost returns quickly.
How do I clear a frozen Frigidaire freezer drain?
Use only the exact model's documented defrost procedure. If user defrosting is permitted, disconnect power as directed, protect food and flooring, let ice melt, collect water through the specified path, and restore caps or plugs. Never probe the drain, chip ice, use flame or high heat, or force water through a hidden tube.
Why does my Frigidaire freezer leak again after defrosting?
Recurrence can indicate a gasket or door gap, blocked airflow, a hidden drain restriction, a drain-pan issue, or a defrost component that is not clearing ice. If water or frost returns after one complete model-directed procedure, arrange service instead of repeating the same melt.
When should I stop using a leaking Frigidaire freezer?
Stop for water near electrical parts, flooding, smoke, burning odor, a damaged cord, a tripped breaker, warming food, a door that cannot close, or a leak that cannot be contained. Keep the door closed and arrange qualified appliance service with the model and leak observations.
Read the exact guide
Official sources
- Freezer Runs Too MuchFrigidaire · Used for secondary cooling symptoms when a leak is caused by frost or a non-sealing door.
- FreezersFrigidaire · Official Frigidaire support index used to locate the exact model's guidance and service follow-up.
- Freezer - Not Freezing or Not CoolingFrigidaire · Direct Frigidaire freezer guidance used to connect a leak with closure, frost, airflow, or warming symptoms.
- Refrigerators / Freezer - Frost Build UpFrigidaire · Direct Frigidaire frost guidance used to explain how a weak seal can lead to ice and subsequent water.
- Refrigerator Water LeaksFrigidaire · Direct Frigidaire leak guidance used for freezer and refrigerator-freezer water-source branches; exact model manual controls.
- Product Support for Frigidaire 16 Cu. Ft. Garage Ready Upright Freezer-FFFU16F2VVFrigidaire · Official Frigidaire product page used to reinforce model-specific owner's-guide and service boundaries; no claim is made about the assigned model.
Community feedback
Share a repair observation
Share a plain-text repair observation. Accepted observations are published automatically; this page may take a moment to update.