
On this page
Start here
Quick answer
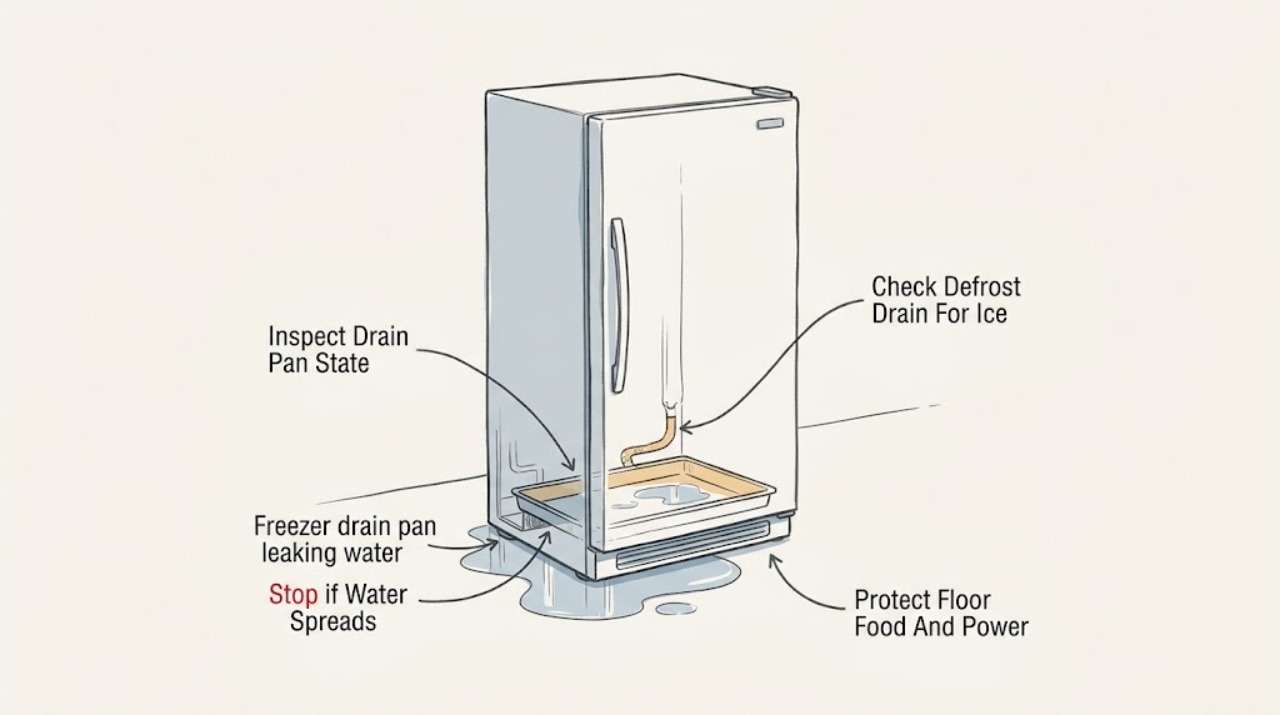
A freezer drain pan normally receives water from a defrost cycle, but water on the floor means the drain path, pan or evaporation path needs attention. First protect food and the floor, and disconnect power from a dry location if water is near the cord or electrical parts. Check whether the drain pan is full, empty but cracked, displaced, or receiving water because a defrost drain is blocked by debris or ice. Also inspect the door seal, cabinet level and any ice-maker or water-supply connections. Follow the exact model manual before removing covers or flushing a drain; never use a knife, ice pick, hair dryer or heater to force defrosting. A cracked pan, recurring overflow, concealed drain blockage, refrigerant or electrical concern, or leak from a pressurized water connection calls for qualified appliance service.
Before you begin
Safety first
- This article supports safe visual checks and model-directed cleaning of an accessible pan or drain only. Do not use sharp or heated tools, handle wet electrical parts, disconnect pressurized lines or remove sealed-system covers.
Work through in order
Diagnostic checks
Use only checks that match the exact appliance or system and its official guide.
-
Check 1
Move food and absorbent materials away from the puddle, place a shallow container or towels where safe, and inspect from a dry position; disconnect power only from a dry location if water reaches the cord, outlet or electrical area.
Expected result: Note whether water is actively flowing, whether it is clear or has food/debris, whether the freezer is still cooling, and whether the leak is at the front, rear, underside or inside the cabinet.
Next step: Keep the unit unplugged when power or electrical parts are wet and arrange appliance or electrical service as appropriate. If the source appears to be a simple accessible spill, clean it and continue to the pan and drain checks.
Stop if: Do not touch wet plugs, outlets or wiring, tip the freezer, drag it by its cord or keep opening the door while food safety is uncertain.
Why this matters
Why: An active rear leak may be a water-supply connection rather than a drain pan. Water near electrical parts, a burning smell, a damaged cord or a non-cooling freezer changes this from a cleanup task to an appliance-safety service call.
-
Check 2
With power disconnected according to the model manual, inspect the accessible drain pan beneath or behind the freezer without removing sealed refrigeration parts or forcing a cover.
Expected result: Determine whether the pan is full of water, dry but cracked or displaced, dirty with debris, or not present where the manual shows it should be. Look for a water trail from the pan edge or a pan that is not seated.
Next step: If the manual permits cleaning an accessible pan, clean and reseat it with power off, then dry the area and monitor the next defrost event. Replace a damaged pan or have service handle a concealed pan, persistent overflow or a pan that will not seat correctly.
Stop if: Do not bend the pan, remove compressor covers, touch hot compressor components, or restore power while water is on electrical connections.
Why this matters
Why: A full pan points toward overflow or evaporation failure; an empty cracked pan points toward a damaged pan; a displaced or dirty pan can spill even when the defrost drain is working. An inaccessible pan should not be reached by improvised disassembly.
-
Check 3
Inspect the visible freezer drain opening and the area where frost or water collects, using the exact owner manual for access; remove only loose debris that the manual permits and use warm water only if the manufacturer specifies that method.
Expected result: Look for ice covering the drain, food particles, water or ice pooled on the freezer floor, a drain cover that is blocked, or water that returns after a defrost cycle despite an apparently clear opening.
Next step: Use only the model procedure for a permitted clean-out and allow the unit to dry before reconnecting power. If a panel must be removed, the drain reclogs, or water returns, stop and arrange qualified appliance service.
Stop if: Do not use an ice pick, knife, screwdriver, hair dryer, heat gun, heater or boiling water to force ice out, and do not puncture the liner or sealed system.
Why this matters
Why: A blocked or frozen drain can divert defrost water into the freezer or onto the floor. A drain that repeatedly freezes or remains blocked may indicate a deeper restriction, drain-heater or defrost-system issue rather than a one-time obstruction.
-
Check 4
Inspect the freezer door or lid seal, hinge-side closure and cabinet position from outside; compare the gasket contact around the full perimeter and look for frost buildup that could keep the door from closing.
Expected result: Look for a torn or folded gasket, a package blocking closure, a door that does not close or swing shut as designed, heavy frost on the rear or floor, or a freezer tipped forward or visibly unstable.
Next step: Remove only a harmless package obstruction and clean the gasket with the manual-approved method. Have a technician correct a damaged seal, unstable cabinet, repeated frost pattern or leveling issue that requires moving the appliance.
Stop if: Do not force the door, bend hinges, shim the cabinet, chip frost with a sharp tool or keep operating if the unit is unstable or its cord/tubing is strained.
Why this matters
Why: Poor sealing can admit warm air, create excess frost and increase defrost water. A forward tilt or damaged gasket can keep water from following the intended drainage path. Frost concentrated around the drain or rear panel supports a drain or defrost investigation, not a pan-only repair.
-
Check 5
If the freezer has an ice maker, dispenser or water inlet, inspect accessible rear tubing, shutoff and connection points without pulling the unit farther than the service loop allows; after any permitted cleaning, dry the area and observe whether a new defrost cycle recreates the leak.
Expected result: Look for a cracked or kinked line, moisture at a fitting, water behind the appliance, a pan that fills again, water inside the freezer or a puddle that appears independently of defrosting.
Next step: Close the appliance water supply if it can be isolated safely and a connection is leaking, then arrange appliance or plumbing service. If the pan remains dry and the unit stays leak-free after a monitored cycle, return it to normal use while continuing to watch for recurrence.
Stop if: Do not disconnect pressurized tubing, tighten plastic fittings aggressively, bypass a water valve, remove sealed panels or operate with water reaching electrical parts.
Why this matters
Why: A rear connection leak can mimic a drain-pan failure and may continue even when the pan is empty. A repeat leak after the drain and pan are clean suggests a concealed drain, defrost, evaporation or water-supply fault that requires model-specific diagnosis.
Use your observations
Decision map
Find the observation that best matches what you see, then follow the next safe action.
-
PATH 01Safety boundary
What you see
The drain pan contains substantial water and the puddle is at or below its edge, especially after a defrost cycle, while no rear supply connection is wet.
Do this next
Turn the freezer off as directed, clean and reseat an accessible pan, dry the floor and monitor. Persistent filling or overflow needs qualified service for drainage, evaporation and defrost diagnosis.
Why this path and its safety boundary
Why it matters: Overflow or failed evaporation is more likely than a cracked pan. The pan may be dirty, displaced, receiving excessive defrost water or unable to evaporate under the current conditions.
Safety stop: Do not leave the appliance powered with water on electrical parts or continue emptying a pan that refills rapidly.
-
PATH 02Safety boundary
What you see
The pan is empty or nearly empty but has a visible crack, hole, warped edge or displacement, and water trails from that area.
Do this next
Keep the freezer dry and arrange model-specific pan replacement or appliance service. Do not patch the pan with an unapproved material as a permanent repair.
Why this path and its safety boundary
Why it matters: The pan itself may be leaking or failing to catch defrost water. A replacement must match the freezer model and fit; a generic tray can interfere with airflow or components.
Safety stop: Do not remove compressor or rear covers beyond the manual, bend the pan into position or touch hot or energized components.
-
PATH 03Safety boundary
What you see
Water or ice pools inside the freezer, the pan is not receiving water normally, and the drain opening is covered by ice or debris or the leak returns after defrosting.
Do this next
Use only the owner manual's permitted drain access and cleaning method. If a cover must be removed, the drain reclogs or water returns, call qualified appliance service.
Why this path and its safety boundary
Why it matters: A blocked or frozen defrost drain is more likely than a pan crack. Repeated freezing can indicate a deeper restriction or defrost-system fault.
Safety stop: Do not puncture the liner, use sharp tools or heat appliances, or force ice through a hidden drain path.
-
PATH 04Safety boundary
What you see
The water is concentrated behind or beside the freezer, a connected line or fitting is wet, or the leak appears when the ice maker or dispenser calls for water rather than during defrost.
Do this next
Isolate the appliance water supply if safe and arrange appliance or plumbing repair. Replace tubing or fittings only after model and connection requirements are confirmed.
Why this path and its safety boundary
Why it matters: A supply line, inlet fitting, filter connection or valve is more likely than the defrost pan. Water can run under the cabinet and make the pan look responsible.
Safety stop: Do not disconnect pressurized tubing, pull the freezer hard against the wall or restore water while a fitting continues to leak.
-
PATH 05Safety boundary
What you see
The gasket does not seal, a package blocks closure, the unit is tipped forward, or heavy frost appears before water reaches the pan.
Do this next
Correct a simple obstruction and clean the gasket according to the manual. Arrange service for a damaged seal, unstable cabinet, repeated frost or a defrost-system fault.
Why this path and its safety boundary
Why it matters: Warm-air intrusion, poor closure or cabinet position may be adding frost and defrost water or preventing proper drainage. A drain-pan cleaning alone may not prevent recurrence.
Safety stop: Do not chip frost with sharp tools, bend hinges or move a connected appliance if its cord or tubing is strained.
Helpful context
Understand the symptom
Find out whether the pan is overflowing or being bypassed
A frost-free freezer can put water into its pan during defrosting, so a small amount of water in the pan is not itself a failure. The important observation is where the water goes. A full pan with water on the floor suggests overflow or failed evaporation. An empty pan while water appears inside the cabinet suggests a blocked or frozen drain, a disconnected drain path or water arriving from somewhere else. Do not assume every puddle under the freezer came from the pan; a supply line, filter, ice maker or spill can look similar.
Ice and debris change the safe repair boundary
Food particles and ice can block a defrost drain, but freezer layouts differ and the drain may be behind an interior panel. Use the model manual for access and cleaning. If the drain freezes again, water returns after a defrost cycle, or a cover must be removed to reach the path, stop repeating the symptom and arrange service. A sharp tool can puncture the liner or a sealed refrigeration component, and a hair dryer or heater introduces electrical and heat hazards.
Do not overlook the door, level and water connections
A door that does not seal can add frost and defrost water, while an appliance tipped forward can keep water from reaching the intended pan. A loose or cracked supply line at the rear can produce a separate leak, especially on models with an ice maker or dispenser. These checks are visual and model-specific; do not pull a connected appliance farther than its tubing and cord allow or tighten a wet fitting while it is pressurized.
Safety boundary
Stop conditions
- Disconnect power from a dry location if water reaches the cord, outlet or electrical parts; do not touch wet electrical connections or operate the freezer in an unsafe condition.
- Do not use an ice pick, knife, screwdriver, hair dryer, heat gun, heater or other electrical appliance to force defrosting; sharp tools can damage the freezer and heat or electricity can create injury and fire hazards.
- Do not pull the freezer farther than its cord, water line and service loop allow, disconnect pressurized tubing or aggressively tighten plastic fittings.
- Do not remove sealed-system or compressor covers, bypass defrost or water valves, patch a cracked pan as a permanent repair or install a replacement part without the exact model fit.
- Call qualified appliance or plumbing service for a recurring overflow, concealed drain blockage, cracked inaccessible pan, active supply leak, electrical damage, loss of cooling or any condition that cannot be safely isolated.
Only after diagnosis
Potential parts
- model-specific freezer drain pan
Consider this only if inspection confirms the original pan is cracked, warped, displaced beyond adjustment or otherwise unable to retain defrost water.
Match the exact freezer model, pan location, mounting points, compressor clearance and evaporation design; do not use an improvised tray. - defrost drain or drain-heater component
Consider this only when a qualified diagnosis confirms a recurring frozen or blocked drain caused by a failed heater, drain assembly or related defrost system.
Match the exact model, voltage, defrost design, wiring and installation instructions; do not bypass a defrost safety component. - freezer door gasket
Consider this only when the model-specific inspection confirms a torn, deformed or non-sealing gasket is admitting warm air and causing frost or drainage symptoms.
Match the exact model, door configuration and gasket profile; verify closure and seal without bending hinges or overloading the door. - freezer water-supply tubing or inlet valve
Consider this only when a connected ice-maker or dispenser line, fitting or inlet valve is confirmed to be the leak source.
Match the exact model, tubing material and diameter, fitting style, pressure requirements and shutoff arrangement; isolate water before service.
When checks do not resolve it
Need a professional?
Arrange qualified appliance service when the drain pan is cracked or inaccessible, the defrost drain repeatedly freezes or clogs, water returns after an allowed clean-out, the freezer stops cooling, or electrical parts are wet. Arrange plumbing or appliance service for a leaking pressurized water line, inlet valve or filter connection. A homeowner may clean an accessible pan or outlet only when the exact manual permits it and power and water are safely isolated.
Safety scope: This article supports safe visual checks and model-directed cleaning of an accessible pan or drain only. Do not use sharp or heated tools, handle wet electrical parts, disconnect pressurized lines or remove sealed-system covers.
Common questions
FAQ
Is water in a freezer drain pan normal?
Some water in a drain pan during or after an automatic defrost cycle is normal. Water on the floor is not: check whether the pan is full, cracked, displaced or being bypassed by a blocked or frozen defrost drain.
Why does my freezer drain pan overflow?
Possible causes include a dirty or displaced pan, failed evaporation, excessive defrost water, a blocked drain path or a door-seal and frost problem. Turn the unit off only as the manual directs, inspect accessible parts and arrange service if the pan refills or overflow recurs.
Can I unclog a freezer defrost drain with a knife or hair dryer?
No. Sharp tools can damage the liner or sealed refrigeration system, and a hair dryer or heater creates electrical and heat hazards. Use only the exact owner-manual drain and defrost method; call service if a panel or recurring ice blockage is involved.
Could a water line be mistaken for a leaking drain pan?
Yes. A connected ice-maker, dispenser or filter line can leak behind the freezer and run underneath it. Inspect accessible tubing and fittings from a dry position, isolate the appliance water supply if safe and arrange service for a pressurized or recurring leak.
Does the freezer door seal affect drain-pan leaks?
It can. A poor seal admits warm air, increases frost and can add defrost water or interfere with drainage. Check for package obstructions, gasket damage and a freezer that is tipped forward, but do not bend hinges or move a connected appliance forcefully.
When should I call an appliance technician for a leaking freezer pan?
Call when the pan is cracked or inaccessible, the drain repeatedly freezes or clogs, water returns after an allowed clean-out, the freezer stops cooling, electrical parts are wet or a rear supply connection leaks. Do not open sealed-system covers or operate unsafe equipment.
Read the exact guide
Official sources
- What should I do when water leaks from the drain tray of the refrigerator?Samsung · Samsung appliance support guidance used for general drain-tray failure patterns; exact freezer model access and service requirements control.
- How to Defrost the Freezer - Product HelpWhirlpool · Whirlpool freezer guidance used for general defrost safety and drain-pan checks; exact owner manual controls the model procedure.
- How to Check the Water Supply LineWhirlpool · Whirlpool refrigerator water-supply guidance used for connected freezer leak diagnosis; exact line and fitting requirements are model-specific.
- What should I do if I suspect my Samsung fridge/freezer is leaking water?Samsung · Samsung fridge/freezer support guidance used for diagnostic separation; exact model manual controls panel removal and repairs.
- Upright & Chest Freezer - Explanation of a Water Dripping SoundGE Appliances · GE freezer support guidance used to explain normal defrost-pan operation; it does not diagnose a leaking pan on another model.
- What to Do if There is Water on the FloorWhirlpool · Whirlpool leak troubleshooting used to distinguish a drain-pan leak from filter, dispenser or supply-line water; exact model manuals control repairs.
Community feedback
Share a repair observation
Share a plain-text repair observation. Accepted observations are published automatically; this page may take a moment to update.