
On this page
Start here
Quick answer
A freezer leaking water while frost is present usually has melted frost or defrost water that is not staying in its intended drain path, or warm moist air is entering through a door, gasket, vent, or ice-maker opening and creating excess frost. Protect the floor and food, identify whether the water is inside the compartment, under the appliance, or at a water connection, and inspect only the closed door seal, visible vents, and accessible loading obstructions. If frost is heavy, use the model manual's defrost procedure and never use a hair dryer, flame, knife, or sharp scraper. If the leak returns after safe defrosting, the drain remains blocked, cooling is poor, the gasket is damaged, or water is near an outlet, stop using the affected function and arrange appliance service.
Before you begin
Safety first
- This article covers safe location, door-seal, loading, visible-vent, and manual-directed defrost observations only. Do not use heat or sharp tools, remove panels, access hidden drains or wiring, disconnect water tubing, or handle refrigerant components.
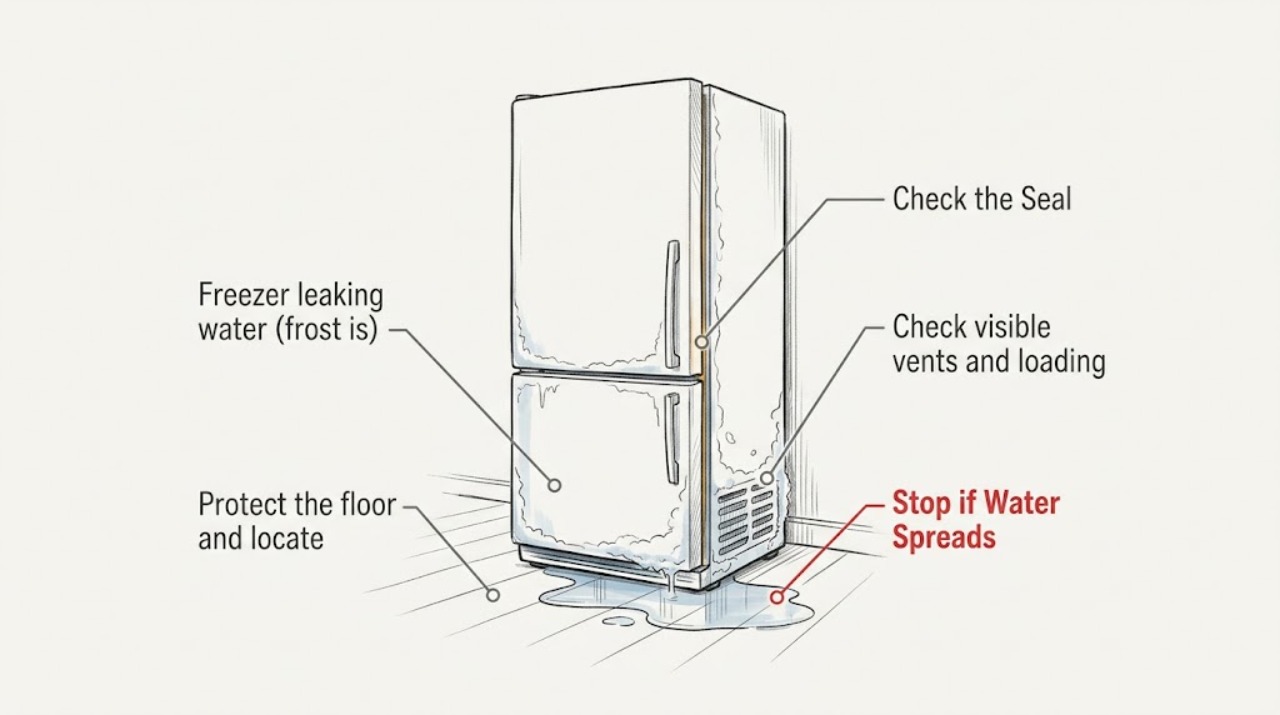
Work through in order
Diagnostic checks
Use only checks that match the exact appliance or system and its official guide.
-
Protect the floor and locate the water source
Move food only as needed to prevent spoilage, place absorbent towels on the floor, and inspect from a dry, stable position without pulling the appliance out. Note whether the water is inside the freezer, under the front or rear, at an ice-maker or dispenser connection, or coming from a nearby spill.
Expected result: Water is confined to the compartment, appears beneath the appliance, follows ice-maker or water use, or is present near the electrical outlet or cord.
Next step: Dry the accessible area and continue only with safe closed-door observations when the source is not near electricity. If the source is a water connection, persistent stream, or unsafe outlet area, stop the affected function and arrange service.
Stop if: Do not touch wet electrical connections, pull on tubing, move a heavy appliance across a wet floor, or keep operating when water can reach the outlet, cord, or other electrical equipment.
Why this matters
Why: Water inside with frost points toward meltwater, a blocked drain, or a container spill; water beneath can involve a drain pan or drain path; water that follows water-system use can involve a connection or valve. Water near electrical equipment is an immediate stop-use condition.
-
Check the closed door and gasket for an air gap
Close the freezer door or lid and inspect the visible gasket around its perimeter. Look for a torn, split, warped, dirty, pulled-out, or folded section and for food, ice, a drawer, or a package preventing full closure; remove only a loose obstruction that can be reached without force.
Expected result: The gasket contacts the cabinet continuously, a visible gap or light remains, the door is held open by contents or frost, or the gasket is damaged.
Next step: Reposition only loose contents and clean a dirty gasket with the method allowed by the owner's manual. If the gasket is torn, the door will not close, or frost blocks the seal, arrange model-specific service or defrosting guidance.
Stop if: Do not cut, glue, heat, pry, or reshape the gasket, force a drawer or door, or continue using the freezer when the door cannot close and food safety is uncertain.
Why this matters
Why: A gap lets warm moist room air enter and can create frost that later melts as water. A continuous seal makes a door leak less likely, but it does not rule out a concealed drain or defrost issue.
-
Check visible vents and loading around the frost
From inside the compartment, inspect the visible air vents and the area where frost is forming. Move only packages that are clearly pressed against a vent or preventing the door from closing; do not scrape ice from a vent or remove an interior panel.
Expected result: A vent is covered, frost is concentrated near the door edge or vent, the compartment is overloaded, or the vents and loading path are clear.
Next step: Restore the manual-specified clearance around vents and close the door. If the frost is heavy or blocks the airflow path, follow the model manual's defrost procedure rather than chiseling it away.
Stop if: Do not poke vents, chip bonded frost, use a sharp tool or heat source, or remove an evaporator cover or fan guard as a user check.
Why this matters
Why: Blocked vents reduce circulation and can worsen temperature and moisture problems. Frost concentrated at the door edge supports air entry, while a clear path with heavy frost shifts concern toward defrost, drain, sealing, or cooling service.
-
Distinguish normal defrost dripping from a floor leak
Without opening service panels, listen and observe during normal operation and note whether a frost-free freezer produces a brief dripping sound inside while no water reaches the floor. Do not deliberately trigger a defrost cycle or pull the appliance out to inspect its pan.
Expected result: Dripping is heard only during a defrost period and remains contained, or water appears in the compartment or on the floor; the freezer may also show heavy frost or poor cooling.
Next step: Monitor only when the water remains contained and cooling is normal. For any visible leak, recurring frost, poor cooling, or uncertain source, record the timing and arrange appliance service.
Stop if: Do not remove panels, reach into the drain pan area, tilt the appliance, or treat a floor leak as normal dripping.
Why this matters
Why: GE explains that frost-free upright and chest freezers can drip melted water into a defrost drain pan during defrost. Contained sound alone can be normal; visible pooling or a recurring floor leak indicates the drain path, pan, seal, water system, or defrost behavior needs further assessment.
-
Use the manual's defrost procedure for heavy frost
If the model manual provides a user defrost procedure, follow it exactly: protect food, keep water contained with towels, and use only the manual-approved power and door position steps. Allow the frost to release naturally or use only a method expressly permitted by the manual.
Expected result: The frost clears and the water remains contained, frost is bonded or too heavy for a user procedure, or the freezer leaks again after it is dry and returned to normal operation.
Next step: If the manual defrost completes without damage, restore the appliance as directed and observe whether frost and water return. If the manual is unavailable, the appliance cannot be safely defrosted, or the leak returns, arrange qualified appliance service.
Stop if: Never use a hair dryer, heat gun, flame, boiling water, knife, screwdriver, or sharp scraper; do not puncture the liner or touch hidden heaters, fans, wiring, or refrigerant tubing.
Why this matters
Why: A safe defrost can remove ice that blocks airflow or a drain, but it cannot prove that the original cause is repaired. Frost that is bonded, recurring, or accompanied by a leak suggests service is needed rather than a faster thaw.
-
Check an equipped ice-maker water path only from safe access
If the freezer has an ice maker or water connection, observe the accessible tubing, filter area, and connection points without removing fittings. Note whether the leak follows ice production, dispenser use, filter replacement, or a recent move; do not pull the appliance out across water.
Expected result: A connection or tubing is visibly wet, cracked, loose, or leaking only after water use, or no water-system pattern is present.
Next step: Stop the ice maker or water function if the model allows that without touching wet wiring, close the household water supply only when its shutoff is plainly accessible and safe, and arrange service for a wet or damaged connection.
Stop if: Do not disconnect tubing, tighten hidden fittings, remove a filter housing, handle wet electrical parts, or operate a leaking water system to reproduce the leak.
Why this matters
Why: A water-system leak can be independent of frost, while warm air entering through an ice chute, bucket, or door seal can create frost and meltwater. An absent pattern shifts attention back toward defrost, drain, door sealing, or condensation.
Use your observations
Decision map
Find the observation that best matches what you see, then follow the next safe action.
-
PATH 01Safety boundary
What you see
A frost-free freezer produces an occasional dripping sound during defrost, but the water stays in its intended pan and there is no interior pooling or floor leak.
Do this next
Keep the door closed normally, avoid blocking vents, and monitor for water escaping containment or frost returning excessively.
Why this path and its safety boundary
Why it matters: This pattern can be normal defrost operation rather than a leak. The frost pattern, cooling performance, and floor condition remain the deciding observations.
Safety stop: Do not remove panels or treat a new floor puddle, heavy frost, or poor cooling as normal dripping.
-
PATH 02Safety boundary
What you see
Frost is concentrated around the door edge or vent, a package holds the door open, a gasket has a gap, or the closed door does not seal continuously.
Do this next
Remove only the loose obstruction, clean the gasket as the manual allows, and arrange service for a torn gasket, misaligned door, or frost that prevents sealing.
Why this path and its safety boundary
Why it matters: Warm moist air entry is a strong contributor to the frost; later meltwater can overwhelm the intended drain path or run into the compartment.
Safety stop: Do not glue, heat, cut, or force the gasket or door, and do not continue operation if the door cannot close.
-
PATH 03Safety boundary
What you see
Frost is heavy enough to cover vents, block a drawer or door, or reduce airflow, and the leak appears after frost begins melting.
Do this next
Use the exact manual defrost procedure once, protect the floor and food, and request service if frost or water returns after the compartment is dry.
Why this path and its safety boundary
Why it matters: The frost itself can create a cycle of restricted airflow and meltwater, but its cause may be sealing, drain, defrost, or another model-specific fault.
Safety stop: Do not chip bonded ice, use heat, puncture the liner, or remove an internal panel to reach the frost or drain.
-
PATH 04Safety boundary
What you see
Water pools inside the freezer, appears under a frost-covered rear area, or returns after a safe defrost while the door seal and loading path are normal.
Do this next
Keep food protected, avoid repeated thawing, and arrange qualified appliance service for the drain and defrost system. Provide the frost location and whether water follows a cycle or power event.
Why this path and its safety boundary
Why it matters: A concealed or restricted defrost drain, drain pan path, defrost-system issue, or installation condition is more likely than a simple door obstruction.
Safety stop: Do not pour water into a hidden drain, insert wire, remove an evaporator cover, or use heat to clear an inaccessible passage.
-
PATH 05Safety boundary
What you see
Water appears at an accessible ice-maker, filter, or supply connection, or the leak follows ice production, dispensing, filter replacement, or moving the appliance.
Do this next
Stop the ice or water function when safely possible, avoid wet electrical areas, and arrange service for the connection or valve. Do not use the freezer's water feature until the leak is resolved.
Why this path and its safety boundary
Why it matters: The leak may be in the water system rather than the frost or defrost path; frost can still be a secondary result of a door or ice-chute seal problem.
Safety stop: Do not disconnect or reroute tubing, pull the unit out over water, or continue operating a visibly leaking line.
-
PATH 06Safety boundary
What you see
Water reaches electrical equipment, the appliance has a damaged cord or outlet, the floor is contaminated or slippery, cooling is failing, or frozen food is thawing significantly.
Do this next
Keep people away, follow the owner's manual and local safety guidance for shutting down the appliance from a dry location, protect or relocate food if safe, and arrange urgent appliance service.
Why this path and its safety boundary
Why it matters: Electrical, slip, food-safety, and property risks now outweigh further troubleshooting. A visible frost pattern cannot make this safe to continue operating.
Safety stop: Do not touch wet plugs or switches, stand in pooled water, use heat to defrost, or reopen the cabinet to investigate hidden parts.
Helpful context
Understand the symptom
Frost and water are connected, but the leak location matters
Frost forms when moisture enters a cold compartment and freezes. When that frost melts during a defrost cycle or after a door-seal problem is corrected, water must travel through the appliance's intended drain path and pan. A few drops heard inside a frost-free freezer can be normal, while water pooling inside the compartment or reaching the floor is not automatically normal. Start by mapping where the water appears and whether it follows a defrost event, door opening, ice-maker use, spill, or power interruption.
Do not turn a frost problem into a cabinet or electrical problem
Heavy frost can hide vents, block a drawer or door from closing, and obscure the drain area. Follow the exact owner's manual procedure for a full defrost and protect the floor with towels. Manufacturers warn against using a hair dryer or another heat source to speed defrosting. Do not chip at bonded ice, puncture a liner, remove an evaporator cover, or reach toward wiring, fans, heaters, or a drain passage that is not designed for user access.
A recurring leak needs a cause, not repeated defrosting
If frost returns after the door closes correctly and the compartment is defrosted according to the manual, the remaining possibilities can include a damaged gasket, concealed drain restriction, defrost-system fault, blocked airflow, level or installation issue, or an ice-maker or water-line leak on equipped models. A temporary thaw can remove the symptom without repairing the cause. Record the frost pattern, leak location, timing, temperature behavior, and any water-system use for service.
Safety boundary
Stop conditions
- Do not use a hair dryer, heat gun, flame, boiling water, knife, screwdriver, or sharp scraper to melt or remove freezer frost.
- Do not puncture the liner, remove evaporator or fan covers, reach toward heaters or wiring, insert a wire into an inaccessible drain, or handle refrigerant components.
- Stop for water near an outlet or cord, a damaged plug, a slippery or contaminated floor, a continuous leak, or any need to move the appliance across pooled water.
- Do not continue operating a visibly leaking ice-maker or water line, disconnect tubing, or operate wet electrical components to reproduce the leak.
- Arrange qualified appliance service when safe defrosting does not stop the leak, frost returns, cooling is poor, the gasket is damaged, the drain is inaccessible, or the cause is uncertain.
Only after diagnosis
Potential parts
- freezer door gasket
Consider this category only when the exact door seal is torn, warped, or unable to contact the cabinet after loading and cleaning checks, and service confirms the gasket is the cause of air entry and frost.
Confirm the appliance model, door or lid configuration, gasket profile, and installation procedure before ordering. - defrost drain or drain-pan component
Consider this category only after service confirms a damaged or restricted drain path or pan; a temporary thaw does not identify which component is responsible.
Confirm the exact freezer design and manufacturer fit information; do not substitute an improvised drain tube or alter an inaccessible passage. - defrost-system component
Consider this category only when qualified diagnosis finds a recurring frost pattern consistent with a defrost-system fault after door sealing, loading, vents, and drainage are evaluated.
Confirm the exact model, component position, electrical requirements, and manufacturer procedure; internal defrost parts are not ordinary user-service items. - ice-maker water valve or tubing
Consider this category only when the freezer has a water system and service confirms a leak at the valve, tubing, filter housing, or connection after the water source is isolated.
Confirm the exact appliance model, tubing and connection type, and manufacturer fit information; do not operate or modify a visibly leaking water system.
When checks do not resolve it
Need a professional?
Arrange qualified appliance service when water pools inside or under the freezer, heavy frost returns after the model's safe defrost procedure, the drain or evaporator area is inaccessible, the door or gasket cannot seal, cooling is poor, an ice-maker or water connection leaks, or the source is uncertain. Stop using the affected appliance or water function and seek urgent help for water near electrical equipment, a damaged cord or outlet, a continuous stream, a slippery or contaminated floor, or significant food thawing.
Safety scope: This article covers safe location, door-seal, loading, visible-vent, and manual-directed defrost observations only. Do not use heat or sharp tools, remove panels, access hidden drains or wiring, disconnect water tubing, or handle refrigerant components.
Common questions
FAQ
Why is my freezer leaking water when there is frost inside?
Frost can melt during defrost or after warm moist air has entered through a door, gasket, vent, or ice-maker opening. The water should remain in the appliance's intended drain path; pooling inside or on the floor can indicate a blocked drain, pan, defrost issue, seal problem, or water-system leak.
Is dripping inside a frost-free freezer normal?
A contained dripping sound during a defrost cycle can be normal on frost-free designs because melted frost flows to a drain pan. Visible water on the floor, recurring interior pooling, heavy frost, poor cooling, or an uncertain source is not a reason to ignore the leak.
Can I use a hair dryer to melt freezer frost faster?
No. Samsung warns that using a hair dryer or another heat source can damage the appliance. Follow the owner's manual's defrost procedure, and never use a flame, boiling water, knife, screwdriver, or sharp scraper near the liner, wiring, fan, heater, or refrigerant tubing.
What does frost around the freezer door mean?
Frost around the door edge often means warm moist air is entering through a gap, blocked contents, a damaged gasket, or a door that is not closing fully. Remove only a loose obstruction, inspect the visible seal, and arrange service for a torn gasket, misalignment, or frost that returns.
When should I call for service for a freezer leak?
Request service when a safe manual defrost does not stop the leak, frost returns, the drain or evaporator area is inaccessible, cooling is poor, the door cannot seal, an ice-maker or water connection leaks, or multiple causes remain possible. Stop for water near electrical equipment, a continuous leak, a slippery floor, or significant food thawing.
Read the exact guide
Official sources
- How to Help Eliminate Condensation and FrostWhirlpool Corporation · Whirlpool manufacturer guidance used for general door, humidity, and vent observations; the owner's manual controls the exact appliance procedure.
- Frost forms in the Samsung freezer, refrigerator, or ice bucketSamsung · Samsung manufacturer guidance used for general frost mechanisms and safe observations; exact controls and defrost procedure vary by freezer model.
- Leaking at the Bottom - Bottom Freezer RefrigeratorWhirlpool Corporation · Whirlpool manufacturer leak guidance used only for equipped bottom-freezer water-line and filter connection observations; a standalone freezer may not have these components.
- Upright & Chest Freezer - Explanation of a Water Dripping SoundGE Appliances · GE manufacturer explanation used to distinguish contained defrost dripping from visible water leakage; it does not establish the internal design of another freezer.
Community feedback
Share a repair observation
Share a plain-text repair observation. Accepted observations are published automatically; this page may take a moment to update.