
On this page
Start here
Quick answer
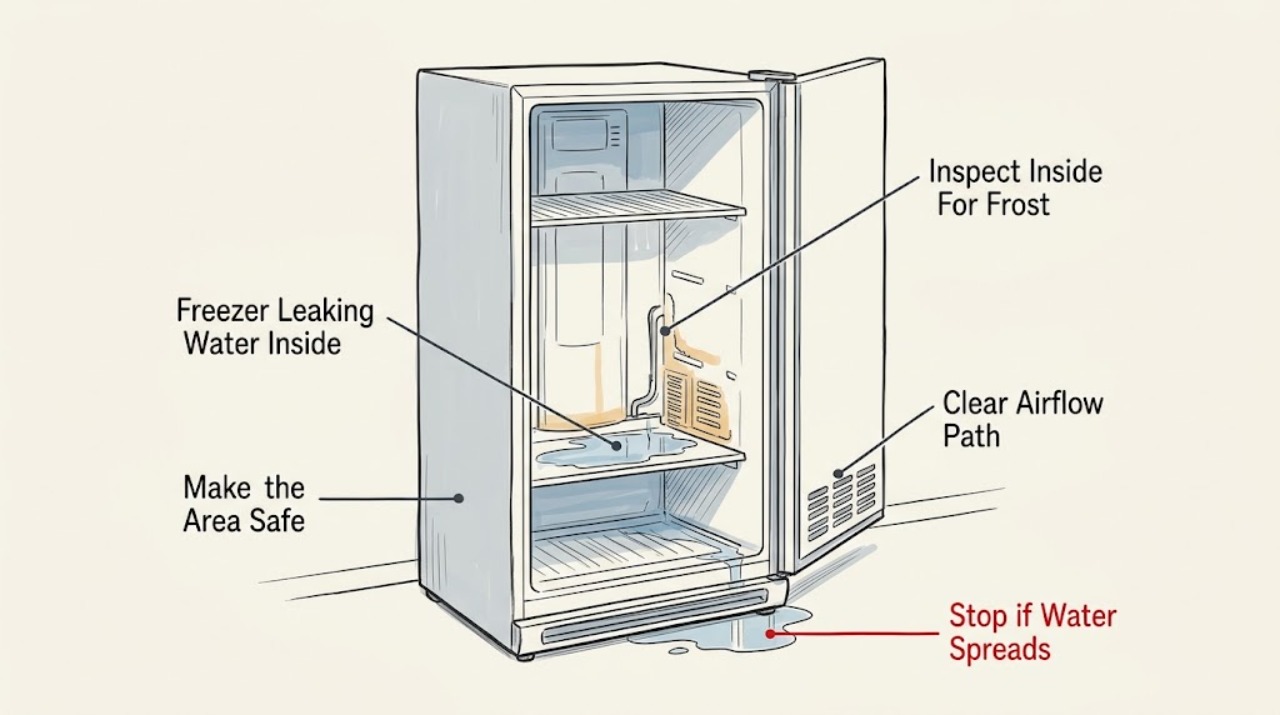
A freezer leaking water inside or beneath it most often needs the leak source separated into a defrost-drain path, door-and-frost problem, or water-supply circuit. Keep the door closed, protect the floor, and do not reach through water toward a cord or outlet. Look for ice or water on the freezer floor, a blocked or hidden defrost drain, a door or gasket that stayed open, and wet tubing or a filter housing only if the appliance has an ice maker or dispenser. Correct only an accessible obstruction or door-loading issue allowed by the model manual. If the drain requires panel removal, the water line continues to leak, the pan or tubing is damaged, cooling is affected, or water is near electrical parts, stop and arrange qualified appliance service.
Work through in order
Diagnostic checks
Use only checks that match the exact appliance or system and its official guide.
-
Check 1
Keep the freezer door or lid closed while you place towels or a shallow container on the floor. If water is near the plug, outlet, power strip, or wiring, do not reach through it; disconnect power only from a dry, safe position or have an electrician handle the hazard. Blot accessible surfaces and note where fresh water appears first.
Expected result: Water starts inside the compartment, appears at the front or beneath the cabinet, comes from a rear water connection, or is close to an electrical component.
Next step: Keep the appliance closed and isolated from the hazard. Continue only with dry, external visual checks; arrange appliance service for an unclear source, an active leak, or any water near electrical parts.
Stop if: Do not pull the freezer through standing water, touch a wet plug or outlet, remove energized covers, or leave food and water damage unattended while repeatedly testing the unit.
Why this matters
Why: The first wet location helps separate defrost or frost melt from an external supply leak or pan problem. Water near electrical parts is an immediate safety boundary regardless of the appliance's likely cause.
-
Check 2
After the area is safe, inspect the freezer floor and the back wall or drain location shown in the model manual without removing an interior panel. Look for a sheet of ice, a puddle below a basket, frost around a drain opening, or water that returns during or after a defrost cycle.
Expected result: Ice and water collect on the freezer floor, the drain opening is visibly blocked by loose ice or debris, water also reaches the floor in front of the unit, or the interior is dry and the leak is only external.
Next step: Clear only loose debris that the model manual explicitly permits you to access. If the drain is hidden, frozen solid, requires a panel, or the leak returns, keep the freezer closed and arrange service for the defrost drain and pan path.
Stop if: Do not chip ice with a knife or screwdriver, pour boiling water into the cabinet, puncture tubing, or remove evaporator or rear panels without model-specific instructions and appropriate service skills.
Why this matters
Why: Ice or water on the floor of a frost-free freezer is consistent with a restricted defrost-drain path. A dry interior makes a supply connection, drain pan, condensation, or another external source more likely; the visible pattern alone does not identify a failed component.
-
Check 3
Inspect the door or lid gasket and the cabinet contact surface. Remove a package that protrudes into the seal, confirm drawers and shelves are fully seated, and check that stored items are not blocking the model's air vents. Close the door completely and check whether the gasket contacts the cabinet around its perimeter.
Expected result: The door was left open, the gasket has a visible gap or obstruction, packages block vents, or the gasket and door close evenly with no unusual frost.
Next step: Correct only the accessible package, drawer, vent, or gasket-surface obstruction and let the freezer stabilize with the door closed. If the gasket is torn, the door is misaligned, frost returns heavily, or water continues, arrange appliance service.
Stop if: Do not stretch, glue, cut, heat, or replace a gasket without confirming the exact model; do not force the door or chip away a frost mass that may conceal tubing.
Why this matters
Why: A door gap or blocked seal can admit humid air, build frost, and create water when that frost melts. A normal seal makes a door-induced leak less likely, so persistent water points back toward the drain, pan, or water circuit.
-
Check 4
If the freezer or refrigerator has an ice maker, dispenser, or water filter, inspect only accessible tubing, fittings, the filter housing, and the shutoff connection. Dry each area with a paper towel, wait briefly without operating the dispenser, and check which point becomes wet. Confirm the filter is fully seated and its seals are present only as the model instructions describe.
Expected result: The supply tube, fitting, filter housing, or valve becomes wet; the filter is cracked or not seated; or the accessible water circuit remains dry while water appears inside or beneath the freezer.
Next step: If safe and accessible, close the household water shutoff serving the appliance and keep the freezer from dispensing water. Replace only a confirmed, model-matched consumable through the normal maintenance procedure; use service for a cracked line, valve, housing, or continuing leak.
Stop if: Do not disconnect pressurized tubing, overtighten plastic fittings, pull the appliance across a wet floor, or operate the dispenser to reproduce an active leak.
Why this matters
Why: A wet supply connection or damaged/mis-seated filter can explain an external or cabinet leak on models with a water circuit. A dry accessible circuit makes a defrost drain, pan, door-frost, or concealed leak more likely.
-
Check 5
From the front and sides, inspect the accessible area beneath the freezer for a displaced, cracked, or overflowing drain pan and for a continuing drip. Do not remove panels or move a built-in or heavy unit. Record whether the leak follows defrosting, door openings, water dispensing, or appears continuously, along with the model number.
Expected result: The pan is visibly displaced or damaged, water returns after defrost, the drip is continuous, or the pan and external area are dry while water reappears inside.
Next step: Keep the appliance off or closed as needed to limit damage and arrange qualified service for a damaged pan, concealed drain, recurring water, or any leak that cannot be traced safely. Give the technician the source location and timing pattern.
Stop if: Do not tilt the freezer, access sealed refrigeration tubing, remove the compressor cover, or keep running it while water reaches wiring, insulation, or the floor.
Why this matters
Why: A pan or drain-path issue is more likely when water arrives after defrost and collects beneath the unit. A continuous drip suggests a supply connection or valve when a water circuit exists. A dry accessible pan does not rule out a concealed drain or internal leak.
Use your observations
Decision map
Find the observation that best matches what you see, then follow the next safe action.
-
PATH 01Next step
What you see
A frost-free freezer has ice or water on its floor, especially below a basket or near the back-wall drain area.
Do this next
Use only the model manual's accessible-drain procedure. If the drain is hidden, frozen solid, or the leak recurs, arrange appliance service instead of removing panels or forcing ice loose.
Why this path and its safety boundary
Why it matters: A restricted defrost-drain path is more likely; the melted water is not reaching its normal pan route. Access may require disassembly on some models.
-
PATH 02Next step
What you see
The door was left open, a package blocked the gasket, the gasket has a gap, or vents were obstructed and excess frost is present.
Do this next
Correct the accessible loading or seal obstruction and observe with the door closed. Escalate if the gasket remains damaged, the door will not close evenly, or water returns after frost should have stabilized.
Why this path and its safety boundary
Why it matters: Warm humid air entering through the door is more likely to have created frost that later melts into water; a gasket or alignment defect may still remain.
-
PATH 03Next step
What you see
A freezer with an ice maker, dispenser, or filter has a wet tube, fitting, filter housing, or valve while the defrost area is not the source.
Do this next
Close the accessible household water shutoff and stop using the dispenser. Use qualified appliance service for pressurized tubing, valves, damaged housings, or a leak that continues after a model-approved filter reseat.
Why this path and its safety boundary
Why it matters: A water-supply connection or filter seal is more likely than a defrost drain problem, and continued pressure can worsen floor damage.
-
PATH 04Next step
What you see
Water appears continuously beneath the freezer, the pan is damaged or overflowing, the source cannot be seen, or water is near electrical parts.
Do this next
Keep the area dry and the appliance isolated from the hazard, protect nearby flooring, and arrange appliance service. Use an electrician for an unsafe wet outlet or cord condition.
Why this path and its safety boundary
Why it matters: A drain pan, concealed drain, supply valve, internal component, or electrical safety issue needs professional assessment; the visible puddle does not identify which part failed.
Helpful context
Understand the symptom
Start with the location, not a guessed part
Water inside the cabinet is not automatically a failed drain, and water beneath the freezer is not automatically a refrigerant or compressor problem. A frost-free unit normally sends defrost water through a drain to a pan; a door left open can create extra frost that later melts; a freezer with an ice maker or dispenser can also leak from its water circuit. Dry the accessible area and trace where new moisture first appears.
Model instructions control access to the drain
Freezer layouts differ. Some drain openings are visible, while others sit behind an interior panel and require disassembly. Use the exact model manual before removing shelves, panels, or a drain cover. Do not chip ice with a knife, apply an improvised heat source, or move a heavy appliance through standing water.
Only after diagnosis
Potential parts
- defrost drain or drain pan component
Only consider this component category after the model-specific diagnosis confirms ice or water on the freezer floor and a restricted or damaged defrost path.
Drain routing, pan design, and access vary by model; confirm the exact model and use qualified service when panels or sealed areas are involved. - freezer water filter, tubing, or filter housing component
Only consider this category when an appliance with a water circuit has a confirmed wet filter, fitting, tube, or housing and the exact leak source is identified.
Filter seals, tubing, and fittings are model-specific and may remain pressurized; verify the model and shut off water before service.
When checks do not resolve it
Need a professional?
Arrange qualified appliance service when water returns after accessible door, loading, and dry-area checks; ice or water on the freezer floor points to a hidden or frozen defrost drain; the drain or pan requires panel removal; a water line, valve, filter housing, or filter continues to leak; the freezer is built in or unsafe to move; cooling or heavy frost is affected; or the source is unclear. Keep the appliance away from wet electrical parts, do not tilt it or access sealed refrigeration tubing, and use electrical help for a wet outlet, cord, or wiring hazard.
Common questions
FAQ
Why is there water inside my freezer?
Ice or water on the floor of a frost-free freezer commonly points to a restricted defrost drain, while a door gap or blocked gasket can create extra frost that later melts. A freezer with an ice maker or dispenser may instead have a filter, tube, or fitting leak. Trace the first wet location and follow the exact model manual before opening panels.
Why is water pooling beneath the freezer?
Water beneath the cabinet can come from a defrost drain or pan, frost created by a door left open, or an external water connection on models with an ice maker or dispenser. A continuous or unexplained leak needs service; do not move the appliance through standing water or reach near a wet outlet.
Can I clear a freezer defrost drain myself?
Only if the exact model manual provides an accessible procedure. Some freezer drain tubes are behind panels and require disassembly, so manufacturer guidance recommends service for those designs. Never chip ice with a sharp tool, puncture tubing, or use an improvised heat source.
What should I do if the freezer water leak is near the power cord or outlet?
Do not touch a wet plug, outlet, or wiring and do not reach through water to disconnect it. Keep people away from the area and have the electrical hazard handled from a dry, safe position; appliance service can diagnose the leak after the electrical risk is controlled.
Read the exact guide
Official sources
- Bottom Freezer Refrigerator - Clogged Drain Tube, Ice on Freezer FloorGE Appliances · Bottom-freezer automatic-defrost drain routing, ice or water symptoms, and service boundary
- How to Help Eliminate Condensation and FrostWhirlpool Corporation · Freezer moisture, frost, door-seal, door-opening, and air-vent checks
- Leaking at the Bottom - Bottom Freezer RefrigeratorWhirlpool Corporation · Bottom-freezer refrigerator external water-line, fitting, shutoff-valve, and filter checks
- Refrigerator Water LeaksFrigidaire · Water leaks inside or outside refrigeration units, door-open frost melt, water filters, and accessible water connections
Community feedback
Share a repair observation
Share a plain-text repair observation. Accepted observations are published automatically; this page may take a moment to update.