
On this page
Start here
Quick answer
Start with the oven cold and the cavity empty. Check for a rack, pan, foil edge, divider, or shifted oven floor blocking the door, then look for a door that was removed and not fully reseated, a hinge that is out of position, a damaged gasket, or a latch left in a self-clean position. GE says door-removal and reseating steps vary by model, and a door is heavy; use the exact manual rather than forcing or lifting it by the handle. A new gasket can feel stiff, but a door that remains open, crooked, catches, shows scorching, or will not close freely needs service. Do not force the hinges or latch, operate with a door that cannot close safely, or work on a hot, energized, or gas appliance.
Before you begin
Safety first
- This article covers cooling, removing loose cookware or racks, visible obstruction and gasket observation, model lookup, and one gentle cold closure check. A technician must handle door removal, hinge springs and locks, brackets, glass, frame, latch, wiring, gas components, and structural repair.
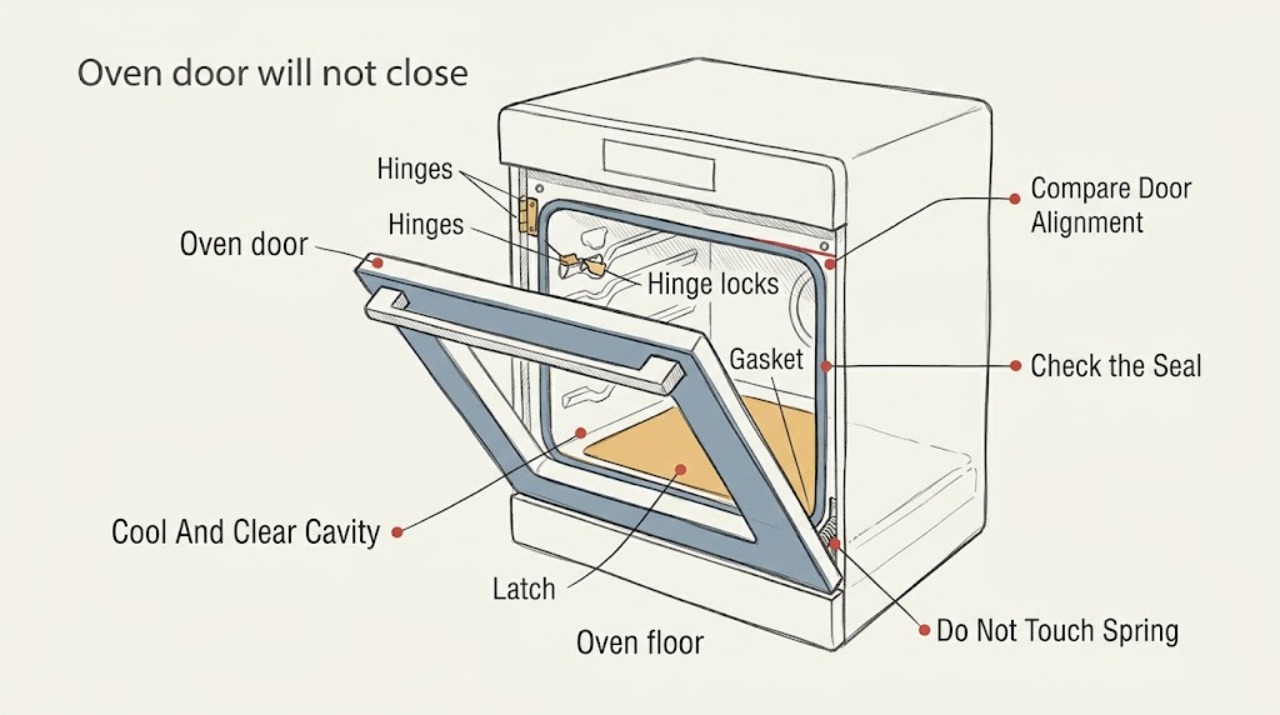
Work through in order
Diagnostic checks
Use only checks that match the exact appliance or system and its official guide.
-
Check 1
Turn the oven off, let it cool fully, and remove only loose cookware or racks that are designed for ordinary user removal. Look along the door path, rack edges, foil, divider, and cavity floor for anything touching the door or frame.
Expected result: A rack, pan, foil edge, divider, spill, or shifted oven floor blocks the door, or the cavity is clear but the door still stops or sits at an angle.
Next step: Remove only a loose user-accessible obstruction and return racks to their correct positions. If the floor is not clearly user-adjustable under the model guide, or the door still will not close, stop and continue to the alignment check or arrange service.
Stop if: Do not pry the door, force a rack, scrape a hot spill, lift a floor panel, or reach into a hot cavity.
Why this matters
Why: A physical obstruction is the first low-risk branch. GE notes that on some models with a hidden bake element, the oven floor can slide forward and block the door; a clear path shifts concern to the gasket, hinge, frame, or latch.
-
Check 2
With the oven cold and empty, view the door from above and both sides without lifting it. Note whether the gap is even, one corner is high, the door was recently removed, a hinge arm is visibly out of position, or a hinge bracket or lock is missing or displaced.
Expected result: The door is straight and evenly spaced, the door was recently removed or reinstalled, one hinge is visibly out of position, or the frame, glass, hinge, or bracket is bent or damaged.
Next step: If the door was recently handled, use the exact GE owner's manual or installation guide to verify the seated hinge and lock position; do not remove a heavy door unless the model guide and safe assistance clearly permit it. Arrange service for a bent hinge, frame, glass, bracket, or unclear access.
Stop if: Do not lift by the handle, hold an unlatched hinge spring, release hinge locks without the model procedure, or attempt to straighten metal or glass.
Why this matters
Why: A recent door-removal event makes incomplete hinge seating or a misplaced bracket more likely. A crooked or visibly damaged door points to alignment or structural repair; GE says the correct removal and reseating sequence varies by model.
-
Check 3
Inspect the gasket perimeter, door glass, frame, and mating oven surface while cold. Look for a gasket folded into the path, a hardened or torn section, a foreign object, scorch mark, or damage that prevents even contact.
Expected result: The gasket is clean and evenly positioned, a loose obstruction or fold is visible, the gasket is torn or hardened, or scorching or smoke staining appears on the oven face.
Next step: Remove only a loose object and place the gasket back into its ordinary visible channel without stretching or heating it. Arrange service for a torn gasket, persistent gap, scorching, smoke staining, damaged glass, or a door that still will not close freely.
Stop if: Do not cut, glue, stretch, heat, lubricate, or pull out the gasket, and do not use the oven with a damaged seal or scorching.
Why this matters
Why: A new gasket may be stiff and can make a door seem less tight, but GE identifies a damaged gasket or broken or misaligned hinge as a service concern when sealing is materially affected. Scorching or smoke staining indicates excessive heat leakage and needs repair.
-
Check 4
If the door is associated with Self Clean or a lock indication, confirm from the control panel that no cleaning cycle is active and let the oven cool naturally. Inspect only the visible latch area for an obvious position mismatch; do not move the latch against resistance.
Expected result: The oven is hot or still completing a cleaning cycle, the latch or display indicates a locked or self-clean state, the door closes but will not latch, or no latch condition is present.
Next step: Follow the exact model's cool-down and unlock instructions. If the door will not close freely, the latch remains displaced, or the latch state is unclear, leave the oven off and arrange service.
Stop if: Do not force or pry the latch, start Self Clean to force a door movement, interrupt a hot cycle by force, or operate with a door that cannot close and latch as designed.
Why this matters
Why: GE explains that a warm oven may not permit self-clean latching and that the door should not be latched for ordinary cooking. A latch or lock that remains out of position after cooling can require service.
-
Check 5
After any safe, model-directed correction of a loose obstruction or visible gasket position, close the cold, empty door gently using the side areas rather than pulling on the handle. Observe whether it reaches the frame evenly without pressure.
Expected result: The door closes evenly with normal resistance, closes only when pushed hard, remains crooked or open, or contacts the frame, rack, gasket, or latch.
Next step: If it closes normally and the gasket is intact, monitor during one normal use. If it does not close freely, stop using the oven and arrange qualified GE appliance service.
Stop if: Do not slam, lean on, brace, tape, or tie the door closed, and do not run heating with the door partly open.
Why this matters
Why: A gentle, even closure after clearing a loose obstruction supports a simple path issue. Resistance, contact, a crooked gap, or the need for force indicates hinge, frame, gasket, latch, or floor misalignment that is not resolved by more pressure.
-
Check 6
If the door still will not close, document the exact GE model, whether the door was recently removed, the obstruction and hinge findings, gasket and frame condition, latch or display state, and any scorching or smoke mark. Leave the oven off.
Expected result: The fault is repeatable and the likely area is known, or the door is intermittently crooked, physically damaged, or unsafe to inspect further.
Next step: Arrange qualified GE appliance service and provide the model, photos of the closed-position gap and visible damage, and the exact point at which the door stops.
Stop if: Do not disassemble the door, release springs, remove hinge locks, replace glass, or alter the latch as a user diagnosis.
Why this matters
Why: These details help a technician separate a rack or floor obstruction from a reseating, gasket, hinge, frame, latch, or self-clean lock problem without requiring an unsafe door-removal attempt.
Use your observations
Decision map
Find the observation that best matches what you see, then follow the next safe action.
-
PATH 01Safety boundary
What you see
A rack, pan, foil edge, divider, spill, or model-specific oven floor position visibly blocks the door, and the door itself is straight.
Do this next
Remove only the loose user-accessible obstruction or follow the exact model's ordinary floor-position instruction, then perform one gentle cold closure check.
Why this path and its safety boundary
Why it matters: The closing path is more likely than a failed hinge or latch.
Safety stop: Do not lift a floor panel, force a rack, or continue if the door still contacts the frame or remains crooked.
-
PATH 02Safety boundary
What you see
The door problem began after cleaning or installation, or one side is high and a hinge arm, lock, or bracket appears out of position.
Do this next
Use the exact GE manual to verify the door's seated hinge position; arrange service if the door is heavy, the hinge is spring-loaded, a bracket is missing, or the alignment does not correct safely.
Why this path and its safety boundary
Why it matters: Incomplete model-specific door reseating or a misaligned or damaged hinge is more likely than a gasket-only issue.
Safety stop: Do not lift by the handle, release a hinge spring, bend the door, or attempt removal without the model procedure and safe assistance.
-
PATH 03Safety boundary
What you see
The path is clear but the gasket is torn or displaced, the door contacts the frame, the glass or hinge is damaged, or scorching or smoke staining is present.
Do this next
Leave the oven off and arrange qualified service to inspect the exact model and confirm the repair.
Why this path and its safety boundary
Why it matters: A seal, hinge, frame, glass, or other structural problem is more likely; a damaged door can allow unsafe heat leakage.
Safety stop: Do not heat, glue, cut, stretch, or replace structural door parts without model-specific service procedures.
-
PATH 04Safety boundary
What you see
The oven is hot, a Self Clean or lock state is active, the latch is displaced, or the door closes but cannot latch as expected.
Do this next
Let the oven cool and follow the exact GE unlock or latch instructions once. Arrange service if the door still does not move or latch normally.
Why this path and its safety boundary
Why it matters: Temperature and latch state are more likely than an ordinary rack obstruction, but the latch should not be forced or used during a cooking function.
Safety stop: Do not pry the latch, start a cleaning cycle as a workaround, interrupt a hot cycle by force, or run the oven with the door partly open.
Helpful context
Understand the symptom
A door that will not close is different from a door that only feels loose
A small amount of movement or warm air at a GE oven door can be normal, but a door that stops well before the frame, sits crooked, hits an obstruction, or leaves the latch unable to engage is not a sealing adjustment. Check the physical path first, then the hinge and latch state. Do not push harder to overcome resistance because the hinge spring, glass, frame, or gasket can be damaged.
Recent installation or cleaning changes the likely branch
If the problem began after the door was removed for cleaning, the hinge arms may not be fully seated or the hinge locks or brackets may not be in the model's correct position. GE states that door removal and replacement vary by model and that some side-opening doors are not owner-removable. If the door was never removed, start with the rack, tray, gasket, floor, frame, and latch instead of attempting door removal.
Keep self-clean and heat out of the diagnosis
A warm oven may not permit the self-clean latch to engage, and a latch should not be moved during an ordinary cooking function. Let the oven cool naturally and follow the exact model guide. A bent hinge, broken latch, damaged glass, scorching, or a door that still will not close freely is a repair boundary, not a cue to force the mechanism.
Safety boundary
Stop conditions
- Stop immediately for smoke, scorching, a gas odor, sparks, exposed wiring, a damaged cord, a tripped breaker, broken glass, uncontrolled heat, or a door that cannot close safely.
- Do not force, slam, brace, tape, or tie the door; do not operate the oven with the door partly open or with a damaged seal.
- Do not lift the door by the handle, release hinge springs or locks, remove heavy door parts, bend the frame, or work near a hot or energized appliance.
- Do not pry or lubricate the latch, defeat a Self Clean lock, heat or stretch the gasket, or alter the oven floor or frame without the exact model procedure.
- Stop after one safe obstruction, visible gasket, latch-state, or model-directed reseating check when the door remains crooked, contacts the frame, requires force, or will not close freely.
Only after diagnosis
Potential parts
- GE oven door gasket
Consider this category only when a technician confirms that the exact model's gasket is torn, hardened, displaced, or unable to seal after obstructions and alignment are addressed.
Confirm the exact GE model, gasket profile, mounting method, and manufacturer's fit information before ordering. - GE oven door hinge or bracket
Consider this category only when a technician confirms a bent, broken, displaced, or incorrectly seated hinge or bracket is preventing the exact model's door from closing.
Confirm the exact GE model, door style, hinge side, bracket design, and manufacturer's fit information before ordering; do not release a spring-loaded hinge as a user. - GE oven door latch or lock component
Consider this category only when a technician confirms the latch or lock is stuck, damaged, or electrically or mechanically faulty after the oven is cool and the model state is verified.
Confirm the exact GE model, self-clean system, latch design, connectors, and manufacturer's fit information before ordering.
When checks do not resolve it
Need a professional?
Arrange qualified GE appliance service when the door remains open or crooked after loose obstructions are cleared, the door was not safely reseated, a hinge, bracket, latch, frame, glass, gasket, or oven floor is damaged or unclear, scorching or smoke staining appears, or a hot Self Clean lock will not release. Door removal, hinge-spring handling, structural repair, latch work, electrical diagnosis, and gas-appliance service require a technician.
Safety scope: This article covers cooling, removing loose cookware or racks, visible obstruction and gasket observation, model lookup, and one gentle cold closure check. A technician must handle door removal, hinge springs and locks, brackets, glass, frame, latch, wiring, gas components, and structural repair.
Common questions
FAQ
Why will my GE oven door not close?
Start with a cold, empty cavity and check a rack, pan, foil, divider, shifted oven floor, gasket, hinge alignment, frame, and latch state. A door recently removed for cleaning may not be fully reseated. Do not force it; a crooked, damaged, or resistant door needs service.
Can I remove and reinstall a GE oven door?
Only if the exact GE model manual provides the procedure and safe assistance is available. GE says door designs and removal steps vary, some side-opening doors are not owner-removable, and the door is heavy. Never lift by the handle or release hinge hardware without the model procedure.
Can a new GE oven gasket make the door seem unable to close?
A new gasket can be stiff and make the door look less tightly sealed for a while, but the door should still close freely without force. If it stops, remains crooked, shows scorching, or the gasket is damaged, stop using the oven and arrange service.
Why is the GE oven latch preventing the door from closing?
The oven may still be hot or in a Self Clean or lock state, or the latch may be displaced or damaged. Let it cool and follow the exact model instructions. Do not force the latch or run a cooking cycle with a door that cannot close normally.
When should I call for GE oven door service?
Call when the door remains open or crooked after loose obstructions are cleared, a hinge, bracket, gasket, frame, glass, or latch is damaged or unclear, the door requires force, or scorching or smoke staining appears. Door hardware and structural repair should be handled by a qualified technician.
Read the exact guide
Official sources
- Range & Wall Oven - Oven Gasket Not Sealing ProperlyGE Appliances · Official GE range and wall-oven guidance used for gasket and structural branches.
- Range & Wall Oven - Lift Off Oven DoorGE Appliances · Official GE support used to explain why door access varies and why damaged doors need service.
- Range - Oven Door Will Not LatchGE Appliances · Official GE range guidance; latch designs and controls vary by model.
- New Range or Wall Oven Door Doesn’t Seal ProperlyGE Appliances · Official GE guidance for new installations and models with a hidden bake element; it does not replace the exact manual.
- Range & Wall Oven - Removing or Reseating Oven DoorGE Appliances · Direct GE Appliances guidance; door designs and owner access vary by model.
- GE Appliances Service and Support by Product LineGE Appliances · Official GE support hub used for model lookup and escalation, not an individual door diagnosis.
- Range - Oven Door Won't UnlockGE Appliances · Official GE guidance for locked-door states used only to define a safe cooling and service boundary.
Community feedback
Share a repair observation
Share a plain-text repair observation. Accepted observations are published automatically; this page may take a moment to update.