
On this page
Start here
Quick answer
A Maytag oven door that will not close is most often blocked by a rack, oversized bakeware, shipping material, food, or soil; a door that looks crooked or a latch arm that is bent or left in the lock position points to a hinge or latch problem. Turn the oven off and let it cool before inspecting. Remove only loose, cool items that are clearly blocking the opening, confirm racks are fully seated, and wipe accessible buildup without moving the gasket. If the door was recently removed, a hinge may not be seated correctly; if the latch is bent, the gasket is damaged, the frame or glass is cracked, the door is hot or locked, or the door still will not seal, stop forcing it and arrange qualified Maytag appliance service. Do not pry the door, bend the latch, remove the door, or run the oven with a gap.
Before you begin
Safety first
- This article supports cool ordinary-access observation, removal of loose obstructions, rack and bakeware checks, and gentle accessible cleaning only when the model manual permits it. It does not authorize door removal, hinge or latch manipulation, live electrical work, gas work, range movement, or heating with a door that does not seal.
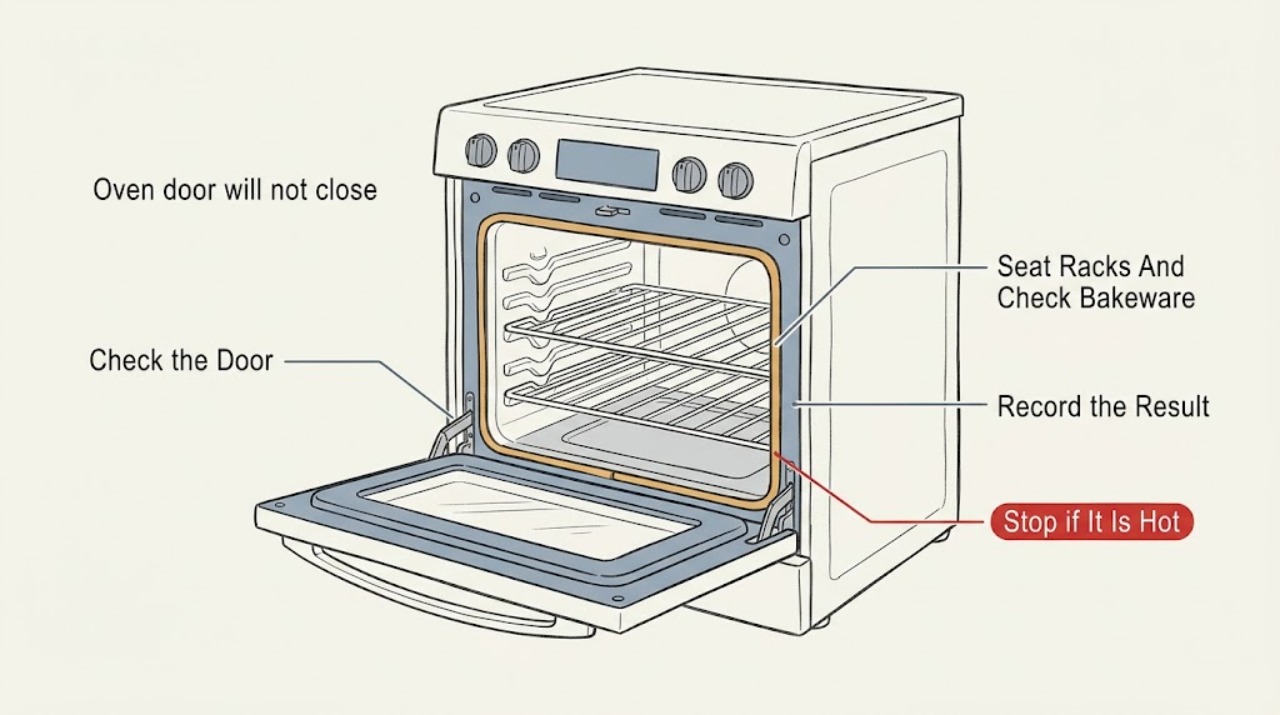
Work through in order
Diagnostic checks
Use only checks that match the exact appliance or system and its official guide.
-
Check 1
Turn the oven off, keep hands and combustibles away, and wait until the door and cavity are cool enough for ordinary inspection. From the front, look for a rack, roll-out rack, pan, casserole, foil, packing material, food, or soil projecting into the door path.
Expected result: A cool loose item is visibly blocking the door, the door path is clear, or the oven is still hot or the door is locked.
Next step: Remove only a loose, cool obstruction without force, then continue to the rack and contact-surface check. If the oven is hot, locked, or the item is stuck, stop and follow the model manual or arrange service.
Stop if: Do not force a hot or locked door, reach into a hot cavity, pull a jammed rack or pan, or use tools to pry an obstruction free.
Why this matters
Why: A visible obstruction is a likely first cause. A clear path does not explain a crooked door, latch interference, damaged gasket, or lock state; heat or a locked door makes further physical testing unsafe.
-
Check 2
After the oven is cool, check from the front that every rack is fully inserted and that any roll-out rack is completely returned. Remove cool bakeware or cookware that extends into the door path; do not push a pan against the door to make it fit.
Expected result: The door closes normally after a rack or pan is reseated or removed, the rack remains out of position, or the cavity is empty and the door still stops before sealing.
Next step: Use only correctly seated racks and model-appropriate cookware. If the empty oven door still will not close evenly, continue with the latch and alignment inspection rather than adding force.
Stop if: Do not bend rack rails, force a roll-out rack, slam the door, or operate with a pan or rack pressing against the door.
Why this matters
Why: A rack or oversized dish can be the entire problem when closure returns after correction. If the empty cavity still leaves a gap, the cause is more likely the hinge, latch, gasket, frame, or door alignment than the cookware.
-
Check 3
With the door open and the oven cool, visually inspect the top front of the oven frame above the gasket, the door contact area, and the gasket itself. Look for a latch arm bowed up or down, hardened food or soil, a gasket pulled out of position, tears, missing sections, or a frame or glass crack; do not move the latch or gasket.
Expected result: The latch looks aligned and the contact area is clean, the latch is visibly bent or blocking the door, the gasket is damaged or displaced, or the frame/glass has damage.
Next step: Wipe only loose accessible soil with a soft, damp cloth when the manual permits it, without moving the gasket. Leave a bent latch, displaced or torn gasket, cracked glass, or damaged frame for qualified service.
Stop if: Do not bend, pry, lubricate, cut, glue, remove, or manually reset the latch or gasket, and do not use an oven with cracked glass or a damaged frame.
Why this matters
Why: Maytag identifies a misaligned lock-arm latch and food or soil buildup as closure barriers. A damaged gasket, frame, or glass can prevent an even seal and is not safely corrected by bending, gluing, or reshaping it.
-
Check 4
Look at the closed-door alignment without forcing closure: compare the side gaps, whether one corner sits lower, and whether the problem began after the door was removed for cleaning or installation. Do not remove the door or handle the hinge arms.
Expected result: The door is visibly crooked or one side has a different gap, the door was recently removed, or alignment is even but closure still fails.
Next step: Photograph the alignment and provide the model number and door-removal history to a Maytag-qualified technician. Use the exact owner manual only to understand the model's hinge arrangement; do not repeat door removal as a test.
Stop if: Do not lift the door, pull hinge locks, insert fingers near spring-loaded hinges, or attempt to bend or reseat hinge hardware without the exact model procedure and appropriate service controls.
Why this matters
Why: A crooked door or recent removal makes incomplete hinge seating or hinge damage more likely. An even alignment with a clear path shifts attention toward the latch, gasket, frame, or a hidden mechanism; visual inspection alone cannot identify the failed part.
-
Check 5
If the display shows Locked, the door was involved in Self Clean, or a control or latch message is present, record the message and use only the model-specific Cancel/Off or documented recovery sequence. Do not test heating while the door is not closing or sealing.
Expected result: The lock indication clears after the documented cool-down or reset sequence and the door closes evenly, or the lock remains, returns, or the door still has a gap.
Next step: If the door closes evenly after the documented sequence, keep the manual with the appliance and monitor it. If not, leave the oven unused and arrange qualified Maytag appliance service with the message and timeline.
Stop if: Do not defeat the lock, force the latch arm, repeatedly cycle power, start Self Clean to manipulate the latch, or run the oven with an unsealed door.
Why this matters
Why: A lock or clean-cycle state can hold the latch and needs its own recovery path. A returning lock, a door that remains open, or an error after recovery points to a latch, control, sensor, hinge, or door problem requiring service.
-
Check 6
For a freestanding Maytag range, observe whether the appliance rocks, sits visibly out of level, or has shifted from its normal position; do not move the range or adjust leveling legs as a troubleshooting experiment.
Expected result: The range is visibly unstable or out of level, the rear anti-tip position is uncertain, or the appliance appears stable and the door still will not close.
Next step: Keep people away from an unstable or shifted range and request qualified appliance installation/service assessment. If the range appears stable, return to the latch, gasket, and hinge service boundary rather than adjusting it yourself.
Stop if: Do not pull out, tilt, lift, or adjust a gas or electric range, and do not disturb an anti-tip device or utility connection as a user test.
Why this matters
Why: Maytag lists range level as a possible door-closure factor, but leveling and anti-tip engagement involve appliance installation and should not be improvised while diagnosing a door fault. A stable, level-looking range makes a local door mechanism more likely.
Use your observations
Decision map
Find the observation that best matches what you see, then follow the next safe action.
-
PATH 01Safety boundary
What you see
The door closes evenly after a cool pan, fully seated rack, packing material, or accessible soil is removed without force.
Do this next
Keep racks fully seated and use cookware that leaves the clearance specified by the model guidance. Stop using the oven if the door later develops a gap, rubs, or requires force.
Why this path and its safety boundary
Why it matters: The closure symptom was consistent with an accessible obstruction rather than an established hinge or latch failure.
Safety stop: Do not keep operating if closure becomes uneven, a latch catches, the gasket moves, or heat escapes around the door.
-
PATH 02Safety boundary
What you see
The cavity and door path are clear, but the top-front lock-arm latch is visibly bowed, remains in the door's path, or does not match the normal position shown in Maytag guidance.
Do this next
Leave the oven out of service and provide a close photograph and model information to qualified appliance service; request latch and lock inspection.
Why this path and its safety boundary
Why it matters: Latch interference is more likely than a rack or bakeware problem. The visible latch condition does not establish whether the latch, control, or associated mounting is damaged.
Safety stop: Do not bend, pry, lubricate, or manually force the latch into position.
-
PATH 03Safety boundary
What you see
One side of the door hangs lower, the gaps are uneven, or the symptom began after the door was removed or reinstalled.
Do this next
Do not remove the door again as a test. Keep the oven unused and arrange qualified service or use the exact model manual with an appropriately qualified installer.
Why this path and its safety boundary
Why it matters: Hinge seating, hinge damage, or door alignment becomes more plausible than a simple obstruction. Maytag's replacement guidance says an uneven door after installation needs the hinge engagement checked, but the exact procedure is model-specific.
Safety stop: Do not lift the door, handle spring-loaded hinge hardware, or bend a hinge arm.
-
PATH 04Safety boundary
What you see
The display or latch indicates Locked, a Self Clean cycle was started or interrupted, or the door is hot and will not release normally.
Do this next
Use Cancel/Off and the exact model guidance, allow the oven to cool, and try no physical latch manipulation. Request service if the lock remains or the door will not close after the documented recovery.
Why this path and its safety boundary
Why it matters: The latch may be intentionally holding the door during a high-temperature cleaning state or may be waiting for the model's documented reset and cool-down sequence; forcing it can damage the mechanism or expose the user to heat.
Safety stop: Do not force, defeat, pry, or repeatedly manipulate a hot or locked door.
-
PATH 05Safety boundary
What you see
The door path is clear and the door appears aligned, but the gasket is torn or displaced, the frame or glass is cracked, the latch catches abnormally, or a gap remains when the door is gently brought toward the frame.
Do this next
Stop using the oven and arrange qualified service for inspection of the gasket, door assembly, hinges, latch, and frame; provide photos without removing parts.
Why this path and its safety boundary
Why it matters: A seal, door structure, hinge, or latch repair is more likely than a user-removable obstruction. A door that cannot seal is an operating and heat-containment problem.
Safety stop: Do not glue, tape, reshape, remove, or substitute door parts, and do not run heating with a cracked or unsealed door.
-
PATH 06Safety boundary
What you see
A freestanding range rocks, has shifted, or appears out of level while the door still will not close after the cavity is cleared.
Do this next
Keep the range unused and request qualified appliance installation/service assessment; do not pull, tilt, or adjust it to test the door.
Why this path and its safety boundary
Why it matters: Installation stability or leveling may be contributing, and an anti-tip or utility-safety concern takes priority over door adjustment.
Safety stop: Stop for a gas odor, a loose utility connection, an unstable appliance, or any need to disturb the anti-tip device.
Helpful context
Understand the symptom
Start with a cool, empty closure path
Turn the oven off and wait until the door and cavity can be inspected without a burn risk. Look for a rack that is not fully inserted, a roll-out rack that is still extended, a roasting pan or casserole that projects into the door path, packing material, foil, food, or soil around the front frame. Maytag lists these as closure obstructions. Remove only a loose item that is cool and safe to handle; do not force a rack, pan, or door past resistance.
Separate a blocked door from a latch or hinge fault
With the door open and the oven cool, inspect the top front of the frame above the gasket. Maytag specifically says to check whether the lock-arm latch is bent or bowed up or down and preventing closure. Also compare the door's side gaps and whether it hangs crooked. A recently removed door, an uneven door, or a latch that does not sit in the position shown by the model's manual is not a reason to bend metal or repeat the removal; it is a service or model-specific installation question.
Treat a locked or self-clean state differently
A Maytag oven can keep the door latched during or after a self-clean cycle, and the exact controls vary by model. Use Cancel/Off and the model's owner manual as directed, then allow the oven to cool before trying to inspect the latch. Never force a locked door, defeat the lock, or reach into a hot cavity. If the lock remains engaged after the documented recovery sequence, leave the oven out of service and request repair.
Do not use a gap as a cooking workaround
The door is part of the oven's heat containment and operating design. A door that does not close or seal evenly can allow heat to escape, affect cooking, and expose nearby surfaces to abnormal heat. If the visible obstruction checks do not restore a normal, even closure, stop using the oven until a qualified technician identifies whether the cause is a hinge, latch, gasket, frame, glass, or another model-specific part.
Safety boundary
Stop conditions
- Stop using the oven for a door that remains open, does not seal evenly, has cracked glass or a damaged frame, or requires force to close.
- Do not force, bend, pry, lubricate, or manually reset the latch, hinge, gasket, or lock mechanism.
- Do not reach into a hot cavity, force a hot or locked door, start Self Clean to test the latch, or run heating with an unsealed door.
- Do not remove or reinstall the oven door, handle spring-loaded hinge hardware, pull a range, adjust leveling legs, or disturb an anti-tip device as a user test.
- Stop for smoke, fire, a gas odor, sparking, exposed wiring, an unstable range, or any utility or structural concern and seek appropriate emergency or qualified help from a safe location.
Only after diagnosis
Potential parts
- oven door gasket
Consider this category only if inspection confirms that the exact model's gasket is torn, missing, displaced, hardened, or unable to support an even seal after the obstruction and alignment checks.
Confirm the complete Maytag model and gasket design with the manufacturer or qualified technician before ordering; do not glue, stretch, cut, or substitute a seal. - oven door hinge assembly
Consider this category only if qualified inspection finds a hinge that is bent, damaged, not seated, or causing the door to hang crooked after other closure causes are ruled out.
Confirm the exact model, hinge style, and installation procedure; spring-loaded hinge work should be performed by an appropriately qualified person. - oven door latch or lock assembly
Consider this category only if the latch is visibly misaligned, remains in the closure path, or model-specific diagnosis identifies a failed latch or lock assembly.
Confirm the exact model and lock configuration; a bent latch or recurring lock state is not proof that a generic replacement will fit or resolve the fault. - oven door frame or glass assembly
Consider this category only if the door frame, inner or outer glass, or mounting structure is visibly cracked, warped, or preventing an even closure and qualified service confirms replacement is needed.
Confirm the exact model and complete door configuration before ordering; do not use the oven with cracked glass or a distorted frame.
When checks do not resolve it
Need a professional?
Arrange qualified Maytag appliance service when the door will not close after the cool obstruction, rack, bakeware, and accessible contact-area checks; when the latch is bent or remains in the door path; when the door is crooked or the problem followed door removal; when the gasket, frame, or glass is damaged; when a lock or Self Clean state does not clear using the exact model guidance; or when a range is unstable or out of level. Leave the oven unused for a gap, cracked glass, damaged gasket or frame, a returning lock fault, or any condition that requires force. For smoke, fire, gas odor, sparking, or exposed wiring, leave the area when safe and seek appropriate emergency or qualified help.
Safety scope: This article supports cool ordinary-access observation, removal of loose obstructions, rack and bakeware checks, and gentle accessible cleaning only when the model manual permits it. It does not authorize door removal, hinge or latch manipulation, live electrical work, gas work, range movement, or heating with a door that does not seal.
Common questions
FAQ
Why will my Maytag oven door not close?
Start with the closure path: a rack or roll-out rack may not be fully inserted, bakeware may be too large, or packing material, food, or soil may be in the way. If the path is clear, a bent latch, displaced gasket, hinge alignment problem, damaged frame or glass, or a lock state becomes more likely. Inspect only when cool and do not force the door.
What should I check if the Maytag oven door is crooked?
Compare the side gaps and note whether one corner hangs lower. If the door was recently removed, Maytag's guidance makes hinge engagement a key question, but the exact hinge design varies. Do not remove the door again or handle spring-loaded hinge hardware as a test; arrange qualified service with photos and the model information.
Can I bend the Maytag oven door latch so it closes?
No. Maytag says to inspect whether the lock-arm latch is bent or bowed and preventing closure, but that inspection does not authorize bending or resetting it. Leave a visibly misaligned latch for qualified appliance service, especially if the oven is locked or was recently used for Self Clean.
Can I use the oven if the door has a small gap?
Do not use heating as a workaround for a door that does not close or seal evenly. A persistent gap, damaged gasket, cracked glass, damaged frame, or latch that catches needs qualified inspection before use; do not tape, prop, or hold the door shut.
What if the oven door is locked after Self Clean?
Leave the door alone while it is hot or locked. Use Cancel/Off and the exact model's documented recovery instructions, then allow the oven to cool. If the lock remains, returns, or the door still will not close normally after recovery, leave the oven unused and arrange qualified Maytag appliance service.
Read the exact guide
Official sources
- Oven is Locked - What to DoMaytag Product Help · Maytag oven lock guidance; control names, lock behavior, and recovery vary by model.
- Oven Door is Not Closing - Checking the LatchMaytag Product Help · Maytag Product Help article covering multiple oven and range families; the installed model manual controls the exact latch arrangement.
- Oven Door Won't Close - Wall OvenMaytag Product Help · Maytag wall-oven troubleshooting; use only the portions that match the installed model and configuration.
- Door Not Closing - RangeMaytag Product Help · Maytag range troubleshooting; leveling and anti-tip work is an installation/service boundary and varies by model.
- High Temperature Self-Clean Cycle InformationMaytag Product Help · Maytag high-temperature self-clean guidance; the installed owner's manual controls the exact cycle and controls.
- Removing and Replacing the Oven DoorMaytag Product Help · Maytag door installation guidance for specified hinge configurations; not a recommendation to remove a door as a homeowner diagnostic test.
Community feedback
Share a repair observation
Share a plain-text repair observation. Accepted observations are published automatically; this page may take a moment to update.