
On this page
Start here
Quick answer
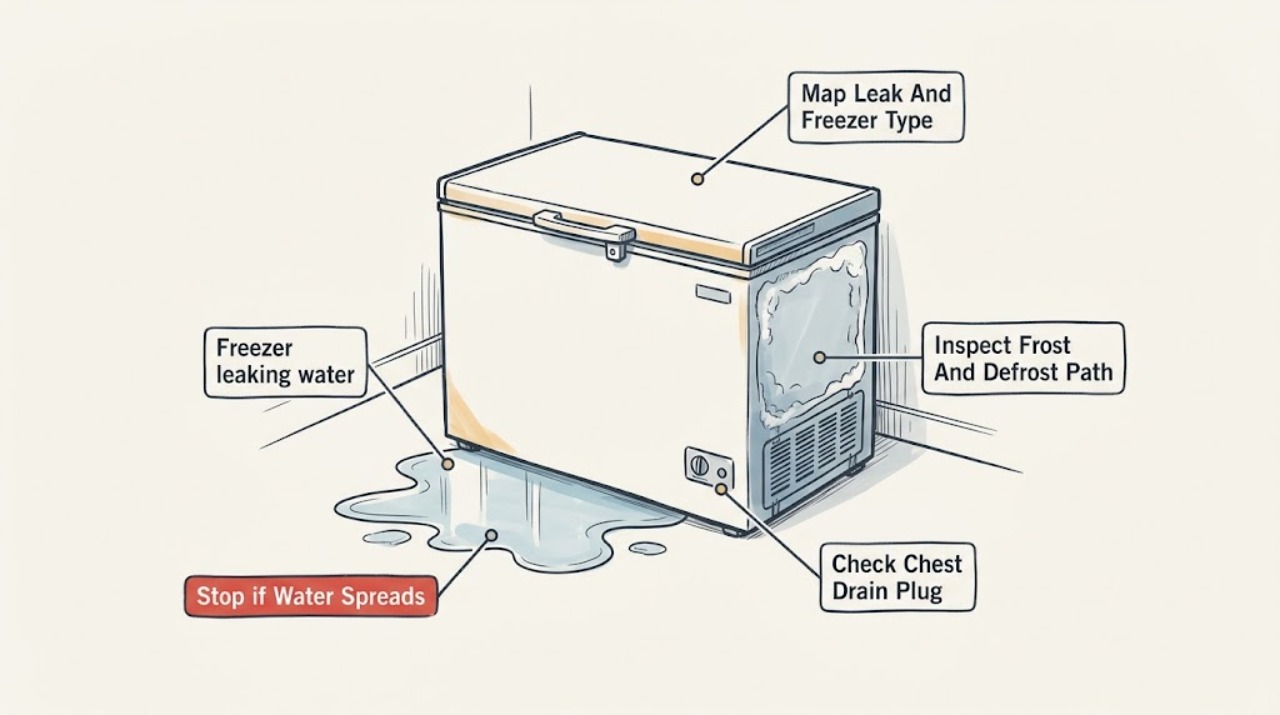
Start by locating the water and identifying whether the Haier freezer is a chest, upright, or freezer section with an ice maker. On a Haier chest freezer, melting frost and an outer drain plug that is not seated properly are a documented leak path; place a container under the plug and check it from the outside without opening panels. On a frost-free or ice-maker-equipped model, water may instead be meltwater from a door or gasket gap, a blocked defrost path, a drain pan issue, or a water-supply connection. Dry the floor, protect food, inspect only ordinary-access parts, and follow the exact model instructions for defrosting. Never use a sharp or metal tool on frost. If the leak continues, reaches electrical parts, causes damage, comes from an internal drain or sealed system, or cannot be traced safely, stop and arrange qualified appliance service.
Before you begin
Safety first
- This article supports drying, ordinary-access observation, visible gasket or ice-bin checks, and the exact model's approved chest-freezer defrost procedure only. A technician should handle concealed drains, drain heaters, drain pans behind panels, wiring, refrigerant systems, and inaccessible water connections.
Work through in order
Diagnostic checks
Use only checks that match the exact appliance or system and its official guide.
-
Check 1
Wipe up the puddle, place a dry towel or shallow tray where it can safely catch new water, and identify the appliance as a chest freezer, upright freezer, or refrigerator freezer section. Observe without moving the loaded appliance or removing rear covers.
Expected result: Record whether the first wet point is under the front, at an outer drain plug, around the door or gasket, beneath an ice maker or water connection, or at the back/underside; note whether the freezer is still cold and whether water appears only during or after defrosting.
Next step: Use the unit-type branch below: inspect the outer drain plug only on a model that has one, inspect ice-maker connections only from ordinary access, and otherwise document the location for service.
Stop if: Do not tip or drag a loaded freezer, remove panels, reach beneath energized equipment, or continue if the floor is unsafe or water is approaching an outlet or wiring.
Why this matters
Why: A front or drain-plug leak on a chest freezer supports a meltwater or plug-sealing path. Water near an ice maker supports a supply, bin, or drain path. A rear or underside leak, a freezer that is warming, or water near electrical parts requires broader service diagnosis rather than repeated wiping.
-
Check 2
If the Haier freezer is a chest model with an accessible outer drain plug, inspect the plug from the outside and confirm it is inserted and seated as the exact model instructions show. Place a tray below it before any approved defrost draining; do not remove it merely to test a leak while the freezer is operating.
Expected result: Note whether the plug is missing, loose, cross-threaded, visibly cracked, wet around its perimeter, or correctly seated with water contained in the intended drain path.
Next step: If the plug is intact but not seated, restore it only as the model instructions permit, dry the area, and monitor for new water. If it is damaged, cannot seat, or leaks after proper seating, stop and arrange a compatible drain-plug or appliance service assessment.
Stop if: Do not force, seal with adhesive, drill, enlarge, or substitute the plug; do not remove panels to reach a hidden drain path.
Why this matters
Why: A missing or improperly seated outer plug can allow melting frost to escape onto the floor. A correctly seated plug with continued water elsewhere makes the plug less likely and points to a different drain, gasket, ice-maker, or cabinet-area source.
-
Check 3
Inspect the visible freezer walls, floor, rear panel, door edge, and gasket for heavy frost, a thawed ice sheet, water tracks, or packages holding the door open. On a frost-free model, look only at ordinary-access areas; do not remove the rear interior panel to reach a defrost drain or heater.
Expected result: Classify the pattern as light meltwater with no frost, heavy frost near the drain or door, frost on a broad rear wall, a split or gapped gasket, food or packaging blocking the door, or water returning without visible frost.
Next step: Clear only packages that visibly block the door or airflow, clean and dry an accessible gasket, and follow the exact model's defrost instructions when a full defrost is indicated. Request service for an inaccessible or recurring internal leak.
Stop if: Never chip ice with a knife, screwdriver, or metal tool; do not remove interior panels, access a drain heater, or apply heat to the liner.
Why this matters
Why: Frost that melts into a controlled drain path can explain a temporary puddle, while broad or recurring frost can follow door openings, warm or uncovered food, blocked airflow, or a gasket that does not seal. Water with no visible frost, especially from behind a panel, may involve an internal defrost drain, pan, or other fault.
-
Check 4
If the freezer has an ice maker or water connection, inspect the visible connection, tubing, ice bin, and area beneath the bin with the water supply handled only as the model instructions permit. Do not pull the appliance out or loosen a fitting that is not ordinary user access.
Expected result: Note whether the water is clean and localized at a supply fitting, beneath the ice bin, from a blocked visible drain opening, or simply melted ice cubes on the floor; check whether the tubing is visibly kinked without manipulating it.
Next step: Wipe and monitor a small melted-ice spill. For a visible fitting issue, follow the exact model instructions only; if water continues, the tubing is damaged, or the connection is inaccessible, shut off water only if the dedicated control is safely identified and arrange service.
Stop if: Do not disconnect water tubing, over-tighten fittings, pierce tubing, or work near water and electricity; stop if the source is behind a panel or the shutoff cannot be identified safely.
Why this matters
Why: A supply fitting leak, melted ice, or a blocked ice-bin drain is a different path from freezer defrost water. A kinked or blocked drain hose can prevent gravity drainage, while a leak behind the appliance may need a technician.
-
Check 5
When the exact Haier model instructions call for a chest-freezer defrost, move food to safe temporary storage, turn the temperature control off or unplug as instructed, place a shallow tray under the outer drain plug, and allow frost to melt without forced heat. Wipe the interior dry and reinstall the plug before restoring power as the instructions direct.
Expected result: Observe whether water drains into the tray rather than onto the floor, whether the drain plug remains seated afterward, and whether the leak returns once the freezer is back at its normal setting.
Next step: Keep food out until the appliance is operating normally, then monitor the floor and drain area. For an upright or frost-free model, do not assume this chest-freezer procedure applies; use its manual or call service.
Stop if: Do not defrost by chipping, heating, pouring hot water into hidden passages, or using a metal instrument; stop if meltwater approaches electrical parts or the drain cannot be safely accessed.
Why this matters
Why: Water that drains and remains contained after an approved chest-freezer defrost supports a frost-load or drain-plug cause. Continued leakage, a drain that will not flow, or renewed heavy frost after the door and plug are correct indicates a service issue or a model-specific condition that needs diagnosis.
-
Check 6
Close the door or lid normally after the visible checks and inspect the gasket perimeter for splits, tears, gaps, dirt, or a section that does not contact the cabinet. Keep packages from holding the closure open and monitor for a new puddle, frost, or temperature loss without repeatedly opening the freezer.
Expected result: Record whether the gasket seals all around, the door or lid remains ajar, frost or condensation returns, water appears only after ice-maker use, or the freezer begins warming or running unusually often.
Next step: Clean an accessible gasket according to the model instructions and keep the closure path clear once. If the gasket is split, the door will not align, water recurs, or cooling is affected, arrange qualified service and provide the leak pattern.
Stop if: Do not glue, cut, stretch, heat, or replace a gasket without confirming the exact model; stop if water reaches electrical components or the freezer cannot keep food safely frozen.
Why this matters
Why: A damaged or gapped gasket can let cold air escape and promote frost and meltwater; Haier also lists an ajar door, blocked closure, frequent opening, warm food, and high humidity as conditions that can increase frost or run time. Recurrence after a clean seal and approved defrost is not a simple spill.
Use your observations
Decision map
Find the observation that best matches what you see, then follow the next safe action.
-
PATH 01Safety boundary
What you see
The appliance is a chest freezer, water appears around the outer drain plug, and the plug was visibly loose or not seated; after model-approved reseating, water remains contained.
Do this next
Keep the plug seated, place a dry marker or towel around the area, and monitor for a new puddle during normal use. Use the exact Haier defrost procedure if frost builds again.
Why this path and its safety boundary
Why it matters: Melting frost escaping through an improperly seated outer plug is the most likely immediate path. A contained drain after correction does not rule out a separate frost or gasket cause if water returns.
Safety stop: If the plug is cracked, cannot seat, or still leaks, stop forcing it and request a compatible drain-plug or appliance service assessment.
-
PATH 02Safety boundary
What you see
Heavy frost was present in a chest freezer, an approved defrost drained into the tray, the plug was reinstalled, and no new water appears outside the intended path.
Do this next
Dry the interior and floor, restore operation and food only according to the model instructions, and reduce unnecessary door opening while monitoring for recurrence.
Why this path and its safety boundary
Why it matters: The puddle was likely meltwater from the frost load and drain process rather than a continuous cabinet leak.
Safety stop: If water returns despite a seated plug or frost rapidly rebuilds, stop repeating defrosts and arrange service to assess sealing, drainage, or cooling operation.
-
PATH 03Safety boundary
What you see
Water is localized beneath the ice bin or at a visible ice-maker supply connection, and the rest of the freezer is dry.
Do this next
Wipe and monitor a melted-ice spill; follow the exact model guidance for a visible supply connection or drain. Request service when tubing or the source is inaccessible.
Why this path and its safety boundary
Why it matters: Melted cubes, a blocked ice-bin drain, or a water-supply connection is more likely than chest-freezer frost drainage.
Safety stop: Do not disconnect tubing, over-tighten fittings, or continue if water is near electrical parts or the leak continues after the visible source is addressed.
-
PATH 04Safety boundary
What you see
The freezer has frost or condensation near the door, a package or door is keeping the closure open, or the gasket has a split, tear, or gap.
Do this next
Remove only the visible package obstruction, clean the accessible gasket as the model permits, and use the exact model's defrost path. Arrange service for a damaged gasket or persistent gap.
Why this path and its safety boundary
Why it matters: Warm air entering through the closure can create more frost and later meltwater. Clearing the floor without correcting the closure allows the symptom to recur.
Safety stop: Do not glue, cut, heat, stretch, or force the gasket or door into position.
-
PATH 05Safety boundary
What you see
An upright or frost-free model leaks from the rear, underside, or an inaccessible interior area, or the water returns even though the door, gasket, and visible connections are correct.
Do this next
Keep the freezer closed as much as practical, protect the floor and food, and arrange qualified appliance service with the leak location, frost pattern, and model information.
Why this path and its safety boundary
Why it matters: An internal defrost drain, drain pan, drain heater, or another concealed component may be involved; the chest-freezer outer-plug procedure does not apply.
Safety stop: Do not remove interior or rear panels, probe hidden drains, pull a pan over wiring, or attempt to access a heater or sealed system.
-
PATH 06Safety boundary
What you see
Water reaches an outlet or wiring, the floor or cabinet is being damaged, the freezer is warming, the source cannot be localized, or the leak continues after the applicable visible check.
Do this next
If safe and the dedicated control is clearly identified, stop power or water only as the exact manual directs; otherwise leave the appliance alone and arrange qualified service. Preserve photos and the model label.
Why this path and its safety boundary
Why it matters: The risk and possible causes exceed ordinary cleaning or drain-plug observation, and continued operation may damage the appliance or food.
Safety stop: Do not work around energized water, move a loaded appliance, or keep testing a leak that threatens electrical safety or food storage.
Helpful context
Understand the symptom
The leak location narrows the cause
First dry the water and observe where a new drop or puddle begins: under an outer drain plug, at the front door or gasket, beneath an ice maker or supply connection, from a rear or underside area, or only after a defrost. The same symptom covers different Haier designs. A chest freezer's manual drain path is not the same as a frost-free upright's internal defrost path, so do not apply a chest-freezer draining step to a model that has no accessible plug.
Melting frost can be normal only when the water is controlled
Haier describes chest-freezer defrosting as a process in which melted frost is directed through the outer drain plug into a tray. Water outside the intended path means the plug, container, floor, or another part of the drain route needs attention. On frost-free models, recurring frost can follow frequent or extended door openings, warm or uncovered food, packages holding the door open, or a gasket gap. Clear visible causes without removing panels, and use the model-specific manual for any full defrost.
Water near electricity changes the decision
A small amount of melted ice can be wiped and monitored, but water near wiring, the compressor area, controls, or a wall outlet is not an ordinary cleanup task. Do not pull a rear pan or probe a drain to reach hidden water. If the water source is persistent, the freezer is warming, a gasket is split, or the leak returns after the approved drain or defrost check, preserve the model information and call a qualified appliance technician.
Safety boundary
Stop conditions
- Do not use knives, screwdrivers, metal tools, heat guns, hair dryers, or open flame to remove freezer frost or reach a drain.
- Do not remove rear or interior panels, probe hidden drains, pull a drain pan over wiring, access a drain heater, or work on sealed-system components.
- Do not force, drill, glue, or substitute an outer drain plug, water fitting, drain hose, or door gasket without exact model guidance.
- Stop if water reaches an outlet, wiring, controls, compressor area, or other electrical component; do not reach through water or tip a loaded freezer.
- Stop if the freezer is warming, food-safety conditions are uncertain, the leak damages the floor or cabinet, or water returns after the applicable visible check.
- For a chest freezer, use the model-approved defrost and drain procedure; do not apply that procedure to an upright or frost-free model without confirming it in the manual.
Only after diagnosis
Potential parts
- freezer drain heater
Consider this category only after a qualified diagnosis finds a frost-free model's drain-heating or ice-blockage problem; a floor puddle alone does not identify this component.
Confirm the exact Haier model, defrost design, electrical specification, and technician-diagnosed fit before ordering or installing. - freezer drain pan
Consider this category only when a qualified diagnosis finds a cracked, displaced, overflowing, or otherwise failed drain pan after the visible drain and gasket checks are complete.
Confirm the exact Haier model and pan location and dimensions before ordering; do not pull a concealed pan near wiring as a homeowner test. - freezer door gasket
Consider this category only when the gasket is split, torn, deformed, or leaves a persistent gap after packages are cleared and the accessible gasket is cleaned according to the model instructions.
Confirm the exact Haier freezer model, door style, gasket profile, and manufacturer's fit information before ordering; a similar appearance does not establish compatibility.
When checks do not resolve it
Need a professional?
Arrange qualified appliance service when a Haier freezer continues leaking after its applicable visible drain or gasket check, the source is behind a panel or beneath the cabinet, a drain pan or drain heater may be involved, the door gasket is damaged, a water connection or tubing leaks, the freezer is warming, or water reaches electrical parts. Have the exact model, freezer type, leak location, frost pattern, door or gasket condition, and any ice-maker symptoms ready.
Safety scope: This article supports drying, ordinary-access observation, visible gasket or ice-bin checks, and the exact model's approved chest-freezer defrost procedure only. A technician should handle concealed drains, drain heaters, drain pans behind panels, wiring, refrigerant systems, and inaccessible water connections.
Common questions
FAQ
Why is my Haier freezer leaking water?
First identify whether it is a chest, upright, frost-free, or ice-maker-equipped model and where the water starts. Haier documents melting frost and an improperly seated outer drain plug for a freezer leak, while other models can involve a gasket gap, internal defrost path, drain pan, or ice-maker connection.
What should I check on a Haier chest freezer that is leaking?
Dry the floor and inspect the outer drain plug from the outside. If the plug is not seated, restore it only as the exact model instructions permit. For an approved chest-freezer defrost, put a shallow tray under the plug and monitor it; do not use metal or sharp tools on frost.
Can frost cause water to leak from a Haier freezer?
Yes. Frost can melt during an approved defrost or when warm air enters through frequent opening, a package-held door, or a gasket gap. The water should remain in the intended drain path; recurring water or frost after that path is checked needs service.
Can I use a knife or hair dryer to remove Haier freezer ice?
No. Haier warns against sharp or metallic instruments because they can damage cooling coils. Follow the exact model's defrost instructions instead, and arrange service when frost is inaccessible or a hidden drain or heater appears involved.
Why is water coming from my Haier freezer's ice maker?
A small amount may be melted ice, but Haier also identifies a leaking water-supply connection or a blocked drain hole or hose beneath the ice bin. Wipe and monitor a melted-ice spill; do not disconnect tubing or work near electricity when the source is not ordinary access.
Can a Haier freezer door gasket cause a leak?
A split, torn, misaligned, or nonsealing gasket can let warm air enter, promoting frost that later melts. Check the gasket perimeter and packages that may hold the door open, but do not glue, cut, heat, or stretch the gasket; persistent gaps need a model-specific service assessment.
When should I call for Haier freezer leak service?
Call when water comes from behind a panel or under the cabinet, the drain plug will not seat, an ice-maker connection keeps leaking, the gasket is damaged, the freezer warms, the leak returns after the applicable visible check, or water reaches electrical parts. Provide the model, leak location, frost pattern, and photos.
Read the exact guide
Official sources
- Haier - Cleaning Inside the RefrigeratorHaier Appliances · Haier refrigerator and freezer-section cleaning guidance; exact freezer model instructions control any additional access or defrost steps.
- Haier Ice Maker - LeakingHaier Appliances · Haier support guidance for ice-maker-equipped appliances; use exact model instructions for water connections and service access.
- Haier - Defrosting Chest or Upright FreezerHaier Appliances · Haier support guidance for chest or upright freezer defrosting; exact model instructions control whether and how a unit is manually defrosted.
- Haier - Chest Freezer Defrost and DrainingHaier Appliances · Haier chest-freezer support guidance; do not apply this procedure to an upright or frost-free appliance unless its exact manual says so.
- Haier - Freezer LeakingHaier Appliances · Haier Appliances support content for freezer leaking symptoms; exact model design and manual control the applicable drain procedure.
- Haier Refrigerator - Ice or Frost Forming on Back WallHaier Appliances · Haier support guidance for refrigerator freezer sections and frost-free designs; it helps interpret frost and gasket symptoms but does not replace an exact model manual.
- Haier - Chest and Upright Freezer Running Too MuchHaier Appliances · Haier support guidance for freezers running frequently or too long; these observations help identify a possible door or gasket-related frost path.
Community feedback
Share a repair observation
Share a plain-text repair observation. Accepted observations are published automatically; this page may take a moment to update.