
On this page
Start here
Quick answer
First identify where the water starts and stop the dishwasher if the leak is active. Water at the front or door edge makes a blocked or damaged seal, poor leveling, oversudsing, or spray misdirection more likely; water underneath or behind the unit points more toward a supply connection, drain hose, inlet valve, float, sump, or pump seal. With the dishwasher off, dry the area and inspect only accessible door, rack, filter, hose, and sink-connection conditions. Use only automatic-dishwasher detergent, keep dishes and utensils from crossing the seal, and compare the hose route and leveling with the Maytag instructions for the exact model. Do not run another cycle while water is reaching cabinets, flooring, or electrical parts. Shut off power at the breaker and the water supply for a continuing leak; internal valves, pumps, seals, a cracked tub, hard-wired connections, and concealed plumbing are a qualified-service boundary.
Before you begin
Safety first
- This article covers normal controls, cleanup, accessible visual checks, model-documented filter care, and obvious loading or detergent corrections only. Water-supply isolation, concealed hoses, inlet valves, floats, pumps, sumps, diverters, tubs, hard-wired connections, and internal electrical diagnosis belong to qualified professionals.
Work through in order
Diagnostic checks
Use only checks that match the exact appliance or system and its official guide.
-
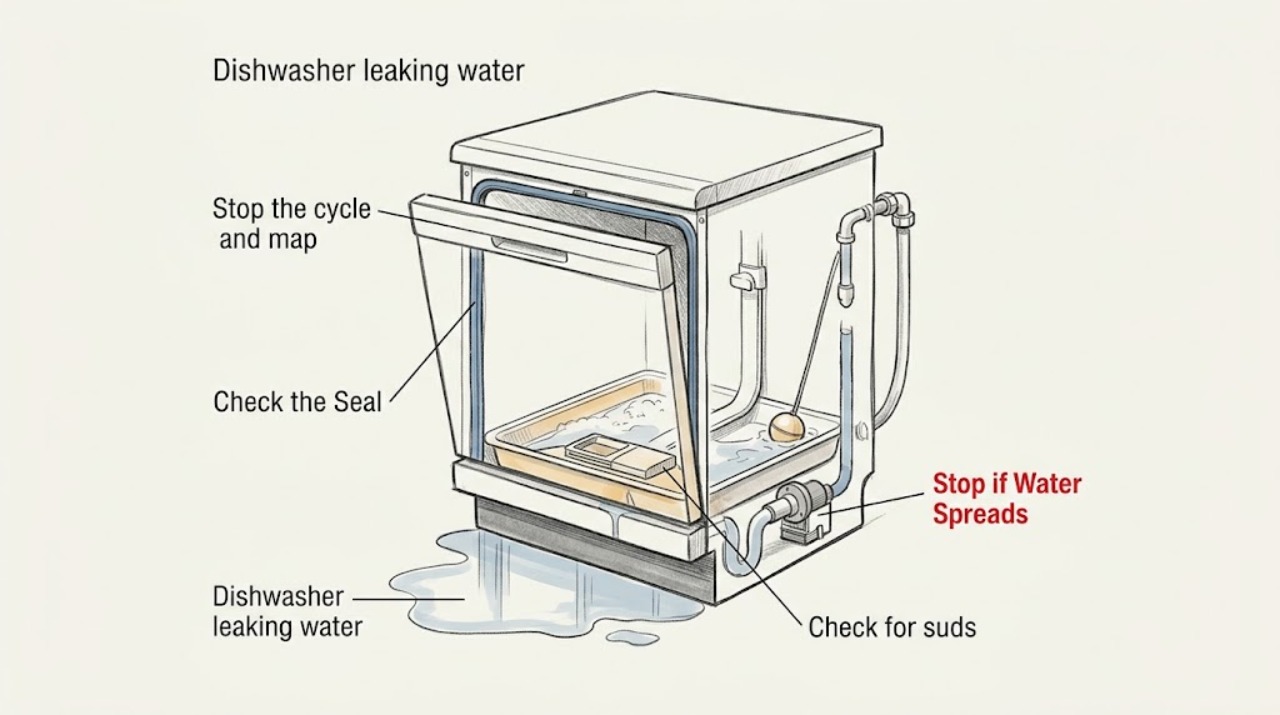
Stop the cycle and map the first wet point
Cancel the cycle or open the door using the normal control, keep hands out of standing water, and dry the floor and accessible cabinet edge. Observe from a safe position where the first new moisture appears: door or front corners, bottom center, rear or side connection, or no active leak.
Expected result: Water appears at the front edge or corners, under the center, behind or beneath the cabinet, only as suds or an overflow, or the area stays dry after cleanup.
Next step: Use the matching location branch and do not run another cycle while the source is uncertain. For an active or spreading leak, shut off power at the breaker and the water supply before further inspection.
Stop if: Stop immediately for water near electrical parts, a strong burning odor, smoke, exposed wiring, repeated breaker trips, uncontrolled filling, or water spreading into cabinets or flooring.
Why this matters
Why: Front moisture shifts attention to the seal, loading, leveling, spray direction, or suds. Center or rear moisture makes the supply, drain, inlet, float, sump, or pump area more likely. Suds can force water out without a failed gasket; no new moisture may mean a one-time spill or vent condensation, but it does not prove the appliance is safe to run.
-
Inspect the door seal, racks, and tub opening
With the dishwasher off and the door safe to open, inspect the gasket and tub lip for food residue, tears, cracks, flattening, or displacement. Check both racks for a utensil or dish protruding into the door path and confirm that the door closes squarely without forcing it.
Expected result: The seal is clean and intact with no obstruction, or there is residue, visible seal damage, an item crossing the seal, a door that does not close squarely, or a tub opening that appears out of square.
Next step: Remove only an obvious loading obstruction and wipe accessible residue with the appliance-care method in the manual. Do not run the dishwasher if the gasket is torn, the tub is damaged, or the door will not close and seal normally; arrange service.
Stop if: Do not pry the seal out, force the door, remove the door, or use the dishwasher with a cracked tub, damaged latch, or water reaching electrical components.
Why this matters
Why: An obstruction or residue can keep the door from sealing. A damaged or displaced seal, or a tub that is not square, can allow wash water to escape at the front. If the seal and loading are normal, do not infer that the gasket is the cause; continue to leveling, suds, and under-unit checks.
-
Check for suds or the wrong detergent
Look inside the tub and around the door edge for persistent bubbles or foam, and review whether dish soap, a spray-on pre-wash product, or excess detergent entered the dishwasher. Do not add chemicals or start another normal load while suds are present.
Expected result: There are visible suds or a recent dish-soap/pre-wash event, or the tub has no unusual foam and only automatic-dishwasher detergent was used.
Next step: Stop the cycle, clean up overflow, and follow the Maytag model guidance for removing suds. After the tub is clear, use only the detergent and amount specified by the exact owner's manual; if leakage returns without suds, arrange service rather than repeating cycles.
Stop if: Do not use chemical drain opener, keep running a foaming cycle, or leave overflow standing against cabinets or flooring. Stop if the correct model procedure is unclear or the leak is active.
Why this matters
Why: Dish soap and residual pre-wash products can create excessive suds that push water past the door and imitate a seal failure. No suds makes a loading, seal, leveling, spray, connection, or internal leak more likely, depending on the wet point.
-
Verify the dishwasher is level and the racks do not redirect spray
Compare the dishwasher's side-to-side and front-to-back position with the installation instructions, and look for a rack item or large object that could block or redirect a spray arm toward the door. Use only an accessible visual check; do not pull the unit from the cabinet.
Expected result: The unit appears square and supported, or it is tilted, not supported on its leveling legs or wheels, the door sits unevenly, or a rack item blocks the spray path.
Next step: Remove only an obvious rack obstruction. If the unit is not level or the cabinet fit is out of square, arrange qualified installation or appliance service rather than loosening hidden hardware or moving the dishwasher.
Stop if: Do not tip, drag, unfasten, or partially remove the dishwasher to adjust hidden feet or connections, and do not continue using it when the door cannot seal.
Why this matters
Why: Maytag states that an unlevel or out-of-square dishwasher can prevent the tub opening and door from sealing properly. A protruding item can also leave a gap or redirect water. A level unit with clear racks shifts suspicion back toward the seal, suds, or an internal water path.
-
Check the model-accessible filter and drain path
If the owner's manual identifies a user-accessible filter, power the dishwasher off as directed, remove the lower rack, and inspect the filter area for food, labels, glass, or other debris without reaching into a pump. Also observe the accessible drain hose and sink or air-gap connection for a kink, loose connection, or backup.
Expected result: The filter is blocked, the drain hose or sink connection is kinked or backing up, only a small amount of water remains in the filter area, or the drain path appears clear while water leaks elsewhere.
Next step: Clean and reseat only the model-accessible filter according to the manual and correct only an obvious external kink or accessible obstruction. If water backs up, the connection is damaged, or the leak remains, keep the dishwasher off and arrange service.
Stop if: Do not put hands into a wet pump area, remove a concealed hose, use drain chemicals, detach a pressurized or water-filled connection, or open an unlisted panel.
Why this matters
Why: A restricted filter or drain path can leave water in the tub and contribute to overflow or backflow. Maytag notes that a small amount of water in the filter area may be normal on some models, so that observation alone does not prove a leak. A clear drain path with an under-unit leak points more toward an inlet valve, sump, pump seal, tub, or other internal fault.
-
Record the supply and drain connection result for service
With power and water isolated for an active leak, photograph or record only the accessible water-supply and drain connections under the sink or at the cabinet edge, plus the model marking, leak location, cycle stage, suds history, and whether the leak changes during filling, washing, or draining.
Expected result: A fitting or hose is visibly wet, cracked, kinked, or loose; the sink or air gap backs up; the connections are dry; or the source is concealed under the dishwasher.
Next step: Do not restart the machine to reproduce the leak. Give the record to a qualified appliance technician; use a plumber when the household drain backs up independently of the dishwasher. Keep the water supply closed and power off until the active leak is repaired.
Stop if: Do not tighten unknown fittings under pressure, move the dishwasher, open the toe-kick or rear electrical area, test a valve or pump, or work on hard-wired connections as an ordinary user check.
Why this matters
Why: A visible connection defect can explain an underneath leak, while a backup at the sink or air gap points to the drain destination. Dry accessible connections and a concealed source shift suspicion to the dishwasher's inlet valve, float, sump, pump or motor seal, tub, internal hose, or control and require professional access.
Use your observations
Decision map
Find the observation that best matches what you see, then follow the next safe action.
-
PATH 01Next step
What you see
Water begins at the door edge or front corners, especially when a rack item crosses the seal, residue is present, the gasket is damaged, or the door sits unevenly.
Do this next
Clear an obvious obstruction and clean accessible residue only. If the gasket, tub, latch, or cabinet fit is damaged or the leak returns with a clear load, arrange Maytag-qualified appliance service.
-
PATH 02Next step
What you see
Foam or bubbles accompany the front leak, and dish soap, pre-wash residue, or excess detergent was used.
Do this next
Stop the cycle and follow the exact Maytag suds-removal guidance; clean overflow and use only automatic-dishwasher detergent afterward. If water leaks again without suds, service the underlying door or tub condition.
-
PATH 03Next step
What you see
Water starts under the center or rear, an accessible supply or drain connection is wet or damaged, or the sink/air gap backs up.
Do this next
Keep water and power isolated for an active leak. Arrange plumbing or appliance service for a damaged/pressurized connection, concealed hose, or independent sink backup; do not keep cycling the dishwasher.
-
PATH 04Next step
What you see
The filter or sump area contains debris, the drain path is restricted, or wastewater returns from the sink/air gap; only a small amount of water is seen in the filter area without floor moisture.
Do this next
Follow the exact manual for accessible filter cleaning and correct an obvious external restriction. Arrange service if water reaches the floor, the drain path backs up, or the leak persists after a safe check.
-
PATH 05Next step
What you see
The front seal, load, detergent, leveling, accessible filter, and external connections are normal, but water still appears under the unit or the leak changes with filling, washing, or draining.
Do this next
Leave the dishwasher off with its water supply closed and arrange qualified appliance diagnosis. Do not remove panels, energize a valve, or run repeated cycles to reproduce the leak.
-
PATH 06Next step
What you see
Water is spreading into cabinets or flooring, reaches electrical parts, the dishwasher smells hot or burned, smoke or exposed wiring is present, filling cannot stop, or the breaker trips again.
Do this next
If safe, isolate power at the breaker and close the dishwasher water supply; keep people away from wet electrical areas and obtain qualified appliance/electrical help. Use appropriate emergency help for smoke, fire, shock, or uncontrolled flooding.
Helpful context
Understand the symptom
Where the puddle begins is the most useful first clue
A Maytag dishwasher can leak at the front edge, under the center, or behind the cabinet, and those locations do not point to the same repair. A front-edge trail is more consistent with the door seal, a rack item, an unlevel tub, oversudsing, or spray reaching the door. Water under the center or rear makes a hose connection, drain line, inlet valve, float, sump, or pump seal more relevant. Dry the surrounding area and watch only from a safe, accessible position; do not remove panels to find the source.
A door leak is not always a failed gasket
Maytag's front-leak guidance also calls out silverware or dishes trapped between the door and tub, food residue at the seal, an out-of-square or unlevel dishwasher, and suds caused by dish soap or pre-washed dishes. Correcting an obvious loading or cleaning issue can be enough, but a torn, flattened, misplaced, or cracked seal and a tub that is not square need a model-specific repair decision. Do not assume that replacing a gasket will fix a leak that starts underneath the unit.
Under-cabinet leaks require water-path checks and restraint
For a leak underneath or behind the dishwasher, Maytag directs attention to the water-supply connection, drain-line connection, and suds. A connection can leak when a washer is not seated or a fitting is loose, while a drain hose can leak or discharge incorrectly. The accessible check is a dry visual inspection with the supply isolated; inlet valves, pump and motor seals, the sump, wiring, and concealed connections require qualified service. Do not keep cycling the dishwasher to make the leak easier to see.
Standing water and suds can imitate a leak
A small amount of water in the filter area can be normal for some Maytag models, but water at the door opening, on the floor, or under the cabinet is not a reason to ignore an active leak. A blocked filter or drain path can leave water behind, and dish soap or excess detergent can create suds that push water past the door. Follow the exact model manual for filter access and use only the detergent specified for an automatic dishwasher; never use a chemical drain opener inside the appliance.
Safety boundary
Stop conditions
- Stop using the dishwasher for an active or spreading leak, water near electrical parts, a cracked tub, uncontrolled filling, smoke, burning odor, exposed wiring, heat, shock, or repeated breaker trips.
- Do not open rear or internal panels, test live wiring or a water valve, remove the dishwasher from the cabinet, tip or drag the unit, or detach a water-filled or pressurized connection as an ordinary user check.
- Do not use dish soap, chemical drain opener, sharp tools in the pump, or repeated wash cycles to chase a leak. Keep power and water isolated until the source is corrected when the leak continues.
Only after diagnosis
Potential parts
- Maytag dishwasher door gasket or tub seal
Consider this category only when the leak starts at the door and inspection or qualified diagnosis confirms a torn, flattened, displaced, or otherwise failed seal after loading, suds, and leveling are excluded.
Confirm the exact Maytag model, seal location, installation method, and manufacturer fit information before ordering. - Maytag dishwasher water-supply or drain hose
Consider this category only when an accessible hose is cracked, kinked, leaking, or a technician confirms the hose or connection is the source after isolation.
Confirm the exact model, hose ends, routing, clamps, and approved connection method; do not substitute a hose based only on appearance. - Maytag dishwasher water inlet valve or float assembly
Consider this category only when qualified diagnosis finds persistent overfill, a valve that does not close, or a float and switch problem after detergent, loading, and drain causes are excluded.
Confirm the exact model, valve configuration, float design, wiring, and manufacturer-approved component before replacement. - Maytag dishwasher pump, sump, or motor seal
Consider this category only when the leak is beneath the unit and qualified service localizes it to the pump, sump, diverter, or motor-shaft seal after external connections are dry.
Confirm the exact model and service diagnosis; similar-looking pumps or seals are not proof of compatibility.
When checks do not resolve it
Need a professional?
Arrange qualified Maytag appliance service when the leak persists after safe checks of the door path, detergent, leveling, accessible filter, and visible connections; when water comes from underneath or behind the unit; when the inlet valve, float, pump, sump, diverter, internal hose, tub, wiring, or hard-wired connection may be involved; or when diagnosis requires moving, opening, tipping, or electrically testing the dishwasher. Arrange plumbing service when the sink, air gap, or household drain backs up independently. Stop immediately and seek urgent qualified help for flooding, water near electricity, smoke, burning odor, shock, uncontrolled filling, or repeated breaker trips.
Safety scope: This article covers normal controls, cleanup, accessible visual checks, model-documented filter care, and obvious loading or detergent corrections only. Water-supply isolation, concealed hoses, inlet valves, floats, pumps, sumps, diverters, tubs, hard-wired connections, and internal electrical diagnosis belong to qualified professionals.
Have this ready
- Provide the exact model, where the first moisture appeared, cycle stage, whether water or suds were present, door-seal and loading observations, leveling and filter result, accessible supply/drain connection condition, recent installation or moving, and any error, heat, odor, smoke, or breaker symptom.
Common questions
FAQ
Why is my Maytag dishwasher leaking from the bottom of the door?
Check for an item or food residue preventing the door seal from closing, a torn or displaced gasket, oversudsing from dish soap or pre-wash residue, a rack item redirecting spray, and a dishwasher that is not level or square. If the seal and loading are normal but water still reaches the floor, keep the dishwasher off and arrange service; an underneath leak can be a different fault.
Can dish soap make a Maytag dishwasher leak?
Yes. Dish soap and residue from spray-on or soaked-dish products can create suds that push water out around the door. Stop the cycle, clean up overflow, and follow the exact Maytag guidance for removing suds. Use only automatic-dishwasher detergent afterward.
What does a Maytag dishwasher leaking underneath usually mean?
The source may be an accessible water-supply or drain connection, but it can also be an inlet valve, float, sump, pump or motor seal, internal hose, diverter, or tub. Note whether it leaks during filling, washing, or draining, isolate power and water for an active leak, and arrange qualified service rather than removing panels.
Is water in the Maytag dishwasher filter area always a leak?
No. Maytag notes that a small amount of water in the filter area can be normal for some models. Water on the floor, at the door opening, beneath the cabinet, or returning from a blocked drain is a different observation. Use the exact manual for filter access and investigate any external moisture.
Should I keep running the dishwasher to find the leak?
No. Repeated cycles can spread water into cabinets and flooring and increase electrical risk. Stop the cycle, dry and map the accessible wet point, and isolate power at the breaker and the water supply when the leak continues or reaches an unsafe area.
Can I replace the Maytag dishwasher gasket myself?
Only consider a user-level gasket procedure when the exact model manual identifies it as accessible and the leak is clearly at the door seal. A damaged tub, latch, out-of-square cabinet, active leak, or uncertain seal location calls for qualified service; confirm the exact model before selecting any part.
When should I call for a Maytag dishwasher leak repair?
Call when the leak persists after safe checks of loading, seal residue, detergent, leveling, accessible filter, and visible connections; whenever water comes from underneath or behind the unit; or when diagnosis requires moving the dishwasher, opening panels, disconnecting plumbing, or testing electrical or internal water components.
Read the exact guide
Official sources
- Leaking - Front - Left Side - DishwasherMaytag Product Help · Maytag dishwasher front/door leak guidance; use the exact model manual for adjustment or replacement steps.
- Leaking from DoorMaytag Product Help · Maytag dishwasher door-leak troubleshooting; model manual controls cleaning and seal replacement.
- Leaking - Underneath - DishwasherMaytag Product Help · Maytag dishwasher underneath/behind leak guidance; connection work follows the exact installation instructions and safe isolation.
- Dishwasher Leaking Troubleshooting GuideMaytag Product Help · Maytag dishwasher leaking-water troubleshooting across models; exact owner manual controls model-specific procedures.
- Dishwasher Water Supply ConnectionMaytag Product Help · Maytag dishwasher water-supply connection guidance; installation instructions for the exact model govern.
- Dishwasher Not DrainingMaytag Product Help · Maytag dishwasher drain-path guidance; filter access and procedures vary by exact model.
Community feedback
Share a repair observation
Share a plain-text repair observation. Accepted observations are published automatically; this page may take a moment to update.