
On this page
Start here
Quick answer
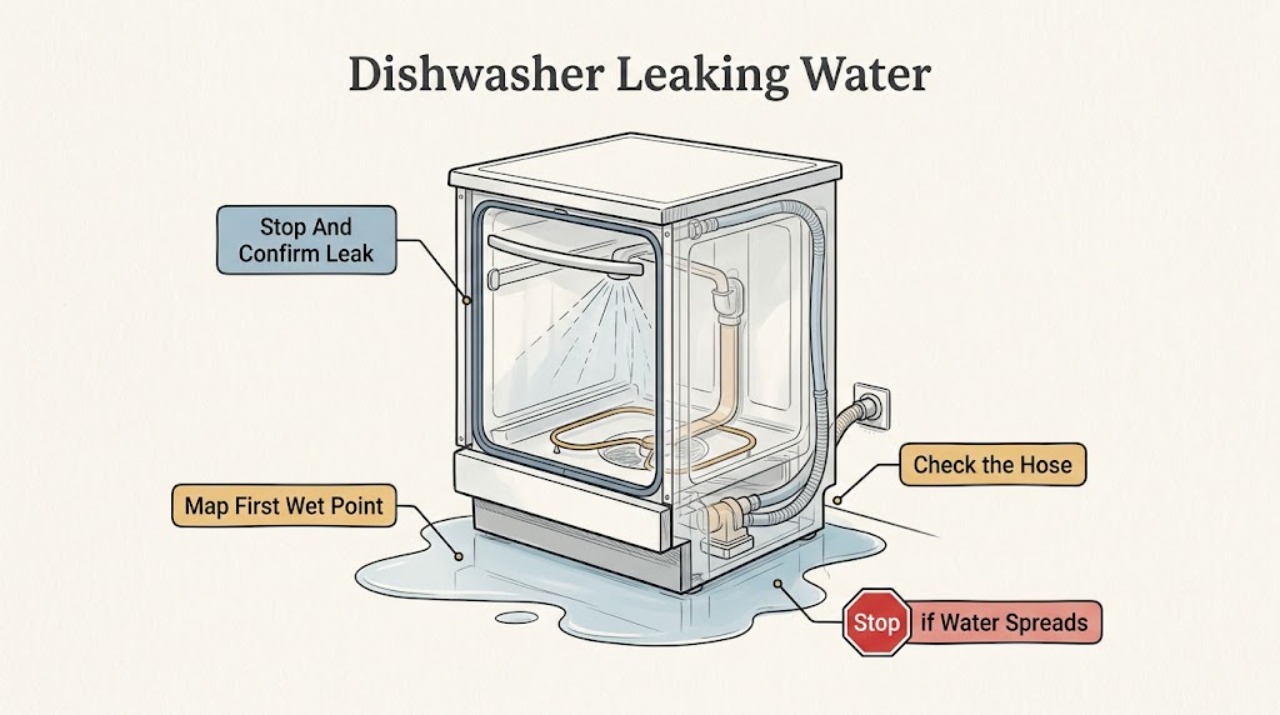
First treat a wet floor as an active water-damage risk: stop the dishwasher, keep people away from the water, and turn off power at the identified breaker and the water supply if the leak is continuing and it is safe to reach them. Wipe the floor and confirm whether water returns, then locate the first wet point without removing panels or disconnecting a pressurized line. Water at the front corners often involves the door seal, suds, loading, spray direction, or leveling; water behind or under the cabinet points more toward a supply or drain connection, inlet, pump, or seal. Check only the visible hose connections, clean and correctly seated door gasket, detergent type, spray arms, filter, and model-approved drain path. Do not run the dishwasher again while an active leak reaches cabinetry, flooring, or electrical equipment. Arrange qualified appliance or plumbing service when the source is underneath or hidden, the leak continues after an accessible correction, the tub or pump area is involved, or water cannot be safely isolated.
Work through in order
Diagnostic checks
Use only checks that match the exact appliance or system and its official guide.
-
Check 1
Stop the dishwasher and keep people away from the wet floor. If water is still flowing, switch off the dishwasher at its identified breaker and close its accessible water supply only if both can be reached without stepping in water or touching wet electrical equipment. Wipe up the water and check whether it returns without starting a cycle.
Expected result: The water does not return and may have been a spill, or water returns, continues to spread, or has reached cabinetry, flooring seams, or electrical equipment.
Next step: Leave the dishwasher off and record the puddle location, time, recent cycle, and whether the water was clean, soapy, or dirty. For continuing flow, failed isolation, or water near electrical equipment, obtain prompt qualified appliance or plumbing help and do not run a test cycle.
Stop if: Do not walk through standing water to reach a breaker, touch wet electrical parts, or restore power while water is actively reaching the appliance or floor.
Why this matters
Why: A dry floor after cleanup does not confirm a repair, but it makes a one-time spill more likely. Returning or spreading water is an active leak that should be isolated before any inspection; the amount and location of floor wetness determine urgency.
-
Check 2
With power and water isolated as needed, inspect from a dry position around the front door corners, lower door edge, toe-kick area, visible side edges, and under-sink cabinet. Use dry paper towels at separate accessible points rather than removing panels or pulling the dishwasher out.
Expected result: The first wet towel is at the front or door, at a visible supply or drain connection, along the hose, under the center or rear, or nowhere accessible; note whether water is clean, soapy, or dirty.
Next step: Photograph the first wet point and keep the machine isolated. Continue only with the matching accessible branch; arrange service rather than running a cycle when the source is underneath, hidden, or still active.
Stop if: Do not remove the toe-kick, slide out the dishwasher, reach under a wet appliance, or use a live-cycle test to locate a leak that is already active.
Why this matters
Why: Front water makes gasket, suds, loading, spray direction, or level more likely. A wet supply or drain connection points to installation plumbing. Center or rear water, dirty water, or an inaccessible source makes a pump, sump, inlet, overfill, or hidden seal more likely and is not a routine exterior adjustment.
-
Check 3
From the dry, accessible cabinet side, inspect the full visible water-supply hose, its connection at the dishwasher and home plumbing, and the visible drain hose or sink connection. Look for moisture, cracks, swelling, loose-looking fittings, kinks, or a recently changed connection; do not disconnect the hoses.
Expected result: A supply connection or hose is wet, the drain-hose connection to the sink or disposal is wet, the hose is kinked or damaged, or all visible hoses are dry.
Next step: Keep the water supply off and use the installation manual or qualified installer for any connection correction. Replace a damaged hose only with model-appropriate guidance; arrange service for a leak along the hidden hose, appliance connection, inlet, or drain path.
Stop if: Do not tighten a fitting by force, cut a hose, remove clamps, or disconnect a line that may still be pressurized.
Why this matters
Why: A wet supply hose or fitting can leak while the dishwasher fills; a wet drain connection can leak during draining. A kink or damaged hose can also affect drainage and cause water to back up. Dry visible hoses shift attention to the door, spray path, tub, inlet, pump, or hidden connections.
-
Check 4
With the dishwasher off, inspect the door gasket and channel for food, damage, flattening, or displacement; check that no dish or utensil protrudes into the seal; look for excessive suds from an incorrect detergent; and inspect accessible spray-arm openings for debris. Wipe the seal with mild soap and water only if the manual permits.
Expected result: The gasket is dirty or out of its channel, a dish blocks the door, excessive suds are present, spray openings are blocked, or the door area is clean and the leak starts elsewhere.
Next step: Correct only a removable obstruction or gently reseat a gasket when the model instructions support it, then keep the dishwasher off until the area is dry. If the gasket is damaged, suds recur, spray is still misdirected, or the leak returns, arrange appliance service.
Stop if: Do not use hand dish soap, force a gasket into place, pry the door or spray arm, or continue operating with a damaged seal or active leak.
Why this matters
Why: A dirty or misaligned seal, an obstructed door, wrong detergent, or diverted spray can let water escape at the front. A torn seal, a door that cannot close squarely, or a clean front area with under-unit water points to service rather than more cleaning.
-
Check 5
When the floor is dry and no active leak or electrical hazard remains, inspect the model-approved filter and drain area for debris, confirm removable parts are correctly reassembled, and observe whether the dishwasher is visibly out of level or was recently installed or moved. Do not remove panels, adjust hidden parts, or restart a machine that still leaks.
Expected result: The filter or drain area is blocked or incorrectly seated, the unit appears out of level or newly installed, the tub or sump has water, or these accessible checks are normal but the floor becomes wet again.
Next step: Follow the exact manual for filter cleaning or installation correction, or have the installer correct a new-installation issue. If water returns, the leak is underneath, or the sump, pump, tub, inlet, or internal seal is suspected, leave power and water isolated and arrange qualified service.
Stop if: Do not remove the dishwasher, open the sump or pump, bypass a leak sensor, test energized wiring, or run repeated cycles to see whether the floor gets wetter.
Why this matters
Why: A blocked or misassembled drain path can contribute to overflow or leakage, while installation or leveling can keep the door from sealing or cause water to pool at the door. Normal accessible checks with a returning puddle make a hidden pump, inlet, tub, or seal fault more likely.
Use your observations
Decision map
Find the observation that best matches what you see, then follow the next safe action.
-
PATH 01Next step
What you see
The first wet point is at a door corner or lower front edge, and the gasket is dirty or displaced, a dish blocks closure, suds are present, or spray openings are diverting water toward the door.
Do this next
Remove only the accessible obstruction, use dishwasher detergent, clean or gently reseat the seal if the manual allows, and keep the machine off if the gasket is damaged or the leak returns.
Why this path and its safety boundary
Why it matters: A door-sealing, loading, detergent, or spray-path cause is more likely than a hidden pump leak.
-
PATH 02Next step
What you see
The supply or drain connection under the sink is the first wet point, or the visible hose is kinked, cracked, swollen, or recently changed.
Do this next
Keep water isolated and follow the installation instructions or use qualified plumbing or appliance service for the connection or damaged hose. Do not disconnect a pressurized line.
Why this path and its safety boundary
Why it matters: A water-supply or drain-installation connection is more likely than a door gasket; drain routing can also cause backflow or overflow.
-
PATH 03Next step
What you see
Water pools under the center or rear, the floor gets wet while visible hoses and door checks are dry, or dirty water and persistent standing water are present.
Do this next
Keep the dishwasher off with power and water isolated and arrange qualified appliance service; provide the first wet point, water appearance, cycle stage, and standing-water observation.
Why this path and its safety boundary
Why it matters: A pump, sump, inlet, overfill, tub, or internal seal problem is more likely and cannot be confirmed safely from outside.
-
PATH 04Next step
What you see
The leak began after installation or moving, the door contacts cabinetry, the unit is visibly out of level, or water pools at the door while hoses and gasket are intact.
Do this next
Do not pull the unit out or adjust hidden fittings while wet; contact the installer or qualified service to verify level, clearances, hose routing, and door closure.
Why this path and its safety boundary
Why it matters: Installation, leveling, or fit can prevent the door from closing squarely or direct water toward the seal.
-
PATH 05Next step
What you see
Water continues to spread, cannot be isolated, reaches electrical equipment or flooring, the tub or cabinet is saturated, or the leak source cannot be accessed safely.
Do this next
Keep people away, shut off the appliance's water and power only from a safe location, remove standing water without contacting energized equipment, and obtain prompt qualified appliance or plumbing service.
Why this path and its safety boundary
Why it matters: This is an active water-damage and safety-control situation, not a routine user repair.
Helpful context
Understand the symptom
Protect the floor before looking for a cause
A puddle may be a spill, condensation, or water from the dishwasher. If water is actively returning, do not create a test cycle just to watch it. Stop the appliance, isolate power and water from a safe location, remove standing water, and dry the accessible area. A leak that has reached flooring, cabinetry, or electrical equipment has already crossed the boundary for unattended troubleshooting.
The leak location changes the likely branch
Front-edge or corner water is commonly associated with the door gasket, suds, loading, spray direction, or a door that cannot close squarely. A wet hose or connection behind the unit points to supply or drain plumbing. Water pooling under the center or rear can involve the pump, sump, inlet, overfill, or another hidden seal. These patterns guide service; they do not justify opening the dishwasher or guessing at a part.
Only after diagnosis
Potential parts
- dishwasher door gasket or lower door seal
Only consider this category when the leak starts at the front door and the gasket is damaged or cannot maintain a seal after the model-approved cleaning and seating check.
Confirm the exact dishwasher model and the manufacturer's installation procedure; do not infer fit from gasket appearance. - dishwasher water-supply or drain hose
Only consider a hose when the visible hose or one of its identified connections is wet, cracked, swollen, kinked, or otherwise damaged.
Verify model, connection type, routing, length, and local installation requirements before replacement. - dishwasher inlet valve or float assembly
Only consider this category when the tub overfills or water originates near the fill path after door, hose, filter, and drain checks are ruled out.
Fill components are model-specific and internal access should be diagnosed by qualified appliance service. - dishwasher pump, sump, or internal seal
Only consider this category when water pools under the center or rear or a technician confirms a hidden pump, sump, diverter, or motor-seal leak.
Do not open the base or remove the dishwasher to confirm this category; verify the exact model and professional diagnosis.
When checks do not resolve it
Need a professional?
Stop using the dishwasher and obtain prompt qualified appliance or plumbing service when the floor becomes wet again, water is under or behind the unit, the tub or cabinet is saturated, the leak is active or cannot be isolated, a hose or fitting is damaged, the gasket is torn, a breaker trips, water reaches electrical equipment, or repair would require removing panels, sliding out the unit, opening the pump or sump, or testing energized wiring. A newly installed or moved dishwasher with leakage should be referred to the installer or qualified service for level, door, hose-routing, and connection checks.
Common questions
FAQ
What should I do first when my dishwasher makes the floor wet?
Stop the dishwasher, keep people away from the water, and isolate power and water from a safe location if the leak is continuing. Dry the area and identify the first wet point without removing panels or running another test cycle while the leak is active.
Why does a dishwasher leak from the bottom of the door?
A dirty, displaced, or damaged gasket, a dish blocking closure, excessive suds from hand dish soap, spray redirected toward the door, or leveling and installation can all make the front edge wet. Check only those accessible conditions and arrange service if the seal is damaged or the leak returns.
When is a dishwasher floor leak a plumber's problem?
Use plumbing help when the sink or disposal connection backs up, the household drain connection is leaking, or the dishwasher drain path cannot be safely isolated. Use appliance service for a leak from the door, tub, inlet, pump, sump, or internal hose, especially when water is under the machine.
Read the exact guide
Official sources
- Dishwasher Leaking Troubleshooting GuideWhirlpool Product Help · Whirlpool dishwasher leak location, door, hoses, pump, leveling, filter, detergent, and service guidance
- Samsung dishwasher is leaking or has a leakage error codeSamsung · Samsung dishwasher visible-leak, hose, gasket, detergent, leveling, spray, and service troubleshooting
- How to set up your Samsung DishwasherSamsung · Samsung dishwasher level, drain-hose routing, and leak-prevention installation guidance
- Samsung dishwasher is not drainingSamsung · Samsung dishwasher sink, drain hose, filter, drain area, and service troubleshooting
Community feedback
Share a repair observation
Share a plain-text repair observation. Accepted observations are published automatically; this page may take a moment to update.