
On this page
Start here
Quick answer
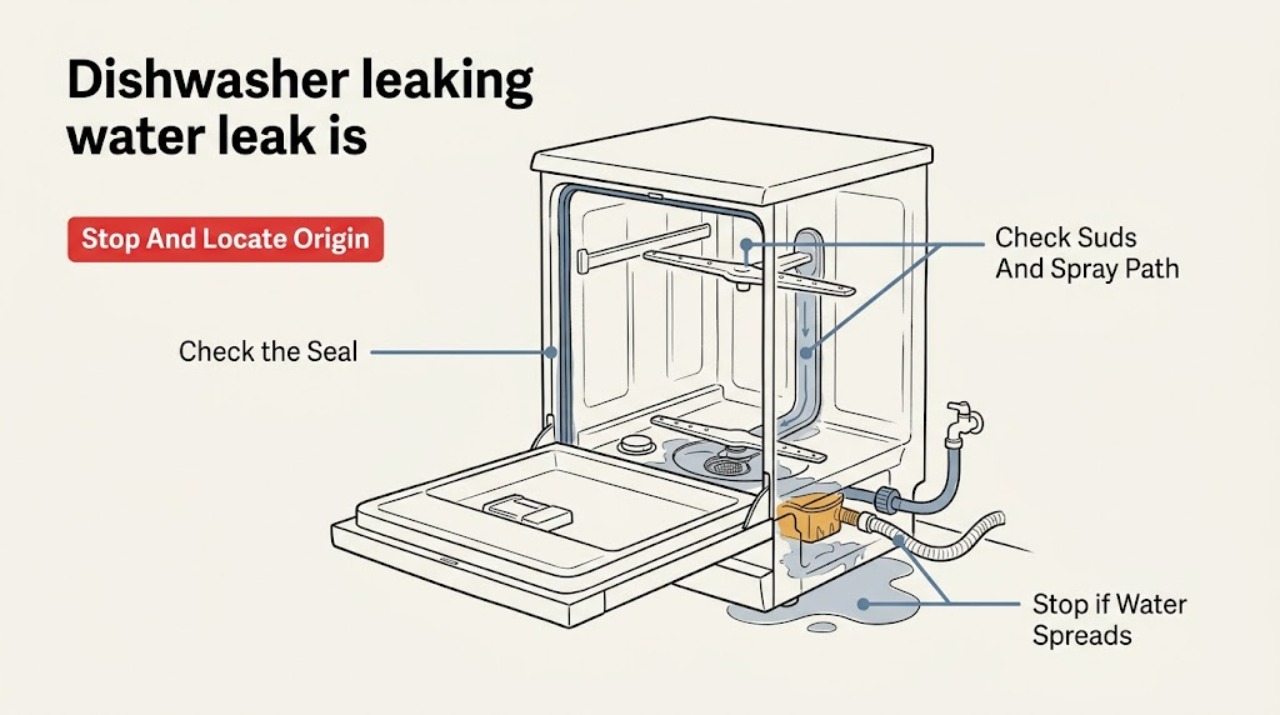
Stop the dishwasher if water is actively escaping, clean up the spill, and isolate the water supply and power only from safe, accessible controls. If the water starts at the door, inspect the gasket, food or utensils at the seal, rack loading, suds, spray direction, vent, and whether the unit is level. If it starts beneath or behind the unit, look only at visible supply and drain connections and note whether the tub is overfilled or fails to drain. Do not remove panels, reach into a wet appliance, disconnect plumbing, or replace a pump, valve, or seal based on location alone; a continuing leak, water under the machine, damaged tub, or uncertain connection needs qualified appliance service.
Before you begin
Safety first
- This article supports safe external observation, cleanup, documentation, and ordinary visual checks only. Qualified service is required for wet-cabinet access, panel removal, plumbing disconnection, electrical testing, internal seals, pumps, valves, sumps, tub faults, and overfill diagnosis.
Work through in order
Diagnostic checks
Use only checks that match the exact appliance or system and its official guide.
-
Check 1
Stop the cycle if water is escaping, keep hands and feet away from pooled water, and from a dry position photograph the floor, lower door edge, cabinet sides, and any visible hose or fitting; do not reach under or into the dishwasher.
Expected result: Water is actively flowing, a damp trail starts at the front door, moisture starts at the center or rear beneath the unit, water is present only after the door opens, or the origin cannot be seen safely.
Next step: If the leak is active or reaches flooring or cabinets, stop using the dishwasher, clean up the water, and isolate the water supply and electrical power only through safe, accessible shutoffs or the breaker. Otherwise continue with the matching visual check and keep the photos.
Stop if: Do not operate the appliance, touch wet electrical parts, step in pooled water, remove panels, or reach beneath the unit while power or the water source is uncertain.
Why this matters
Why: Active flow or an origin that cannot be inspected safely is an isolation and service condition. A front trail supports a door or spray-path investigation, while a center or rear trail makes supply, drain, pump, sump, or overfill more likely; water released when the door opens may be vent condensation rather than a continuing leak.
-
Check 2
With the appliance off, cool, and dry, inspect the visible door gasket and tub edge; remove only loose food residue or a utensil plainly caught at the seal, and check racks for an item protruding into the door path.
Expected result: The gasket has a crack, tear, flattened or displaced section, or food on it; an item blocks the seal; the door contacts cabinetry or does not close squarely; or the gasket and door path look intact.
Next step: Remove only the plainly visible obstruction and run no further cycle until the door closes without interference. Photograph a damaged or displaced gasket and arrange model-specific service or replacement guidance rather than forcing it into place.
Stop if: Do not force the door, stretch or glue the gasket, remove trim, adjust hidden hinges, or continue use when the seal is damaged or the door cannot close squarely.
Why this matters
Why: A damaged or obstructed seal, misaligned door, or protruding rack item can let water out at the front. An intact visible seal does not rule out an internal tub seal, leveling, spray, or beneath-unit cause.
-
Check 3
Look inside the tub for foam, bubbles, or a detergent spill, and check from above that dishes are not blocking the visible spray-arm path; do not put hands near a moving arm and do not add chemicals.
Expected result: Foam is present, dish soap or pre-wash residue may have entered, the spray arm is visibly obstructed or damaged, or there are no suds and no obvious loading obstruction.
Next step: If suds are present, stop and allow them to dissipate, clean the overflow, and do not restart a wash until the source is addressed. Correct loading only for the next safe test when the appliance is dry and the leak has been cleared; request service for a damaged arm or persistent leak.
Stop if: Do not use hand dish soap, drain cleaner, solvent, or an improvised chemical treatment; do not run a cycle to test an active leak or reach into a moving or hot appliance.
Why this matters
Why: Wrong or excessive detergent and residue from pre-washed dishes can create suds that push water out. A blocked or damaged spray path can redirect water toward the door. If neither is present, a door seal or beneath-unit source remains more likely.
-
Check 4
From outside the cabinet, observe whether the dishwasher sits squarely, the door meets the tub evenly, the control panel or door touches an adjacent cabinet, and any visible door vent cap is seated; do not remove trim or make structural adjustments.
Expected result: The unit appears tilted or out of square, the door rubs or sits unevenly, a vent cap is visibly loose, or warm moisture appears only during drying or when the door is opened.
Next step: Record the condition and model information; follow the exact installation guidance or arrange service for leveling, alignment, or vent work. Do not treat condensation as proof that an active leak is harmless.
Stop if: Do not pull the unit out, loosen mounting hardware, remove the vent, or continue operation if the door cannot seal or water is reaching cabinetry.
Why this matters
Why: Poor leveling, cabinet contact, door misalignment, or a loose vent component can prevent a seal. Warm moisture or a spot after opening can be normal vent condensation, but repeated pooling or water during washing is not explained by condensation alone.
-
Check 5
With power and water safely isolated when needed, inspect only accessible, dry-to-touch areas around the supply fitting, drain hose route, sink connection or air gap if present, and floor beneath the front edge; do not disconnect a fitting or pull the appliance out.
Expected result: Moisture appears at a supply connection, at the drain route or sink connection, around the air gap, at the center or rear without a visible connection, or nowhere accessible.
Next step: Photograph the wet point and keep the water supply isolated. Have a qualified appliance or plumbing professional verify the connection and internal source before any hose, valve, pump, or sump part is ordered.
Stop if: Do not remove panels, disconnect hoses, loosen fittings, enter a wet cabinet, or restore power to test a suspected internal leak.
Why this matters
Why: A supply-area leak is more consistent with an inlet connection or valve path; a drain-route or air-gap leak is more consistent with drain installation or plumbing. Moisture at the center or rear without an accessible source can involve an internal pump, sump, seal, or tub and needs service.
-
Check 6
Without restarting an appliance that is actively leaking, record when the first moisture appears relative to filling, washing, draining, or drying, and note whether water remains in the tub after a normal completed cycle; do not force a drain or use drain chemicals.
Expected result: The leak starts while filling, only while spraying, during draining, after the cycle, during drying or door opening, or the tub remains unusually full with no visible suds.
Next step: Give the timing, water level, detergent used, and photographs to the service professional. Keep the dishwasher off and the supply isolated when water remains beneath it or the cause is not obvious.
Stop if: Do not run repeated test cycles, pour chemicals into the tub, bypass an overfill control, or open the pump, sump, drain, or electrical enclosure.
Why this matters
Why: Timing during filling supports the inlet or overfill path; timing while spraying supports loading, spray direction, or the door seal; timing during draining supports the drain route, sump, pump, or plumbing; timing during drying or door opening may be vent condensation. Standing water without suds can also indicate a drain or plumbing issue.
Use your observations
Decision map
Find the observation that best matches what you see, then follow the next safe action.
-
PATH 01Safety boundary
What you see
Water begins at the lower door edge or corner, and the gasket is damaged, dirty, displaced, or blocked by a rack item or utensil.
Do this next
Remove only the plainly visible obstruction, keep the appliance off if the gasket is damaged, and arrange exact-model gasket or door service guidance.
Why this path and its safety boundary
Why it matters: A front sealing or door-closure problem is more likely than a hidden supply leak.
Safety stop: Do not force the door, glue the seal, or run the dishwasher with water reaching the floor or cabinetry.
-
PATH 02Safety boundary
What you see
Foam or bubbles are present, dish soap or pre-wash residue may have entered, or a loading item visibly blocks the spray path.
Do this next
Stop the cycle, clean up overflow, let suds dissipate, use only automatic-dishwasher detergent going forward, and request service if leakage returns after the appliance is dry and correctly loaded.
Why this path and its safety boundary
Why it matters: Suds can push water out of the tub, while an obstructed spray path can direct water toward the door; neither finding proves that a gasket or pump needs replacement.
Safety stop: Do not add drain chemicals or more detergent, run repeated tests, or put hands near a moving or hot spray arm.
-
PATH 03Safety boundary
What you see
Water appears beneath or behind the unit at an accessible supply fitting, drain hose route, sink connection, or air-gap area.
Do this next
Keep the supply isolated, photograph the connection, and have qualified appliance or plumbing service verify and repair it before operation.
Why this path and its safety boundary
Why it matters: An installation or plumbing connection is more likely than a door-only leak, but the visible wet point may not be the original source.
Safety stop: Do not disconnect the hose, pull the appliance, retighten an inaccessible fitting, or restore power while the cabinet or floor is wet.
-
PATH 04Safety boundary
What you see
Water pools at the center or rear beneath the dishwasher, the leak has no accessible connection, the tub overfills, or a leak persists after safe door and detergent checks.
Do this next
Stop using the appliance, isolate water and power safely, document the cycle timing and water level, and arrange qualified appliance service.
Why this path and its safety boundary
Why it matters: An internal pump, sump, motor-shaft seal, inlet or overfill problem, tub issue, or concealed drain fault becomes more likely; an exact part cannot be selected from the puddle location alone.
Safety stop: Do not remove the toe-kick or panels, reach under the appliance, bypass the float or overfill control, or order an internal part by symptom alone.
-
PATH 05Safety boundary
What you see
A small spot appears only after the door opens or during drying, with no continuing moisture during washing and no wet supply or drain connection.
Do this next
Monitor from a dry position without touching the vent and document when the spot appears; request service if water continues, the vent cap is loose, or cabinetry or flooring is getting wet.
Why this path and its safety boundary
Why it matters: Vent condensation is plausible, especially where the manufacturer describes warm moist air during drying, but recurring pooling or water during a wash is still a leak condition.
Safety stop: Do not seal a vent, remove a vent cap, or keep running cycles when condensation cannot be distinguished from an active leak.
Helpful context
Understand the symptom
First separate a door leak from a leak beneath the dishwasher
Dry the accessible floor and cabinet edge, then use a flashlight from outside the appliance to see where water first reappears. A wet lower door edge or front corner points toward the door seal, an obstruction, suds, spray direction, vent, alignment, or leveling. Water appearing at the center, rear, or underneath shifts attention to the supply connection, drain line, pump or sump area, overfill, or a plumbing connection. A puddle location is only a starting clue because water can travel along the floor or insulation.
Door and front checks are visual and low risk
With the dishwasher off and cool, inspect the visible gasket for cracks, tears, flattening, displacement, and food residue. Remove only an item that is plainly caught between the door and tub or protruding from a rack; do not force the door or bend the seal. Check for dish soap or unusual foam, including residue from pre-washed dishes, because suds can push water out of the door. Also note whether the door contacts a cabinet, whether the unit appears out of square, or whether water is actually condensation from the vent rather than a continuing leak.
Beneath-unit checks stop at visible connections
Do not pull the dishwasher out or remove a toe-kick or access panel just to search for the source. From a dry, safe position, look for fresh moisture at visible supply fittings, the drain hose route, the sink connection or air-gap area if present, and the floor around the appliance. A leak that follows filling points toward the water supply or inlet path; a leak during draining points toward the drain route, sump, pump, or a plumbing connection. Persistent water beneath the unit, a suspected internal seal, a cracked tub, or an unexplained overfill is a service boundary.
Use detergent and timing as diagnostic clues
Only automatic-dishwasher detergent belongs in the appliance. If foam or bubbles are present, stop the cycle and let them dissipate; clean up overflow and do not restart a normal wash while a leak is active. Record whether the leak begins during filling, washing, draining, or drying, and whether the machine is empty or loaded. That timing helps a technician distinguish a door or spray-path issue from an inlet, drain, pump, overfill, or vent-related issue without requiring unsafe disassembly.
Safety boundary
Stop conditions
- Stop using the dishwasher and isolate the water supply and electrical power only through safe, accessible controls when water is actively escaping, reaching cabinets or flooring, or appearing beneath the unit.
- Do not reach into a wet or energized appliance, remove panels, pull the dishwasher out, disconnect plumbing, or probe electrical parts.
- Do not use hand dish soap, drain chemicals, solvents, or improvised foam treatments; never run repeated test cycles while an active leak remains.
- Do not force the door, glue or stretch a gasket, bypass an overfill control, or choose a pump, valve, sump, hose, or seal from the puddle location alone.
- Arrange qualified appliance or plumbing service for an internal or unexplained leak, persistent water beneath the machine, a damaged tub, overfill, standing water without a clear cause, or any repair beyond ordinary visual checks.
Only after diagnosis
Potential parts
- dishwasher door gasket or tub seal
Consider this category only when inspection confirms a torn, flattened, displaced, or otherwise failed seal and door alignment or obstructions have been addressed.
Confirm the complete dishwasher model and the manufacturer's seal design and installation guidance before ordering; do not force or glue a gasket. - dishwasher drain hose or connection seal
Consider this category only when qualified diagnosis identifies a wet or damaged drain route or seal rather than a door or internal tub source.
Confirm the exact model, hose routing, connection design, and plumbing requirements; do not disconnect a wet connection as a test. - dishwasher inlet valve or supply connection
Consider this category only after a technician confirms that filling or a supply-side connection is the source and the existing fitting or valve is damaged.
Verify exact model and water-connection specifications with the manufacturer or technician; installation requires safe water and electrical isolation. - dishwasher pump or sump seal
Consider this category only when a technician isolates an internal center or rear leak to the pump, sump, or seal after external connections and suds are ruled out.
Confirm the complete model and internal assembly design before ordering; do not select or install an internal part from puddle location alone.
When checks do not resolve it
Need a professional?
Arrange qualified appliance service promptly when water is active, appears beneath or behind the dishwasher, reaches cabinets or flooring, returns after safe door and detergent checks, or comes from an internal pump, sump, valve, tub, or seal. Coordinate plumbing service when an accessible supply, drain, sink connection, or air-gap connection is wet. Treat electrical exposure, extensive water damage, or an inability to isolate the supply or power safely as an urgent stop condition.
Safety scope: This article supports safe external observation, cleanup, documentation, and ordinary visual checks only. Qualified service is required for wet-cabinet access, panel removal, plumbing disconnection, electrical testing, internal seals, pumps, valves, sumps, tub faults, and overfill diagnosis.
Common questions
FAQ
What should I do first if my dishwasher is leaking?
Stop the cycle, keep away from pooled water, clean up the spill, and isolate water and power only through safe, accessible controls when needed. Do not run the dishwasher again until the source is identified or a professional has assessed it.
Why does a dishwasher leak from the bottom of the door?
Common possibilities include a damaged or dirty gasket, an item or food blocking the seal, poor leveling or alignment, suds from incorrect detergent or pre-wash residue, or water redirected by loading or a spray path. Inspect only from safe access and do not force the door.
What can cause water beneath a dishwasher?
A visible supply fitting, drain connection, or air-gap or plumbing issue may be involved, while water at the center or rear can involve an internal valve, pump, sump, seal, overfill, or tub. The puddle location alone cannot identify the failed part, so keep the appliance off and arrange service for a persistent or internal leak.
Could dishwasher foam be causing the leak?
Yes. Hand dish soap, too much detergent, rinse-aid spills, or residue from pre-washed dishes can create suds that push water out. Stop the cycle, let the suds dissipate, clean up overflow, and use only automatic-dishwasher detergent; seek service if the leak returns.
When is a dishwasher leak a service call?
Arrange qualified appliance or plumbing service for water beneath or behind the unit, a continuing or unexplained leak, a damaged tub or gasket, overfill, standing water without a clear cause, wet electrical areas, or any repair requiring panels, plumbing disconnection, or internal parts.
Read the exact guide
Official sources
- Leaking - Underneath - DishwasherWhirlpool · Official Whirlpool Product Help guidance for water beneath a dishwasher and visible supply, drain, or suds-related conditions.
- Dishwasher Leaking Troubleshooting GuideWhirlpool · Official Whirlpool Product Help guidance for dishwasher leaks from the front, beneath, or behind the appliance; exact model instructions control.
- Leaking from DoorWhirlpool · Official Whirlpool Product Help guidance for leaks from the dishwasher door or front edge.
- Dishwasher - Leaking or Flooding UnderneathGE Appliances · Official GE Appliances support guidance for water or flooding beneath a dishwasher.
- Dishwasher - Leaking From DoorGE Appliances · Official GE Appliances support guidance for dishwasher leaks under or around the door; model-specific instructions control.
Community feedback
Share a repair observation
Share a plain-text repair observation. Accepted observations are published automatically; this page may take a moment to update.